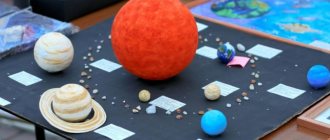
What is a life-size puppet? Each of us has seen it at least once - this is a full-length costume of a person that looks like a animated cartoon character, animal, bird, and even popular food. Children's parties, entertainment and advertising events, themed and corporate parties cannot do without them. Children will be simply delighted at the sight of their big favorite hero, and adults will not ignore such an unusual holiday character. Of course, making such costumes requires certain skills, financial investments and time for work. But a person with a great desire will definitely get a life-size doll, sewn or glued with his own hands. Let's figure out what they are and how they are made.
List of necessary materials for creating crafts
To create an original craft from a sponge, you need to purchase a package of multi-colored foam rubber products. This will be one of the main, but not the only material for creative work.
Other materials will be required:
- Scissors, a blade or a scalpel - with their help it is convenient to give the desired contours to the toy, and a scalpel or blade is used to separate the hard base of the washcloth from the foam rubber.
- Felt pens, gouache, markers, paints.
The listed items will be needed for drawing the elements and coloring them. When using paint for coloring, do not forget to dry the sponge thoroughly and only then proceed to the next step.
Recommendation: “When working, it is better to avoid using watercolors, the distinctive feature of which is blurriness and a long drying time. They don’t give a rich color on foam rubber.”
It wouldn't hurt to purchase:
- Gun glue and PVA - with a hot glue gun you can join individual parts of one work, as well as make decorative droplets on the surface of the foam rubber product. Once frozen, they will look impressive on the toy.
- Glitters and sprinkles are used to decorate finished works. They are mixed with PVA glue so that the glitter adheres firmly to the craft, and the product is left to dry completely.
The necessary materials depend on the child’s ideas and imagination. When working you may also need:
- scotch;
- plasticine;
- colored paper.
Materials and their properties for a homemade rug
The materials used depend solely on the imagination and practical skills of the master, for example:
- multi-colored yarn;
- polymer twine, sisal;
- rope made of jute or hemp;
- belts made of leather, faux leather, textiles;
- pieces of towels, jeans;
- nylon tights;
- knitted T-shirts, cut into strips;
- clothing labels;
- remnants of artificial fur;
- champagne and wine corks;
- plastic bottle caps;
- sea, river pebbles;
- beer can caps;
- LED Strip Light;
- colored shreds;
- plastic bags;
- plastic bottles, also cut into strips;
- wood cuts coated with varnish;
- real moss.
Each of the materials has its own advantages:
- remnants of all kinds of textiles from old T-shirts, pants, tights are found in abundance in every home - they are usually thrown away, and weaving a rug will give such waste a new life;
- knitting threads, small balls of which inevitably remain when making various products, are also unlikely to be suitable for anything - if only for a small rug;
- from caps that can only be returned for meager pennies to a plastic collection point or made into an original product for the bathroom or hallway;
- smooth pebbles, approximately the same size, are also suitable for bedding in the shower, an original door mat for an apartment, a private mansion;
- products knitted from colored threads are placed on the floor in the nursery - it is convenient for children to play on them;
- Wine corks do not absorb moisture, mold and mildew do not grow on them, the material is pleasant to the touch.
Interesting ideas for crafts made from sponges
Foam rubber is a soft and pliable material. It cuts well and is able to take the desired shape with the help of ribbons or threads. Before you figure out what kind of craft you can make from a washcloth, it is advisable to familiarize yourself with the different options.
Decorative moss
Today, decorative moss is extremely popular in the production of creative works, which can give a beautiful look to any product. It is especially in demand for decorating New Year's decorations. You can make moss from an ordinary washing sponge, and at the same time make a Christmas tree.
Required:
- Foam sponge;
- acrylic based paint.
Stages of work:
- Use a scalpel or blade to separate the hard part from the foam base of the product.
- The soft part of the washcloth is moistened with water to remove static electricity and cut into small pieces.
- Dilute acrylic paint with water to a thick consistency, dip each piece of foam rubber, squeeze it out and put it on a paper sheet to dry.
The moss elements dry quickly because most of the paint has been wrung out. After drying, the sponge parts do not deform and retain their original structure.
Christmas tree
You can use the foam base of products as an independent material. In particular, with the onset of Christmas, all kinds of Christmas trees become in demand:
- A triangle is cut out of the prepared sponge and small pieces are plucked from the surface of the triangle with your fingers or tweezers.
- The Christmas tree is painted by dipping it in green acrylic paint. When the foam is saturated with paint, squeeze out the excess, place it on a dry surface and leave to dry.
You can powder this winter beauty with snow-white paint that imitates snow. After drying, the tree is tied with threads and used at your discretion.
Pincushion "Fly agaric"
A great idea for crafts made from kitchen sponges are pincushions made by children themselves. The work is quite simple, since there is no need to paint the parts. Pincushions will decorate the interior of the room and will be useful.
To work you will need:
- Colored paper;
- napkin;
- packaging of multi-colored sponges;
- colored cardboard;
- brush;
- office glue;
- thin ribbons;
- gouache.
Preparation method:
- First you need to create the base of the needle bed. To do this, you need to cut out two squares of different sizes. A larger figure is cut out of cardboard, and a smaller one is cut out of colored paper. Next, a small paper square is glued to the center of the colored cardboard figure.
- The needle bar must have a loop so that it can be hung on the wall surface. To do this, take a thin tape and form a loop shape. It can be fixed in two ways: from the back of the cardboard base or by inserting it between a paper and cardboard square. The basis for the craft is prepared.
- Next, they begin to make the needle bed itself. Depending on the idea, cut out a circle, rectangle or square from a colored sponge. Foam rubber is easy to cut and children will have a lot of fun during this activity.
- The prepared parts are glued with the thick side onto the base, and grass is made from the remaining scraps by cutting the edges. All that remains is to paint the white specks on the cap with gouache. The fly agaric pincushion is ready.
Types of life-size puppets
Life-size puppets are conventionally divided into several types:
- standard, consisting of a head and torso;
- rectangular or square packaging dolls, such as juice packaging;
- glove dolls - a single design worn over the entire body, for example Smeshariki;
- dolls with human facial features, consisting of a costume on the body and decoration on the head, for example: Batman or Baba Yaga.
It is easier to make costumes in which you do not need to assemble the head separately, because this is the most labor-intensive process. From this point of view, it is easiest to make a package doll, such as SpongeBob SquarePants. Now we will describe how to make life-size dolls with your own hands.
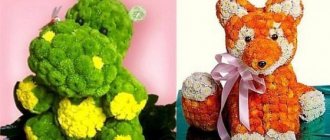
Making animal figurines
Children love creating creative works with friends and adults. Therefore, it is important to choose an activity you like. For example, making your favorite animal images from foam rubber.
Funny kitten
Using foam rubber you can make a playful kitten. For this lesson you will need a washing sponge, white hair ties and a scalpel (or a knife).
Step by step execution:
- Using a scalpel, carefully separate the hard part of the product from the soft one. Squishies (squeeze toys) are made from the cut off soft part.
- To form the kitten's ears, place the sponge vertically and secure the two upper corners with white rubber bands.
- To create the body of the animal, attach an elastic band in the middle of the sponge.
- The paws are formed by attaching elastic bands to the two lower corners.
The kitten is ready and all you have to do is draw its face. The child can choose how to do this - with paints, felt-tip pens or using parts made of colored paper.
Cute pig
An excellent toy for a child that he can make himself. When pressed, it does not wrinkle, takes on all sorts of shapes and returns to its original state. This process amuses children and adults.
Necessary materials:
- Foam sponge;
- acrylic paints;
- primer;
- fine-grained skin;
- scissors;
- hot glue;
- felt.
Work progress:
- Draw an oval on the sponge and cut it out with scissors. Since the sponge has a significant width, the oval may turn out sloppy. To remove errors, it is advisable to use a sharp tool to cut thin pieces.
- To give the resulting oval an attractive appearance, it is treated with fine-grained sandpaper. It is important to achieve a smooth and even surface.
- Acrylic primer is applied to the surface of the finished oval and impregnated, kneading the workpiece. You need to act at a fast pace, not allowing the primer to harden. When the surface is completely primed, the workpiece must be dried.
- The stage of coloring the craft consists of mixing red and white paint to obtain a pink color. Apply it to the sponge in two layers. This will give the craft a more saturated shade. After dyeing, leave the product to dry.
- Draw eyes and a snout on the blank, highlight the cheeks and mouth.
- Two ears are cut out of felt and fixed to the finished product with hot glue. At this point the work is considered completed.
Paint watercolor trees
Mix up some watercolors and dip a sponge into the paint. Then simply dab the sponge where you want the leaves. The sponge texture will create the leaf details for you and all that's left to do is paint the trunk and add a light wash on top of the leaves when everything is dry.
We recommend reading:
Crafts from isolon - a manufacturing master class, nuances of working with the material and step-by-step instructions on how to make a craft (85 photos)- Crafts from saw cuts: stylish and beautiful options for decorating the garden and interior with your own hands (130 photos)
- Crafts from toothpicks - interesting ideas, manufacturing examples and the best crafts for children (120 photos)
Anti-stress toy made of sponge
A soft foam sponge is a suitable material for bringing any creative idea into reality. Squishies help relieve stress and promote relaxation. Thanks to these qualities they have gained great popularity.
In terms of their characteristics, homemade crafts are in no way inferior to their purchased counterparts. They also wrinkle well, hold together, crunch, and after use they return to their original shape, just like store-bought anti-stress.
In general, such a thing provides soft tactile sensations, and when created with one’s own hands, it also develops imagination and creative skills.
Ball pattern - easy and simple
In some cases, when doing something or in needlework, it may be necessary to make a ball of a certain size and diameter. It’s unlikely that you can just take it and do it. This requires precision. To get the desired product, a ball pattern is required. Then it will turn out round and without corners. Of course, the choice of material for the ball is also of no small importance. It should be non-stretchy.
Of course, there are people who can rely on their eye and use mathematical calculations to make a spherical product. But will it be the right ball? Let's look at how you can make it to exact dimensions.
How to make a ball pattern?
The easiest way is to make a ball with a diameter of no more than one meter. If the size is larger, there may be some inconvenience.
Usually the ball is made from petals of the same size and shape. They are glued or sewn together along the drawn line. At the same time, we must not forget to leave seam allowances.
If you make a ball out of foam rubber, you can make it not with separate petals, but with interlocking ones. That is, you don’t need to make each petal separately, but draw the required shape directly on the foam rubber. In this case, there is no need to leave seam allowances. But this is only suitable for foam rubber.
When creating a ball of fabric, each petal is cut out separately and stitched. The seam should be invisible, the transition should be smooth.
Beginning of work
To get the correct ball pattern, you must know its diameter, that is, its visible size.
Next, you need to decide how many petals the ball will consist of. A small one can consist of six. The larger the ball and its circumference, the more petals you will need.
To find out the height of the petal, you need to divide the circumference by two.
To calculate the circumference of a ball, you need to multiply its diameter by a constant value π = 3.14.
Accordingly, if the diameter of the ball is thirty centimeters, then the circumference is 30 * 3.14 = 94.2. The petal height will be 94.2 / 2 = 47.1 cm.
Next, you can calculate the width of the petal. If we want there to be eight of them, then we divide the circumference of 94.2 by 8, we get 11.775 cm.
Afterword
If all these calculations are difficult for someone, then you can look for a special calculation generator to get the correct ball pattern. Just enter the desired diameter and number of petals, and the program itself generates the size of the future ball (even with seam allowance).
Having learned how to sew a ball of fabric, you need to save the patterns. Perhaps they will come in handy more than once.
fb.ru
Children's applications
Making applications gives the child a lot of positive emotions, develops fine motor skills and thinking, and promotes emotional development.
"Chicken on the Lawn"
To create creative work, first take cardboard and draw a chicken on it. At the same time, you can ask the baby a question about what he knows about chicks. Grass, flowers, a flying dragonfly and a butterfly are drawn nearby.
To work you need to prepare:
- Floral sponges;
- sharp scissors;
- black marker;
- PVA glue.
Preparation method:
- Cut the sponges into small pieces. More complex elements imitating butterfly wings and a chicken's nose are recommended for parents. The child can make light elements independently. From the prepared pieces a craft from a floral sponge will be created.
- The painted surface of the chicken is coated with PVA glue.
- First, glue the nose, then paste over its silhouette lines on paper. After this, you can fill the chicken figure with the remaining pieces of yellow foam rubber.
- Glue the chick's paws and eyes.
- The dragonfly and grass with flowers are decorated in the same way.
- When gluing a butterfly figure, first glue the wings and then the body.
The application is ready. It does not take much time, but it develops perseverance and accuracy in the child.
Step-by-step manufacturing process
Choose a hero - an animal or other favorite character that you will embody. Do-it-yourself life-size puppets are created in stages; first you need to draw a sketch of a chosen animal, for example, by hand or using special computer programs. Then it is combined with the figure of a person of average height (from 160 to 170 cm) and, if necessary, the proportions of the animal are changed, the head is reduced and the body is lengthened so that the suit fits harmoniously. Now you can calculate the dimensions and make patterns. Knowing the actual width of the suit, calculate the required number of layers of isolon. For example, if the width of the head is 65 cm, with a width of one layer of isolon 4 cm, 16 layers will be required, 8 on each side.
Sewing life-size dolls is done as follows: an ordinary jumpsuit, or rather its pattern, is taken as the basis of the costume. Add at least two sizes for a loose fit and to accommodate the foam. For a thin suit, take foam rubber 1 cm wide, for a thicker one - 2 cm. You can do without it, but then at least use padding polyester. The dimensions of the pattern are adjusted based on the required volumes of the animal. For example, they remove the darts at the waist if it is not needed, add a few centimeters if a tummy is needed, or lower the bottom if the legs need to be shorter. A layer of needle-punched fiber is applied to the foam layer, then the fabric is stitched together. You may have to alter and adjust the costume several times; life-size dolls take more than one hour to sew with your own hands. The inside is lined with cotton jersey. If the suit will be worn by one person, the lining can be glued, but if there are several, it is better to make it removable. Next they do the most difficult thing - the head. First, contours are cut out on the internal parts: the external one according to the sketch of the animal’s head and the internal one according to the sketch of the human head that will be located inside. The cut parts are glued together, the surface is leveled or sanded. Thin foam rubber is glued inside and outside the head, and fabric is glued on top. The eyes, mesh mouth, and nose are glued on. Gloves are sewn separately, legs too. The process of making legs is similar to creating a head: pieces of isolon are also glued together, cut along the contour outside and inside so that the foot fits there.
You can make any life-size puppet you like. Let creativity bring joy and give positive emotions.
sailboat
Even a three-year-old child can do this craft. Having made the toy himself, he will be able to play with it while bathing.
You will need:
- Sponge of your favorite color;
- colored paper;
- straw for drinks;
- sharp scissors.
How to do it:
- Separate the washing part from the foam base of the sponge. It will serve as the base of the future boat.
- Stick a drinking straw into the soft part, thus creating the mast of a sailboat.
- A sailboat is cut out of a colored sheet of paper and pinned onto a straw.
beauty
Get gradient or ombre nails: Cut a sponge to the size of your nail and paint your nail the lightest ombre color (or white). Then apply nail polish colors to the sponge, allowing them to overlap each other and using the polish generously. Then apply nail polish to your nail, rubbing it up and down to blend it into a gradient.
Add a glitter tip to your nail polish. After you paint the base color and let it dry, take a makeup sponge and apply glitter polish to the tips of your nails.
Apply the thicker coat to the very tip and the lighter coat towards the center of the nail to create an ombre effect.
Make nail polish remover: Instead of using a million cotton balls, place a sponge in a mason jar and soak it in acetone to make your own sponge nail polish remover.
Keep it sealed in a jar when not in use and when it gets too dirty, replace the sponge and add nail polish remover.
Get an easier pedicure by placing pieces of cut up sponge between your toes to avoid staining your nail polish when painting your toenails.
It's like a salon toe separator, but cheaper. Remove lint from clothes: Just like with pet hair, a damp sponge wiped on your clothes will also remove any unwanted lint - just wipe the lint off with your fingers.
Durable shoes: Cut a round makeup sponge and insert it between the heel and back of the shoe.
If you like the placement of the sponge, you can even use a hot glue gun to secure it permanently.
Keep your earrings together:
- push pairs of earrings through a small piece of sponge, securing them at the back;
- This will keep them together as a pair and will also clean the needles after each wear.
Clean eyes: Soak makeup sponges in alcohol and water, then store in the freezer covered with plastic wrap. The rubbing alcohol will keep the sponges from freezing completely, leaving them extremely cold and pliable—perfect for putting on tired eyes in the morning.
Tank
The boys will be absolutely delighted with simple but interesting creative work made from scrap materials.
Necessary materials:
- Foam sponge;
- Stationery glue;
- colored paper;
- scotch;
- scissors.
Progress:
- A small red star and three identical small circles are cut out of black paper;
- 1/3 of the blue sponge is cut off;
- The barrel of the tank is formed from black paper and glued;
- the cut out third part of the blue sponge is glued to the larger part;
- Next, glue the barrel, fix the black wheels and place the star on top.
How to make a life-size puppet
If you don't have a large box, you can cut out a few of the parts you need and glue them together. The height of the box is calculated as follows: measure the height from the top of the head to the hips and add about 10 cm. The finished box should not have a bottom. First, holes are cut for the hands, eyes and mouth, they must be large enough to provide ventilation to the person inside. Next, measure the height and width of each side, cut out rectangles of fabric slightly larger than the required size, sew them on the inside, coat them with glue and put them on the box. Bend the edges inward, leaving all holes free. Now a black mesh is used, which is glued from the inside to the areas of the mouth and eyes. A red semicircle (tongue) and two white rectangles (teeth) are glued to the mouth; white circles, larger in diameter than the cut holes, are glued to the outside of the eyes, and blue circles are already on them. Eyelashes from black fabric are attached and the nose is sewn (a small rectangle of yellow fabric is sewn from the inside, stuffed with scraps and sewn to the face). A white strip of fabric makes a shirt, a black strip makes a trouser, and a red strip makes a tie. The main work is completed, all that remains is to complement the costume with tights or knee socks and shoes.
Cake
It's good when a child has a birthday soon. Friends come to him, give him gifts, and his grandmother bakes an extraordinary cake. But if the holiday is still far away, you can make a cake from scrap materials.
Necessary materials:
- kitchen sponges - 2 pcs.;
- scissors,
- gouache,
- ruler;
- PVA glue;
- wide brush;
- black marker;
- cigarette paper.
Step by step execution:
- Step 1. Draw a triangle on the sponge.
- Step 2. Using sharp scissors, cut out the drawn figure. The work is quite difficult for a young child. Therefore, adults can help him.
- Step 3. Draw a triangle on the second sponge and cut it out. This way you get two blanks for the future toy cake.
- Step 4. Next, the cake pieces need to be coated with cream and jam, which will be used as gouache. The edges of the first triangle are painted with red, and the edges of the second with white paint. If the paint spreads a little during work, this will make the craft look much more natural.
- Step 5. Using a wide brush, apply glue to the toy piece with jam and apply a triangle with cream to it.
- Step 6. Make icing from light tissue paper. The paper strip is rolled into a thin tube and bent into three parts. The resulting part is glued to the back wall of the cake.
- Step 7. As a decoration for a piece of cake, you need to make a rose from cream. It is also made from thin tissue paper. A strip of the required width is cut out and rolled into a tube. Next, it is crumpled and wound around a pencil in the form of a spiral, removed and a beautiful flower is formed. Select an area to place on a piece of confectionery and glue on the decoration.
- Step 8. The cake is covered with white icing on the sides. To do this, you will need thick white gouache so that it is not completely absorbed into the foam. Leave the product to dry.
- Step 9. You can decorate the resulting dessert with strawberries. To do this, you need to crumple a piece of red tissue paper in your palms, roll it into a ball in the shape of a berry and decorate the toy sweet product.
The cake is ready. If desired, you can make brown glaze instead of white. Get a chocolate version of the dessert.
HOW TO SEW A BALL FROM MATERIAL
Let's look at how to sew a ball - the basis for beautiful crafts for the Christmas tree. Based on this pattern, you can sew beautiful balls of material and decorate them with sequins, beads or rhinestones, or toys with a round shape.
You can select beautiful scraps of velvet, lurex, embroidered with shiny threads and immediately sew the finished ball.
BALL PATTERN
FROM MATERIAL
The pattern consists of four petals. AB=1/4 the circumference of the ball, CD=1/2 the circumference of the ball. Arc length of 1/2 ball = 3.142*R Arc length of 1/4 ball = 1.571*R where R is the radius of the ball (half the diameter) Example: for a ball with a diameter of 8 cm, AB = 6.27 cm, CD = 12.57 cm , plus seam allowance
The filling for the ball is padding polyester, pieces of fur, cotton wool or pillow filling. Make a pattern for the ball on thick cardboard. Lay out the pattern on the material and cut it out. Don’t forget about the seams, add 0.5 cm to the main pattern.
stroim—dachy.ru
"SpongeBob"
It is best to make your favorite character from a famous cartoon from a yellow foam sponge. The rectangular shape of the selected ornamental material follows the shape of the main character. Therefore, children will only have to stick on the necessary prepared parts.
For the nose, half a plastic casing from a chocolate egg will do.
The remaining elements of the cartoon character are cut out of cardboard.
All that remains is to glue them to the yellow sponge with PVA glue. The character's arms and legs can be made from wire.
Baby signets
You can make stamps and seals from a kitchen sponge. They cut out a certain shape, dip it in a plate with gouache and apply it to the product. For example, for coloring eggs for Easter.
Another option: draw a tree with branches and leaves on a sheet of paper. In order not to waste time drawing fruits, you can make a template, seal or stamp. Cut out an apple or pear from a foam sponge, dip it in paint, and in a few minutes the tree will be covered with growing fruits.
By turning on your imagination, your child will be able, with the help of adults, to come up with a lot of options for using stamps. These could be shrubs with raspberries, watermelons growing in a melon patch, mushrooms in the forest.
Features, advantages
Making a homemade rug is an easy way to express yourself through crafts. An original handmade product will decorate any interior and surprise guests. Production costs, in most cases, are kept to a minimum here - the most expensive will be luminous decor, for which you need to purchase a couple of meters of LED strip. Making a rug from all kinds of corks and lids will only force you to visit several friends after the holidays in order to collect more suitable raw materials. A textured item, in addition to decorative purposes, can create a light massage effect.
The finished carpet is placed on the floor to make it warm to walk on, sit on, or hang on the wall, creating a practical decor that has organizing pockets.
Colored balls
To create balls, you need to prepare several multi-colored foam sponges and nylon threads for tying together the parts. Foam rubber products are cut into many strips.
Then, having mixed them into a colorful assortment, they begin to form balls. Lay out 5 strips in two rows, mark the center and connect with threads.
The good thing about balls is that a child can swim with them and play in the room without fear of breaking a window.
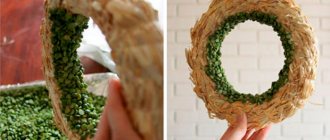
Illuminated rug
Sometimes at night you want to go to the toilet, go to the kitchen to eat, drink a glass of water or prepare a bottle of formula for the baby, so you have to get up and leave the bedroom. In the dark, and even in a half-asleep state, there is a risk of bumping into something, and turning on the overhead light is not always possible so as not to wake up other family members. For such cases, LED floor lighting in a rug will be an interesting and useful solution.
Craftswoman Johanna Hyrkas came up with the great idea of using an LED strip as a lighting sign for the way out of the bedroom. The ribbon is twisted in a spiral, located inside a round rug woven from ordinary rope, and a long tail leads further from the room. Soft, cozy light spreads across the floor without disturbing sleep.
Such a rug with LED lighting can serve as a night light in a child’s room. In addition, a strip of rug can be laid along the walls and lead to the toilet or kitchen. For such purposes, it is better to use a sealed closed LED strip. You can make a rug with your own hands, using a large crochet hook or using your fingers to braid a ribbon with thick yarn or rope. Of course, there are expensive models of LED floor lighting with a light power control. But often the homemade option is an excellent budget solution, as in this case.
Doll furniture
Little princesses love to play with dolls. Every girl probably has a big house for them with all the attributes.
As an addition, you can make furniture from kitchen sponges. The shape of the ornamental material is ideal for creating toy sofas, tables, armchairs, and cribs.
They can be connected to each other even without special support made of cardboard or wood. It will be enough to sew a furniture cover.
Cushions in the form of rolls are created by cutting out the shape of an elongated oval on a sponge and cutting it out. The furniture will last a long time, and the costs, unlike the purchased version of children's furniture, will be minimal.
Using a sponge at home
Repaint your brick: If you don't like the color of your brick, you can easily paint over it using a sponge. Paint the entire wall or fireplace a base color, then cut the sponge into a brick shape and press the dark color on top.
The sponge will retain the texture of the brick and will look natural. Remove old wallpaper: Mix hot water and laundry starch to create a paste. Rub the mixture onto the wallpaper using a sponge and let it sit and dry until the wallpaper comes off.
Useful crafts from sponge
You can make a lot of useful things from kitchen sponges. They can give a rebirth to old headphones.
If you suddenly lose the rubber inserts, they can easily be replaced with foam rubber ones. Just cut a small circle out of a sponge, make a hole in the center and insert it into the headphones.
After reading the descriptions of various crafts made from foam sponges, everyone can be inspired to create them with their own hands. It is imperative to involve children in common work. This will contribute to the development of his imagination and will be useful in school education.
Weaving rugs from old things: master class
Despite the simplicity of the methods for making rugs, quality work requires consultations with experienced needlewomen. Master classes will help you watch step-by-step instructions, learn how to make a carpet correctly and accurately, choose the right scheme and study the order of its implementation, the subtleties and nuances of technology, where each technique is examined step by step. They can be easily found on the Internet.
Handicraft is an interesting activity that can be mastered by showing perseverance, accuracy, attention and patience.
You can get answers to your questions by contacting experienced home craftswomen or by studying numerous videos with recommendations and techniques for making original things.