List of necessary materials for creating crafts
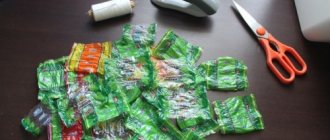
To create an original craft from a sponge, you need to purchase a package of multi-colored foam rubber products. This will be one of the main, but not the only material for creative work.
Other materials will be required:
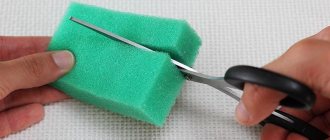
- Scissors, a blade or a scalpel - with their help it is convenient to give the desired contours to the toy, and a scalpel or blade is used to separate the hard base of the washcloth from the foam rubber.
- Felt pens, gouache, markers, paints.
The listed items will be needed for drawing the elements and coloring them. When using paint for coloring, do not forget to dry the sponge thoroughly and only then proceed to the next step.
Recommendation: “When working, it is better to avoid using watercolors, the distinctive feature of which is blurriness and a long drying time. They don’t give a rich color on foam rubber.”
It wouldn't hurt to purchase:
- Gun glue and PVA - with a hot glue gun you can join individual parts of one work, as well as make decorative droplets on the surface of the foam rubber product. Once frozen, they will look impressive on the toy.
- Glitters and sprinkles are used to decorate finished works. They are mixed with PVA glue so that the glitter adheres firmly to the craft, and the product is left to dry completely.
The necessary materials depend on the child’s ideas and imagination. When working you may also need:
- scotch;
- plasticine;
- colored paper.
How to make SpongeBob characters out of paper
Still not difficult. Especially when you have designer-designed diagrams at your disposal. You just need to download, then print, cut and glue. And then you can have fun playing with these cute paper toys and come up with your own story. Or add them to your collection of paper toys, which we will be happy to give you the opportunity to replenish by posting new characters here on our blog.
And so, our first character is our main character’s favorite pet snail named Geri.
All white parts need to be greased with glue and bent to glue our snail. The parts assembly diagram is drawn on the diagram inside the file.
And our next character is Mr. Krabs, a businessman from the bottom of the ocean.
Interesting ideas for crafts made from sponges
Foam rubber is a soft and pliable material. It cuts well and is able to take the desired shape with the help of ribbons or threads. Before you figure out what kind of craft you can make from a washcloth, it is advisable to familiarize yourself with the different options.
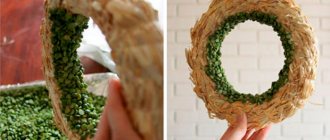
Decorative moss
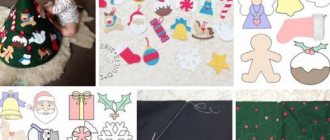
Today, decorative moss is extremely popular in the production of creative works, which can give a beautiful look to any product. It is especially in demand for decorating New Year's decorations. You can make moss from an ordinary washing sponge, and at the same time make a Christmas tree.
Required:
- Foam sponge;
- acrylic based paint.
Stages of work:
- Use a scalpel or blade to separate the hard part from the foam base of the product.
- The soft part of the washcloth is moistened with water to remove static electricity and cut into small pieces.
- Dilute acrylic paint with water to a thick consistency, dip each piece of foam rubber, squeeze it out and put it on a paper sheet to dry.
The moss elements dry quickly because most of the paint has been wrung out. After drying, the sponge parts do not deform and retain their original structure.
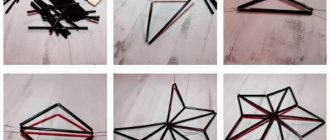
Christmas tree
You can use the foam base of products as an independent material. In particular, with the onset of Christmas, all kinds of Christmas trees become in demand:
- A triangle is cut out of the prepared sponge and small pieces are plucked from the surface of the triangle with your fingers or tweezers.
- The Christmas tree is painted by dipping it in green acrylic paint. When the foam is saturated with paint, squeeze out the excess, place it on a dry surface and leave to dry.
You can powder this winter beauty with snow-white paint that imitates snow. After drying, the tree is tied with threads and used at your discretion.
Pincushion "Fly agaric"
A great idea for crafts made from kitchen sponges are pincushions made by children themselves. The work is quite simple, since there is no need to paint the parts. Pincushions will decorate the interior of the room and will be useful.
To work you will need:
- Colored paper;
- napkin;
- packaging of multi-colored sponges;
- colored cardboard;
- brush;
- office glue;
- thin ribbons;
- gouache.
Preparation method:
- First you need to create the base of the needle bed. To do this, you need to cut out two squares of different sizes. A larger figure is cut out of cardboard, and a smaller one is cut out of colored paper. Next, a small paper square is glued to the center of the colored cardboard figure.
- The needle bar must have a loop so that it can be hung on the wall surface. To do this, take a thin tape and form a loop shape. It can be fixed in two ways: from the back of the cardboard base or by inserting it between a paper and cardboard square. The basis for the craft is prepared.
- Next, they begin to make the needle bed itself. Depending on the idea, cut out a circle, rectangle or square from a colored sponge. Foam rubber is easy to cut and children will have a lot of fun during this activity.
- The prepared parts are glued with the thick side onto the base, and grass is made from the remaining scraps by cutting the edges. All that remains is to paint the white specks on the cap with gouache. The fly agaric pincushion is ready.
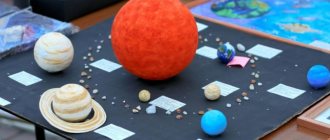
SpongeBob using sculpting technique
The marine cartoon character SpongeBob with his extraordinary appearance is always cheerful and cheerful. SpongeBob, as he is also called, lives at the bottom of the Pacific Ocean, but we are so fond of him that many do not mind placing him in their apartment. We suggest you fashion this extravagant hero with your own hands. So, a sculpted SpongeBob made from polymer clay is the topic of today’s article.
SpongeBob using sculpting technique
Prepare:
- white clay,
- blue clay,
- red clay,
- green clay
- and brown colors.
You will also need a work surface and a set of modeling stacks
Step one. Combine white and brown mass to create a suit: shirt and trousers.
Step two . Take a piece of yellow material of the required size and form a rectangle narrowed at the bottom. Using a sharp stick, cut out the smile, adding black mass into the depth.
Step three. Make the eyes: roll 2 small balls from white material, then attach them to the upper part of the body. Flatten to desired size. Form small circles from the blue material and attach them to the white ones. Then place dots of black material on the blue circles and press with a stack. Twist thin sausages from black material to imitate eyelashes, carefully attach them in threes above the eyes.
Step four. Roll out a small oval for the nose from yellow material and attach it under the eyes.
Step five . To create a SpongeBob smile, insert two white teeth. You can fashion them from small pieces of white material, rolling them into short sausages.
Step six. Make small indentations around the perimeter of the figure using a stack with a round tip, and dimples on top. This will help imitate a kitchen sponge. Tint them with green mass.
Step seven. Let's start making SpongeBob's shirt. A small piece of white material will serve as a shirt. In the center of the future shirt, attach a small ball of the same color and use a stack to form a collar.
How to sculpt SpongeBob
Step eight. Under the collar, attach a small red ball (tie knot), and under it a flattened tie of the same color. For the pants, we have already prepared brown material, form a bar and attach it at the bottom. Roll small brown balls into sausages and use a round stick to make them slightly hollow, as shown in the photo. Add black boots. Toothpicks or cocktail straws will help you attach them.
Step nine. We sculpt hands. After plucking off some of the yellow material, repeat the steps in the photo below.
SpongeBob made from polymer clay is ready to lift your spirits.
Spongebob made of clay
Source
comments powered by HyperComments
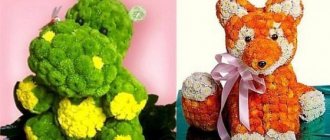
Making animal figurines
Children love creating creative works with friends and adults. Therefore, it is important to choose an activity you like. For example, making your favorite animal images from foam rubber.
Funny kitten
Using foam rubber you can make a playful kitten. For this lesson you will need a washing sponge, white hair ties and a scalpel (or a knife).
Step by step execution:
- Using a scalpel, carefully separate the hard part of the product from the soft one. Squishies (squeeze toys) are made from the cut off soft part.
- To form the kitten's ears, place the sponge vertically and secure the two upper corners with white rubber bands.
- To create the body of the animal, attach an elastic band in the middle of the sponge.
- The paws are formed by attaching elastic bands to the two lower corners.
The kitten is ready and all you have to do is draw its face. The child can choose how to do this - with paints, felt-tip pens or using parts made of colored paper.
Cute pig
An excellent toy for a child that he can make himself. When pressed, it does not wrinkle, takes on all sorts of shapes and returns to its original state. This process amuses children and adults.
Necessary materials:
- Foam sponge;
- acrylic paints;
- primer;
- fine-grained skin;
- scissors;
- hot glue;
- felt.
Work progress:
- Draw an oval on the sponge and cut it out with scissors. Since the sponge has a significant width, the oval may turn out sloppy. To remove errors, it is advisable to use a sharp tool to cut thin pieces.
- To give the resulting oval an attractive appearance, it is treated with fine-grained sandpaper. It is important to achieve a smooth and even surface.
- Acrylic primer is applied to the surface of the finished oval and impregnated, kneading the workpiece. You need to act at a fast pace, not allowing the primer to harden. When the surface is completely primed, the workpiece must be dried.
- The stage of coloring the craft consists of mixing red and white paint to obtain a pink color. Apply it to the sponge in two layers. This will give the craft a more saturated shade. After dyeing, leave the product to dry.
- Draw eyes and a snout on the blank, highlight the cheeks and mouth.
- Two ears are cut out of felt and fixed to the finished product with hot glue. At this point the work is considered completed.
How to make Spongebob. DIY crafts from washcloths
Many cartoon characters are so beloved by children that images of them can be seen on T-shirts, mugs, pencil cases and generally in the most unexpected places. The stronger the desire to “revive” your favorite character, and this time we will think together about how to make SpongeBob and use handmade washcloth crafts made at home in the form of your favorite cartoon character.
This cheerful little guy has gained considerable popularity with his slightly hooligan character and tireless desire to please. And a toy made with one’s own hands (even with the help of parents) is especially dear to a child. Moreover, there are items for making our sea friend in almost every home. You can also see this character in the game SpongeBob Krabby Patties.
The name itself - SpongeBob - tells us where to start. Although, to be honest, it always seemed to me, despite the name, that it was made from a piece of Dutch cheese, but my little one enlightened me that it was a sea sponge, describing not only SpongeBob himself, but also his friends and their habitat. Well, so much the better.
What to make from
You can start creating Bob, who will live not in the cartoon, but directly with your child.
I would take a good square sponge, there are those, you know, with large holes, of all colors, including yellow, very similar to SpongeBob himself (if not, you can use ordinary dishwashing sponges. They are small in size, but If you sew two to each other, you will get what you need).
Let's prepare colored paper (preferably thick), glue (PVA is fine), felt-tip pens or pencils, scissors. We make a slit in the washcloth, approximately where the mouth should be (you can then insert a piece of red paper into it - let Bob show us his tongue).
Decorating baby Sponge
Bob's pants in the cartoon are brown, but these are yours, homemade Sponge, so let your baby choose the color.. Cut them out of colored paper and glue them to the sponge with glue and a brush (the entire volume of the sponge, otherwise it will remain behind us without pants).
Cut out two circles for the eyes and draw eyes with black and blue felt-tip pens. We glue in the same way. Now Bob is wearing pants and even sighted.
In place of the mouth, you can glue a red semicircle in the shape of lips and a pair of teeth - this will make the toy look funnier. We cut out four longitudinal pieces from a dish sponge - these will be Sponge's arms and legs. Sew them on using a needle and thread.
If Bob's body is made of a dish sponge, then you can draw circles with a dark yellow felt-tip pen - and the resemblance to the cartoon character is obvious. Yes, this is not the main thing. The main thing is that the child himself takes a direct part in the process, trust him, and then he will get real pleasure from his new toy.
And he will know how to make SpongeBob with his own hands, and not only him.
We offer a video on how to make a craft from a washcloth in the form of your favorite cartoon character.
Anti-stress toy made of sponge
A soft foam sponge is a suitable material for bringing any creative idea into reality. Squishies help relieve stress and promote relaxation. Thanks to these qualities they have gained great popularity.
In terms of their characteristics, homemade crafts are in no way inferior to their purchased counterparts. They also wrinkle well, hold together, crunch, and after use they return to their original shape, just like store-bought anti-stress.
In general, such a thing provides soft tactile sensations, and when created with one’s own hands, it also develops imagination and creative skills.
How to make squishies with your own hands from a sponge
How to make squishies from a sponge is a very popular question. The sponge is an excellent basis for homemade toys and allows you to bring almost any idea of the author to life. Do-it-yourself squishy made from a sponge is also a good stress reliever, like toys made from other materials, but it is not only playing with anti-stress that helps you relax, but also the process of creating it.
What is a sponge squishie?
Many people are interested in why sponge squishes are popular; in terms of their characteristics, such anti-stress toys are in no way inferior to store-bought toys. It also wrinkles well, crunches, holds together, and after playing it returns to its shape, just like a store-bought anti-stress.
But such a toy also has an undeniable advantage: you can make squishes with your own hands from a sponge at any time of the day. The main thing is that you have a few scrap materials at home, and that the creator has inspiration to work.
For adults, sponge squishies help relieve stress and nervous tension, get rid of bad habits, and for children this game is an excellent opportunity to develop fine motor skills. And in general, such a toy provides pleasant tactile sensations, and if you create it yourself, it develops imagination and creative skills.
Separately, it should be said about the disadvantage of sponge as a material for squishies. It is one, but significant: the size of the planned toy is limited by the size of the dishwashing sponge itself.
Real designers, of course, are not deterred by this fact; they know how to make a series of squishies out of an ordinary sponge, or combine several sponges into one toy.
Some craftsmen even have entire collections of mini sponge squishies.
Some skeptics say that the sponge itself wrinkles well, why change it? But only those who have never played with a real anti-stress can say this. In the game, not only tactile sensations are important, but also the aesthetics of the process. Agree, it is much more pleasant to play with beautiful “balls”.
To make a beautiful squish from a sponge, you will, of course, need an ordinary dishwashing sponge, or better yet, a whole package - this is the basic component of the toy, but far from the only one.
Also useful for creativity:
- Scissors or sharp knife, blade . These tools are good for giving the desired contours to the toy, and the knife and blade are also used to separate the scraper (the dense part of the sponge) from the foam.
- Felt pens, gouache paints . With their help, we add anti-stress colors and draw details. If you use paints for decoration, do not forget that the sponge needs to dry thoroughly before proceeding to the next step. It is better not to use watercolor paints, as they take a long time to dry and do not always give the desired rich shade to the foam rubber.
- Paper and tape, cover for textbooks and notebooks, plastic bag . These materials form the basic anti-stress shell. In this case, the sponge will act as a filler.
- Gun glue . With this glue you can not only connect different parts of one toy, but also leave “drops” on the surface of the sponge. Once hardened, such drops of gun glue will form a very interesting texture.
- Glitters and sprinkles . They are used to decorate the finished slime, so that the sparkles stick to the sponge squishies made by yourself, you can mix them with a drop of office glue, and then apply it to the anti-stress surface. Let the glue dry thoroughly before starting the game.
The list of necessary materials is, perhaps, limited only by the imagination of the anti-stress author. Depending on your idea of how to make a squish from a sponge, you may need both light plasticine and bases with foam balls. The combination of several textures makes the anti-stress game very fun.
You can decorate the finished squish with any decorative elements, not just sparkles. Depending on the intended design, ordinary buttons and foamiran flowers can serve as decoration. The more experienced the author of the squishies, the bolder the experiments in decoration.
The best DIY sponge squishies ideas
If you have just begun to be interested in the topic of how to make squishies from an ordinary sponge, then it is best to start with the easiest ideas to implement. Elementary crafts include squishies without a shell.
Next, you can try toys with complex decorative elements, for example, airy plasticine or cotton wool.
But products in which a sponge serves as a filler are not at all difficult to make, but they require some experience in working with materials and the patience of the developer.
In terms of design, such toys can be absolutely anything. Many boys like anti-stress in the form of super heroes, and girls - in the form of animals. Adults are delighted with mini fruits. For your first homemade toy, choose simple geometric shapes and simple decoration.
Squishies without shell
The most famous toy from this series is SpongeBob SquarePants.
In order to get anti-stress in the form of a famous cartoon character, just take a yellow sponge and draw with it the famous square pants and smile of SpongeBob.
But don’t stop at just one character - try making a squishy from an ordinary sponge in the form of an orange slice, a cake or a muffin.
What you will need to create a squishy:
- a sponge in the color of the idea (orange for orange slices, brown for a cake, etc.);
- scissors;
- markers;
- gouache.
How to make squishies without shell:
- Separate the scraper from the foam rubber. In most cases, it is enough to pull the two parts in different directions, but to ensure an even cut, it is better to use a knife.
- We cut out the required shape of the toy from foam rubber. To ensure smooth edges, it is recommended to first cut out the toy template on cardboard, and only then cut out the anti-stress in volumetric shape using the template.
- We paint the sponge according to the original idea and let it dry.
Even if the sponge is chosen to match the color of the idea, for example, yellow for SpongeBob, it is recommended to additionally paint the base. This will make the material a little stiffer, but the color will be richer and more uniform. After painting the base, it will also be easier to apply faces on the porous material with a felt-tip pen.
Squishies with complex decor
How can you make a squish from a sponge so that it does not differ from the store-bought one? It’s very simple - decorate it with elements of various textures. At home, it is easiest to work with airy plasticine, but satin ribbons, PVA glue, and glitter can also be used. The simplest design is a cake or mini donut made from a sponge.
What you will need for a squishy with complex decoration:
- regular sponge for washing dishes;
- scissors;
- gouache paints;
- air plasticine;
- satin ribbon for decoration;
- glue.
How to make a sponge squishy cake:
- Paint the sponge the desired color. Since the idea is to create a cake, it is best to choose brown paint to make the anti-stress look as much like a chocolate dessert as possible. To make the squish larger, you can glue several sponges together.
- Trim the edges of the sponge to create a cake shape. We begin to decorate this “chocolate” base with textural elements.
- Knead the airy plasticine and roll it out into an even layer, which we place on top of the cake. Carefully glue the homemade marshmallow to the base of the cake.
- You can attach beads or charms made of polymer clay to the plasticine field of the cake, and decorate the base of the toy with a satin ribbon along the contour.
Squish with complex decorations is very pleasant to play. Constantly changing textures during contact with the skin is distracting and allows you to quickly relieve stress.
Squishy with shell
Squishies with a shell are very popular not only because they are very durable, but also because you don’t have to be afraid that the paint from the sponge will transfer to your hands and the glitter will crumble - the design of the toy will remain unchanged, since the paint and glitter will be tightly covered with tape or polyethylene.
What you will need for the shelled squishy:
- paper;
- wide tape;
- sponge;
- felt-tip pens or paints, glitter for decoration.
How to make squishies from a sponge with a shell:
- On paper we draw the basis of anti-stress. You should try simple shapes first, such as a small cloudy one. You need to make two templates (for the back and front) and carefully cut them along the contour.
- We paint the paper: make the background of the cloud soft blue, draw eyes and a smile. To make the game more fun, invite the girl to put make-up on her face on a cloud, and invite the boy to draw a superhero mask.
- We cover the paper with tape, as if laminating it.
- We connect the two parts of the workpiece with tape, leaving a small slot at the bottom (we make a kind of pocket).
- In the pocket we put a sponge cut to the shape of a paper blank.
- We seal the anti-stress hole, completely covering the filler with the shell.
Durable plastic bags are actively used as shells; they are also easy to find in any home, just like a dishwashing sponge. But wide tape, which is the easiest way to fasten the edges of the shell, is not always at hand.
If you don't have tape, you can try to fasten the polyethylene with a hot iron.
To do this, place two pieces of polyethylene on a sheet of paper that need to be fastened together, cover with a second sheet of paper and slowly move a hot iron along it.
Note! You can put not only a whole sponge in the shell, but also finely chopped pieces. In this case, you will be able to make a very soft squish from a sponge.
Features of working with a sponge
There are actually many more ideas on how to make a squish out of a sponge. This material is easy to use and accessible to everyone. And although an ordinary sponge is already quite easy to work with, there are several secrets, knowledge of which will greatly facilitate creativity.
How to properly work with a sponge when making squishy:
- Don't rush to cut the scraper off the sponge; perhaps it should be used as an additional layer of squishy. For example, in cake toys, the scraper will look like another layer of “cake”, and the dense texture will add originality to the game.
- Add a few drops of fragrance to the toy. The sponge absorbs and retains odors well, and the game will turn into a real extravaganza of aromas.
- Do not throw away sponge trimmings. The largest pieces can be glued and then sewn together to make Frankenstein squishies, while the small ones are suitable for filling 3D anti-stress shells.
- Don't limit yourself to one type of material. Combine several layers with different fillers and textures in one squish. This will make the toy more interesting and unique.
- Always carrying an anti-stress with you is very useful. In tense situations, such a toy will help you relax and calm down. And in order not to forget the squishies at home, just attach a key ring to the finished product.
Working on a simple toy will take no more than 15 minutes, but you can actively play with it for a very long time.
How to make squishies from a sponge - watch the video:
Making sponge squishies is a fun process for children and adults. Joint creativity helps the child develop, and the finished toy relieves tension and stress.
And adults also enjoy playing with such anti-stress toys. An ordinary sponge is an excellent material for creativity and is always at hand.
But to make a squishy out of a sponge with your own hands, you need to know a few tricks that will significantly simplify the process of creating a toy.
Source: https://slimeyou.ru/vidy/squishy/71-kak-sdelat-skvishi-svoimi-rukami-iz-gubki.html
Children's applications
Making applications gives the child a lot of positive emotions, develops fine motor skills and thinking, and promotes emotional development.
"Chicken on the Lawn"
To create creative work, first take cardboard and draw a chicken on it. At the same time, you can ask the baby a question about what he knows about chicks. Grass, flowers, a flying dragonfly and a butterfly are drawn nearby.
To work you need to prepare:
- Floral sponges;
- sharp scissors;
- black marker;
- PVA glue.
Preparation method:
- Cut the sponges into small pieces. More complex elements imitating butterfly wings and a chicken's nose are recommended for parents. The child can make light elements independently. From the prepared pieces a craft from a floral sponge will be created.
- The painted surface of the chicken is coated with PVA glue.
- First, glue the nose, then paste over its silhouette lines on paper. After this, you can fill the chicken figure with the remaining pieces of yellow foam rubber.
- Glue the chick's paws and eyes.
- The dragonfly and grass with flowers are decorated in the same way.
- When gluing a butterfly figure, first glue the wings and then the body.
The application is ready. It does not take much time, but it develops perseverance and accuracy in the child.
sailboat
Even a three-year-old child can do this craft. Having made the toy himself, he will be able to play with it while bathing.
You will need:
- Sponge of your favorite color;
- colored paper;
- straw for drinks;
- sharp scissors.
How to do it:
- Separate the washing part from the foam base of the sponge. It will serve as the base of the future boat.
- Stick a drinking straw into the soft part, thus creating the mast of a sailboat.
- A sailboat is cut out of a colored sheet of paper and pinned onto a straw.
Tank
The boys will be absolutely delighted with simple but interesting creative work made from scrap materials.
Necessary materials:
- Foam sponge;
- Stationery glue;
- colored paper;
- scotch;
- scissors.
Progress:
- A small red star and three identical small circles are cut out of black paper;
- 1/3 of the blue sponge is cut off;
- The barrel of the tank is formed from black paper and glued;
- the cut out third part of the blue sponge is glued to the larger part;
- Next, glue the barrel, fix the black wheels and place the star on top.
Step-by-step photo lesson:
From the printed sheet we cut out the largest detail - the yellow body. I will cut it along all the arcuate lines.
We bend the small white “pockets” inward.
Then we bend the entire body blank to form a cube.
Apply glue to the white areas and glue the upper part of the body to form a three-dimensional cube.
Cut out the lower part of the body in the form of a white and brown part.
Then bend along all the dotted lines.
Apply glue to the “pockets” and glue the figure together.
Cut out a small detail in the form of a white shirt collar and a red tie from the printed sheet. Then we glue the upper part over the lower part of the body.
Just below the eyes you can see a short vertical line. You should run a blade along it or carefully cut it with nail scissors. Then we bend the nose part. Glue it together. And we push the part into the middle of the slot. We insert it.
Cut out the left hand in yellow. Apply glue and glue it to the left side in the indicated place.
We twist the white part of the shirt. Apply glue and glue it into a tube. Glue the part to the left side of the craft.
You should also cut out the arm and the white part of the shirt for the right side, so that you can glue it on later.
Cut out the brown part. Roll up the sides. Apply glue to the white “pockets”. Glue it together.
Now you can cut out the left and right legs. Fold along the dotted line and glue the two parts together.
Glue the legs one by one.
We attach the brown part of the shorts to them.
Source
Cake
It's good when a child has a birthday soon. Friends come to him, give him gifts, and his grandmother bakes an extraordinary cake. But if the holiday is still far away, you can make a cake from scrap materials.
Necessary materials:
- kitchen sponges - 2 pcs.;
- scissors,
- gouache,
- ruler;
- PVA glue;
- wide brush;
- black marker;
- cigarette paper.
Step by step execution:
- Step 1. Draw a triangle on the sponge.
- Step 2. Using sharp scissors, cut out the drawn figure. The work is quite difficult for a young child. Therefore, adults can help him.
- Step 3. Draw a triangle on the second sponge and cut it out. This way you get two blanks for the future toy cake.
- Step 4. Next, the cake pieces need to be coated with cream and jam, which will be used as gouache. The edges of the first triangle are painted with red, and the edges of the second with white paint. If the paint spreads a little during work, this will make the craft look much more natural.
- Step 5. Using a wide brush, apply glue to the toy piece with jam and apply a triangle with cream to it.
- Step 6. Make icing from light tissue paper. The paper strip is rolled into a thin tube and bent into three parts. The resulting part is glued to the back wall of the cake.
- Step 7. As a decoration for a piece of cake, you need to make a rose from cream. It is also made from thin tissue paper. A strip of the required width is cut out and rolled into a tube. Next, it is crumpled and wound around a pencil in the form of a spiral, removed and a beautiful flower is formed. Select an area to place on a piece of confectionery and glue on the decoration.
- Step 8. The cake is covered with white icing on the sides. To do this, you will need thick white gouache so that it is not completely absorbed into the foam. Leave the product to dry.
- Step 9. You can decorate the resulting dessert with strawberries. To do this, you need to crumple a piece of red tissue paper in your palms, roll it into a ball in the shape of a berry and decorate the toy sweet product.
The cake is ready. If desired, you can make brown glaze instead of white. Get a chocolate version of the dessert.
Let's sculpt SpongeBob step by step
If you look closely at the cartoon, the yellow color will immediately catch your eye. This is exactly the shade you will need for sculpting crafts. But the work also cannot be done without additional parts made of brown, white, blue and red plasticine. Prepare a stack and a plastic ballpoint pen body for work, which will help create a sponge effect.
To easily obtain a rectangular block, cut the required amount from the selected plasticine. You don’t even have to knead the plasticine, but just smooth out the ribbed side with your fingers.
Do the same with the brown material. Attach the square pants to the yellow piece.
Use two matches to make very thin legs. Place a thin layer of yellow plasticine on the matches and attach black boots.
Insert matches into the bottom of the shorts.
Attach a white collar and a red tie.
Cover the surface of Bob's yellow body with round pieces obtained from a ballpoint pen.
Attach the boy's big blue eyes to the front.
Add long eyelashes, chubby cheeks and two front teeth that stick out.
Don't forget about your hands too. These parts of SpongeBob's body are also very thin; make them from yellow plasticine and attach them to a block body.
SpongeBob made from plasticine is a sweet boy, a positive hero. We hope you will have only pleasant impressions after the lesson you spent with your child.
"SpongeBob"
It is best to make your favorite character from a famous cartoon from a yellow foam sponge. The rectangular shape of the selected ornamental material follows the shape of the main character. Therefore, children will only have to stick on the necessary prepared parts.
For the nose, half a plastic casing from a chocolate egg will do.
The remaining elements of the cartoon character are cut out of cardboard.
All that remains is to glue them to the yellow sponge with PVA glue. The character's arms and legs can be made from wire.
DIY SpongeBob - paper toy
Today we will devote a post to crafts based on our favorite children's cartoons - we will make three-dimensional toys according to the diagrams. And our crafts are the characters of the cartoon “SpongeBob”: Geri, Patrick, Mr. Krabs and SpongeBob himself - Square Pants, we will make all of them with our own hands. Better yet, offer to make these naive heroes for your children with you. Collaborative creativity is fun time spent together and that in itself is valuable.
Baby signets
You can make stamps and seals from a kitchen sponge. They cut out a certain shape, dip it in a plate with gouache and apply it to the product. For example, for coloring eggs for Easter.
Another option: draw a tree with branches and leaves on a sheet of paper. In order not to waste time drawing fruits, you can make a template, seal or stamp. Cut out an apple or pear from a foam sponge, dip it in paint, and in a few minutes the tree will be covered with growing fruits.
By turning on your imagination, your child will be able, with the help of adults, to come up with a lot of options for using stamps. These could be shrubs with raspberries, watermelons growing in a melon patch, mushrooms in the forest.
Colored balls
To create balls, you need to prepare several multi-colored foam sponges and nylon threads for tying together the parts. Foam rubber products are cut into many strips.
Then, having mixed them into a colorful assortment, they begin to form balls. Lay out 5 strips in two rows, mark the center and connect with threads.
The good thing about balls is that a child can swim with them and play in the room without fear of breaking a window.
Doll furniture
Little princesses love to play with dolls. Every girl probably has a big house for them with all the attributes.
As an addition, you can make furniture from kitchen sponges. The shape of the ornamental material is ideal for creating toy sofas, tables, armchairs, and cribs.
They can be connected to each other even without special support made of cardboard or wood. It will be enough to sew a furniture cover.
Cushions in the form of rolls are created by cutting out the shape of an elongated oval on a sponge and cutting it out. The furniture will last a long time, and the costs, unlike the purchased version of children's furniture, will be minimal.
Useful crafts from sponge
You can make a lot of useful things from kitchen sponges. They can give a rebirth to old headphones.
If you suddenly lose the rubber inserts, they can easily be replaced with foam rubber ones. Just cut a small circle out of a sponge, make a hole in the center and insert it into the headphones.
After reading the descriptions of various crafts made from foam sponges, everyone can be inspired to create them with their own hands. It is imperative to involve children in common work. This will contribute to the development of his imagination and will be useful in school education.