Hi all! Summer is coming to an end and it’s time to get ready for school.
Today I want to tell you and show you how to make a beautiful and stylish accessory for your school uniform - a tie brooch made from grosgrain or satin ribbon.
A tie is a fairly fashionable item of clothing that is liked by both young and adult fashionistas. And thanks to the fact that it is attached to a brooch, it can be worn with different outfits, for example, it goes well with shirts, blouses or dresses.
This decoration is quite easy and simple to make, and even a novice craftswoman can cope with this task. Therefore, I suggest you start creating beauty so that you can soon enjoy a stylish new thing.
Kanzashi brooch tie for girls for school uniform (master class)
At school, we require students to wear business attire, so dressing formally and not informally is already a necessity. But I always want some kind of zest, and here a tie brooch will be both in theme and that very zest. So let's get started.
For production we will need: - Satin or grosgrain ribbon 1 cm wide; — A measuring tape or ruler; — Preparation of a brooch; - Scissors; - Lighter; - Glue; — Threads with a needle; - A small piece of felt;
- For the middle, a half bead, rhinestone or any other decoration;
I took a black grosgrain ribbon. Black because this color is universal, and blouses are mostly light and will go well with them.
And grosgrain ribbon, because it is much stronger than satin, there are practically no puffs on it and I like the matte color without shine better, in my opinion it looks more serious compared to satin, but satin also has its place, because it has its own good.
The width of the ribbon I took was 1 cm, but using the same principle you can assemble a tie from a wider ribbon, for example 2 or 2.5 cm.
First you need to cut: 3 pieces of 18 cm. 1 piece of 16.5 cm.
1 piece 14.5 cm.
On each segment you need to find the middle; to do this, you need to fold the segment in half and slightly iron the fold with your fingers. Then straighten it out and apply glue to the middle (I usually use moment crystal, but you can use any other), then bend both edges to the middle and press well so that it sticks.
This must be done with all segments.
Next, we begin to collect the bow. First we connect the longest segments together.
We connect it so that we get an upside down letter x.
Glue the third long piece on top.
Next, glue the middle one onto the big one, and the smallest one onto the middle one.
This is what the preparation should look like.
For the tail of the tie, we need another 18 cm piece. It needs to be folded in half, slightly moving the ends apart.
- The ends need to be folded facing each other.
- And cut off the ends at an angle.
- Be sure to trim the ends with a lighter to prevent fraying.
- Apply to the bow and align.
- You need to glue it from the back side to the bow and also to each other along the fold.
- The brooch needs to be sewn to a small piece of felt.
- And then this small piece with the brooch needs to be glued to our decoration on the back side.
- Glue the middle to the bow and our tie for school is ready.
My daughter tried it on and she loves it! How do you like this tie? Write below in x.
- And if you want to sew a lace blouse yourself, then you will be interested in this master class.
- I also recommend looking at the article How to make hair bows.
Source: https://bantomaniya.ru/master-klassy/galstuk-brosh-iz-lent
A few facts about a tie
- A classic tie is sewn according to certain canons. More often, from expensive silk with plain weave. In mass production, it is replaced with inexpensive analogues or polyester. There are ties made of wool, cashmere, cotton and linen.
- Basically, it is worn by men , but a female look, complemented by a tie, is not so rare and always looks interesting.
- A tie can be of different lengths, widths and shapes.
- The width of the tie matches the lapels of the jacket or blazer and should not conflict with them or the width of the shirt collar. It is important to maintain proportions and choose a tie of suitable width for a jacket with a narrow or wide lapel.
- There is an important rule in terms of length : the tie should reach the top of the belt buckle.
- Classic cutting of a tie is carried out on the fabric at an angle of 45 degrees. That is, obliquely.
- And by the way, if you want to become a tie collector, get used to responding to a strange word - grabologist.
Ribbon tie-brooch for girls for school
In today's master class, we will make our own tie-brooch from grosgrain ribbons, as well as 2 bows to go with it. This set is perfect for a girl’s school uniform, for example, for Last Bell or September 1st.
To make a tie brooch, you will need the following materials.
We prepare the segments: 2 pieces of gray grosgrain ribbon, size 4x32 cm, 1 piece of blue grosgrain, size 4x30 cm, 2 pieces of gray grosgrain, size 2.5x20 cm. Cut three strips of lace to fit the size of the ribbons, 4 cm wide.
We sew each ribbon into a circle; we sew 4 cm wide ribbons together with the lace.
First, we’ll make a bow from gray grosgrain ribbons, placing the pieces on top of each other, then put a blue piece on top.
Let's make a bow from gray rep, 2.5 cm wide. And sew it to the main bow.
Now we’ll make the tie itself. Take a piece of blue rep, 4 cm wide and measuring 36 cm, and fold it in half. Cut the edges of the tie at an angle and melt it with fire.
Take a piece of gray grosgrain ribbon 2.5x13 cm and put it on the blue piece, fix the tie on top with glue.
We glue a tie under the bow and glue the middle - a brooch or cameo.
Glue the brooch blank from the inside out. The brooch tie is ready.
To complete the set we will make bows in the same style with elastic bands. We will make the bows a little smaller; for this we use grosgrain ribbons of the following sizes.
- Gray rep 4x24 cm - 2 pcs + lace,
- Blue rep 4x22 cm - 1 piece + lace,
- Gray rep 2.5x17 cm - 2 pcs.
When the bow is formed, glue the elastic band.
Source: https://alidiy.ru/galstuk-brosh-iz-lent-svoimi-rukami/
DIY brooch tie. Master class by Tatyana Plotnikova
Home ← Master classes ←
19.08.2015
Administrator
- Recently, handmade accessories have become popular, for example, bows, flowers, ties, brooches, etc. from ribbons. In this master class I will show you how to make a tie brooch with your own hands. For this we need grosgrain ribbon and lace 38 mm wide.
- Photo 1. We make blanks for the bottom of the tie from ribbon and lace: the length and number of blanks are shown in the photo.
- Photo 2. We bend the blanks in half and glue the ends together.
- Photo 4. We sequentially glue “loops” of tape onto the longest piece.
- Photo 5. Now we cut the blanks for the bow. Length and quantity in the photo.
- Photo 6. We bring the ends of the blanks to the center and glue them together.
- Photo 7. Using hot glue, we connect all the parts together and then sew them together. then glue the blank with the brooch.
- Photo 8. The bow for the tie is ready.
- Photo 9. Glue the tail to the bow and the ribbon brooch is ready!
- Photo 10. Using curly scissors, cut out an oval from white foamiran and glue it to the tie from the wrong side, thereby covering the junction of the parts. We glue the pin with a small piece of foamiran. We are not lazy to do everything carefully, because... the reverse side should also be beautiful.
- Photo 11-13. My ties are brooches.
Share the link to the post on social networks ↓
Source: https://kollekcija.com/galstuk-brosh-svoimi-rukami-master-klass-tatyanyi-plotnikovoy/
Kanzashi brooch tie in master classes (photo and video)
School clothes are a common uniform for educational institutions, which are made from neutral, dark shades of fabric. In order to diversify a slightly boring shape, you can make your own brooch or tie-brooch using the kanzashi technique from satin ribbons.
As an example, two master classes will be offered, the authors of which are Elena Leonova and Tatyana Matrukhan. Their interesting ideas, which are fashionable attributes, will appeal to every schoolchild.
Making a frill tie
- black and white satin ribbons, the width of which is five centimeters and two and a half centimeters;
- lace;
- needle and thread;
- scissors;
- lighter and glue gun;
- metal clasp for brooch.
Cut a satin ribbon, 5 cm wide, into several pieces, namely: two white ones, 18 cm long, one white and one black, 20 cm long. Scorch the edges with fire to prevent the threads from fraying. Now move on to the tape, which is 2.5 cm wide. You need two black pieces of 18 cm each, as well as one black and one white 20 cm long.
Tie pattern for a schoolboy
In my case, almost all the material was “used” for sewing the skirt. There was a small piece left from which the tie was sewn.
I created the pattern based on the ties of my son and husband, and also based on the interests of the little customer.
I had to deviate a little from classic sewing and cutting. What you won’t do for the joy of your loved ones.
For detailed construction of the pattern and sewing of the tie, see the video.
Note: Due to the lack of main fabric, I assembled the tie in three parts. You can cut out one whole piece from the base material. Or assemble a tie from 2 parts. Look for the option that best suits your conditions.
I cut it straight and sewed the tie from two parts.
Important. I duplicated the top of the main wool part with a part made of lining fabric. This method is radically different from classical sewing.
The second, narrow piece is completely lined.
In the process, I added two pieces to decorate and secure in the loop of the narrow end of the tie. I wanted to make it “really” beautiful.
Tie-brooch for school for a girl made of satin ribbons
Svetlana July 24, 2016
Ribbon brooch tie
Today, school ties for girls are gaining more and more popularity. Such jewelry can be considered brooches.
They look incredibly beautiful with a black and white school uniform, and are usually made in the same color scheme.
To turn a plain white blouse into a festive outfit for the first or last bell, simply decorate it with a tie, like the one shown in this tutorial.
What is needed to create an accessory
Ribbons for creating a tie
For the ponytail, prepare:
- white grosgrain ribbon 4 cm – stripes 30 cm and 25 cm;
- black grosgrain ribbon 2.5 cm - strip 30 cm;
- black lace 2 cm – strip 25 cm.
For the bow:
- white grosgrain ribbon 4 cm - stripes 26 cm, 24 cm (2 pieces), 22 cm and 18 cm;
- black grosgrain ribbon 2.5 cm – stripes 24 cm (2 pieces);
- black lace 2 cm – strip 18 cm;
- a stone and a base for it or a camellia - to decorate the middle of the brooch;
- a pin and a strip of felt 2 cm by 3 cm.
How to make a school tie-brooch from ribbons step by step:
How to make a tie brooch part 1
- Prepare white (4 cm) and black (2.5 cm) grosgrain ribbon, white lace (2 cm). Cut the pieces to the required length. Some black and white parts will need to be combined. For the lower part: white (wider) and black (narrower) stripes 30 cm long, white and black lace stripes 25 cm long. For the upper part: white ribbon and black lace 18 cm long, white and black ribbon 24 cm long (2 segments).
- Bend all the pieces intended for the top of the bow (white and black and white) into rings. Glue the edges together, carefully overlapping each other. Then press down each ring with your finger in the central part to create a blank for the bow.
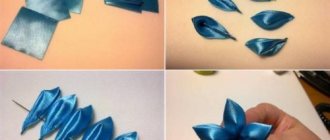
- Turn the long sections intended for the ponytail into tongues. Place the back side up, pinch the center with your finger and lift both sides of the piece up.
- Also turn the white piece combined with black lace into a tongue. But its length will be shorter by about 2.5 cm.
How to make a tie brooch part 2
- Place the top of the two tabs together to create a tie tail.
- Attach two black and white blanks to create a bow in the center, moving them diagonally.
- Next, attach the white piece and the shortest strip of lace.
- Glue the tail.
Tie-brooch
- Add pebble decor to the center to make the piece look complete.
Brooch tie from the inside out
- Add the last white piece (squeezed ring) from the inside to cover the ponytail attachment point. Secure the back with a small pin using felt.
This tie measures 12 cm by 17 cm. To prevent the accessory from being too heavy, it is better to use a lightweight center.
Shared master class
Svetlana Sorokina
Source: https://hobby-mk.ru/galstuk-brosh/
How to make a tie for girls (Lady Tie)
« previous entry | next entry » Jun. 7th, 2013 | 02:19 pm
So, in order to sew your own girlish tie, we will need:
- a piece of fabric, preferably natural, about 50x50 in size (I used a sleeve from a large men's shirt), - matching thread and a needle, - a small beautiful button, - (optional) if you have thin fabric, you may need adhesive interlining, which glued with an iron - a Chinese stick/brush/knitting needle to turn the tie, - nail scissors to cut a buttonhole.
1.
The tie consists of 4 identical parts - strips approximately 32-25 centimeters long, 2.5 centimeters at the narrow end and 6 at the wide end. The pattern looks something like this. You should try to cut the parts so as to match the pattern, but this is not necessary.
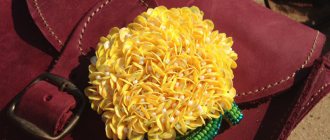
Brooch made from grosgrain ribbon - ideas, manufacturing methods
When dressing for school or the office, we are obliged to adhere to the uniform: white blouses, black skirts... This is very boring and quickly gets boring, we want to stand out from the faceless crowd of identically dressed people. Unfortunately, very often this is not permissible.
In search of a compromise solution, some fashionistas began to decorate uninteresting blouses with elegant and stylish brooches. It won’t be difficult to purchase them; stores never cease to pamper us with wonderful accessories.
What if you don’t buy it, but make it yourself, purchasing fifty rubles worth of materials? How do you like this idea?
Let's try and create some amazing grosgrain ribbon brooches. They will transform your appearance, give you an elegant aristocratic look, and it will become the most vibrant and stylish!
Tie-brooch made of grosgrain ribbon
By creating something with our own hands, we begin to create magic. Now it was just a piece of ribbon, a few beads, a beautiful button and suddenly a unique product appeared!
Brooches are the most exquisite accessories that highlight the individuality of their owner. Handmade jewelry has always been highly valued, because it gives the appearance exclusivity and originality.
Remember the old films - the ladies there are often presented as very elegant, sophisticated, and a brooch was always present as the main accessory. Let us also try to create it in the form of a tie, using a grosgrain ribbon as a basis.
DIY school tie for September 1st. Video master classes
Before we knew it, the holidays were already over. The hassle associated with the new school year is in full swing: buying school supplies and uniforms for children who have stretched out over the summer. And the guys themselves are actually looking forward to meeting their classmates. By the way, these worries can be pleasant if you approach the matter creatively, which is what most caring parents do.
Of course, not everyone thinks that a harmonious combination of the color of notebooks and a pencil case is an important task, but a neat appearance and neat appearance will only add points to your child in the eyes of teachers. And the mood of children who are self-confident is completely different, and it certainly affects learning outcomes.
Those who love the special solemnity of their outfits have probably paid attention to school ties for girls , decorated with an elegant brooch.
Such a tie for a girl to go with her school uniform can be worn not only on September 1st - it will help you out more than once during the school year. This product resembles the jabot familiar to many, and it can be made not only from measured lace, but also from satin or grosgrain ribbons.
The traditional color scheme for a school tie is black and white, but if your child’s uniform has other colors, but you can include these shades in the decor, you will get a wonderful set.
Making a school tie with your own hands is not an impossible task. Even if you are new to needlework, video tutorials will make it easier to understand the process, because you will see the masters at work with your own eyes.
The tie you see in the photo was made by a needlewoman under the nickname MiLena. For production details, see the link below:
How to make a school tie with your own hands. Video master classes
We have also prepared for you a selection of video master classes on making school ties with your own hands from various authors. Choose your tie and get to work quickly!
- 1. DIY tie for a girl to go with her school uniform from Olga Ivanova:
- 2. DIY school tie made from ribbons, master class from Yulia:
- 3. Kanzashi brooch tie for September 1, video master class from Marina Shuvalova:
- 4. DIY school tie, master class from Anna Napolska:
- 5. DIY school tie-brooch for September 1st from Kanzashi Alina Boloban:
- 6. DIY school tie, master class from Anastasia Kulikova:
- 7. DIY school frill, master class from Julia:
- 8. DIY school ties for girls from Lyubov Stasyuk:
- 9. Master class on making a tie for school from OLya LIgus:
10. School kit. Tie and elastic bands from Tatyana Burakova:
Source: https://www.darievna.ru/page/shkolnyj-galstuk-na-1-sentjabrja-svoimi-rukami-video-master-klassy
Other options
The photo of crafts-ties mostly shows various options for voluminous postcards or part of dolls’ clothes. But you can go further and come up with more original options.
For example, it’s easy to use paper ties to create something like a Christmas tree garland that will look funny somewhere in the room near your desk or on the Christmas tree itself. In addition, such a garland can contain not only ties, but also other elements of the same kind.
In this way, you can make crafts from men's ties, or you can make ties themselves, and their scope of application is quite wide: from room decor and decorating toys to going out, to work, official events, business meetings.
Crafts of varying complexity can be done by absolutely everyone from preschool children to adult children who are interested in needlework.
Ribbon brooch
A brooch is an exquisite accessory that emphasizes your individuality. Handmade jewelry is exclusive and unique. In this article we will look at how to make a brooch from a ribbon with your own hands.
Types of tapes
Satin ribbons Rep ribbons Transparent ribbons Lace ribbons Velvet ribbons Shiny ribbons
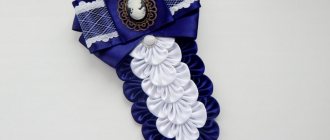
Brooch-tie using kanzashi technique
You will need: blue lace ribbons 4 cm and 2.5 cm wide, grosgrain blue ribbon 4 cm wide, grosgrain dark blue ribbon 2.5 cm wide, flower, scissors, ruler, glue gun, thread, needle, piece of felt, brooch clasp.
Master Class
- Prepare 4 pieces of grosgrain and lace ribbon measuring 4x13 cm.
- Connect the grosgrain and lace ribbons, then form loops and secure with glue.
- Gather 4 loops into a bow and secure with glue.
- Prepare 3 pieces of grosgrain ribbon measuring 2.5 x 24 cm, then bend each piece on both sides, connecting the ends in the center, securing with hot glue.
- Gather 3 blanks into a bow and secure with glue.
- Prepare 2 pieces of grosgrain and lace ribbon measuring 4x20 cm and assemble a bow.
- Prepare a piece of lace measuring 2.5x16 cm and gather it into a circle using a thread and needle.
- Prepare a piece of grosgrain ribbon measuring 2.5 x 14 cm, then fold the edges on both sides and meet them in the center.
- Glue the circle to the center of the folded segment.
- Glue the flower to the center of the circle.
- Glue the first piece to the second (x-shaped bow with a triple bow).
- Glue the third and fourth blanks together (x-shaped bow and blank with a flower).
- Glue 2 large pieces together and set aside.
- Prepare stripes for the tie: 2 pieces of grosgrain and lace ribbon measuring 4x13 cm and a piece of grosgrain measuring 2.5x10 cm.
- Connect the grosgrain and lace ribbons, then cut them diagonally at the bottom and sharpen a thin strip.
- Glue the 2 strips together and glue a thin strip in the center.
- Glue this blank on the back side at the bottom of the bow.
- Prepare a piece of rep and lace measuring 4x26 cm and assemble a double strip with loops at the ends.
- Glue the blank to the back of the bow.
- Glue a felt rectangle and secure the fastener in it.
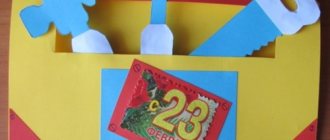
Making a shirt and tie
To make the base of the postcard, take a sheet of colored cardboard and fold it evenly in half. We draw the shape of the shirt on cardboard of a completely different color, the next step is to cut out the shape. We apply the shirt to the base of the card using glue. Well, as for the tie itself, we also depict it on cardboard and carefully cut it along the contour with scissors.
The next step is to apply the tie to the shirt. Inside the craft, write your most sincere and positive wishes to the person for whom this wonderful and original card is intended.
You can decorate your shirt and tie at your discretion; there are many options. So, the work is ready.
The best gift is a gift made with your own hands, and if this gift is also made with soul, then it is a clear leader. Creating original and unique crafts with your own hands becomes a very entertaining and interesting process. This activity can become a hobby for both adults and children.
With the help of such simple activities for making a gift with your own hands, thinking, imagination, fantasy and creativity develop.