Usually in the house of a good housewife there is a large number of dishes in which she prepares various dishes and stores the prepared food. If placed incorrectly, dishes can take up too much space, making it difficult to work in the kitchen. If you are faced with a similar situation, you should think about purchasing special containers, containers or stands for compact storage of dishes.
If you have free time and a desire to create convenient stands for lids, you should try making them with your own hands. We will show you an interesting and simple way to create holders for storing pot lids.
Table stand
An excellent device that helps during cooking. No more searching for a place for a hot lid covered with condensation droplets. All moisture will drain onto the stand, and the heated elements will not damage the tabletop. It is also recommended to place a spatula or ladle here.
DIY string holder
A simple way to store pot lids in the kitchen to make with your own hands - you need to measure the diameter and fasten several strings or pieces of copper wire of a suitable length to two self-tapping screws inside the cabinet. They should sag a little so that the weight is distributed evenly along the entire length and ensures reliable fastening.
Instead of a string, you can stretch a rubber band that stretches and can support a pan lid of any size. When installing rails or strings, you need to take into account that the protruding handle does not interfere with closing the door. It should be located at the same level as the internal shelf.
Sliding stand
An interesting, versatile device that can be adjusted in length to suit your storage needs. For this reason, the stand can be used on a countertop, open shelf or wall cabinet. Reliable as it is made of stainless steel.
Suitable not only for storing boards and pot lids, but also frying pans, baking trays and baking dishes.
Tools for storing pot lids
Door and wall rails. They are inexpensive and easy to make. Mounted on a wall or cabinet door. Before purchasing a roof rail, you need to measure the length of the surface that is selected for this purpose. There are no strict priorities for fastening and materials. In other words, the range of choices is wide and you can build on your personal preferences. The screwing process takes place using the supplied components or individually selected ones. After which you can safely hang the lids from the dishes and freely find them at the right time.
A common mistaken way to store lids is on the pans themselves. Of course, most housewives do this, but this is wrong, since it clutters up the free space in the kitchen. Owners make another mistake when they store the lids in a stack. Maybe this is appropriate for dishes, but for accessories with a protruding handle it is no good. Because this creates an unstable structure of dishes, which is about to fall apart and cause even more trouble for the housewife.
A common mistaken way to store lids is on the pans themselves.
If your kitchen boasts a large area, it makes sense to place dishes in a horizontal position. Although, of course, this is convenient, it requires a lot of free space. However, it is better to store the lids in doll-shaped drawers. It’s good if the pots are located on top, and the lids for them are located below, in special cabinets. You will save time searching for the right utensils and required accessories. Be sure to stack the lids in one column so as not to clutter the space in the cabinets.
Hooks on the wall
An alternative method is using hooks. They are usually placed above a hanging bedside table. These drawers can definitely be filled with some everyday items, but there is plenty of free space above them. Why not then use it for its intended purpose? A particularly win-win option is the lid handles in the form of loops. This makes it easier to hang them somewhere and provide your kitchen with additional free space. For solid pens, stores sell special holders. And yet, attaching them will not be as convenient as in the case of loops.
Hooks are usually placed above a hanging bedside table.
Holder
Towel holders are attached using a similar method - inside the walls and doors of the cabinet. The material of the product can be either wood or metal. If you have experience in fastening this type of structure, you will save significantly financially, and the product itself will be no worse than purchased.
Simpler designs are also suitable for holding kitchen utensils. To do this, take ordinary wire or a metal rod. We attach the thread with two self-tapping screws in the very place where the lids from kitchen utensils will be stored. Now all the necessary kitchen accessories are in plain sight, which will reduce the time spent searching for a particular lid.
To accommodate one lid, 2 to 4 hooks may be sufficient.
Lid holders can also be made using hooks. Attach the hooks with the back side (there should be special Velcro on this side) to the doors or inner wall of the cabinet. In accordance with the radius of the lid, secure the hooks to the desired width. In order to place one lid, 2 to 4 hooks are enough.
Providing your kitchen with more extensive storage can be done with homemade pegboard. You can purchase this kind of product at any hardware store. The main thing is to grab enough hooks. Secure them at an angle to ensure the lids are securely stored.
Stand
Stands made of metal or plastic. Suitable for cutting boards, large pots and pans. It is easy to purchase such stands, as well as to place them on the tabletop itself or inside the cabinet. An ordinary plastic drying rack can serve as a table stand. They are sold at any hardware store.
It is easy to purchase such stands, as well as to place them on the tabletop itself or inside the cabinet.
Hanger
Wall stand. In hardware stores you can see structures that are easily attached to the wall. Their key advantage is their low price, saving space, and the required equipment is at hand. A practical approach is to install the racks on the wall with a horizontal crossbar with hooks. Dishes and accessories will be stored in one place. A good option is also a perforated board. If previously it was in the garage, today it is openly used in kitchens. It costs nothing to attach a stand or hooks to it.
Their key advantage is their low price, saving space and the required utensils are at hand.
Delimiter
A box in a box. Well, to be specific, we are talking about a special compartment in a large cabinet. Naturally, such departments will be provided exclusively for lids and utensils. Visually, it will look like this: pots and pans are located in the center, and lids and other accessories are located on the sides. You can make such compartments yourself or order them in advance from craftsmen before making the kitchen set. Pay special attention to the width of such a compartment (at least 60 cm). Otherwise, the kitchen utensils simply won’t fit.
In the center there are pots and pans, and on the sides there are lids and other accessories.
Hinged structure for doors and walls. Such racks can also be made personally or ordered from professionals. The structure is attached to the inside of the wall or door. The choice of product depends on the size of the furniture and finances. They are divided into three categories: hooks, hangers and drawers. By the way, the latter are easily attached using a screw or special Velcro. The pull-out compartment is made of a mesh shelf that slides out along runners. Of course, this option is much more expensive than hooks and hangers. But it definitely looks nice. Guests will definitely appreciate this approach to storing dishes and lids.
The structure is attached to the inside of the wall or door.
When cooking, it is very convenient to use a special stand. This way you won’t waste time searching for the right kitchen item.
Wall holder
A budget solution for those who are not embarrassed by open storage of kitchen utensils. This product can be hung on a railing or fixed directly on the wall. An alternative option is to place the holder on the inside door of the cabinet or on its side wall. The height depends on the number of covers, and finding a suitable device is not difficult.
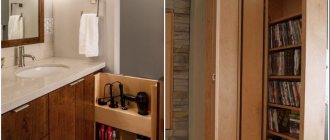
How to Store Pots and Pans Lids Inside a Kitchen Cabinet
Closed storage is practiced by most housewives. Because in this way it is possible to maintain proper order, ensuring the concealment of objects thanks to the cabinet doors. In general, there are several options for storing cookware lids and accessories. The key advantage here is the concealment of objects. To ensure a decent place to store dishes, it is important to consider the size of the cabinet and the amount of money.
The closed type of storage is practiced by most housewives.
If you don't want to spend a lot on additional furniture parts, you can do some things yourself. In this case we are talking about holders that serve as organizing stands.
Compartment in the cabinet drawer
If you are the owner of wide and deep kitchen cabinets, then the question of how to place the lids can be solved without difficulty. A spacious compartment should be provided inside the roll-out box, which will allow you to ergonomically organize its filling. Compartments can be built-in or purchased separately.
Master class: wooden stand
Any detailed diagram of a hot stand will be an excellent assistant in your work. To make a wooden stand, it is best to use hardwood.
- It is necessary to prepare cuts of branches three to six centimeters thick.
- The front side of the stand is sanded with sandpaper.
- Using glue, the cut parts are glued together on a base made of plywood or thick fabric.
- The stand needs to be put under pressure and wait until it is completely dry. This may take about 6-8 hours.
You can take a wooden block and cut out identical squares from it. After this, the pieces of wood are fastened together with glue or dowels.
To prevent the stand from deforming, it must be varnished.
Hanging holder
A clever way to store lids is to string them onto the handles of saucepans and frying pans and hang them on special hooks. It’s convenient that everything is sorted immediately and does not require time to search and select a set. The method is suitable for those who cook a lot and have a whole collection of pots, ladles and other utensils.
Organizers
Factory organizers are designed to be installed on a countertop or inside a drawer. They divide the free space into several compartments, allowing you to conveniently arrange all the dishes.
The problem with organizers is that it is not always possible to choose the right size model. In this case, the space can be filled with several containers made of plastic or metal. In such a separate box you can fold the lids compactly. So that they do not fall and take up unnecessary space in the closet.
Another option for zoning space: non-standard use of lid stands from the mass market.
Usually these structures are collapsible. However, many manufacturers produce models with adjustable sizes. This stand can be transformed into a vertical partition for a drawer. This method is ideal for those who live in a rented apartment. After all, it does not require drilling walls or furniture.
In principle, you can make a partition yourself, for example, from wood or plywood. But in this case you will have to spend more effort and time.
Railings
The simplest solution for large-scale storage of dishes and cutlery on the wall. You can hang everything you need for cooking on the rails: items will always be at hand, and the worktop will remain free. It is worth considering that the surface underneath must be resistant to mechanical stress and easy to clean.
Life hack: small roof rails can be placed on the inside of the facades.
Drawer
One of the convenient ways to store pot lids in the kitchen is a separate drawer, which is often used as a tray for cutlery. When ordering a headset, you can provide several similar compartments.
Ovens are most often installed at some distance from the floor, so a basement drawer can be built under the hob to store kitchen lids.
Idea 3. Organizer for cutlery and kitchen utensils made from cans
Tin cans cost nothing, but they are durable, easy to clean, and their shape is just right for storing all kinds of spatulas, ladle, forks, spoons and other utensils. If you put in a little effort and creativity, you can make a convenient and cute organizer out of them, which, even if it doesn’t fit into the interior of a city kitchen, will definitely fit in at the dacha. You can also use an organizer made with your own hands from cans to store tools, brushes, felt-tip pens and other small items.
Stand for spoons and forks made from cans
To make such a stand for spoons and forks, you will need:
- 4 or 6 clean and dried cans, without lids or burrs;
- Acrylic paint for metal or enamel paint (it will protect the cans from rust);
- Several wood screws and a screwdriver;
- Thick nail and hammer;
- Furniture handle or leather strap with fittings;
- A small wooden plank.
- Paint the jars inside and out and let them dry for one day.
- If necessary, saw the wood to the desired size, sand it, clean it and finally paint it (not necessarily to match the cans).
- Take a nail and a hammer and make a hole for the screw in all the cans.
Tip: To make this process easier and not damage the paint layer, place a small block on the table using a clamp, then wrap the block in felt and only then put a jar on the block (see the picture in the lower left corner in the next photo collage)
- Place the cans against the board and align them the way they will be mounted later. Mark the location of the holes on the board with a pencil.
- Make small holes in the board where the marks were marked, using a hammer and nail.
- Screw a screw into the hole of the first can to attach it to the board. Repeat the procedure with all remaining jars.
- Finally, install a furniture handle or leather strap on the end of the wooden board using the same self-tapping screws. Ready!
Here are a few other deco ideas and modifications to the design of cutlery stands made from cans.
Making a handle for a pot lid
The first thing to do is to drill holes strictly in the center of the covers; this is quite easy to do, since the covers initially have marks on them from the factory.
Further. When everything is ready, insert the bolt inside.
Then we put on the washer and twist the two lids together using a nut, clamping it with pliers.
Now we take the handle and install the protruding part of the bolt into the hole in the cover, but before that we put a washer on the bolt.
Then we put on the washer but on the other side and tighten it with a nut.
Idea 8. Universal knife holder
A knife holder is a very useful kitchen gadget that helps keep your workspace tidy and keeps your knife blades sharp for longer.
Making a knife holder with your own hands is very easy - just pick up a small vase and fill it tightly with bamboo/wooden skewers, colored beans or... colored spaghetti, as in our master class.
To make a knife stand, prepare:
- A container or vase is the height of the blade of your largest knife. The shape of the container can be any, but without any bends;
- Spaghetti, lots and lots of spaghetti;
- Several large ziplock bags (or just large bags that can be tightly tied in a knot);
- Alcohol (for example, vodka);
- Liquid food coloring in the desired color (or several colors if you want to make a multi-color filling);
- Baking trays;
- Aluminum foil or old oilcloth tablecloth;
- Paper towels;
- Kitchen scissors.
- Make sure your container is clean and dry, then fill it tightly with spaghetti. When the container is full, remove the spaghetti and add a couple more bunches of pasta to the pile as a reserve (in case you make up for broken sticks).
- Divide the spaghetti evenly between the bags and pour enough alcohol into the bags to wet all the sticks. Next, add 10-40 drops of food coloring to each bag.
- Seal or tie your bags, then place them in additional bags to avoid leaks. Slowly shake and turn the bags to mix the coloring into the alcohol and pasta. Next, place the bag on one side and leave for 30 minutes, then turn the bag over again and leave it for another half hour. Continue soaking the spaghetti in this manner (no more than 3 hours) until it reaches the desired shade.
- Cover your baking sheet with aluminum foil, then a layer of paper towels (or oilcloth). To protect your hands from staining, it is advisable to wear gloves. Remove the spaghetti from the bags, after draining all the liquid, place them on a baking sheet in a single layer and leave to dry. From time to time, the spaghetti needs to be sorted to dry evenly.
- Once your spaghetti is COMPLETELY dry, start placing it in the container.
- Shake the filled container and smooth out the spaghetti. Insert your knives to determine the optimal filling density, adding pasta or removing excess if necessary.
- Now, using kitchen scissors or other very sharp scissors, trim the spaghetti to the desired length without removing it from the container (it's best to do this over the sink). It is important that the spaghetti does not exceed the height of the container by more than 2-3 cm, otherwise it will break quickly.
We place lids on the shelves of wall-mounted or floor-standing cabinets
Do you need to free up your countertop and increase your work space?
Then transfer ideas for table top lid storage to floor or wall cabinet shelves. Another convenient option is a special wooden box with holes in the bottom. The lids are placed in any order, with special separating cones inserted into the holes. In addition, IKEA and other furniture manufacturers offer a wide range of folding organizers for such utensils.
Idea 10. Storage basket
There can never be too many baskets in the house, because they are so cute and help organize the storage system more rationally. Fortunately, you can make baskets with your own hands from newspaper tubes or just sheets of paper. Moreover, paper baskets can be very strong and practically no different from baskets woven from rattan. Perhaps this is one of the best ideas for crafts for the home and kitchen using scrap materials.
Read how to make such a basket for storing household items with your own hands in our step-by-step master class.
Today we will talk about an express technique for making a paper basket, which can be used to store small items (keys, stationery), yarn, as well as for an unusual presentation of fruits, Easter eggs, bread or pastries for a holiday table or as a gift.
Even a child can weave such baskets quickly and easily
- About 15 sheets of thin A3 paper, cut in half lengthwise (this can be printer paper, a full sheet of newspaper, or even baking paper);
- A container of suitable size with straight sides (for example, a jam jar);
- Glue in stick;
- One skewer;
- Spray paint (optional).
- Starting at one corner, begin to roll the sheet of paper tightly around the skewer to the diagonally opposite corner to create an even and long tube. Once the tube is ready, add a few dabs of glue to the corner of the paper to hold it in place and remove the skewer. Do the same with all the remaining sheets. In this master class, 30 tubes were required to weave 2 baskets.
- If necessary (for example, if you used newspaper sheets) or if desired, paint the tubes with acrylic paint.
- Take an even number of tubes and connect them together as shown in the photo in the upper left corner. In this master class, for a basket the size of a jam jar, 6 tubes were required, for a larger basket - 8 tubes.
- Start braiding: Take one of the outer tubes (which is under the grate) and lay it over the adjacent tube, then pass it under the next tube, then run the tube again over the next tube, etc. Continue weaving by lifting the already entwined tubes vertically (from now on we will call these tubes stands).
- When 2-3 cm remains from the first working tube, increase its length. To do this, apply glue to the new tube and insert it into the remaining “tail”. Continue weaving over and over again, adding paper tubes as needed.
- Once you have weaved a base of the desired diameter (the same size as the container), place the container on it and begin weaving around it, pulling the stand tubes close to the walls.
- Having weaved the basket to the end, remove the jar and carefully wrap the end of the working tube into the weave.
- Tuck the ends of the posts inside the weave and trim if necessary. Next, you can spray paint from a can as in our master class.