The most enjoyable time is communicating with your child. Cognitive games or creative activities develop visual imagination, spatial orientation and hand motor skills. Making a toy with your own hands is very simple and interesting for both adults and children.
What types of crafts are there?
Any materials can be used for the work. Based on the age and gender of the child, you can choose the right product.
Children up to 3-5 years old love to ride in the car, feeling protected from all sides. At the age of 5-7 years, it is interesting to play with crafts, inventing the course of events and various adventures. Older children want to create something bright and unusual for decoration or a gift.
Crafts can be divided into three types:
- Volumetric;
- Flat;
- Edible.
Volume cars
Volumetric designs are suitable for girls and boys of different ages. Cars can be large for riding or small for playing and decorating. They are made from: cardboard box, toy box, toilet paper roll, notebook sheet, stationery cardboard, pasta, beads and other accessories, fabric, foam rubber, plastic bottle, plasticine, matches, wooden blocks, pine cones.
Flat
Most often, flat machines are made in the form of a painting or applique. Very little children work with colored paper, older children can use: cereals, beads, plasticine, leaves of various trees and bushes.
Edible
The most exciting process is to prepare a delicious craft. Children enjoy playing cook and look forward to the results. For such crafts, everything that is in the refrigerator is used, you just need to give free rein to your imagination. A car baked in the oven with banana wheels looks not only beautiful, but also appetizing. A cucumber convertible or a pear bus, to accustom your child to vegetables and fruits.
Crafts from liquid boxes
They can also be used to create useful or unusual crafts. The flight of fancy in this case is not limited to anything.
Toy cars, planes, ships
Crafts made from household waste, such as empty boxes of milk, kefir, and juice, will help build cars, ships, planes, and trains for boys.
Before making toys, wash and dry all boxes. In order to make a car, first prepare 4 wheels:
- They can be made from the lids that were used to close the boxes. Make holes in the center of the lids using a hot knitting needle or other sharp object heated over a fire.
- Measure the width of the box and cut two wooden skewers slightly longer than the width of the box.
- Insert the skewers into the cocktail tubes (these will be the axes), leaving bare the places where the skewers are attached to the lids.
- Secure the ends of the skewers using a glue gun into the holes in the lids. Glue the axles to the box.
- Before installing the wheels, the box can be painted or covered with colored paper, and windows can be cut out. If you cut one of the wide parts off the box, you get a dump truck.
Making a boat is even easier. On one of the sides, cut out a rectangle in the upper part, cut out portholes on the sides, and you can install a flag on the stern or make sails.
Flowerpots and vases for plants
Since drink boxes are made to be waterproof, they can be used to make flower vases. The top of the box is cut to the height of the desired size of the future vase. You can apply putty to the outside of the bag in any order, and after drying, cover the surface with aerosol paints.
You can also insert a glass or plastic vessel inside the vase. You can bring such a craft made from waste to school.
Very interesting flowerpots are made from fabric and alabaster. To do this, a piece of fabric cut to the size of a tetra pack is dipped completely into the alabaster mixture.
Lay the fabric around the perimeter of the box, you can make folds, it will be more interesting.
A texture is applied to the not yet hardened alabaster; it can be an imitation of wood, stone, it all depends on your imagination. The entire surface is primed with PVA glue, then with acrylic varnish. To obtain the texture of wood, you can apply bitumen varnish on top and rub it with a sponge.
Feeder
Making a feeder from an empty juice or milk carton couldn't be easier. Make holes on two or four sides, not reaching the bottom, since food will pour in there:
- The holes can be made in the form of a rectangle or an arch.
- If you do not completely cut out the side part, you will end up with a canopy on top, this will not make it possible to cover the food with snow in the winter.
- In the lower part you can make small through holes for skewers or pencils. Birds will be able to sit on them and peck food.
Creative people can make a feeder in the shape of a house, an owl, or another fancy figure. These crafts made from household waste will help teach children to care about birds.
Money box
At what age each parent decides for themselves to start a piggy bank for their child.
The hole under the lid fits small coins and folded bills. For larger coins, you can make a slot nearby.
It is not so easy to get coins out of such holes, so at the right time you will have to cut off the bottom to get them out.
Convertible from a roll
Quickly and easily, turn a cardboard toilet paper roll into a convertible for a toy man. This craft can be fun to play with or put up as a figurine.
To do this you need: an empty roll, scissors, markers or paints, glue. In the middle part, cut an oval with scissors, leaving a few centimeters short on one side. Bend the resulting part inward, in the shape of a seat. On a white sheet of cardboard, draw five circles, 2-3 centimeters in diameter, these are the wheels and steering wheel, decorate and cut them out.
To make the wheels and steering wheel rotate, you can use toothpicks as a connection; be sure to break off the sharp ends and cover them with plasticine. Before assembly, decorate the frame and glue small parts, for example: headlights, door handles, exhaust pipe. All these little things are pre-cut from plain or colored paper.
Crafts from matchboxes
It would seem – a matchbox is so small, what can come out of it? In fact, this is an excellent material for all kinds of crafts, the creation of which requires very little time and skill. From these cardboard “bricks” you can build, make toys and educational games.
Alphabet
Many people think that the alphabet and the alphabet are one and the same. In fact, there is a difference, the alphabet is drawn letter signs, and the alphabet is letter signs accompanied by illustrations.
The letter itself is difficult for a child to understand; first he must understand how it works. Therefore, the alphabet was invented for preschool children; it is a bridge between the drawn message and the letter designation.
To develop a child’s interest in the alphabet, you can make “houses” for letters from matchboxes: each box should be covered with colored paper, leaving the retractable part uncovered. You can write letters on the top side, or stick on printed letters, cut them out from old magazines, newspapers, or colored alphabet (you can find them in any bookstore).
In each “house” hide a small object whose name begins with the corresponding letter. You can put a pebble in the box with “b”, a cotton pad in the box with “b”, and leave the box with “y” empty.
When the child learns the letters, you can additionally make a set of “houses” and make words from them. It is very good to make such crafts from waste for kindergarten.
Educational games
By analogy with the alphabet, you can make a game that teaches counting. Just stick numbers instead of letters, and put the appropriate number of small items inside the box: buttons, peas, matches.
To understand the animal world, you can use an image of the animal’s habitat in the same way, and put an image of the animal or its miniature in the box:
Toy houses and furniture
Even a preschooler can handle building a house from match bricks:
- To do this, you can take 10-12 boxes (depending on the number of floors) and cover the fixed part with colored paper.
- Glue the resulting boxes in pairs so that on one side the inner box opens to the side.
- Then these glued pairs are connected in height using glue. The result will be a multi-storey building.
- On each “brick” draw a window, and on the lowest floor - the front door and the gate to the garage. On each floor, the inner part slides out to the left and right, in which you can draw different interiors (kitchen, bedroom, hallway). On the lower floor, a car is “moving out” of the garage.
Now the stores are full of toys on any theme, including a variety of doll furniture. But the one he makes himself will be his favorite. Children as young as 3 years old can handle “making” furniture.
Show your child how you can make a bed out of five boxes. To do this, glue three boxes together using double-sided or masking tape.
Only 3 parts are needed for the simplest table. Between two boxes laid vertically, one piece is attached horizontally at the top. Depending on the desired size, the number of boxes increases both in height and width.
By gluing together several rows of boxes it is easy to make a chest of drawers.
To fill the living room with furniture, you can make a chair, a bedside table, a TV, for the bathroom - a washing machine, for the kitchen - a table, chairs, a stove, a wardrobe.
Organizer
There are always a lot of little things in the house that are difficult to find at the right time. An organizer will help you cope with this mess.
Of course, you can buy it in a store, but if you like to turn waste into useful things, then creating an organizer for small “lost items” from matchboxes is the best option. It's quite simple to do:
- Remove the moving parts from the required even number of boxes (they will be needed later) and glue them together using a glue gun. Glue the boxes neatly one on top of the other, then attach as many vertical rows as wide as you need.
- To prevent the boxes from slipping through, the back of the structure is covered with cardboard. This way you can make the organizer two or four sided. If you plan to keep the organizer in a visible place, then you can decorate it.
A student can make such an organizer as a gift for mom for small jewelry or for dad to store nuts, screws and other small items.
Application made of cereals and colored paper
This picture will decorate any room, not just a children's room. Making a car out of paper and cereals will appeal to children of any age.
For this we need: a rectangle made of cardboard, any color will do. Colored paper or typewriter printed. Silicate or PVA glue, brush and various cereals.
We begin work by forming a machine out of paper. After drawing the body, wheels, steering wheel, bumper and other additional parts on colored paper, cut them out and glue them to the base. Gradually applying glue to the right places, we fill it generously with grains, for example: wheels with buckwheat, glass with semolina, body with peas or lentils, be guided by the main color of each part.
The background can be decorated with multi-colored pasta. Leave it in a horizontal position for several hours to allow the glue to dry. One hour later and the craft is ready.
Crafts from disposable tableware
One of the advantages of disposable tableware is that it can be recycled after use. Disposable tableware seems to be created in order to create with it. It can be used not only for children's crafts, but also for adult creativity.
Decor elements
From disposable tableware you can create budget-friendly, unusual decor for interior design, cottages, and gardens.
A very beautiful decor for decorating a kitchen or dining room can be made from disposable plastic spoons:
- On cardboard you need to cut a circle of the desired diameter, draw a circle in the center to create a flower
- Glue the spoons with a glue gun in a circle so that its edges go around the inner circle from the outside. Do the same with the second row, gluing the spoons in a checkerboard pattern.
- To create a flower in the middle of the panel you will need spoons with the handles cut off. Glue the resulting “petals” from the concave parts, forming a lily flower. All that remains is to paint the composition with spray paint to match the color of the interior, and glue a loop to the back to hang the panel.
Using the same principle, you can make a frame for a round mirror in the hallway or bathroom, or a clock. Attach a mirror to the middle of a circle cut out of plywood, and glue spoons without handles to the edges.
To prevent dust from collecting inside the spoons, it is better to glue their insides to the plywood. It will look beautiful if you make 5-6 rows of “petals”.
Photo frames, flowers from spoons, vases, lamps, lampshades, garden decorations - just a small list of what can be made from disposable tableware.
Fan
You can make a beautiful accessory - a fan from disposable forks, a CD, lace, ribbons. You will need approximately a pack of 25 forks:
- Cut the CD in half (it cuts well with scissors).
- If you don't have a disk, you can use cardboard, draw a circle and cut it in half.
- Draw a rounded line approximately in the middle (at least 2 cm away from the edge), along which you need to glue the fork handles tightly using a glue gun.
- Glue the second half of the disk or cardboard on top. You can decorate the semicircle with velvet or any other fabric.
Ribbons, lace, beads, and flowers are used to decorate the fan. In the upper part, thread a ribbon or lace through the teeth of the forks, securing them along the edges with glue so that 2 teeth are visible on the outside. If desired, before starting to assemble the fan, the forks can be painted with acrylic paints.
The destructive impact of humans on our planet cannot be underestimated. Children need to be taught from an early age to think about preserving the environment. This can be done in a playful way, developing creative abilities and instilling a love of work.
There is no need to spend money to make crafts from waste, because everything you need is in the house.
By making crafts, you can spend interesting time with your child, and the crafts themselves can become useful in play and everyday life.
Various options
Pet crafts made from plasticine deserve special attention. For younger children, modeling will be not only an entertaining, but also an educational activity, genuinely interesting, from which it will be simply impossible to escape.
Plasticine is an extraordinary tool; it softens, kneads, is divided into parts, and easily takes on the desired shape. With its help you can make incredibly beautiful figures; show your child the language and the world of modeling will captivate him.
DIY flower bouquet
A decorative craft bouquet of flowers with your own hands will decorate any vase and refresh the interior. Such bouquets are not only pleasant to contemplate, but also a pleasure to make. They are much more durable than fresh flowers, and if they are made carefully and with love, they will delight you and your household for a long time.
Bouquets are formed from separately created volumetric flowers. Lush peonies are especially popular. They are very simple to make and look like real flowers. The only thing where there can be complications is in the process of assembling the petals and placing them on a long stem from a skewer.
If you follow the tips and recommendations that accompany the craft, you can quickly master this wisdom.
Now there is no problem to capture as a memory what is especially dear to you. After making flowers or a bouquet of flowers from paper or other material, do not be lazy to take a photo of the flowers.
Perhaps in the future, this photo will open a whole gallery of your crafts. It will be pleasant to remember the beginning of creativity, and it will also be entertaining to demonstrate to your family how a fascinating hobby began.
Observe the nuances
- Start with dark areas, this will add volume to the final drawing and allow you to apply paint in several layers.
- The next layers of wool are painted lighter, then it will turn out lush and elegant.
- Shadow elements always have more layers of application than light ones. Each new layer of paint must dry before the next application, otherwise the paint will bleed.
- Remember, animal fur grows in different directions, draw correctly.
- At the last stage, antennae and highlights are drawn - everything that makes the work realistic.
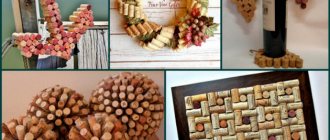
From wine corks
Wine corks are often simply placed in a transparent glass container and placed on the dining table, used as a decorative element.
At the same time, the container itself should be like a bottle, tall and deep. It will look quite nice when it's filled.
From the wine caps themselves you can make coasters for hot dishes. To do this you will need a thin wooden base and glue. Glue is applied to the wooden base and wine caps of equal length are glued on. For convenience, they can be cut in half.
After the glue has dried, the surface of the covers must be sanded with fine sandpaper. If desired, they can be coated with paint and varnish.
We make VAZ 2101
This domestic car was designed to help disabled people. When creating the drawings, the engineers wanted to introduce a separate seat for the stroller. After its release, the car spread throughout the world. Everyone dreamed of a penny. Over the entire period of production, more than 5 million copies rolled off the assembly line, some of which today can be found even in Europe.
Making a car with your own hands is done on the basis of a diagram that can be found on the Internet. This is the simplest option that can be made using a minimum amount of material and time. Brief instructions:
- the template is printed on a color or regular printer;
- cut along the contour;
- then bends are made;
- The sides are carefully glued together using PVA.
The piece takes several hours to dry. The craft can then be used as a competition entry.
Pistachio shell painting
Few people suspect that even a painting can be created from a shell.
For production you will need:
- pistachio shells;
- glue;
- paints.
First, you need to make flowers from the shells. To do this, lubricate the bottom of the shells with glue. The buds need to be made larger each time. Color the finished flowers. You can use spray or acrylic paint. When using acrylic-based paint, it should be diluted with water in any container.
Make patterns from painted flowers. Use a glue gun to secure the flowers.
Craft - fire truck
The scheme is similar to the previous version. Only here a different color palette is used: red, white and black. Brief instructions:
- Carefully form the base in the form of a cabin and a part with water. It is better to make the second part more elongated;
- Next, neat sausages are molded from which hoses and ladders will be made.
In this case, the size of the car allows the use of 3D technology. If you make a product from polymer clay, then the fire truck craft can be used during games.
Material and tools
Usually all the components are already at home. You just need to find the desired color of cardboard or paper, scissors and PVA glue. If parents know how to draw, then having a printer is not necessary. What can additionally help in creating crafts for the competition:
- A printer saves a lot of time. The diagram can be printed in advance on an A4 sheet and transferred to cardboard. Photos of the car’s crafts are in the public domain.
- Markers or paints.
To attach parts, it is better to use double-sided tape and PVA glue. It is advisable to use scissors with a rounded blade.
Cardboard vehicle fleet
A car made from cardboard is more durable, it can be played many times, and even the choice of manufacturing techniques is great.
- How to sew a decorative mini bag with your own hands
- Crafts from cotton pads - beautiful ideas and tips on how to make decorations and toys with your own hands (70 photos)
- DIY New Year's crafts: 70 photo ideas and a master class on making crafts for the holiday
Techniques for making models from cardboard
- By bending cardboard according to the diagram
- By gluing a large number of parts to obtain volume (for example, to make one wheel, you will need 4 round blanks that need to be glued together)
- By cutting out complex shapes and attaching without glue.
Find blank diagrams online or come up with them yourself, selecting part by part. Cut out the pieces using a utility knife.
Glue several almost identical parts into one. This will give you a streamlined model of the truck body/cab/tractor compartment and wheels.
Use a glue gun with silicone adhesive to securely attach the parts. Decorate the work with stickers or color it with felt-tip pens.
Working with this technique, you can make a whole fleet of cardboard cars.
- Crafts for Mother's Day - how to make simple and beautiful original decorations and toys with your own hands (130 photos + video)
- Craft flag - how to make it with your own hands correctly? Master class on making for holidays and parades (105 photos)
- Eyes for crafts: how to make templates and a master class on making eyes from various materials (100 photos)
Don’t forget to make a parking lot, garage or obstacle course from the same cardboard, because cardboard can be used to make not only cars, but also road signs, houses, bridges and much more.
You never know what your soul will respond to.
Do-it-yourself animal crafts are a great way to awaken in yourself, perhaps even hitherto unknown feelings. The only way to understand the world is through our emotions.
The talent for creativity allows you to embody any ideas, patience and accuracy obliges you to bring your idea to the ideal.
Let them be scary, disgusting, cute, kind, beautiful, incomprehensible little animals; obvious badasses, sad and happy, wild and domestic, the flight of fantasy has no limits - this is the art of expressing the inner world in external manifestation.The portal offers even more ideas: https://hobbi.guru/
You can start with simple things, and over time, developing your skills, move to a more complex level and create a masterpiece.
Flowers from napkins
Flowers made from napkins are a great idea to beautifully decorate a festive table, the indispensable attribute of which is napkins.
Nowadays there are napkins of all kinds of colors on sale, so there will be no problem in ensuring that the flowers have maximum similarity with their living counterparts.
Roses and tulips look great on red napkins. White napkins are suitable for almost all types of flowers.
Paper napkins are delicate and hold their shape well.
Note!
- Crafting tulips from paper - TOP-100 photos of interesting ideas for creating tulips from paper + simple instructions for beginners
- Mimosa craft: TOP-160 photos of simple and complex crafts. Master class for children and adults on making mimosa with your own hands
- DIY napkin flowers - a detailed master class with simple diagrams. Non-standard solutions for creating flowers + photos of finished crafts
And how great flowers look from viscose napkins.
You just need to show a little imagination, and you will amaze the guests who come to your celebration with the grace of lotus flowers made from paper napkins. Such an addition to the main course plates will amaze those gathered and increase your rating as housewives.
Bottle car
Who said that a car can't float? It is quite possible that the bottle car craft will go sailing with the child.
You will need a lot of empty plastic bottles and tape.
The first step will be to construct 3 parts, such as a raft of different sizes. We connect three rafts, placing them one by one from largest to smallest using tape.
Other parts can be cut from polystyrene foam (it is also not afraid of water). You can decorate using improvised means.
This machine is not a rescue tool, so it must be under adult supervision when in the water.