Any type of creative activity develops a child’s imagination, perception of colors, textures and shapes, and contributes to the formation of spatial and imaginative thinking in general. Thanks to working with applications, kids learn diligence, patience and perseverance. Applique is the simplest and most accessible form of creativity for a child, because children from the age of 2 can glue cut-out figures onto cardboard.
Three-dimensional paintings
There is nothing complicated in making such a painting in the style of romanticism, as in the photo of three-dimensional paper crafts. To make the figures symmetrical, the sheet must be folded in half each time and 1/2 of the parts cut out. You can achieve an accurate fold when working with thick paper if you first work out its line with a sharp object (make a thin groove).
For greater effect, it is recommended to alternate open and closed hearts. It is appropriate to add a few elements of a different color and write a suitable romantic statement from a famous person.
Funny turtles
To make this craft:
- draw a turtle figurine on a sheet of colored paper and cut it out;
- cut thin strips of corrugated paper of different colors, and then form a shell from them on the back;
- Use a felt-tip pen or black marker to add small details: eyes, mouth, paws and tail.
Funny turtles can be presented to loved ones as a gift. Turtles of different colors look very positive.
Application in the style of abstractionism
A diagram of how to make a three-dimensional paper craft in the style of abstract art includes:
- coating the plywood base with white acrylic paint;
- preparing pieces of tracing paper of different shades;
- Layer-by-layer application of prepared elements onto plywood with gluing of each layer.
If you lay out the tracing paper overlapping, you will get a beautiful effect of overlapping colors.
Butterfly
The principle of making a butterfly is almost the same as a pig:
- make a cone;
- a head and antennae are cut out of paper of the same color and attached to a cone;
- wings are made from paper of a different color;
- draw or cut out eyes and mouth from paper.
You can make a bee or wasp in a similar way.
Painting from waste paper
To create this accessory, you can use old wallpaper, unnecessary geographical maps, newspapers yellowed by time, etc. Paper covers from vinyl records will also work.
In general, all the pulp and paper products that you were sorry to throw away can acquire a new life, being framed in an original frame.
Handy materials for crafts
Every home has some unnecessary craft supplies. You don't have to buy them at all. You probably buy something in stores.
Most things have packaging. You shouldn't throw it away. Better save it for crafts. Here is a list of what may be useful:
- Boxes for household appliances, shoes, cakes;
- Sleeves for rolled napkins and toilet paper;
- Paper cups for drinks, coffee and ice cream;
- Chocolate foil;
- Caps from plastic bottles;
- Packaging for gifts and bouquets.
Of course, this doesn't mean you can't throw anything away. Still, you shouldn't clutter your house. Do not leave dirty, torn or thin boxes.
Wicker panel
By combining two drawings, you can also get a three-dimensional paper craft with your own hands. You need to select two pictures of the same size, but with a contrasting image. These can be photographs, greeting cards, printouts from a computer.
The selected material must be cut into equal strips and intertwined, periodically fixing with glue. The finished panel should be inserted into a baguette.
DIY 3D paper painting
This example is a simple one. It suggests making a cute picture with your own hands, which will be a nice gift for Valentine's Day. It is a sheet of paper decorated with cut out voluminous hearts that look like butterflies wanting to flutter in a split second.
You can place many hearts on one A3 sheet; their size is chosen by the author of the craft. To cut out even hearts, you need to fold a sheet of colored red paper in half. Draw halves of hearts along the fold. Cut, unfold and get a full-fledged heart.
There is no need to smooth out the cut pieces. They shouldn't be flat. Glue the hearts onto a sheet of paper, mixing them. Let one be closed, the other unfolded. In principle, you can choose any color or even replace the shapes with stars, flowers, etc.
Fan
A beautiful three-dimensional paper craft is a fan. Necessary materials:
- colored paper;
- glue;
- knife;
- ribbons and beads
Procedure:
- Fold the paper into an accordion shape.
- Fix one end of the fan.
- Decorate the product according to your own wishes.
Photos of such crafts can be easily found on websites dedicated to paper crafts. Don’t forget that you need to adapt the finished work to suit yourself, and not try to repeat it completely. For decoration, you can use not only prepared decorations, but also painting with markers.
Application "Ladybug"
With your baby you can make a simple and at the same time beautiful applique. If you have no ideas, then you can watch step-by-step master classes with photos or videos. We will take as an example an applique with a ladybug.
For the craft you need:
- Colored paper
- Scissors
- White list
- Glue
- Marker black
Manufacturing:
Cut out three identical circles of arbitrary size from red paper and fold each circle in half. Then cut out a semicircle from black paper that is smaller than the red circles. This is the head of our ladybug. Also cut two thin strips of black paper. These will be the antennae for the future ladybug.
Now glue the head on a white sheet in a random place. Glue the mustache to the head and draw round tips on the mustache with a marker. You need to glue the red circles to the head with one half. And between the second protruding semicircles, glue the third semicircle with the folded side. You will get a voluminous body.
Draw black circles on the body with a marker. You can draw grass and a flower under the cow. The application is ready. This wonderful craft can be done with children in kindergarten. This perfectly develops hand motor skills and creative thinking of children.
Paper modeling for children
There are many benefits to children making paper crafts. Such creativity develops imagination, fine motor skills, thinking, perseverance and attentiveness. Three-year-olds can make something out of paper. You should start with applications.
Applications for 4th grade
At the last stage of primary education, children finally develop the skills necessary for creativity. All that remains is to focus on further developing skills in working with materials and revealing the abilities of each student.
Classes must be conducted with the aim of maximizing creative potential, so that each student creates a completely unique and extraordinary work.
At this stage, applique classes should be partially transferred to home in the form of homework. Parents can help their child in the creative process by bringing in their ideas and showing other techniques for creating an image.
Plus, working on an applique together is a great way to spend time together!
Regular applique practice can significantly enrich your imagination and even develop accuracy. This is a rather painstaking process, and, moreover, when the work is finished, it is necessary to clean the workplace.
Creative development when practicing applique in childhood helps people of all kinds of professions in adulthood, for example, designers, architects, engineers and constructors, since this type of creativity develops creative thinking.
Stripes
The essence of another type of volumetric modeling is gluing together multi-colored paper strips. This technology is used to create applications, panels, and to decorate works made by other methods. Here are the instructions:
- Form loops from the strips by gluing the ends of the blanks.
- Use them to designate flower petals, peacock or swan feathers.
If you glue strips in the form of a three-dimensional hemisphere to cardboard, you can create a turtle, a balloon, an apple, or an entire underwater world.
By gluing many strips crosswise in the middle and lifting the free ends with a thread inserted into the holes made in them, you can get a pear.
Note!
- DIY paper crafts: TOP-200 photos of exclusive ideas and craft options
- DIY paper origami craft step by step: ready-made diagrams for creating beautiful origami at home (90 photo ideas)
Crafts from paper and glue for children: step-by-step instructions for creating interesting crafts with your own hands (90 photo ideas)
Christmas balls woven from paper ribbons look attractive.
Application for 2nd grade
Having become one year older, the children feel an even greater need to understand the world around them and creative self-realization. Applique lessons need to be made more challenging.
For example, by adding even more creative materials and increasing the choice of topics. After studying for a whole year at school, children begin to realize that with effort, it is possible to achieve something: both a good grade and praise from the teacher.
During this period, it is worth paying attention to technology and practical skills. Children should remember key points, if necessary, take notes on the course of actions and practice them.
Cones and cylinders
Compact three-dimensional figurines of animals and people based on a cone and cylinder can play the role of toys for a puppet show. Such products are easy to create.
For a cone, it is better to use a template the size of a third of the whole circle. A muzzle or face is depicted on a piece of colored paper. Wings, tails, ears, legs or arms are attached to the finished cone. Dolls are created from cylinders in the same way.
Planets
Earth, Mars, Jupiter and others can be made from foam balls, which are sold in a craft store. Acrylic paints and gouache work well on them.
The rings of Saturn will turn out to be like a CD if you cut a hole inside it, the diameter of which is equal to the diameter of the ball. You can fix it with a glue gun.
When working with polystyrene foam, do not use substances containing solvents, otherwise it will melt.
Balls can be made from threads.
You will need:
- threads of different colors;
- PVA glue;
- water;
- Balloons.
Progress:
- Dilute water and glue in a ratio of 1*1.
- Place the threads in the solution for half an hour.
- Blow up the balloons.
- Wrap them with glue-soaked threads.
- Hang the balls to dry. This may take several hours.
- Pierce the balls and remove from the workpiece.
Planet balls can be used not only in combination with other elements, but they themselves can become the center of the composition.
You can make a “Space Mobile” from them:
- cut out the ring that will become the base;
- paint with silver paint or wrap in foil;
- Attach balls-planets and stars to the ring with threads.
It will be a wonderful addition to the interior of a children's room.
Quilling
The beauty of voluminous paper products created using the quilling technique is undeniable. This craft is a composition of twisted ribbons of colored paper. The strips are prepared in advance, rolled into peculiar curls and given the shape of petals, droplets, and hearts.
Typically, this papercrafting method is used to embody scenes on a natural theme. For example, you can make flowers and, using them on a cardboard base, create a flower meadow, complementing the picture with the sun and clouds.
Autumn tree
To make a tree you will need several sheets of paper of different colors and cardboard. First, cut out and glue a brown tree trunk onto a sheet of cardboard. And bright autumn leaves are made from multi-colored paper squares folded into a fan.
It turns out very beautiful. This applique can be used to decorate a wall in a children's room.
Note!
DIY paper crafts: TOP-200 photos of exclusive ideas and craft options
- DIY paper origami craft step by step: ready-made diagrams for creating beautiful origami at home (90 photo ideas)
- Crafts from paper and glue for children: step-by-step instructions for creating interesting crafts with your own hands (90 photo ideas)
Costume elements
Children's matinees and role-playing games, which are fashionable today, contribute to the development of the art of creating paper crafts. Various types of paper and cardboard are used. Using a headdress, you can make a real fairy-tale hero out of your child. For you need:
- Make a base from wide Whatman paper.
- Wrap the blank around the baby's head. Please note that the accessory should not cause discomfort to the child.
- Sew the ends together with thread or glue them together.
- Decorate the “hat” to your liking. You can use artificial hair yarn to make a figured crown, animal ears, a snowflake or a mustache.
Materials and methods of their use
Paper is one of the most affordable materials and, in addition, it is presented in stores in a wide variety: colored, velvet, thick, thin, corrugated, etc.
Paper can be used in different ways in creativity - painted, cut, twisted, glued, there are many options.
Accordions
Volumetric paper crafts for children with accordion-type details look quite interesting. At the same time, they are incredibly easy to make.
Creating three-dimensional paper products is very exciting and accessible to people of all ages. In addition, such activities have a beneficial effect on a person’s psychological and emotional state. If you are short on imagination, then ideas and templates for three-dimensional paper crafts can be easily found on the Internet.
Application for 1st grade
For children who have just come to school from kindergarten, it is necessary to organize exciting and interesting activities.
The main goal is to attract children to creativity as much as possible, to capture their attention and accustom them to active mental activity, initiative, flexibility and the desire for creative discoveries.
If children are interested in these activities at an early stage, then interest and involvement will grow in the future.
The most optimal method of conducting a lesson is a lesson in the form of a game with the addition of educational moments.
For example, when studying the topic “animals” or “plants” in the subject “Man and the World”, in a creative lesson you can be given the task of creating an image of an animal of your choice, while giving an additional task of memorizing some information on the topic.
Then it is worth organizing a presentation of the work, where each of the children will present the image they created with their own hands in public, accompanied by a short story.
Children 6-7 years old love fairy-tale and cartoon characters, because they actively watch cartoons, and their parents often tell them fairy tales. It is worth taking this feature into account and organizing classes on relevant topics.
Photos of volumetric paper crafts
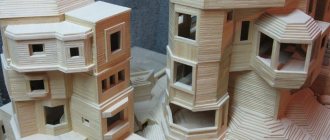
Cardboard house
This is how you can make a great doll house out of cardboard. Let's take a step-by-step look at how to make such crafts from cardboard with your own hands.
You will need a large cardboard box, separate sheets of thick cardboard, colored paper or wallpaper, gouache, brushes and, of course, glue with scissors.
If the box is deep, cut it in half crosswise. If space allows, make 2 floors. The house will be in a vertical section. Glue the partitions. Cover the walls inside the rooms with colored paper or wallpaper, or paint them.
Make furniture from the same cardboard and glue it to the house. Build a roof from the second part of the box and decorate it. Here the house is ready.
Bookmarks
Unusual bookmarks for book pages can be made from scrapbooking paper.
The manufacturing technique is simple; you don’t need anything else except paper. The rectangular leaf is folded in half, you should get a strip 2-3 cm wide. The resulting strip is folded across (also in half). Along the resulting line, the two ends of the strip are bent at an angle. The result should be a blank that resembles an inverted house. The four corners are bent so that the craft looks like a heart. The resulting pocket will hold a book page. A heart bookmark is a convenient and beautiful solution for little readers.
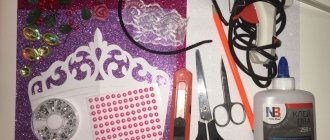
Decorating the room
Fairy lights
Quite a few simple and beautiful options for garlands can be created by following the same algorithm. For this craft you will need a strong rope (cotton yarn, thin twine), colored double-sided paper, a template, a pencil, and glue. Place the template on colored paper, trace, and cut out. Templates can be anything: from butterflies and flowers, to snowmen and Christmas trees.
Children from the middle preschool group, or younger preschoolers under the guidance of adults, can handle this work. Fold the resulting figures in pairs, lay a rope between them, and glue them together. Young children can decorate the figures with additional details from self-adhesive paper: colored spots can be glued to butterflies, and New Year's balls can be glued to Christmas trees. Children love to decorate the garland pieces in random order, and adults love the end result.
Chain
The chain garland, familiar to everyone from childhood, is very simple to make, but looks voluminous and beautiful. Even the smallest children can make it with their own hands. In order to make a garland, you need to cut strips 1.5-2 cm wide from double-sided scrapbooking paper.
Then cut the “links” - divide the strips into fragments of the same length. Glue the ring from the first fragment. Thread the second fragment inside the ring and seal it - you get a second link connected to the first. Glue all the segments in this way, threading each subsequent one into the previous one. The garland is ready.
Harmonic
Cut colored paper of two shades into an even number of strips. Connect single-color strips together so that you get two long stripes. Glue the beginning of these multi-colored strips at right angles to each other. Then alternately bend one or the other strip to the middle at a right angle until they run out. Secure the edge in the same way as the initial edge.
Sockets
Another effective and interesting way to decorate a room is decorating with paper rosettes. Even a toddler can handle folding paper into an accordion, but an older child can be trusted with scissors and the entire job. In order to make a socket, you will need:
- thick colored paper, preferably double-sided;
- scissors;
- glue or thin double-sided tape.
First you need to take a square sheet of paper (or cut a regular sheet to a square) and fold it into an accordion. Next, fold the accordion in half to make a fan. At this stage, you can form an openwork edge by cutting the ends into a semicircle, a triangle, or as your imagination desires.
Make 3 more of these blanks, then glue them together one by one. Also glue the edges of the first and last fan together, closing the circle. If desired, decorate the center of the craft with a circle of designer paper, a sticker, or a colored bead. The socket is ready!
You can make flowers from rosettes of different sizes and place them beautifully on the wall. And half rosettes will make an excellent garland if you glue them one after another, alternating wide and narrow sides.
Fruits made from paper rosettes will also look original. For the craft, you need to cut out strips of paper, 4.5 cm wide and 18 (2 pcs.), 23 (4 pcs.), 28 (4 pcs.) centimeters long. Fold the strips into accordions and glue the pairs together. Form circles from the glued strips and glue them into rosettes.
There should be 5 pieces. Place the smallest socket on top of the others, the largest in the middle. Glue them together and decorate the top with a leaf of green paper. If necessary, you can attach a rope to the top of the fruit, with which it will be attached to the wall or garland.