Larisa Kudryavtseva
Paper
- the most accessible material for creative activities with
children
.
When making paper crafts with your own hands
, the child learns to work with scissors, develops fine motor skills, accuracy, and patience.
I offer you a master class on making woven rugs from paper strips
. Of course, I won’t reveal anything new to you, but still. But what if.
For this it is necessary.
Since our rug
when finished it will look like a painting, you need to select cardboard
(the basis of the painting)
and the basis of
the rug
so that they are combined. On the back of the cardboard we outline the selected template. Let's cut it out.
Folding the base of the rug
in half and for the child’s convenience, we draw lines along which he will later make cuts.
Marking lines on the base of the mat
can be done straight or oblique, as this will play a role in the finished craft.
Cutting the base of the rug
and cut the second part
of the rug
.
We weave our rug
.
We take the base of the picture, coat it on the back side with glue along the perimeter of the cut-out area and glue the finished rug
.
The rug
can be placed in different directions.
So that the reverse side of our painting is not visible, we will cover it with a landscape sheet. If you suddenly want to give it to someone, you can make an inscription.
We complement our work with small details.
This is what we got.
Publications on the topic:
“Maslenitsa has come to us!” Master class on making paper crafts with children of middle and senior preschool age Came to us.
“Ask me about the meaning of life, I may not answer you right away. I won’t look for a catchphrase And talk about everyday life. Each of us has.
Description: this master class is intended for children aged 4-5 years, additional education teachers, educators, and parents. Purpose:
The simplest woven rug will turn into an object worthy of admiration in the hands of a child. To make a woven rug from paper, it is enough.
Master class for college students “Manual labor in kindergarten. Paper crafts" GOAL: student mastering the organization of manual labor in professional activities and corresponding professional competencies.
Master class for young teachers. MKDOU "Kindergarten "Altn Bulg" Tsagan Aman village, Yustinsky district. Republic of Kalmykia. Educator: Vankaeva.
Young children do not realize the importance of some of the crafts they make with the help of a teacher in primary school or kindergarten. Each application or toy that the baby makes develops certain abilities and skills in the child. For preschool children
this is cutting out figures and gluing them on paper, light drawings with colored pencils, creating three-dimensional figures (for example, a ladybug), rolling colored balls; for children of primary school age - rolling tubes to create a house with your own hands, the simplest elements of the quilling technique, working with self-adhesive paper, cutting out shapes and much more.
In kindergarten and primary school, children are required to make crafts, for example, paper weaving. Paper weaving for beginners
is not difficult. This technique is not complicated, but it develops finger motor skills and attentiveness of the child. The technique involves weaving different colors of paper together.
Such a craft
– a fun and interesting pastime with parents or class teacher. A primary school teacher knows that it is necessary to devote at least one class hour to weaving a paper mat - usually this technique arouses delight and great interest in children, and they make such a colorful paper mat more than once, following the step-by-step diagram.
Original paper crafts can be created not only using the origami technique - for example, if you use twill weave, you will get a nice paper braid, or a mat, or an entire carpet. The step-by-step manufacturing technology is not so complicated, but it will require care and perseverance, especially when making large items. To see if you can handle a big job, you can weave a small sample. Instructions for making a rug are presented in our article. And in the gallery there is a presentation of finished works.
To make a bright rug
, you need to stock up on paper and some office supplies:
Children learning weaving techniques must know how to use a ruler . Paper size
can be changed depending on the desired size of the craft.
How to make a rug from colored paper: master class
Paper strips are sold in craft stores (mainly for the quilling technique), but you can weave them yourself. Even a beginner can cope with such a craft. To make a rug, you need to follow a step-by-step master class:
Making a rug from paper strips
It is very important to respond to the child’s requests for help, especially at the moment of interweaving strips and parts of the base of the craft. It is important to take breaks while working and monitor the weaving that the child does. You should approach each child and work with him individually, answering his questions regarding the craft. From such a linen rug you can make a wallet, bookmark and much more.
Exotic crochet Japanese rugs
Although Japanese rugs with their unique pattern look complex, the technique for making them is simple: hollow rings are knitted, which are then connected to each other. The lightest model consists of four rings filled with a fabric of double crochets. Another version of the Japanese rug: we make a knitted ring, a chain of hollow rings connected by a standard weave is sewn to it. A Japanese rug will add ethnic motifs to the interior. The carpet configuration can be changed.
It is difficult to imagine all the variety of knitted rugs. Give free rein to your creative imagination - crochet a rug yourself exactly the way you want it, best suited to the design of your home. An exclusive decorative interior element will bring comfort, coziness and warmth to your home. Don't be afraid that what you knit will look old-fashioned.
However, try to avoid excessive variegation and the melange effect, and maintain clear boundaries between the colors of the yarn used. Apply a smooth transition from one color to another. This will give a good effect. Get inspired and start implementing your “knitted masterpiece”.
Gallery: wicker rug and decorative paper cage (25 photos)
How to make a cage from newspaper tubes with your own hands: master class
For middle school children and adults who like the technique of paper weaving, a more complex craft is suitable - weaving a decorative cage from newspaper tubes. To weave such a decorative element, you must have the following accessories.
KSU "Comprehensive school No. 12 of Shakhtinsk"
Teacher of technology and fine arts, 1st category Sultangareeva L.M.
Technology, 5th grade GES 2012, Materials Science
Lesson No.
10 Date: ________ Duration: 1 hour
Section: Introduction to fabrics.
Fabric processing technology. Topic: Making a plain weave layout
(
practice
)
Target:
create conditions for the formation of students’ knowledge about the basics of textile materials science;
Tasks:
to promote the formation of knowledge about the structure of fabric - the weave of threads, as well as the consolidation of knowledge about textile fibers and their classification; properties of natural fibers of plant origin;
promote the formation of practical skills in executing a plain weave layout;
promote the development of students’ attention, ability to analyze and systematize information; as well as developing work culture skills;
to promote interest in the educational subject, a culture of behavior (work ethics standards) in the educational workshop.
Lesson type
: combined - a lesson in repeating the material covered, acquiring new knowledge, gaining practical skills and consolidating the studied material in practical work.
Visual aids and equipment:
– Visual aids
: educational collections “Textile fibers”, “Cotton”, “Linen”, samples of cotton and linen fabrics (with edges);
Loom model
; fabric creation layout;
Samples of weaving;
Books on the topic: “Materials Science”: “How a Shirt Grew in a Field”;
Instruction cards “Performing a plain weave layout”;
Computer;
Slide presentation (Power Point presentation) “Weaving”.
Pattern of plain weave and thread weave.
Topic content
:
Professions of spinner and weaver.
The process of creating fabric;
Key terms: “materials science”, “fabric”, “textile fibers”, “natural fibers of plant origin”; “warp and weft threads”; “front, back side of fabric”;
Warp and weft thread directions;
- plain weave fabric.
PROGRESS OF THE CLASS.
- Organizing time.
a) greeting;
b) identification of absent students;
c) organizing students’ attention; checking readiness for class.
Pay attention to the board on which the “Exhibition of Fabrics” is located.
- Introductory part of the lesson.
- Report the topic of the lesson. Setting educational goals for the lesson.
We continue to study a new very important section of the program. What is it called?
- Repetition. Updating students' knowledge. Conversation.
What material is used to make garments?
Summarizing. Analysis of students' knowledge level.
III
. Main part of the lesson
- Induction training
Teacher's story “ Materials Science. Weaving threads"
(using educational tables and Power Point slide presentation materials).
Fabric is formed as a result of the interweaving of threads: - warp threads (lobar)
- and
weft
(
transverse
).
This is the position of the threads in the fabric. The warp threads are strong, long, thin, and do not change their length when stretched. The weft threads are less strong, thicker, and shorter. When stretched, they increase their length. The edge
runs along the edges along the fabric and protects the fabric from fraying.
The width of the fabric is the distance from edge to edge. The simplest weave of threads is plain
, in which the threads are intertwined through one another.
It is used to produce cotton and linen fabrics.
- Preparation for practical work.
a) work with educational material (instruction cards “Making a plain weave layout”)
b) consolidation of work stages;
c) repetition of the rules for safe work with scissors;
d) demonstration by the teacher of a sample and techniques for completing a learning task.
- Practical work of students “Making a plain weave layout”:
Teacher's activities:
Targeted walk-through of workplaces to identify operational safety procedures and observe safety regulations when working with scissors;
Ongoing instruction on the technology of completing a training task;
—
analysis of the implementation of a training task.
- The final part of the lesson.
- Summing up the lesson.
Consolidation. Exercise: “ Continue the sentence”
For sewing clothes and linen in everyday life, we use material -…
Reflection: conversation.
Were you able to complete the layout?
What will you remodel at home? Why?
What interesting things did you learn during the lesson? What new terms did you learn today?
How will this knowledge be useful to you in life?
- Analysis of student participation during the lesson. Giving grades for work in class.
- Handing out homework.
Find and bring pieces of various fabrics (search with your mother and grandmother and find out their name and origin).
Instruction card
Practical work
“Making a plain weave design from paper”
Materials and tools: paper, scissors, ruler, fabric samples, glue.
- Cut out two squares of 10x10 cm from paper
- Mark two squares 1 cm apart
- Draw an additional line on one of the squares, departing 1 cm from the edge. Cut the square into strips up to the intended line.
- Cut the second square along the marked lines into separate strips.
- Weave the strips through one another, as shown in the figure, and glue the ends of the strips.
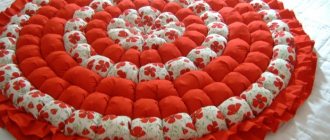
Carpets have been created by hand for many centuries. To create an exclusive accessory for decorating your own home, you can use a variety of materials in the form of threads and yarn, ropes and plastic bags, lids, terry towels, pebbles from the sea, corks, etc.
The first thing you can say when starting a master class on how to make a rug with your own hands is the manifestation of imagination, the application of perseverance and patience, and then you can create a unique product without difficulty.
And if you fill the mat with a removable pad in the form of an abrasive filler, then it will turn from decorative into massage.
The photo of the rugs shows that the floor covering can be made with your own hands from pre-prepared pompoms or pile threads, by knitting, weaving or weaving.
Knitted floor products
To make a knitted product, you need to prepare the following materials
- cardboard sheets,
- marker pen,
- threads of various thicknesses,
- scissors,
- hook number 7 or higher (can be replaced with knitting needles).
First of all, air loops are collected in the quantity that corresponds to the rectangular size of the future carpet. To make a round product, it is enough to cast on five air loops, connect them with a ring, and then, adding them in a circle, tie the workpiece.
For convenience, they came up with the “patchwork” technique, when several parts of the canvas are prepared, and then they are all sewn into a single product.
Most popular questions
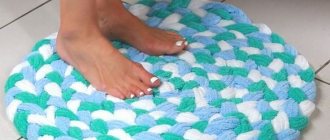
How often can you walk on the mat? A foot massage device is a useful and safe invention. If the baby likes it, he can walk on it as much as he wants.
Can these rugs be washed? It all depends on the materials from which it is made. Fabric items with sewn buttons are easy to wash. Products made from chestnuts or stones are not intended for washing. They should be treated with soapy water and dried in the sun.
In order for a child’s foot to form correctly, he needs to run barefoot on different surfaces - sand, stones, grass. Sometimes such pleasure cannot be organized every day. Therefore, special mats made by caring parents from natural materials are suitable for daily foot stimulation.
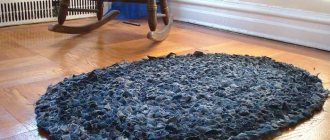
Old things
Anyone who has accumulated unnecessary T-shirts, T-shirts and other knitwear items can make rugs from old things.
To work you will need:
- construction mesh, divided into large cells,
- thick crochet hook,
- strips cut from old things.
A strip of fabric is placed under the prepared mesh in the center, and the ends are pulled out using a hook and tied tightly. The next strip is threaded side by side in the same way and also tied with a knot.
Knitting is carried out in a spiral until the entire mesh is filled. You can make braids from such strips in advance and lay out a carpet from them.
Note!
Patchwork - a classic of patchwork creativity
Making a patchwork rug requires a more careful selection of materials, and if a complex item is conceived, then considerable skill. This is the same technique used to make the famous “granny” quilts.
Since the product is intended for the floor, the fabric chosen is dense: denim, gabardine, drape or tweed from an old coat. You will need a lining made of solid fabric, also strong. If you have worn-out carpet, it will make an excellent base.
The design of the item needs to be thought out in advance, a combination of colors should be carefully selected, preferably bright ones, and one of the many designs developed in this area should be taken as a model. It is useful to familiarize yourself with what has been created by experienced craftsmen.
Many of the author's mosaic items are complex, exquisite, practically a master class. You will have to sew both by hand and by machine, because the amount of work is large.
To assemble a kind of mosaic, which is a rug made from scraps of fabric using the patchwork technique, first take into account all types of elements that make up the selected ornament. A paper template is made for each of them. To make and work with them, use:
- scissors;
- paper or cardboard;
- pencils;
- fabric chalk;
- pins.
Using templates, cut out the required number of parts, leaving seam allowances. Referring to the image of the finished product or your own conceived pattern, the ornament is laid out, sewn by hand, then by machine, ironing each seam.
Weaving from strips of paper
A rug woven by a child from strips of paper with his own hands can serve as a beautiful background for an applique. In the process of work, important skills and abilities are developed, fine motor skills are trained.
Children make such rugs from strips of paper in kindergarten and elementary school during technology lessons. In addition to colored paper from children's art kits, you can use waste material for weaving: old magazines, leftover wallpaper, etc.
In addition to the rug, from strips of paper in the same way you can weave bookmarks for books, pictures-panels with a certain pattern or image similar to pixel drawings and patterns for cross stitch (more about this in the article), and you can also decorate the main ones with this weaving method application elements.
Rug made from strips of paper
The size of the mat and the width of the paper strips can be chosen as desired. But be sure to take into account the age and capabilities of the children who will weave the rug. It will be easier for preschoolers to do this craft if the stripes are wide enough, about 2 - 3 cm. This means that the rug should be larger - the size of an entire sheet of colored paper or half of it. Children of primary school age will be able to weave from strips 1 - 2 cm wide. My daughter and I made a rug from strips 1 cm wide, so a description of weaving a rug will be given for strips of this size.
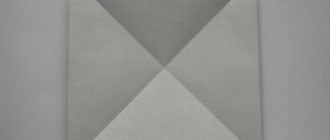
How to weave a rug from strips of paper. Flat straight weave
- The base of the mat can be a square or rectangular sheet of paper. It needs to be folded in half.
- Draw a line 1 cm from the edge opposite the fold. This is necessary to ensure that all cuts are located at the same distance from the edge.
- Make marks on this line at a distance of 1 cm from each other.
- Make marks on the fold at a distance of 1 cm from each other.
- Connect the corresponding marks and make cuts along them.
- Expand the base.
- From colored paper of one or more colors, cut out strips 1 cm wide and the same length as the length of the base.
- Weave the strips into the base in a checkerboard pattern.
- Glue the ends of the strips to the base.
The cuts can be not only straight (they can go at an angle, zigzag, or be wavy) and not necessarily at the same distance from each other.
Paper strip bookmark
The bookmark is woven in exactly the same way as the rug, only on a rectangular base. The size of the base and the number of strips are optional.
Historical reference
When translated from English, the word "String" means "rope", or "string", or "tension". Accordingly, String Art is thread art or a type of isothread. Isothread is embroidery on cardboard, that is, on a hard surface, and String Art is already an interweaving of threads on nails.
Author - Veronica Zapsha (@veronitta)
String Art is not a new creation at all, but it is very famous due to its beauty and originality!
This art came from England. Four centuries ago, English weavers used nails and thread to decorate their homes in this way. They drove nails into wooden planks and pulled threads onto them in a certain sequence. This is how openwork products for wall decoration were obtained.
Then the invented thread weaving technique was transformed and improved with the help of the English researcher Mary Bull. With the help of threads and nails, she taught children algebra and geometry, and thus the string art technique from Mary Bull appeared.
We invite you to watch a short tour of the String Art technique and a master class by Diana Kiseleva: