What types of tents can there be?
Depending on the choice of one type or another, it will be decided not only how to make a winter fishing tent with your own hands, but also further ease of use.
Here are some popular winter fishing tents:
Umbrella design. The easiest tent option to use and make. As is clear from the name, the model opens like an umbrella.
In order to make a dome of this type, duralumin rods are used. And the fabric layer itself is synthetic, covered with a tarpaulin to protect it from wet precipitation.
Automatic option. This is a very popular tent design among anglers. All this thanks to incredible ease of use.
The frame opens on its own, like a spring. The fabric is stretched over it and the tent is assembled. The most inconvenient thing is that the frame is very brittle and, due to the lightness of the tent, it blows away with the slightest breeze.
Check it out here too!
Frame. This is the most rarely used type of tent. Assembling and disassembling the frame takes a lot of time, it is difficult to call it stable, and it is not particularly durable.
Homemade keel for an inflatable boat.
Many spinning anglers experience a certain inconvenience when fishing from an inflatable boat - at the moment of casting, the boat rotates. To avoid this, it is enough to equip it with a simple keel. Of course, even an inflatable boat equipped with the keel described below will not stand rooted to the spot, but its mobility will noticeably decrease.
Such a keel consists of three parts - a nylon cord, a piece of tarpaulin and a metal rod. Cut out a right triangle from the tarpaulin. One leg should be about 0.5 meters long (the depth of the keel), the other should be slightly shorter than your boat.
Then a cord must be sewn into the long leg (its length should be enough to secure the keel on the bow and stern), and the hypotenuse must be stitched so that a rod made of any stainless material can freely fit into the resulting narrow and long pocket. The rod can be made collapsible, which will simplify its transportation. If there are no loops on the stern of your boat for attaching a rope, then they need to be glued additionally. When installing the keel on the boat, it is not necessary to tighten the rope too much.
Based on materials from the book “DIY Fishing Tackle and Hunting Equipment. Manufacturing and repair." Storozhev Konstantin.
Rules for making a tent
The biggest and most important requirement for a homemade winter tent is its comfort. In winter, it is especially important to have a warm place that will allow you to warm up at any time.
It is the provision of insulation of a tent for winter fishing with your own hands that is considered the basic rule of manufacture.
But there are some other requirements that need to be taken into account if you decide to make a tent yourself:
- It should be light in weight and easy to transport or carry. This requires its assembly to be as compact as possible.
- The dome fabric is chosen to be dense and protected from moisture. Depending on the density of the fabric, the tent will be warmer or cooler.
- Disassembly and assembly should not be complicated or very long. Sometimes you need to warm up urgently and the long process of assembling a tent prevents this.
- The materials of the tent should retain heat well inside for a long period. In addition, with the high lightness of the tent, it is necessary to take care of its additional fastening to protect it from the wind.
Balcony decoration
A child's playroom should have shelves or a closet for toys. We paint it a cheerful color. The walls can be decorated in the same spirit, hang a photo of the baby or pictures with animals. We lay soft material, carpet or special puzzles on the floor.
We take care of the safety of materials, because the room is being prepared for children. It is better to hang curtains on the windows, especially if the balcony faces the sunny side. It will simultaneously perform a decorative function and protect the child from the sun.
It’s easy to make something beautiful and useful for a child with your own hands. The main thing is to have a desire and show imagination.
Related article: How to easily make a cabinet for a balcony yourself
Video gallery
Photo gallery
What may be useful
In order for a do-it-yourself winter fishing tent to be reliable, it is not at all necessary to purchase expensive material. Moreover, everything that a master might need can be found in almost any home.
Check it out here too!
For example, the tent most often created by fishermen is made on the basis of a special box, which can be easily purchased at a fishing store.
In addition to such a box, you will need a few more materials, which are also not difficult to obtain. Two pairs of skis, some for children, others for schoolchildren, along with poles.
Source
Why do children need a tent?
A children's tent is a necessary item in a home raising children. First of all, you can play it. Secondly, a small tent will not take up much space in the children's room, and children's delight at its appearance will know no bounds. They play in it with pleasure and hide toys. During the hot season, a small tent is a good help for parents. By installing a “durable hut” in their country house, garden, or beach, parents can rest assured that their child will be protected from the rays of the scorching sun. Children really enjoy spending time in their own little house.
What should a tent be like?
Making such a shelter yourself does not require effort, although it protects from adverse weather conditions no worse, and sometimes better than a purchased one, while saving money.
In the manufacture of such structures, the craftsman’s own requirements for the size and weight of the product, the speed of its assembly, the ability to protect from cold, the possibility of insulation and the installation of additional equipment are taken into account.
Taking these conditions into account, a homemade tent for winter fishing should:
To retain heat, therefore, to cover it, use a material that has good strength, thermal insulation, moisture resistance, but at the same time has breathable properties.
Be lightweight, mobile, compactly folded, and quickly installed. Frames made of aluminum or composite materials meet these requirements.
Choosing a tent site
When choosing a space for a structure, you need to pay attention to its liveliness . Preference should be given to an area where household members rarely appear. For example, this could be a corner of the room.
Recommendations:
- If you plan to build a hut on a cool day, it is recommended to find a place for it not far from the heater. It is important to ensure that it is kept away from windows and doors. Otherwise there may be a draft.
- During the summer, it is better to choose a place near a fan that will cool the air.
- On a hot day, you can build it next to an open window, through which a sufficient amount of fresh air will enter the room. However, you first need to make sure that direct sunlight will not fall on the hut from this window.
- If possible, in extreme heat it is best to build huts and forts in the basement, where it never gets too hot.
It is always worth remembering the safety rules. You cannot place a hut so that it blocks the exit from the room. Otherwise, the children will be trapped.
Types of shelters
Depending on the methods of ice fishing, structures are divided into:
For mobile devices. They are extremely light and quick to install, they are useful when changing holes frequently and protect more from wind than from frost. These include:
A cape tent in the form of an isosceles triangle, which is easily made from transparent polyethylene film, which gives a good overview.
An appropriately elongated ice screw can be used as a support in such a structure, and pins or screws can be used for fastening. Among the disadvantages of such a shelter, the fragility of the material and cramped living conditions are noted.
A dome tent with a central support in the form of a metal pole driven directly into the ice. For ease of transportation, the pole can be collapsible. The same plastic film or a denser synthetic material is attached to it, which adheres to the ice using pins.
Stationary (frame). They are used for fishing at a fixed location. They can serve as a permanent place of residence or as a temporary shelter.
The functional characteristics of such a building can be improved by installing a warm floor and a heating system.
This category may include the following types of structures:
Umbrella - a frame made of strong rods and duralumin tubes is covered with a tarpaulin or synthetic awning according to the principle of an umbrella.
Automatic - The protective material of the shelter is immediately attached to the frame, which, when unfolded, takes the desired shape. The advantage of such a product is the speed and ease of assembly, the disadvantage is its fragility and instability in strong winds.
Frame. A base is constructed from several duralumin tubes, bent in an arc, fastened together and covered with an awning. The shape and size of the base determines the dimensions of the tent.
Types of tents
By independently developing a project, you can construct a tent of almost any design and shape. It all depends on how exactly you imagine it, and on the materials that are available. There are four main types of tents:
- tourist - has a small size and can be easily carried in a backpack. It is mounted from a frame and guy ropes that stretch the awning and make the structure stable even in windy weather;
- folding - a lightweight structure consisting of racks and an upper canopy, without side rails. Most often used as a shelter during a picnic;
- gazebo-tent - a structure similar to a gazebo, with side walls made of fabric or mosquito net attached to the upper horizontal part of the frame;
- tent-pavilion is a mobile structure used during festive events: weddings, celebrations, etc. It is decorated with various types of fabrics and can be of various sizes and shapes.
Preparing the site
Before you start making a structure with your own hands, you need to decide on its purpose and model. The materials and tools that will be needed in the work depend on this.
DIY winter fishing tent
Winter fishing is a lot of positive emotions, which can be diluted by some of the negative emotions associated with weather conditions. It is not difficult to imagine the discomfort an angler feels in the presence of frost, and even wind, which increases the feeling of cold. The wind may not be strong, but it can bring a lot of problems. If you have a winter tent for fishing, then some of the problems can be reduced to zero.
The presence of a tent allows you to increase the total time a fisherman spends on a pond in winter. Moreover, you can easily raise the temperature in the tent to above zero, which will allow the fisherman to feel very comfortable.
General characteristics and main design elements
Polati in a literal interpretation are shelves for sleeping located in a log hut between the stove and the wall. The ancient Slavs had two-story rooms, with adults below and children above. It is not difficult to guess that in the modern interpretation, the beds are nothing more than wide benches. Only unlike ancient times, today they are used in baths in two rooms - in the steam room and in the relaxation room.
In a steam room, or otherwise, the shelf is a multi-tiered structure designed for the main bath procedure - visiting the steam room. The shape of such a structure is a staircase with 2, 3 or even 4 steps, the width of which can be 40 or even 50 cm.
In the rest room, the floors are usually located against the wall, the width is usually from 80 cm to 1 meter. They are needed for a relaxing holiday and for massage, so the height of such a structure is somewhat non-standard, from 60 to 80 cm.
In a Russian bath, the shelves in the steam room are fixed rigidly, so that the frame and the covering cannot be moved from their place without tools. But in modern baths they often use mobile furniture options - benches, stools and chaise lounges. And if the former are applicable for temperatures of 90-110 degrees, then sun loungers are usually used in steam rooms with a low temperature of 65-70 degrees.
What do people look like in a bathhouse?
Bath shelves include several design elements:
- Frame;
- Bed or bed yourself;
- Side boards;
- Additional elements - headrests, ladders;
- Steps - small benches installed in front of the shelves for convenience;
- Stairs and handrails (this element is used for large steam rooms with 5 or more steps).
Types of tents for ice fishing
Depending on the design features, winter tents are divided into specific models.
These are the simplest designs that are easy to assemble and install. To make the frame of such a tent, you should use durable but lightweight materials. Synthetic fabrics or their combinations with tarpaulin are more suitable as an awning for covering.
Machine
The design is designed in such a way that the frame acts as a spring, which takes the desired shape when it is released from the packaging. They are quite popular due to their simplicity of design and lightness. Despite this, these tents have a number of disadvantages. Firstly, they are not resistant to strong winds, and secondly, they are not so easy to fold. Therefore, when going fishing, you will have to practice beforehand. It unfolds itself, but without the skills, it will be very difficult to fold it and if you overdo it, you can break it.
Frame
This tent consists of several folding poles and an awning that covers this frame. We can safely say that this is the same simple option, but it takes a long time to assemble and disassemble. In addition, it is not particularly durable. Therefore, fishermen rarely purchase such a design.
How to make a simple awning?
One of the options for creating a frame for a homemade awning is to purchase ready-made prefabricated poles in specialized stores for tourism and fishing. This will allow you to get by only by sewing a retractable awning for outdoor recreation, but it will be much more expensive than making it from scratch. In addition to the above tools, you will need:
- roulette;
- marker;
- grinder for cutting pipes;
- drill for drilling holes;
- fastening material.
The choice of fabric for an awning is quite wide, and purchasing a suitable one will not be any problem. If you need a collapsible awning for installation at the dacha, the beach, or over a children's sandbox, it is easier to go with the simplest option. To make it you will need the following materials:
- PVC pipes;
- waterproof material for awning;
- sewing machine;
- lavsan threads;
- If it is not possible to sew by machine, then use a hand needle.
Prepare, cut off the required piece of fabric. If the planned width is not enough, and the awning should be much more spacious, then the material is increased with additional pieces, simply stitching them together. For reinforcement, a backstitch is used.
It looks something like this:
- two slices are placed on top of each other, leveled, but one edge should protrude above the other by about 1.5–2 cm;
- cover another layer with the protruding edge and lay a seam not far from the cut;
- The stitched fabrics are straightened, the protruding seam is folded onto the fabric in such a way as to hide the visible cut, and after that the next seam is laid.
How to properly perform this seam can be seen in the diagram presented.
The choice of this particular type of stitched seam is due to its high reliability - it is able to withstand the highest wind and physical loads - the main thing is that the threads match the fabric. After the canvas is ready, you need to make gaps along the edges for the frame - the place where the pipes will be inserted. This is done much easier. On both sides, the fabric is folded with a double hem of the appropriate size and a straight stitched seam is laid. Then the frame pipes are inserted, all that remains is to stick the protruding ends into the ground, and the awning is ready.
Another option for quickly making an awning:
- a structure in the shape of the letter “A” is prepared from pipes;
- the fabric is folded in half and a braid is sewn in the center, which will serve as a fastener for the fabric on the upper crossbar;
- There, in the center, ropes are sewn on one side and the other, then the same ropes are sewn to the lower ends of the awning - they will serve as guy ropes.
With such a product you can safely go on vacation, to the country house, with such an awning it is easy to cover a car or a children's play area.
Requirements for a homemade tent for winter fishing
A tent for winter fishing should protect the fisherman from wind, frost and precipitation. Moreover, the tent should have enough space to relax so that you can cook lunch or just drink tea to keep warm.
You can purchase any tent at specialized retail outlets, especially since the assortment is very large. Be that as it may, some fishermen make them themselves, taking into account all the requirements. Besides, who else but the fishermen knows what kind of tent is needed. Moreover, not all factory-made models meet the requirements of winter fishing enthusiasts.
A homemade tent should be:
- quite light and compact;
- mobile so that you can move easily;
- covered with dense but breathable fabric;
- easy to install and dismantle;
- durable and strong, and also retain heat for a long time.
Choosing material for a tent: tips for choosing
When installing wooden supports for a stationary tent, you must take into account that it will stand in the open air throughout the year. Therefore, the material for the frame must be durable, high quality and reliable.
For support posts, you can take rounded or laminated timber, as well as pine or spruce boards, since they are least susceptible to rotting. Less commonly used are boards made of oak, larch or fir, since these are expensive lumber for such a lightweight structure.
As covering material for a tent you can take:
- Awning fabric, which is used to make awnings and tents. It is a polyester mesh filled with plasticized PVC (polyvinyl chloride), making the material waterproof. Tent awning fabric will protect it from rain
- Tent fabric made from polyester. It is slightly thinner than an awning and consists of 3 layers: two outer ones - made of polyester and nylon threads, and a middle one, made of polyurethane or polyvinyl chloride transparent impregnation.
- Raincoat. Thin but durable polyester material, which is designed for the manufacture of lightweight canopies for awnings and other temporary buildings. For the tent covering, dense raincoat fabric is used on a water-repellent and airtight membrane.
Tent fabric has different subtypes:
- Oxford. Waterproof material made of polyurethane or PVC (polyvinyl chloride). This is a durable and elastic nylon fabric that has a high degree of resistance to temperature changes. Disadvantages: highly electrified and has a low degree of fire resistance.
Oxford tent fabric for tent is durable and elastic
- Taffeta. Fabric made from polyester or nylon with a special structure. A polyurethane or polyvinyl chloride protective layer is applied to the base material. Advantages: resistance to aggressive chemical environments, repulsion of fatty substances. Nylon fabric has a high degree of waterproofness, strength and wear resistance. Disadvantages: electrified and practically non-hygroscopic. Polyester fabric does not stretch, has excellent air permeability, dries quickly, but is not strong enough for a stationary tent.
Taffeta tent fabric for covering a tent is not suitable for a permanent structure
- Teflon with cotton. This is a thin fabric consisting of two layers (top cotton and bottom Teflon). Most suitable for making light summer coverings for tents and other summer cottage structures.
Tent fabric Teflon with cotton for tent is very light
To work you will have to stock up on these tools
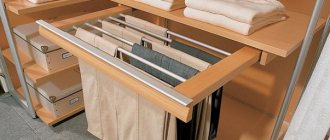
Most tents made by anglers themselves fit into a fishing box. By the way, you can also make a box yourself, which is what many fishermen do, although you can buy it. In addition to the box, you will need the following accessories:
- two pairs of skis, one for children, one for school;
- tubes. In this case, it could be ski poles;
- unnecessary folding bed;
- dense fabric, such as tarpaulin.
At first glance, how can you build a tent from such a set of elements? But, nevertheless, such a design proved that it has the right to life. The final product fits into a fishing box, which is very easy to transport on ice. The structure is quickly and easily assembled and just as easily moved on ice in working condition.
The only negative is that there is little space in it. But if you approach the problem constructively, then it is possible to solve it and increase the size of the tent. Paradoxically, it protects from the cold, and this is the main thing.
Preparing the balcony
The child should play in the room both in summer and winter. There is no point in equipping a summer version of the playroom with your own hands. After all, with the onset of cold weather it will have to be dismantled and the apartment will again be loaded with a mass of children's things and toys. What you should do is simpler - insulate the balcony or loggia where the tent is located.
The following work needs to be done:
- floor insulation;
- installation of a plastic window frame;
- wall insulation;
- installation of an additional heat source. Perhaps it will be a warm floor.
Do you think that insulating your balcony will be too expensive? But these measures will help to insulate the entire apartment, which will allow significant savings on additional heating in the future. Moreover, children grow up, and then the toys can be removed and the loggia can be turned into a full-fledged office where the child can do his homework. There are many options.
The main thing is the safety of the child on the balcony. If you live on the ground floor and the loggia is barred, you don’t have to worry and can safely leave the window to ventilate. But if the balcony is not protected by bars, you will have to install safety locks on the window handles so that children cannot open it.
Drawings of a homemade winter tent
Judging by the drawings, the tent is mounted on skis, which simplifies its installation on ice. Regular tents require special fasteners. In addition, skis allow you to move the entire structure around the pond countless times. As a rule, winter fishing is not limited to one punched hole - there can be ten, or even more, and each hole has to be fished.
The only thing is that it is problematic to use it in the presence of strong wind, since it is mounted on skis, the wind will be able to move it across the pond on its own. In this case, you can get used to it and use the power of the wind to move it. The main thing is to drill the holes correctly.
Manufacturing of fasteners
The production of fastening elements for a two-person canvas tent deserves special attention, because the stability of the structure and its ability to withstand the wind will depend on their quality.
We are talking about pegs and screws that are used during the installation of the awning.
The material from which the fasteners are made depends on the season of the intended holiday. For example, if you are going outdoors in the summer, it is better to make the fasteners from light metal so that the folded tent is easy to carry. If desired, they can be made from any available materials while in nature. Strong branches with a sharpened edge will do so that they can be easily stuck into the ground (Figure 5).
If you want to make your own metal fasteners, be prepared for the process to take a long time. For this purpose, it is best to use long metal rods or strong screws. The top needs to be bent into a ring, and the bottom of the screw is already sharp enough and will fit into the ground without any problems.
Figure 5. Homemade fasteners can be made from thick wire or self-tapping screws
As for the screws, it is better to use a threaded metal tube to make them. For ease of use, it is advisable to secure the handle at the top.
Step-by-step production
Despite the fact that this design was born a long time ago, many anglers have tested it in harsh winter conditions.
How to make a tent with your own hands
- Ski poles act as a frame and are installed vertically. Horizontal tubes should be thinner. At the corners, the frame is connected using tees, the diameter of which must match the diameter of both vertical and horizontal tubes.
- The next step is to attach the vertical tubes to the skis. A metal plate is attached to the ski, into which a tongue is inserted in the letter T, attached to the lower end of the tube. To secure the stick, just rotate it at an angle of 90 degrees.
- Two sticks are prepared from an old cot that will connect the frame to the box. Take a bent tube, at the end of which there is a docking unit. At the other end of the tube there is a latch, which serves as a fastening element for the docking unit.
- A spring is made from a copper strip that connects the box to the tubes.
- Finally, all that remains is to pull up the awning. Metal strips with holes are attached to the lower part of the awning. The brackets attached to the ends of the skis are pulled into these holes. The awning is connected to the brackets using ropes. For stable behavior of the tent on ice, it is equipped with two anchors.
Drawings and patterns of a homemade tent
A tent, like other equipment, must meet the conditions of its use. Unfortunately, the choice of fabrics for tents is very limited. Typically, homemade tents are made from bologna and calendered nylon. New bologna does not allow water to pass through, but freezes heavily and becomes hard. When it's windy it makes a loud noise. Calendered nylon allows water to pass through. A nylon tent can serve as shelter only in winter.
Before you start sewing, you need to make a tent model on a scale of 1:10. From the layout you can determine all its geometric dimensions.
The shape of the tents is very diverse. There are tents with a gable roof, a lean-to roof (they are used by climbers when spending the night on walls), in the form of a hangar and an umbrella. The last two types of tents resist the wind better than others.
Tents with tension frames have become widespread. They are easy to use, provide the necessary comfort, and “hold” snow and wind well. Let's look at how to make a tent in one of these options.
When setting the size of the tent, we assume that it can accommodate 2-3 people. Two - in comfort, three - in traveling conditions. The tent is additionally equipped with an awning. The appearance of a tent without an awning is shown in Figure 1.
If you expect dry, frosty weather, purchase calendered nylon for your tent. You can use thin percale or teak, but in this case the tent will become heavier. It is better to make the bottom from technical nylon - avisent. The awning is made from Bologna. If you are going to the highlands where there is no rain, then the awning can be made from calendered nylon.
First, let's prepare the bottom of the tent. Figure 2 shows a drawing of the bottom of the tent. We will strengthen the corners of the bottom with overlays, which we will cut from the same fabric as the bottom (Fig. 3). At the places indicated by arrows in Figure 2, we sew rectangular reinforcing elements (Figure 4). We will sew on them pieces of ribbons 8 cm long and 1.5 cm wide, as shown in Figure 4. A nylon cord can be threaded into the resulting loops, which will become an additional guy line during windy times.
| Rice. 1. General view of a tent without an awning |
| Rice. 2. Drawing of the bottom of the tent |
| Rice. 3. Pad on the bottom of the tent |
| Rice. 4. Rectangular reinforcing pad on the bottom of the tent |
| Rice. 5 |
| Rice. 6. Preparation of the bottom corner element |
| Rice. 7. Connect the corner elements to the bottom of the tent |
Now let's move on to the corner elements. To do this, fold the part shown in Figure 6, A in three, and along its edge at a distance of 0.3-0.4 cm we will lay a line that will connect all the “petals” of the part (Fig. 6, B). We will sew a leather pad onto the reinforcing element, on which we will install two eyelets with an internal diameter of 0.5-0.7 cm (Fig. 6, B). These elements will serve as support for the tense frame of the tent. Let's stitch the corners of the bottom of the tent, while inserting corner elements into the seam as shown in Figure 7. You can also choose the version of the corner element shown in Figure 8.
| Rice. 8. Such a corner element of the tent bottom is also possible |
| Rice. 9. Sew a small sleeve into the bottom of the tent |
| Rice. 10. Tent roof drawing |
The manufacture of the bottom of the tent is completed by sewing in a small sleeve - an “emergency hatch” in case water gets into the tent. You have already noticed that the bottom of the tent resembles a trough, so you simply cannot do without such a hatch. The location of the sleeve is marked with a cross in Figure 2. You will understand how to sew the sleeve into the bottom of the tent by looking at Figure 9, A, B, C.
Now let's make the top of the tent. It consists of two walls and a roof. The roof drawing is shown in Figure 10. The dimensions of the roof and the width of its sections are also shown there.
Even if you cut out roof panels from a single piece, in the area of sections 115 and 78 you should strengthen the panels by laying and stitching folds (Fig. 11, A) or sewing reinforcing tapes about 1 cm wide (Fig. 11, B ). If you decide to install reinforcing folds, lengthen the roof to the desired length.
We will strengthen the edge points of sections 115 and 78 with overlays from fabric folded in three and the top. The overlays are the same as in Figure 6. The fitting diagram is in Figure 180. Along the sections of the roof panel 60 cm long there are rectangular reinforcing elements 6 cm wide and 60 cm long. We adjust them like a tape onto the roof in sections 115 and 78.
| Rice. 11. Strengthen the roof panels | Rice. 12. We will strengthen the roof sections with overlays |
| Rice. 13. Hook | |
Now let's step away from the sewing machine. The fact is that to attach the tent to the frame we need 10 fastening hooks. To make them you need 60-80 cm of stainless steel wire with a diameter of 3-4 mm. Stainless steel electrode wire may be suitable for welding. Almost all hook sizes are shown in Figure 13. And only size A will be determined by the diameter of the tubes that will go to the tent frame.
Let's continue the assembly. For hooks, we cut 10 cm long pieces from wide rubber braid. We sew two roof panels along a 60 cm long cut. We put a pocket into the seam, which was previously prepared from the top fabric. The pocket pattern is a rectangle 60 X 10 cm. We close the short sections of the pocket with a hem seam with a closed cut (Fig. 14, A). A 60 cm long tube will be inserted into this pocket. In the middle of the seam we insert two rubber loops with hooks. We process the cut with a hem seam, into which we insert several loops of braid, located at an equal distance from each other (Fig. 14, B). The loops will be useful for later hanging a lantern and other necessary items on them. We carefully secure all places where ribbons and rubber bands are located.
Rice. 14 Let's process the pocket
Rice. 15. Tent wall drawing
Let's move on to the walls. The cutting drawing is in Figure 15. We reinforce the edge points of the section measuring 98 cm with overlay elements, as in Figure 180. We adjust the overlays on the edges of the walls at points A, B, C, D and A', B', C', D'. In the same places we set up rubber loops with hooks. When assembling the top of the tent, the reinforcing elements must coincide with the reinforcing linings on the roof. On the halves of the side panels A, B and A', B' we sew in ventilation sleeves in the same way as shown in Figure 7. On half of the VG we sew in a storm entry-sleeve with a diameter of 68 cm and a length of 85 cm. We process the cut of the entrance-sleeve with a hem seam with a closed cut . We insert a cord into the seam. We take the cord out of the seam in two diametrically opposite places: this will make it easier to tighten the entrance. When sewing in the entrance-sleeve, we will evenly place 6 loops with buttons along its perimeter (Fig. 16, A). The collar of the entrance-sleeve can be reinforced with nylon braid, as shown in Figure 16, B. Buttons can be made from the thickest plastic crochet hooks (Figure 17).
| Rice. 16. We will place 6 loops with buttons around the perimeter of the entrance to the tent. We will reinforce the entrance edge with braid | Rice. 17. Plastic button made from a thick crochet hook | |
| Rice. 18. Let's assemble the roof of the tent | ||
On the half of the VG there is an entrance with zippers, which are covered with slats. In good sunny weather, when there is no need to install an awning, you will enjoy using this comfortable entrance. We believe that you can sew two zippers 80 cm long without our help. It is only desirable that the zippers be nylon and, if possible, have a double-sided slider. When assembling the tent top, place a buttonhole at the T point (see Figure 15) to secure the entrance in the open position. You can install buttons on the strips that cover the zippers to close the entrance even more tightly.
Now let's assemble the tent. Starting from the center of the roof, we connect it to the walls of the tent (Fig. 18). In the locations of the reinforcing elements we insert rubber loops with hooks. At these points we place fasteners. The coincidence of the reinforcing elements of the walls with the reinforcing elements on the roof will convince you that the panels are connected evenly. We sew the bottom with a sewing seam - and the tent is ready.
Let's make an awning from bologna. Its cut is shown in Figure 19. The roofs of the awning in a section of 61 cm are reinforced with an overlay (Figure 19, A). The roof can be stacked, that is, it can consist of several parts. This depends on the width of fabric you have. If the roof panel is stitched, add seam allowances to its dimensions - 2 cm for each seam. The dimensions of the tent walls are shown in Figure 20. We supply both walls with ventilation sleeves in places corresponding to the ventilation holes on the tent. On one of the walls we make an entrance-sleeve, the same as on the tent. In the center of the center line of the walls we set up a hexagonal reinforcing element with a loop of braid pre-attached to it (shown in Fig. 21). This design of the element will allow the load from the guy wire to be more evenly distributed. The reinforcing element is made from awning fabric folded in two or three layers.
Rice. 19. Tent drawing
Rice. 20. Tent walls
| Rice. 21. Hexagonal reinforcing element | Rice. 22. Let's stitch the leather pad |
| Rice. 23. Apron drawing | |
| Rice. 24. Processing the corner of the apron | |
We assemble the awning in the same way as the roof of the tent. The ends of the reinforcing element in a cross-section of 61 cm (Fig. 9, A) are duplicated on the inside of the tent with leather pads (Fig. 22) of a round shape with a diameter of 12 cm. A tube will rest against this leather pad, which we will insert into a pocket on the tent.
On the lower part of the awning it is necessary to sew an apron made of avisent (apron dimensions in Fig. 23). We will apply a technological line to the apron, along which we will adjust the awning. It is better for you to check the dimensions of this line using the dimensions of the bottom of the awning that you have obtained. We strengthen the corners of the apron with reinforcing elements from the apron fabric (Fig. 24). We fold the fabric of the elements in half. We also reinforce the inner and outer corners of the apron with triangular-shaped leather overlays. We will place a guy eyelet on the leather trim of the outer corner. We will install another eyelet, the size corresponding to the corner eyelet of the tent, on the leather lining of the inner corner. We also place fabric linings in the middle of the long sides of the apron, and place leather corners on them (Fig. 23). We also install grommets on these corners.
The apron is ready. Now let’s sew an awning onto the apron (Fig. 25)
It's time to go to the "metal shop" and make the tent frame. For the frame you will need duralumin tubes with a diameter of 10-12 mm and a wall thickness of 1-2 mm. You can use another elastic material, such as fiberglass. Rumor has it that fiberglass children's ski poles are very suitable for our purposes. The heaviest poles are made from elastic elements from the “Wave” or “Lotus” tents, which are also available separately.
| Rice. 26. Rolled side of the frame elbow | |
| Rice. 27. Adapters can be made on a lathe | |
| Rice. 25. Let's sew an awning on the apron | Rice. 28. Tips on the knees of the frame |
One arc of the tent requires about four meters of tube. Why around? It all depends on the material from which you made the tent with an awning, and on the quality of sewing. If you tighten the seams, the stands will be shorter; if you stretch the fabric while sewing, the stands will be longer. Four meters is the length of the racks, taken with a margin.
We make the frame posts from separate elbows 55-60 cm long. To connect them, roll one end of the tube (Fig. 26). Adapters can be made on a lathe, for example, such as in Figure 27. There should be tips on the end bends of the frame (Figure 28). The diameter of the tip is 1 mm smaller than the inner diameter of the eyelets installed at the corners of the tent and the inner corners of the apron. After the transition elements and tips are ready, we string the knees onto a round rubber band. We will strengthen the ends of the braid on the tips (see Fig. 28). This rubber band will help you assemble the frame faster. We will insert another piece of tube 60 cm long into the tent pocket (see Fig. 14, A).
The final length of the posts will have to be determined experimentally. You will need to try setting up a tent with an awning several times. How to do it? Let's pitch the tent. Insert the frame arcs crosswise into the corner eyelets of the tent (see Fig. 17). Let's raise the tent and throw hooks on the poles. Throw an awning over the arches and insert the tips into the internal eyelets on the apron, located on one side. Let's move to the opposite side of the tent and try to insert the tips into the other two grommets. If you managed to do this, even with great difficulty, great! The frame length is chosen correctly! If you cannot tighten the awning, you need to shorten the posts a little.
How to sew a tent with your own hands
Alternatively, you can make a tent in the form of a house. To make it you need to take:
- Water-repellent fabric with an area of 14 square meters. meters.
- Metal washers, 1.5 mm in diameter, 20 pcs.
- Braided rope, up to 15 m long.
- Narrow ribbon, about 9 m long.
- Fabric for bedding, rubberized within 6 m.
Such a tent can accommodate one or even two people. First of all, you need to prepare two pieces of fabric measuring 1.8 x 0.9 m. Marks are made on the 1.8 m side every 65 centimeters. The same is done with the other (0.9 m) side. The fabric should be cut at the joining points to create the entrance and back wall of the tent.
The diagram shows the implementation of further work step by step. Most importantly, all parts must be sewn securely. Use tape to reinforce the seams. There are times when a tent is made from ordinary fabric. In case of bad weather, polyethylene film is used, which can protect against wind and precipitation. Metal rings are sewn into the fabric for fastening. As a rule, they are located at the bottom of the awning, as well as in the places where the fabric is attached to the frame.
Advantages of an awning shelter
An awning is good in all cases; it can not only be a reliable shelter from precipitation, but also protect from cold and wind.
Under the awning you can build a fire in bad weather or set up a barbecue without worrying about safety. It is much easier and faster to install; under it you can organize not only an overnight stay, but also an entire dining room. In hot weather, you can hide from the sun under it, and the space, blown from all sides, will create a comfortable stay in the shade. Mosquito nets will protect you from annoying insects.
You can make a fire under the awning in bad weather
The main selection criterion is an acceptable price; an ordinary awning can be purchased in the range of 300-750 rubles.
Necessary materials
It is quite possible to sew a tent yourself, but you need to understand what requirements it must meet. First of all, it should be:
- Reliable, and can withstand not only long-term use, but also a wide variety of external factors: from wind to rain;
- Comfortable. Its size should be based on the number of people who will be in it. The growth of people is also important;
- Not heavy. This is important, especially if it’s not just fishing, which you can go on by car, but a real hike.
Based on the above criteria, the materials for the construction must be dense and waterproof. And it’s absolutely great if they are also light. Examples include:
- Thin tarpaulin;
- Raincoat;
- Percale;
- Rubberized percale;
- Bologna;
- Special tent fabric. This is the most ideal option.
The amount of material directly depends on the shape of the future tent, but the difference is not very big. For example, a standard three-pitched structure for 4 people requires on average 2-3 square meters less than a gable or single-pitched form.
Additional materials will also depend on the type of tent. The minimum kit includes:
- Strong ropes;
- Tape for processing seams;
- Bedding made of waterproof material;
- Needles and threads.
As you can see, the set is quite simple and very affordable. You can find everything you need at your nearest hardware or hardware store.
Material of manufacture
For the manufacture of frames and flooring from available lumber, mainly linden and aspen are used. These tree species are best suited for building floors and cladding the walls of a steam room. The wood of these tree species does not contain resinous inclusions and is not subject to rotting. It is easy to work with this material during the assembly of the structure, and during operation, neither linden nor aspen cause trouble and will last for many years.
But birch and conifers with a high resin content should absolutely not be used as flooring and cladding. They release tree resin, which can cause injury and even fire. And birch will begin to deteriorate almost from the first day.