Let's make autumn with our own hands! You and I will learn how to make leaves, the same ones that autumn decorates itself with! Such skill will help us decorate the room, preparing it for the autumn holidays, or create a mood of calm and comfort at home, and most importantly, we will learn something new and interesting. You can craft with your little ones, choosing a job that suits their abilities. I have put together a collection of different designs. And you yourself can determine what will be interesting to your baby.
I divided the work on making autumn leaves into 3 stages:
- Preparing the paper. You need to draw a suitable autumn pattern on it.
- Creating a template for cutting out leaves.
- The cutting itself.
- Therefore, I’ll tell you point by point what and how to do.
Let me remind you that we have already made crafts from real leaves and crafts from pine cones, and spent a fun weekend with autumn crafts from different materials. If interested, be sure to check out the linked articles.
Autumn leaves made from accordion paper
Volume leaves made of paper look especially impressive. You can use them to make bouquets and three-dimensional compositions, or they can be secured with tape or pins on wall newspapers or photo frames with autumn drawings.
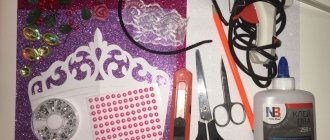
Necessary materials:
- paper and stencils for blanks;
- pencil and scissors;
- glue stick or glue.
For design work where only one side will be visible, you can take single-sided colored paper from standard children's sets. If the composition is planned to be voluminous, only double-sided will do.
It is worth checking in advance whether the stem is strong enough when crushed. Glossy sheets are not suitable for such crafts.
You can invite the children to first color the A4 sheets themselves, at the same time telling them about the changes in their color in the fall and showing that in nature there are no monochromatic surfaces. To prevent the paint from being damaged when crumpled, you need to use watercolor. The paper must be completely dry before starting work.
Technique:
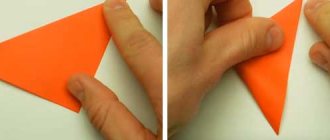
- In kindergarten, children trace a template along the contour on paper. Older children can easily make isosceles triangles according to the diagram on their own.
- On the cut-out workpiece, first lay the first fold of 1.5 cm, and then the rest along it “inside-out”. Each fold must be pressed tightly - strictly fixed with a pencil or ruler.
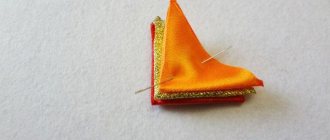
- The finished accordion is folded in half.
- From the remaining ribbon, fold a twig and pass it through the slot of a leaf folded in half.
- All that remains is to crumple the cutting and secure the central part of the product with glue.
Carved leaves are made using the same principle. The basis of this template of autumn leaves for cutting is an isosceles triangle turned into a herringbone.
Crafts from paper autumn leaves
Now, you and I have learned how to make origami leaves, but now what can we come up with to make? We offer you a garland. look how interesting it turns out. =)
This garland is very easy to make. You will need threads, a needle, circles of colored paper, and the leaves themselves. We string everything on a thread and everything is ready. The most important thing is to prepare all the details.
If you don’t want a circle, then cut out the droplets. It will look simply gorgeous!
What do you think about this composition?
Of course, you won’t surprise with a wreath, but it’s worth showing as an example.
By the way, it’s very easy to watch; if you need to make a craft, then it might be great for you.
Corrugated paper leaves
Corrugated paper is the most successful material for quickly making autumn leaves. The veins are already determined by the texture of the material itself.
During a creativity lesson at a preschool educational institution, preschool children can be asked to make an applique or collage out of them. Older children can make additional gluing to make the leaf as natural as possible - the effect will ensure multidirectional relief of the paper. In any case, templates will be required.
Making a leaf with hard veins:
- You need to cut out rhombuses from corrugated paper, then divide them into triangles. For maple you will need 10 parts.
- The parts are set aside from the center, turning the workpieces over, the veins are laid out in a herringbone pattern and glued together with an overlap of 2-3 mm.
- The maple leaf template must be applied so that the center of the gluing coincides with the axis of the veins. The outline is marked with a pencil, then the workpiece is cut out.
- Tightly rolled paper becomes a twig.
If you glue the twig carefully, the leaves will look good from all sides. They can be used to make garlands and volumetric compositions.
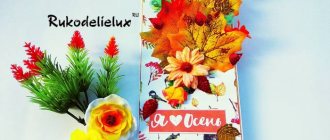
Flowers from autumn leaves: beautiful DIY crafts
Flowers in any form are considered the most beautiful decoration of the home interior. Therefore, it is not surprising that they are made from all kinds of materials and autumn leaves are no exception.
Previously, we looked at how to make roses from maple leaves. They are most suitable for creating beautiful and lush bouquets. To keep the leaves in shape for a long time and not spoil, you can treat them with glycerin:
- Dilute 300 ml of glycerin in water (about 600 ml).
- Pour this liquid into the bag.
- Carefully place the leaves in the bag.
- The bag must be sealed and left for several days (about 3-5 days) in a dark place.
- Then take out the leaves and let them dry.
How to make flowers from leaves: step-by-step description
We will need:
- Red and yellow leaves
- Twigs
- Scotch tape or green tape
- Scissors
- Threads
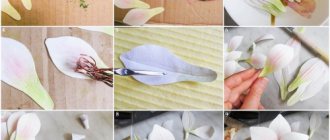
Prepare the leaves first.
We begin to collect the flower from the core. To do this, take a leaf and bend it in half, face outward.
Roll the leaf into a loose roll.
In the second sheet, wrap the protruding upper part.
Wrap the leaf around the core of the flower, twisting it. Don't forget to pinch your future flower at the base.
Do the same with other leaves, twisting them onto the bud one by one.
Continue until the flower has a nice shape.
Insert the twig into the base of the flower and begin wrapping the tape.
Cutting templates
To work with children, templates for any equipment can be printed on a printer, and then transferred to cardboard and cut out.
The high density of the blanks for tracing will ensure their durability. Having planned lace, requiring the use of a stationery knife, autumn leaves stencils for cutting can be made from thin plastic. Otherwise, the blanks will be disposable.
DIY autumn leaves with bright stains
To make autumn leaves with bright patterns, you need to prepare leaves cut out of cardboard, cling film, gouache paints, a glass of water and a brush.
We apply several spots of paint of different colors onto the film at a short distance from one another. To get streaks, the film must be folded in half. The colors will mix. After this, place a leaf cut out of cardboard on the painted surface and press it down a little with your hand. Carefully take it out by the tail and, turning it over on the back side, set it aside to dry.
Volumetric leaves, like real ones
The naturalness of paper leaves is given by coloring. In any case, monochromatic options will look like crafts.
The paper can be tinted so that the colors do not seem rough:
- grated crayons or pencil lead;
- watercolors and blurred watercolor pencils;
- alcohol paints (for example, from a felt-tip pen) and a sponge;
- airbrush or spray drops with any stiff brush.
To make the composition beautiful and realistic, the teacher must tell you in advance which colors are characteristic of which plant and help you choose shades.
You can literally copy the texture of the leaves by simply highlighting it with chalk or a wax pencil. To do this, you need paper thin enough so that the relief of the veins can be clearly felt through it.
Having placed the original under the sheet, you need to lightly touch the surface so that the tinting lies brighter on the folds. If you choose the shade of the paper and chalk in advance, you can get a realistic effect.
The veins of the leaves, even if they are made of plain paper, should be embossed. There are simple ways to corrugate a workpiece without resorting to complex stamping methods. To make embossed veins, you will need:
- a dense but fairly soft base (folded paper sheets, linoleum, thick oilcloth);
- scissors, sharp stick, toothpick or skewer;
- visual diagram.
Having placed the workpiece on a soft surface, you need to push through the veins, observing the natural pattern of the original. The lines should not be rigid or drawn according to a ruler.
For paper-plastic techniques that make it possible to obtain voluminous blanks, scissors are usually used. A part is passed through their cutting edge at a fracture, causing it to begin to curl.
When working with children, you can also use a thin ruler - this will prevent injury. The main thing is to show with an example how pressure affects the quality of twisting.
The veins on the leaves can also be made voluminous. To do this, you will need a glue gun or 3D pens that have become quite common. The relief is simply drawn with plastic, and then painted along with the main plane.
A similar effect can be achieved with simple PVA glue, if you dry it a little in an open container. It is difficult to implement such techniques in a kindergarten, but the use of new interesting technologies will make classes with older children more interesting.
Wreath of autumn paper leaves with children
The next and last craft from paper leaves that we will make is an autumn wreath. Yes, yes, wreaths are not only for Christmas. Do you think where it might be appropriate? I suggest you watch this creative MK, and ideas, I’m sure, will come by themselves.
Materials:
- Scissors;
- PVA glue;
- Colored printer paper;
- Simple pencil;
- Cardboard;
- Yellow satin ribbon 30 cm long;
- Figured hole punch “Maple leaf”.
Subsequence:
Draw a circle on a sheet of cardboard. You can use a large plate as a stencil.
Inside it we make another smaller circle.
Cut out the resulting ring.
On the reverse side we glue a loop of satin ribbon to it.
Using a figured hole punch, we cut out maple leaves from multi-colored paper.
We glue the cardboard base.
This is such a cute autumn decoration for the interior. As you can see, nothing complicated.
Let's see what other leaf wreaths you can make.
A simple but stylish option. Do you agree?
Even children can handle creating such a wreath.
Felt leaves look even more natural than paper ones.
This is how you can decorate your home on the eve of Halloween!
If you want to surprise everyone, then take something as unusual as this type of craft into your collection. I suggest making a wreath like this. It looks bright and wonderful and will decorate any room or party room.
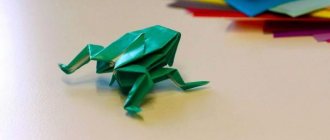
Autumn leaves using origami technique
Origami classes are included in the school curriculum. The complexity of the idea is chosen taking into account the age of the children.
For kids, you can offer modular equipment - maple or currant leaves made from modules. In this case, you will only have to fold the diamond-shaped blanks, which are then glued together into the finished composition.
Registration of a group in kindergarten
For large compositions, cut out and slightly tinted leaves from paper and cardboard are suitable. Large beads or berries from painted acorns can become rowan branches. A more stylish option is compositions using the quilling technique - lace patterns made from colored stripes.
The teacher will have to take on most of the work, although children can also assemble the simplest spirals into flowers using a glue stick.
Technique:
- The selected ornament must be transferred to thick paper. The main pattern is laid out along the contour using pins. In the case of leaves, these are veins.
- Ribbons folded into spirals fill the volume of the sheet. You can play with the color of the parts of the composition.
- The joints are treated with a glue stick or a brush with PVA.
After complete drying, the composition can be removed from the template.
How to dry leaves for crafts:
If the leaves are damp, let them air dry a little. You can put them in a spacious box so that the leaves get air. This way you will get rid of possible mold on the leaves. If it is not important for you that the leaves are smooth and even, then leave them like that in the basket until completely dry.
But if you want even leaves, you can't let them dry out completely. Place them between book pages or sheets of paper/newspaper, but always under pressure.
Thus, the leaves should dry completely for about two weeks.
There is a special herbarium press. It will allow the leaves to dry much faster, and they will be ready for fall crafts in a few days.
But you can also speed up the process by drying with an iron. Turn your iron to the lowest setting and iron a piece of wood sandwiched between two pieces of white paper.
Classroom decorations with leaves
Another spectacular technique is twisted structures using the paper-plastic technique. The relief is created by inverted stripes - internal stripes. Works can be modular. In this case, diamonds of the same type need to be fastened together.
Technique:
- A stencil of autumn leaves for cutting out of paper needs to be traced. Only double-sided paper is used, otherwise the reverse side will be visible when flipped.
- The workpiece is cut along the contour, the internal parts are perforated with a paper knife.
- Thin central ribbons are turned over, making the leaf symmetrical, and secured with glue or a stapler.
All that remains is to fasten a few leaves into a composition. To avoid ruining the look, you can use double-sided tape.
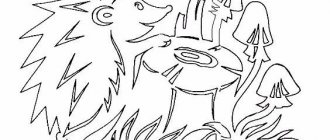
Stencils and templates of autumn leaves for cutting - download and print on A4
To make a beautiful leaf, you need a stencil or template. You can do it yourself, as we tried in the previous subtitle. But it’s much easier to download and print ready-made templates. Then even a child can cope with making paper leaves. I have prepared a small collection of stencils for you.
And a few more black and white templates for sketching. Click on the picture to enlarge.
Vytynanki - leaves on the windows
The vytynankas will look impressive on the windows. This is a lace cutting technique. Double-sided options will be equally impressive on both the inside and outside of the window. The technique is only suitable for children who can confidently handle a paper knife.
Cutting should not be offered to children due to the risk of injury. You can offer ready-made schemes for implementation. Older children can come up with an ornament on their own. The design is first drawn on cardboard and cut out, then the blank is used to transfer the design to the main color.
Leaves for dress design
In kindergartens and elementary schools, fashion shows with the simplest elements, including those made of paper, are practiced. For middle classes, such ideas are no longer relevant; they only make teenagers laugh. They can be offered to make crafts from foamiran - dense textiles that hold their shape.
Parents should be warned in advance about becoming familiar with this technology, as investments will be required. To work you need:
- foamiran itself (primary colors can be purchased one sheet per class);
- molds or molds (leaves, petals);
- tongs or iron for heating;
- paints for creating shades and a sponge for coloring;
- beads, sparkles, glue for attaching parts.
The investment will be worth it. This design, unlike paper, will withstand any presentation - after heating, the material holds its shape even when crumpled. Volumetric items can be worn on ordinary days - the fashion for hand-made items is only growing.
There are dozens of original techniques for making autumn leaves. Depending on the age of the children and the final idea, the lesson can be carried out step by step, showing the children the techniques sequentially, or leaving most of the work for independent creativity. In the second case, you need to introduce ideas as a whole, choosing feasible options.
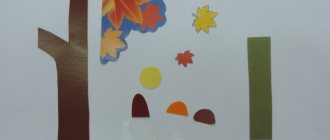
How to make DIY fall crafts from leaves
If you have prepared and dried tree leaves in advance, you can begin to create beautiful and original autumn crafts. They can create a cozy atmosphere in the home or be a suitable piece for display in a school or garden.
If you don’t have enough imagination and imagination to create crafts from leaves, then you can use a selection of works and master classes.
Evaluate your child’s age and skills before you start creating your own autumn crafts from tree leaves.
Related materials for working with leaves:
Colored cardboard and paper. Cardboard usually acts as a background and basis for work. If you glue leaves onto paper, it may bend and curl due to the weight of the leaves, so it is better to use cardboard. You will need colored paper for additional decoration (to make eyes or other parts of the animal’s body).
How to glue leaves: this can be done with regular PVA glue (it glues dry leaves well), but hot glue is also perfect.