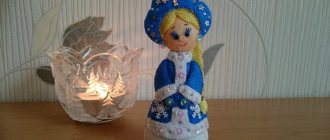
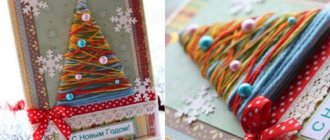
DIY New Year's kokoshnik of the Snow Maiden made of cardboard and fabric
For the kokoshnik you will need the following materials: cardboard, PVA glue, rubber glue No. 88, guipure, tulle, paper and silver braid.
First, you need to make a kokoshnik pattern from paper, fitting it to the head of the future Snow Maiden. After it is ready, you should fold it in half and apply a design for cutting, leaving space for gluing the tape. Next you need to cut out the pattern, and there should be as few slots as possible in the center of the kokoshnik, otherwise the strength of the product will suffer.
The next step: glue the cardboard in three layers using rubber glue No. 88. Then it is important to cover it with white paper, transfer the finished pattern and carefully cut it out. Next, you need to glue the front side of the kokoshnik with guipure using PVA glue. You should attach a pattern to the reverse side, draw the pattern well, cut everything out with nail scissors and glue the tulle. Then you can decorate the crown to your own taste with sequins, beads, sparkles and silver braid.
It is very important to make a fastening for the kokoshnik. The technology is as follows: you need to make a headband from thick cardboard, fitting it to the Snow Maiden’s head, and glue it to the cardboard arms. Make a cap from satin, attach it to the inside of the crown and headband, and decorate it with braid. The kokoshnik for the New Year's holiday is ready.
Do-it-yourself kokoshnik for the Snow Maiden made of cardboard – master class with photos
Materials for the kokoshnik: cardboard, newspaper, PVA glue, organza, thread, needle, scissors, beads, sequins.
Instructions:
Step 1 . Make a template from newspaper. It is best to fold it in half, then the product will be symmetrical. The cutout for the head must correspond to the size of the head of the future Snow Maiden.
Step 2 . Transfer the template to cardboard and carefully cut out.
Step 3 . From organza (or any other fabric) make a pattern according to the kokoshnik template, leaving room for seams. Place it on the cardboard on the front side and, bending the edges, carefully sew it to the inside of the product. Then do the same procedure on the inside, but fold the weave inside the kokoshnik.
Step 4 . Decorate the crown with beads and sequins according to your own taste.
How to sew a Snow Maiden costume for a girl with your own hands
Step 1. What materials do we need?
- Brocade fabric (or other medium-weight fabric) - 1 meter
- Faux fur (white) - 60 cm.
- Faux leather (you can use thick felt). Needed for the soles of felt boots. Square 21*21cm.
- Ribbon for kokoshnik - 1 meter
- Ribbon made of beads for decorating a kokoshnik - 80 cm.
- Cardboard for kokoshnik A4 format - 1 sheet
- Glue "Moment" transparent
Step 2. Sew a sheepskin coat
1. To sew a sheepskin coat, we need to make patterns for the back and front, sleeves, and facings for the neck. Prepare all the patterns for the Snow Maiden costume for a girl in order to arrange the details on the fabric more economically. From the photograph, transfer the data onto a piece of paper.
2. We transfer the finished patterns onto the fabric. Pay attention to how the fabric is folded. It is not simply folded in half, but the edges of the fabric are shifted. That is, there are folds on both sides. At one fold we pin the shelf and the back next to it, and at the other fold we pin a cap and a facing for the shelf. The sleeve and back facing extend to this width. Don't forget to transfer all the notches from the patterns. Two notches on the sleeves, one notch on the front in the armhole area.
3. We begin to assemble our sheepskin coat from the back part. Overlock the middle back seam using an overlocker or zigzag separately. Iron it!
4. Now we will sew the middle seam of the back, retreating 20-22 cm from the edge of the neckline.
5. Smooth out the middle back seam using an iron.
6. Now we need to sew the zipper into the middle seam of the back. At first glance, this operation seems scary, but the main thing is to do everything step by step. First, baste the zipper with small stitches so that it does not move anywhere when sewing. On the machine, change the double-horned foot to a special one. foot for sewing in a zipper. It doesn't look that scary; it has two notches, one of which you need to insert a zipper into and stitch it. This needs to be done on both sides of the zipper.
And now - forward!
7. We switch to the iron and iron our zipper. Congratulations - half the work is done!
8. Our back is ready. We take the shelf and put it on the back. Combine shoulder and side seams. If you rarely sew, I recommend basting seam allowances and then machine stitching. If you already have some experience, you can pin and stitch on a machine.
9. Shoulder and side seams need to be overcast. And we sew the bottom of the sheepskin coat in a circle.
10. Now we process the necks with a facing. We cut off the shoulder seams at the facing and grind them down.
11. Using an overlocker, we sew the shoulder seams, the middle seam of the back and the bottom of the facing, separately.
12. We pin or baste the finished facing onto the neck of our sheepskin coat. We sew a line on the machine.
13. Take scissors and make cuts in the rounded parts of the neck. This is necessary so that the neckline lies flat after we turn the facing inside out.
14. Now it is important to secure the edge of the back facing. To do this, change the foot of the machine to a single-horned one. This is necessary so that the line goes as close as possible to the edge of the zipper.
15. Turn our facing inside out. Trim off the excess zipper. Now you need to bend the middle back seam allowance, and bend the edge of the facing on top. And thus the corner will turn out!
16. To make the facing fit nicely, we need to stitch 1 mm from the facing seam. We bend the allowances onto the facing and lay a line along it.
17. All that remains is to sew in the sleeves. And sew the seam of the sleeve.
18. We overlock the sleeve seam.
19. We sew the bottom of the sleeve in a circle.
20. Now you need to iron the sleeve seam with an iron. To do this, bend the bottom 2.5 cm and press it with an iron.
21. The next step is to sew in the sleeves. We stick the sleeve into the armhole. We combine the notches of the sleeve and the seam of the sleeve with the side seam of the sheepskin coat. We distribute a small fit, it is needed so that the sleeve looks beautiful.
22. Sew around the armhole.
23. Fold the bottom of the sheepskin coat by 2.5 cm and iron it with an iron.
24. We have a brocade sheepskin coat ready. All that remains is to decorate it with fur. To do this, we cut out a strip 7.5 cm wide and about three meters long. My fur width was 150 cm, I cut out two strips and stitched them together.
25. Fold the long strip in half lengthwise and grind it on a machine at a distance of 1 cm. We will get a long tube.
26. One edge of the tube needs to be sewn up on a machine; through this edge we will turn our tube inside out using a regular pen or pencil.
27. We need to manually sew a decorative fur cord or tube to the sheepskin coat. We combine the seam on the tube with the middle seam of the back and begin basting first to the left, then to the right. We pierce the cord itself and the brocade right through.
And our beautiful sheepskin coat is ready!
See also:
DIY gnome costume for a boy
Step 3. We sew a hat for the Snow Maiden
So, let's move on to the next element of our costume.
1. We need to copy the hat pattern onto a sheet of paper according to these measurements.
2. Cut out two parts of the hat with a fold. Two details are needed to make the hat look beautiful - both outside and inside. The seams will not be visible!
We will need two strips - one of fur, the second of brocade: 10 * 52 cm.
3. You need to close the strips into a ring separately!
4. Sew down the details of the cap, as shown in the video.
5. Stitch the edges of the cap.
6. Now you need to lay out the cap and align the seams. Pin and sew on a machine. Don't forget to do this on both the top and bottom parts of the hat.
7. Fold two strips of fur and brocade facing inward. You need to pin it in a circle and machine stitch it, turn it inside out.
8. Now we sew this ring to our hat. One layer for the top hat, a fur layer for the bottom hat. We grind two layers of brocade and fur in a circle. And we grind off two layers - only from brocade - and leave a small hole. We need it in order to turn the hat inside out.
9. Manually close the open seam through which the hat was turned inside out.
So the hat for the Snow Maiden is ready!
Step 4. Making felt boots
1. And again we transfer the pattern details onto a sheet of paper according to these measurements.
The patterns you will need are:
Foot (leather) - 2 parts Back upper part - 2 parts with fold Back lower part - 2 parts with fold Front top part - 2 parts with fold Front lower part - 2 parts with fold
2. Cut out the details of the felt boots. If there is leather, then we make the sole from it; if there is none, you can use any white fabric or fur itself! Please note that fur has a pile direction and should be cut in the direction of the pile!
3. Don't forget to put notches wherever they are indicated!
4. We combine the parts along the notches, chop and grind them on a machine.
5. The stitching seam needs to be fluffed with a needle. Remove any lint that has gotten into the stitching seam. The seam itself will be less noticeable.
6. Assemble the front part of the felt boot along the notches.
7. We chop off the front and back parts of the felt boots along the side seams.
8. Turn the felt boots right side out, the seams will need to be fluffed out with a needle.
9. Now your task is to sew in the sole, aligning the notches. And then chop it off!
10. Turn the felt boots inside out. Our handsome guy is almost ready! All that remains is to bend the top of the felt boot 2 cm inward and sew it on a machine.
Hurray - the felt boots are ready!
Snow Maiden's kokoshnik on a wire frame - step-by-step MK with photo
For this kokoshnik the following materials are needed: elastic wire, cardboard, Moment glue, brocade (preferably silver), beads, sequins, seed beads, thread and needle.
First, you need to make the frame of the future kokoshnik from elastic wire. Then the base of the product should be cut out of cardboard (the wider, the more stable it will be on the head) and sew it to the bottom of the frame. Then you need to cut out the top of the kokoshnik and sew it to the wire frame using a thread and needle. Next, using Moment glue, carefully glue the brocade to the rim and top of the crown. Well, the last and most pleasant thing: decorating the kokoshnik to your own taste using beads, sequins and beads (best with glue - a gun). If you need to give the product greater stability, you can sew a tulle cap on the wrong side.
Option two. A circle skirt as the main part of a New Year's costume
Using an absolutely similar pattern, we can create the lower part of the festive clothes.
Using the already familiar formula presented when describing the construction of the cape, we measure, calculate and apply the required dimensions to the canvas, where R1 is the width of the waist, and R2 is the desired length of the product.
If you plan to secure the skirt with an elastic band
, then it should be slightly larger than the actual girth.
To create a belt, you can use a rectangular piece of fabric about 6 cm wide. It needs to be folded in half, insert an elastic band inside and sew it to the skirt.
Alternatively, you can use a button or a sewn-in zipper to secure it.
Using such a simple scheme, but showing originality when choosing materials such as guipure, lace or satin, you can create a gentle image of the adult granddaughter of Santa Claus
.
New Year's kokoshnik made of beads - how to make it yourself
Materials for the kokoshnik: veil, pearl beads, Czech beads, wire, rhinestones, gold thread, sparkles, cardboard, pen, scissors, bead needle.
The instructions for creating are as follows:
- Step 1 – create a drawing of the future kokoshnik on A3 cardboard, adapting it to the desired size.
- Step 2 - pull the veil onto the painting stretcher, securing it with clamps, the tension should be uniform, like a canvas.
- Step 3 - since the veil is translucent, the kokoshnik pattern is clearly visible, which needs to be transferred to the fabric.
- Step 4 – embroider the required pattern with Luneville crochet using gold threads.
- Step 5 – embroidery with beads, rhinestones and beads.
- Step 7 - to create a good and durable frame, you should sew in wire, then trim it with gold threads.
- Step 8 – sew in sequins and beads.
- Step 9 – create a headband from wire and attach it to the kokoshnik.
- Step 10 – prepare pasta: 4 tbsp. l. pre-weld PVA glue until thick and cool, 2 tbsp. starch with 2 tbsp. flour and 0.5 tbsp. cold water. Everything is mixed until smooth.
- Step 11 – remove the kokoshnik, leaving the fabric on all sides. Start gluing: fabric - cardboard - fabric - cardboard - fabric. After gluing, press drying is necessary for 30 hours.
- Step 12 – cut out the kokoshnik from cardboard.
- Step 13 – sew on the bead mesh.
Snow Maiden's accessory
It's hard to imagine the Snow Maiden's costume without this accessory. As a rule, it is decorated with sparkles and snowflakes. In this case, a template is also initially created. The product should be curly and quite tall.
To make a kokoshnik for the Snow Maiden, you will need the following tools and materials:
- tulle;
- scissors;
- satin ribbon;
- glue;
- decorative elements.
The pattern of the headdress to be made should first be made on plain paper, and then transferred to fabric. Instead of tulle, it is allowed to use any other suitable materials.
There is nothing easier than making a kokoshnik from cardboard with your own hands. In the future, you should adhere to the following instructions:
The stencil is applied to the canvas and outlined.
Blanks are cut out. They should consist of three layers. They are subsequently glued together using transparent glue.
The lower part of the structure is sheathed with tape. Due to this, the accessory will fit much more tightly to the head.
The ties are sewn on.
The top edge is decorated with snowflakes made from fabric or plain paper. You can also resort to dyeing the product. When painting, snow-white, blue and silver shades are used.
In this case, you can select very diverse drawings. Frosty patterns, all kinds of monograms, as well as stars of various sizes would be appropriate. In this case, glass beads and sequins can also serve as decorative elements.
New Year's kokoshnik made of plastic napkin and tulle
Another incredibly beautiful kokoshnik for the New Year holidays. To make it you will need: plastic (a plastic napkin or folder will do), paper pattern, beads, glue, pencil, brocade, lining fabric, elastic, tulle, rhinestones.
We cut out the pattern of the future kokoshnik from paper, fitting it to the head of our Snow Maiden. Then, according to the pattern, we cut out the base of the kokoshnik from plastic (in this MK we used a napkin for hot food). Place the plastic base on the tulle and stitch for secure fixation. Draw a pattern for the kokoshnik on paper, place the pattern under the base and outline it with gold glue or glitter. After this, you can glue all the beads, rhinestones and sequins onto the kokoshnik with hot glue. Then you should sew a hat from brocade, having previously measured the head of the future Snow Maiden, and sew an elastic band to the bottom. The next step is to connect the base of the kokoshnik and the cap. At the very end, you can also sew satin ribbons.
Crochet Snow Maiden kokoshnik - diagram and description
To make a knitted kokoshnik you will also need crocheting skills.
For the product you will need blue and white yarn (120 and 100 g each, respectively) and a No. 5 hook. As auxiliary materials, you should take scissors and chalk, which are used by tailors, a measuring tape and a blank with which you can make pompoms.
Keep in mind that when making a kokoshnik in this way, you will need the ability to knit double crochets, double crochets, chain stitches, make connecting loops and increase stitches. Initially, the base hat is knitted. To make it, you can use any pattern according to which you can make the base of the hat.
As soon as the base of the hat is ready, its lower part should be decorated with a white border in the form of a knitted pattern. For this you can use either the method indicated in the diagram or any of your own.
After this, use chalk to mark on the base of the cap where the kokoshnik crown will be placed. Lay a straight chain stitch along the marked line. On a knitted chain, it is worth marking the central loop. Next, you should put aside work with the base and make a pair of white pom-poms. It is better if they turn out to be up to 5 cm in diameter.
Next, continue tying the upper part of the kokoshnik with white thread in the form of a crown, making an openwork edge. It is worth tying the white part of the crown with a blue thread. Sew pompoms to the sides of the crown. The base of the kokoshnik can be additionally decorated with snowflake stripes.
More crochet kokoshnik patterns
Kokoshnik made of cardboard with beads - how to make a kokoshnik for the Snow Maiden with your own hands step by step
Materials for the master class: cardboard, thermo-velcro base, white veil, glue gun, satin, braid, beads, wire.
Instructions:
- Step 1. Cut out the kokoshnik template and base from cardboard.
- Step 2. Place the templates on a rigid base and cut out two of each.
- Step 3. Place a pre-prepared fabric on the sticky part of the base and iron it well. The fabric will stick, and then you can cut off all excess along the contour of the templates.
- Step 4. Carefully apply patterns and markings onto the front side of the future kokoshnik, along which to sew the braid.
- Step 5. Fold the kokoshnik and the base right side to it and sew.
- Step 6. Place the beads on the wire and weave. It is important to pay attention to the fact that this weaving must be tapered.
- Step 7. Sew the completed weaving to the rim of the kokoshnik.
- Step 8. Make a pattern from the beads and attach it to the base of the crown using a glue gun.
- Step 9. Attach a veil, preferably white, to the back of the kokoshnik. The product is ready.
How to sew a Snow Maiden hat
It is advisable to make the hat from the same fabric as the rest of the outfit. If you are already making it from another, make sure that the patterns on the hat and clothes are not particularly different. The Snow Maiden's hat consists of six wedges. To calculate the size of each of them, you need to determine the head circumference, add 3 to this number and divide the sum by 6.
The height of the headdress is measured from the ear to the top of the head. Transfer the pattern to the fabric and cut, taking into account the seam allowance. Grind the wedges down on a sewing machine, trim the bottom with fur or silver tinsel, and sew a pompom to the top. Decorate the hat as your imagination dictates.
Kokoshnik for the Snow Maiden made of cardboard with a scythe - step-by-step master class
For the next kokoshnik you will need materials: brocade, satin, cardboard, artificial hair braid, beads, beads, braid, headband, clothespins.
Next you need to follow the instructions.
- Make the basis of the future kokoshnik from cardboard.
- Cut out the front side of the product from the brocade, making sure to leave room for hems.
- Glue the brocade onto the cardboard, and the corners can first be secured with clothespins.
- Cut out the wrong side of the kokoshnik, but do not leave any space for hems; glue on the brocade.
- Bend the edges and carefully glue them to the back of the kokoshnik with a glue gun.
- Sew a cap for the crown, decorate the edge with braid. Then sew it to the kokoshnik
- Take a strip of brocade and sew a braid of artificial hair onto it, glue it all to the rim of the crown.
- If desired, you can make a bow from brocade and attach it to the back of the product.
- Decorate the seams and edges of the kokoshnik with beads, beads or sequins.
How to sew a Snow Maiden dress yourself?
If you couldn’t find ready-made clothes that can be easily converted into Snow Maiden’s robes, then you can sew them yourself. Fleece or patterned brocade in white or blue colors are suitable as materials. To determine the length of the fabric, you need to add the length of the sleeve to the expected length of the dress and trim it with white fur with a pile. Don't forget about zipper/velcro, thread and buttons. The decor should be selected so that all materials are combined with each other. The scheme is as follows:
Find the pattern you need; if you wish, you can draw it yourself. The design should be transferred to the back side of the fabric, cut out and sweep away the details. Try them on a model. If all components of the suit fit well, sew the shoulder and side seams. Sew the sleeves, sew fur to the desired places (hem, sleeves), add a zipper or Velcro. You can decorate your outfit with sequins, openwork snowflakes, pebbles or rhinestones. Place the remaining fabric on the belt.
New Year's kokoshnik for the Snow Maiden on a plastic base
An excellent version of the Snow Maiden’s kokoshnik made from scrap materials. For work you need: a plastic base (for example, a plastic hot plate), fabric, glue, decorative elements: braid, beads, rhinestones, etc.
Cut two blanks from the plastic base and stitch them together. Cut out the same base from fabric, stitch the top, put it on a piece of plastic, and sew it at the bottom using thread and a needle. Decorate the bottom of the product with beads. Glue the braid along the rim around the head with a glue gun. Decorate the kokoshnik itself to your liking with sequins, rhinestones, beads or beads. Make a bow from a satin ribbon measuring 1.5 meters by 15 centimeters and attach it along the edges of the crown, but be sure to symmetrically on the wrong side. At the very end, you need to sew an elastic band to the edges of the product. The kokoshnik for the New Year holidays is ready.
Starched version
A crocheted kokoshnik will be an unusual and original decoration for a girl. You can make it in two ways.
You will need yarn (choose the color to your liking), rhinestones, PVA glue (instead of starch, much more convenient), iron, headband.
Start your work from the base of the kokoshnik. Glue the yarn to the edge of the hoop and wrap it carefully, securing it at the end. Then knit the product according to the chosen pattern:
Article on the topic: Women's knitting patterns. Magazine with diagrams
Steam the resulting product with an iron, then soak it in PVA glue, dry it and attach it to the rim. At your discretion, decorate the kokoshnik with rhinestones.
Kokoshnik of the Snow Maiden on a plastic base - MK with photos step by step
Another beautiful and quite easy to make kokoshnik. For it you will need the following materials: plastic folder, brocade fabric, glue gun, wide elastic band, paper, satin ribbon, decorative elements: beads, sequins, beads, rhinestones, etc.
Progress:
- Step 1. Make a kokoshnik shape from paper and fit it to the head of the future little Snow Maiden.
- Step 2. Transfer the workpiece to a plastic folder (in this case it will not bend or break).
- Step 3. Make a pattern from brocade fabric in the shape of the future kokoshnik. At the same time, be sure to leave two centimeters for hems on the front side (no need to leave anything for the back side).
- Step 4. Glue the fabric along the edges of the crown, make cuts in the right places for a better fit.
- Step 5. Sew a wide elastic band and a satin ribbon to the bottom of the kokoshnik so that the ribbon hides the elastic band.
- Step 6. Decorate the product to your own taste, using accessories (sequins, beads, beads or rhinestones).
Wearing traditions
The exact time of the appearance of the kokoshnik is unknown, as is the full history of its origin, but already in the 10th century, products similar to it were a common part of clothing in Rus'. Until the twenties, it was part of the bride's headdress, which the young wife wore until the birth of her first child, and then took off and put on only on holidays. Now this item of clothing has practically disappeared from everyday life and is used as part of carnival costumes and clothing for performances.
The kokoshnik was made to order. It could be bought from professional craftswomen - kokoshnits, who possessed all the skills necessary to create a headdress and knew how to handle not only fabrics, but also natural pearls, gold threads and beads. The price of especially expensive products reached up to 300 rubles in banknotes (for comparison: a strong peasant horse cost 60 rubles), so kokoshniks often became family heirlooms. They tried to carefully protect them and passed them on from generation to generation.
This dress was worn only on holidays - it was intended to emphasize the solemnity of the occasion. On ordinary days, women wore braids and warriors. The traditional hairstyle for a kokoshnik was two braids arranged in a wreath or bun. The headdress completely covered the hair of a married woman, but there were also girls’ kokoshniks, which made it possible to do other hairstyles.
A distinctive feature of the dress is the comb. It could be in the shape of a crescent, or in the form of an arrow, a circle, a triangle, a crown, or a fan. In ancient times, by the shape of this headdress one could determine the province from which the girl came. Ornament also played an important role. Traditionally it consisted of a frog, which symbolized fertility, and two swans, associated with marital fidelity. The back side of the kokoshnik was also decorated - usually there was a drawing of the tree of life.
Original ideas for the kitchen: making a basket from paper towels
This dress is usually associated with weddings. It is sometimes mentioned in the texts of ancient prayers for marriage and family. When the kokoshnik began to replace traditional scarves and hats, in some places it was still preserved as part of the wedding tradition - for example, newlywed girls wore them for three days after the celebration. For such a special occasion, it was customary to wear a pearl kokoshnik - even if the bride’s family could not afford it, they had to borrow an element of the costume from neighbors or acquaintances.
The word “kokoshnik” was first documented in the 17th century. Under Peter the Great, it was prohibited from being worn among courtiers, but was preserved as part of the wedding tradition. Tsarina Catherine II brought part of the traditional Russian costume back into use. During the Napoleonic Wars, it came back into fashion due to the subsequent surge of patriotism and renewed interest in tradition. Even Russian empresses wore it.
According to the decree issued by Nicholas I, the kokoshnik became part of the court dress. Maids of honor wore it until the revolution. In the 19th century, there was another surge in the popularity of this attribute. Court ladies wore richly decorated and often “exaggerated” versions of traditional kokoshniks to balls and special events, which demonstrated the luxury and richness of the costumes.
Do-it-yourself kokoshnik for the Snow Maiden made of wire and fabric - MK with photos and videos
Materials required for the kokoshnik: wire, electrical tape (or adhesive tape), fabric (chiffon and organza), threads, needle, accessories (beads, rain, rhinestones, sequins, etc.).
First you need to make the frame of the future product from wire. Then this frame should be wrapped with electrical tape or adhesive tape, so as not to damage the fabric in any way.
Next, it is important to cut out two parts according to the shape of the workpiece: one from chiffon and one from organza. Pin along the entire shape of the wire and sew carefully. After this, you can start decorating using pre-prepared accessories: rain, rhinestones, beads, seed beads or sequins.
At the very end you need to make a headband. To do this, you need to tie a white cloth on the Snow Maiden’s head, attach a kokoshnik and carefully draw a line. Then all that remains is to trim off the excess and sew on the headband. The crown is ready.
Snow Maiden's kokoshnik made of cardboard on a rim - master class step by step with photos and videos
Another very beautiful kokoshnik made of cardboard. The instructions for making it are quite simple. For work you will need: cardboard, hoop, fabric, satin ribbon, decorative elements, glue, scissors.
- The headband should be wrapped in white satin ribbon and glued with a glue gun.
- First, draw a sketch of the future kokoshnik on paper, then transfer it to cardboard and cut it out.
- Take a pre-prepared fabric, fold it in half (right side inward), transfer the template, making sure to leave room for the seams.
- Sew the product blank, turn it inside out and carefully iron all the seams.
- Insert the cardboard into the fabric base and sew it with a hidden seam.
- Sew the headband to the wrong side of the crown.
- Prepare decorations using the kanzashi technique: cut out squares from satin ribbon of three colors (one side is five centimeters). Place them all face outwards diagonally and burn them with matches or a lighter.
- Glue the blanks onto the kokoshnik according to your own taste with a glue gun.
Do-it-yourself Snow Maiden kokoshnik made of cardboard and foil-isolon - step-by-step MK with photos and videos
No less interesting is another master class on making kokoshniks. Necessary materials: foil insulation, cardboard, silver braid, crepe - satin, elastic band, glue gun, scissors, accessories.
Instructions:
Step 1. Cut out the base of the future kokoshnik using a stencil from foil-isolon and cardboard. It is good to glue them together.
Step 2. Spread the foil with glue, apply crepe-satin (right side out), smooth it out (so that there are no folds left anywhere). Turn over, trace around the edges with a pencil, leaving 1.5-2 cm and carefully cut out with scissors.
Step 3. Place the fabric on the paper base (right side out) and glue.
Step 4. For convenience, you need to sew an elastic band to the edges of the kokoshnik.
Step 5. Using a glue gun, very carefully glue the silver braid onto the edges of the crown.
Step 6. Attach beads, lace, rhinestones, beads or sequins to the front side of the product according to your own taste.
Snow Maiden costume size
I sewed the Snow Maiden costume for a 3-4 year old girl (86 - 98 cm). Below you will find patterns for heights of 86, 92 and 98 cm.
Glossary of terms
Experienced seamstresses already understand all the terms used in this material. But perhaps it was you, inspired by our master class, who decided to sit down at a typewriter for the first time and don’t know many special words. This matter is fixable. We decipher the terms especially for you!
To stitch or topstitch means to join two layers of fabric. Ironing is simple: iron the allowances (edges) in different directions. Iron - iron seam allowances (edges) in one direction. The face of the fabric is the side where the pattern or surface is clearly defined. At the edge of the overlock seam , stitch (see above) the fabric the width of the foot from the edge of the allowance.