Birthday is always a fun holiday!
A holiday of joy and laughter, balloons, delicious cake and, of course, colorful party hats. In this article, we are ready to offer you several simple master classes on making caps for birthday celebrations, as well as options for decorating ready-made caps. Why buy standard and boring caps in the store if you can make them yourself.
In order to make hats for a birthday celebration or other fun party, you will need thick decorative paper or plain paper, or thin cardboard will also work. You will also need scissors, a pencil, glue and a cap stencil (we attach the stencil below).
How to make a cap?
First you need to print a stencil of the cap and transfer it to paper or cardboard. Then carefully cut out. If you don’t plan any more decoration, then feel free to start gluing.
Attach a pompom made of thread and ties to the top of the cap. So, we figured out how to make the simplest cap. Now let's look at what options for decorating a birthday cap you can make with your own hands from scrap materials.
Festive paper hat
Bright multi-colored paper caps are a popular accessory, appropriate both at a noisy crowded party and at a home event in a close circle of family and friends. However, we often find it difficult to find a ready-made item of the right color or size. In order not to waste time shopping, arm yourself with several sheets of thick paper and a diagram, and make exactly the kind of caps that you would like to see at your holiday.
For this project you will need the following:
- Scheme: you can download it here
- Thick colored paper or thin cardboard
- Multi-colored ribbons
- Corrugated or crepe wrapping paper for border and pompom
- Thin wire
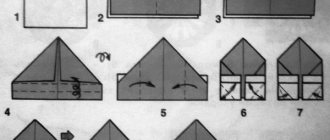
1. Print and cut out the diagram.
2. Transfer the template to a sheet of colored paper and cut out the blank.
3. Fold the cap by inserting the protruding portion of the side edge into the slot. For reliability, the connection point on the inside of the cap can be secured with tape.
4. Make cross-shaped cuts on opposite sides of the cap and thread the tape through them. Tie the end of the ribbon with a knot on the inside so that it does not slip out of the hole.
5. Decorate the hat with applique, border and pompoms made from wrapping paper.
How to decorate a hat with New Year's tinsel?
One of the options for a very impressive decoration of a holiday cap is the use of New Year's tinsel and decorative adhesive paper.
Cut out the necessary elements for decoration from adhesive paper. These can be circles, squares, triangles, stars, flowers or stripes. Glue the decorative elements to the paper cap.
Decorate the base of the cap with New Year's tinsel, glue it with glue or double-sided tape.
Also make a pompom from New Year's tinsel and fix it on the tip of the cap.
Manufacturing sequence
Sewing a chef's hat occurs in several stages:
- taking measurements;
- pattern making;
- cutting parts;
- sewing crowns;
- preparing the bottom of the product and sewing it to the crown.
Armed with patience and everything you need, you can get to work.
Head circumference is measured with a measuring tape, which tightly, but without tension, covers the head at a level just above the eyebrows. The resulting value is the size of the cap; in an adult it is most often in the range of 55-60 cm.
The height of the crown, that is, the cylinder, is chosen arbitrarily, but not less than 7 cm.
It is not recommended to make it too high, more than 20 cm, since at a high height it will be difficult to ensure the rigidity of the cylinder while wearing the cap.
The pattern for the crown is a rectangle. For example, the selected dimensions of the finished chef's hat are 57 cm (head circumference) and 10 cm (crown height). Increase seams by 1 cm on each side.
The sewn product has a two-layer crown. In this case, the dimensions of the rectangle are 59X22 cm. Most cutters create a pattern of simple symmetrical parts in half size, that is, you can limit yourself to a rectangle of 29.5X22 cm.
On the pattern you should write on one side: “fold line.” Then it is enough to place the pattern on the prepared fabric so that the fold line of the pattern coincides with the fold of the material.
The circle for the top of the cap is drawn with a radius of 35-39 cm. The larger the size of the circle, the more magnificent the top. If it is not possible to cut the specified size from the remaining fabric, it is allowed to reduce it. The limit is 20 cm radius (flat top).
A seamstress who is confident in her skills can skip the step of creating a chef's hat pattern on paper and mark directly on the fabric using colored chalk.
The cut out rectangle is folded in half in length. The open side is stitched (you can do it directly on a sewing machine) at a distance of 1 cm from the edge. Then the edge strips are folded 0.5 cm each in their own direction and smoothed with an iron. Also, using an iron, a non-woven tape is attached, positioned so that one of its edges runs along the middle line of the resulting cylinder.
The tape should be on the part of the crown that will cover the head. The part is folded exactly along the line of the tape so that both the tape and the folded edges are inside. It is advisable to immediately iron the folded edges (1 cm) inward along the top of the cap: the marked fold lines will make further assembly easier.
A circle cut out of fabric for the top of the product must first be gathered along the edge to the size of the seat. To make it easier to find the desired size, you can use a ready-made pattern for the crown (half), periodically applying the assembled edge to it. Depending on the choice of finishing option for this part, the appearance of the finished chef's hat changes significantly.
You can sew a circle with long stitches around a circumference 1 cm from the edge of the part and, pulling the thread, distribute the fabric evenly. The same effect can be easily achieved by machine stitching with the longest stitches possible, and then evenly distributing the fabric, gradually pulling up the bottom thread.
The finished chef's hat looks more impressive when tuck folds with a depth of 1.5-3.0 cm are formed along the edge of the circle. The process is a little more complicated, but the result is worth it.
If you choose this method, you will have to carefully bend and grab each fold with a couple of stitches. It may not be possible to make all the folds the same the first time. You'll have to pull out the thread and try again. All folds should face the same direction. When the edge of the top is gathered to the desired size, the folds need to be ironed 2-3 cm in height.
The prepared top must first be basted to the crown, placing its edge between the two layers of the base of the cap. It is more convenient to perform this operation in two stages. First, connect the top to the outside of the crown, then baste the inside, inserting the needle approximately 1 mm below the fold line (edge inside).
As a result, the junction of the parts will turn out to be five-layered, but all the edges will be securely hidden. All that remains is to stitch these layers as close as possible to the joining line and remove the basting stitch threads (if they are peeking out).
How to decorate a cap with multi-colored ribbons?
Drape the paper blank for the cap with a beautiful fabric and secure the edges with hot glue.
Decorate the base of the festive cap with an assembly of satin ribbons. Make a pompom from a small piece of tulle. Ready-made caps can be decorated with decorative elements: hairpins, beads, butterflies, etc. This version of holiday hats is perfect for a girls' party.
How to decorate a cap with flowers?
Yes, yes, you can even decorate holiday hats with flowers. This option would be very appropriate for a summer birthday party outdoors.
Drape the blank for the cap with decorative paper or a beautiful fabric. Make a pom pom from a small bouquet of summer wildflowers. Decorate the base of the cap with flowers, either artificial or real.
Fabric hat
Fabric hats are the most popular option. They are made for adult Halloween witches from any textile. Since the size of the product is quite large, frames that help maintain the shape of the headdress become a prerequisite for it. Some combine materials. For example, a fabric crown and cardboard fields. A textile hat will last a long time and will be used at many Halloweens, while maintaining its terrifying appearance.
Required materials and tools
To create a textile hat you will need:
Witches' headdresses can have a sharp tip pointing towards the sky, or gently sliding somewhere to the side. The fabric for the brim and crown will have to be starched.
Work technique
First, measure the circumference of the head of the witch for whom the hat is intended. Based on the resulting figure, a pattern is created on a sheet of cardboard with a margin of 1.5 cm. Then frame “circles” are made. Two pieces are cut from a coil of wire. One is equal to the circumference of the head, and the second is the length of the outer brim of the hat. The ends of both pieces are connected, twisting tightly. You can use a soldering iron. Now the crown is sewn together, and a smaller wire circle is attached to the bottom. If the cap should “fall off” gently, then it is straightened out figuratively and the resulting folds are secured in the right places with stitches. For the brim of the hat, two identical parts are cut out. They are applied to each other and stitched. Now the fields can be turned right side out. A wire circle of larger diameter is attached to the rim. Carefully finish the remaining stitch on the outside. If there is no wire at hand, it is replaced with a cardboard circle. It will keep its shape a little worse. Then the fields are sewn to the crown. The place where two elements are fastened is masked with black or purple ribbon.
Decor
A pointed witch's hat made of fabric is decorated with translucent mesh. The veil is sewn to the brim from the inside. A large “dome”, which will hang from all sides of the headdress, is collected under a black inconspicuous elastic band and put on top. Hats are decorated with bright lacing, bats, snakes, buckles, tufts of feathers, spiders, picturesquely sliding along a thread from a sharp tip. Models made of black silk and decorated with bright orange “bouquets” of maple leaves look great. Modest but mysterious hats are decorated with silver threads entangling the cap. They complement the decor with tiny rhinestones or stars. To emphasize the gloomy style, they use skulls, “claws” of small animals, and miniature ravens, which are placed on the brim of the headdress. The original decor can be crocheted. For example, a light cap made of gray yarn (openwork knitting) will imitate a cobweb on a black hat.
How to decorate a cap with fabric?
Paper party hats don't have a reputation for being a long-lasting party accessory. Caps often tear and lose their attractive appearance.
If you drape the holiday cap blank with beautiful fabrics, the cap will not only have a neat and festive look, but will also be more resistant to damage.
Decorate the top of the caps with multi-colored fluffy pompoms made from the most ordinary knitting threads.
Quality certificate compliance criteria
Sanitary standards dictate the mandatory use of hats for chefs, but do not provide specific guidance on models.
Often, kitchen workers themselves are involved in choosing options for chef's hats, depending on their personal preferences.
Chefs' hats weren't always snow-white. Initially, their color was more practical - gray. Later, a new criterion emerged: employees in food processing areas must wear light-colored or white hats. Today color is not of fundamental importance. White can be shaded with contrasting shades.
The health of those who taste the food directly depends on the hygiene of food industry workers. Therefore, chefs’ hats must meet the following criteria:
- Breathability. Provides comfort during the work process;
- Non-toxic. Eliminates the development of allergic reactions;
- Easy to clean. Allows you to maintain the original shape and presentable appearance for a long time;
- Barrier qualities. Protect dishes from hair, harmful bacteria and microorganisms.
How to update old birthday party hats?
If you already have party hats that were left over from your last party, then there is an opportunity to give them a second life. Glue decorative paper, lively eyes, a bright pompom to them and now you have a character for a Monsters, Inc. themed party.
Decorate your hats with sparkling sequins and you have the perfect holiday accessory for organizing a glamorous party.
Paper headdress for herringbone costume
In recent years, the Christmas tree costume has become very popular at children's parties. If, as a rule, there are no special problems with making a dress, then a headdress forces parents to work hard. In fact, everything is done extremely simply.
To work you will need a large sheet of paper, green tinsel and very small Christmas tree decorations. You need to make a regular bag out of paper. Then it needs to be cut so that the wide part fits the diameter of the child's head. Now the decoration (tinsel) comes into play. You need to carefully wrap it around the entire paper cap. Then the carnival headdress, which by this point will already resemble a Christmas tree, is decorated with small toys. It is necessary to choose only plastic products for decoration, but in no case glass toys.