Step-by-step wool felting for beginners
Handicrafts such as wool felting are becoming more popular and do not lose their relevance. This is a very ancient way to create unique and beautiful things with your own hands; it is also called felting. Let's look at how to do wool felting step by step for beginners.
Before we completely immerse ourselves in creativity, let's find out what felting and wool felting is? This is a method of making various crafts from flat to voluminous by weaving fibers.
Why does wool roll and create beautiful products? The fact is that natural wool has the same structure as split human hair. But if in the latter case, a person may develop tangles, then wool allows making crafts by felting.
Felting can also be done using cashmere, angora or mohair. Using such a base and special tools you can get: toys, clothes, shoes and even carpets. The fibers are intertwined in different ways. Below we will look at such types of felting as dry and wet. Let's look at the tools that are used in these techniques.
The first and most important thing you will need for your work is special needles. They differ from ordinary needles in that there are special notches at their ends, which push the hairs through, and the hair gets tangled. The needles are resilient, but often break, especially if they are not handled correctly.
Needles are distinguished:
- By numbers. The thickness of the needle depends on the serial number. When working with wool, they use different needles, starting with a thick one, and when it begins to fit tightly into the material, this is a sign that the needle needs to be changed to a thinner one.
- By section. The following types are distinguished here: triangular, conical, diamond, cylindrical, star-shaped. There are also special types: crown and reverse. In the first, the notches are located at the very tip and are used to attach small, decorative elements. The second one also has serrations at the end, but they are directed in the other direction, which allows you to pull out the wool and create fluffy products.
The choice of needle depends on your convenience. Experienced people advise starting with star-shaped needles and, after gaining initial experience, stopping at tools with a complex cross-section. Each master uses his own set of needles, and there are no identical preferences, so you will have to make the choice personally.
(Felt backing and sponge)
When felting wool for beginners, you will also need a mat or, in other words, a backing. In order not to hurt your finger or break the needle on the workbench, you need backings. You can buy all this only in specialized stores or in craft supplies.
You can stop at:
- Foam washcloth. This is a budget option and can be purchased at any hardware store. The positive aspects of such a substrate are that it is inexpensive and accessible. However, the washcloth quickly deteriorates and very often pieces of foam rubber remain on the product.
- Brush. This is a special brush for felting. It is convenient to create even the smallest details. The negative quality of such a brush is that it fluffs up quickly.
- A backing made of hard felt. Compared to the options mentioned above, this choice will be the best. This mat is wear-resistant, dense, and easy to work with. The backing is thin and there is a chance of damaging the table or needle.
These are the basic tools that beginners will need. Now let's move on to the minor ones:
- Holders. They fit over needles and help simplify the felting process, especially when making flat parts.
The holders are designed for different numbers of needles. You can purchase anywhere from a plastic to a wooden holder at a craft store, but if you want to save money, make your own from wood cork. - Machine for felting (felting). After gaining experience in felting, you may find such a machine very convenient. It is used to make reliefs on toys.
- Carder (or comb for fluff). This is a familiar pet comb that can be purchased at a pet supply store. Use a comb to fluff the wool and mix colors.
- Thimbles. They should definitely be used if you decide to do this type of needlework for the first time. Due to the sharpness of the needles, it is almost impossible to avoid injury without thimbles. They will also come in handy for those who have overly sensitive hands.
- Molds. You can use anything from cooking molds to homemade molds here. They are useful for creating neat and flat applications.
This list is complemented by all the usual tools and materials, such as glue, scissors and sewing needles.
Felting wool video:
There is also an interesting way of modeling from salt dough
What kind of wool is suitable for felting?
Any wool is suitable for felting - from angora to cat. The main condition is that the hairs are thin and fall into a lump. Sometimes plant fibers are used as an additive to create decorative effects: flax, nettle, hemp, soy, silk, bamboo.
Natural carded colors
The main material is sheep, llama, alpaca, and camel wool. Each type has its own characteristics and, depending on the thickness and elasticity of the hair, is used to make different things: brooches, clothes, bags, toys, paintings and carpets.
Types of wool for felting
Sheep wool is the most accessible, so it is used by both beginning needlewomen and experienced craftsmen.
Carding is most convenient for dry felting
Lightened bleached and tinted wool in various colors is available for sale. There are designations for “fine” and “semi-fine” wool.
The difference is not only in thickness, but also in the presence of guard hairs in semi-fine yarn, which complicates the process of wet felting, but for dry felting this parameter is not so important
Merino
Leader in production thanks to the elasticity and softness of fine hairs. Merino wool produces delicate items with the smoothest surface. Hair thickness 14.5–23 microns. Strong wool with fibers of 20-23 microns goes on mass sale; finer types cost an order of magnitude more and are bought by fashion houses for exclusive collections.
Merino
Carding
Indispensable for dry felting. The wool is combed with a carder, while the fibers are straightened and laid in any direction, forming an even sheet. When dry felted, this wool wadding forms a dense mat, forming a smooth surface with fine hairs. The fiber thickness is 25–30 microns, so it is suitable for toys, bags, shoes, outerwear, rugs and paintings.
Carding and mechanized carding
Tops, combed ribbon
These are neatly combed strands of wool in which the fibers are located in one direction. Such strands consist of semi-fine and fine hairs and are indispensable for wet felting or nunofelting.
Combed tape
Tow
It consists of hairs of varying quality - both small thin and guard hairs. It is used for stuffing toys or making rough products by dry felting - felt boots, bags, carpets.
Sliver
Similar to tow, sold in strips and bundles. It is of higher quality, smoothly combed, not dyed, but contains small debris and coarse hairs. The application is the same as tow. The base of toys is made from sliver, which is then rolled with finer and more expensive wool. Suitable for dry and wet felting.
Rovnica
It is a large, loosely twisted thread, which is suitable for knitting with thick knitting needles followed by felting in a washing machine or for creating individual decorative elements of clothing, bags, shoes, paintings.
The above types of wool can be seen clearly in the video from the Fox Workshop :
Dry felting
We became familiar with the necessary tools. Now let's look at felting methods, starting with dry felting. It should be noted that this principle of felting appeared much later than wet felting, however, now it is very popular.
Megamaster.info draws your attention to the fact that making toys from wool using dry felting will be a difficult process for beginners, and children should not be trusted with such work. If you are distracted, you can get injured, because the needles severely tear the skin.
It is better to use L-shaped needles. They are easy to purchase in craft stores. Consider the principle of dry felting:
- Separate the desired part of the wool from the general tape. We rub it between our palms. Thus, the fibers will begin to tangle. We wrap the material into a cylinder; this should be done as tightly as possible.
- We take the needle and plunge it deeply into the material. We need to compact the material inside. To do this, simply carefully turn the needle. This way, the wool will fall evenly. The ball will become dense, and its surface will gradually straighten out.
- If the needle becomes difficult to pass inside, replace it with a thinner one. When the ball stops deforming when pressed, this means that felting can be stopped. And in order to get relief shapes on it, simply process the same place in the same way.
That's the whole principle of dry felting.
House using dry felting technique
You will need: foam rubber, scissors, unspun wool in beige, red, brown, white and green, felting needles, a brush with hard bristles.
Master Class
- Cut out a base in the shape of a house from foam rubber.
- Prepare thin strands of beige wool and loosely wrap the foam blank.
- Felt the fur, making frequent injections with a special needle.
- Felt red wool to the roof of the house.
- Felt the door with brown wool and the window with white wool.
- Make a window frame from thin strands of brown wool.
- Felt green wool branches to decorate your home.
The house using the dry felting technique is ready! I recommend watching this video!
Felting for Beginners – Very Easy Tutorial for First-Time Felters
Wet felting from wool
This is the first method of processing wool, which appeared even before drying. If you want to use wet felting from wool, you should know about its principles:
- the material is soaked in a soap solution (it must be hot);
- the wool is rubbed in different directions; it is better to use a felting machine for this;
- felt is obtained in this way.
Before creating products, keep in mind that after drying, the wool will shrink by 30 percent.
And now a little more about the process:
- We determine what size material we need. Let's separate it. We lay several layers of wool on the film. We place each subsequent layer perpendicularly. On the latter we apply the intended pattern from individual fragments of wool of a different color.
- Add soap to warm water. We wet the material with the solution and cover it with film on top. We smooth the surface with our hands.
- For density, the workpiece can be wrapped with a bamboo napkin or mesh. To remove excess liquid, the workpiece can be additionally wrapped in a towel.
- As the product dries, it will shrink. Rinse the resulting fabric in warm water and leave until completely dry.
Jewelry, clothes, bags and even carpets are made in a similar way.
And now you can move on and find out how felting wool toys for beginners occurs, because we already know the principles and we have the tools prepared.
There is also an interesting scrapbooking craft technique.
Types of felting (techniques)
There are two main methods of felting: dry and wet.
Dry felting
Dry felting is for bulky items: toys, figurines, jewelry or something similar. Using your fingers, a piece of wool is given the desired shape, and then pierced many times with a special needle. As a result, the hairs adhere tightly to each other, forming a homogeneous material.
Dry felting example: felting toys
Dry felting example: felting toys
Wet felting
Wet felting - for appliques, items of clothing, canvas for bags, scarves, blankets, etc., that is, for flat products. First, the wool is laid out in a certain order on the work surface, and then moistened with warm soapy water. The fibers intertwine with each other and form a dense fabric.
Creating a painting using the wet felting method
Finished painting using wet felting method
Wool watercolor
Wool watercolor is a very interesting technique. It is used to create amazingly beautiful textured paintings. Colored wool is laid out in the finest strands, resulting in smooth watercolor transitions.
Technique for applying wool watercolor
What does wool watercolor look like?
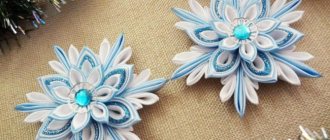
Nunofelting
Nunofelting is an unusual technique with an unusual name. Using it, you can “paint” silk, chiffon and other expensive delicate fabrics with amazing woolen patterns and abstractions. The result is unique and very elegant accessories.
While working...
Even a dress can be “sewn” by felting
How to felt wool toys for beginners
Let's look at some simple examples of felting crafts using the wet and dry method. Let's start with the simplest thing, making slippers using the wet felting technique. We will need:
- unspun wool;
- soap;
- template (pattern);
- water;
- net;
- bamboo rug;
- yarn;
- needle;
- knitting needles
When making slippers, it is better to use a template. The template can be made on a medium-thick laminate.
Let's start making:
- We lay out the wool in two layers and rub it thoroughly. You need to lay out layers lengthwise and crosswise. Cover the material with a net and water it with soapy water. Press with your hands and smooth out. We try not to move the fur.
- We remove the mesh so that the material does not fall on it. Then smooth it out with your hands. Get rid of excess liquid. Apply two more layers and repeat the work again. Make sure there are the same number of layers. It is better to write down each new addition.
template for slippers - We need to cover the template with wool on both sides. We wipe the material, cut it and take out the template.
- We design the heel and toe of the slippers. We place the product in a bamboo mat and begin to carefully roll out the product, at least 50 times, while pressing firmly on it.
- We put the slippers on the last, trim the edges and give it shape. All that remains is to decorate the felted wool slipper, in our case it is embroidery and elastic at the top of the product.
What is wool felting?
This type of needlework is the process of creating a variety of products from unspun wool by interlocking and weaving its fibers using various methods using special hardened steel needles.
This process is also called felting (or felting). This exciting activity helps develop creativity.
Reference! Not all wool is suitable for felting, but only natural fibers. The best choice in this case would be mohair and alpaca wool.
Felting allows you to create original designs on fabric, beautiful toys and various decorative elements (photo). Let's look at how to felt a wool picture with your own hands with step-by-step instructions.
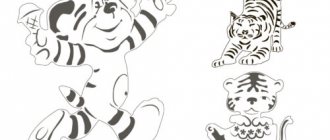
Making cats using dry felting
To make toys from wool, dry felting is the best option for beginners. Let's look at the method using the example of a cute cat. You need to prepare:
- wool;
- needles;
- padding polyester;
- threads;
- acrylic paints;
- mat;
- pastel;
- polymer clay;
- brush.
Ready? Then let's start:
- We take a padding polyester and use a needle to form a figurine in the shape of an egg.
Fluff the selected wool of the desired color and apply it to the padding polyester. We begin to felt the material using a large needle. We stick the needle as deep as possible, thus compacting the ball from different sides. It turns out to be a torso with a head. - Next, we will make blanks for the paws. We use padding polyester and wool. We pierce the material until the paws become loose. We roll the legs onto the previously obtained figure and give them shape. We fix everything together with a needle.
- Let's work in the muzzle area. Let's add a little wool here and increase the volume for the eyes. Let's form a triangular plane for the nose. We form cheeks from two separate pieces of wool and roll them. We do the chin in a similar way.
- Let's sand with a small needle. From a separate piece of material we make a tail for the cat. We attach it to the body.
- We make eyes from polymer clay. You already know how to sculpt from polymer clay. Glue the eyes to the cat. We work on the smile, then add the bridge of the nose and a small orange nose.
- Let's move on to the final stage. We need to make felting of two identical triangles - these will be the ears. We attach them to the cat's head. Use acrylic paint to paint the eyes and lightly tint the toy.
Ready. You can make many different animals this way:
Toy felting technique
When making toys using the felting method, in addition to the basic materials, you will need padding polyester and wire for the frame.
General principles for designing crafts using dry felting:
- You need to form a toy figurine from a twisted bundle of wool.
- If you plan to make an animal, you should “blind” the face.
- Repeated piercing is necessary to make recesses for the mouth and eye sockets.
- The ears are created on a sponge in the form of a thin fiber from identical tufts of wool.
- When connecting parts, the seams are covered with wool, which fluffs up at the point of attachment.
- Using similar actions, you need to form blanks for other parts of the craft (horns, tail, paws).
- Carefully glue beads into the eye sockets.
- Finally, use a thin needle to polish the surface of the product, hiding the flaws by adding woolen material.
- The simplest toy is considered to be a caterpillar; beginners can use it to develop skills and gain experience.
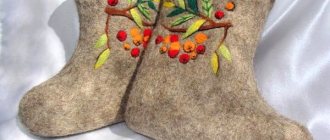
Felting wool slippers for beginners
So now we’ll make felting slippers using the wet technique, this way you can make toys and absolutely everything, the main thing is to know the technique, and its description is below.
What you need to felt wool slippers:
- Wool
- Templates
- Soap solution
- mosquito net
- Cellophane gloves
- Synthetic fabric (tulle)
- Bamboo mat
- Ruler
- Nail scissors
- Scissors
- Bubble film
- Towel
- Massager
- Homemade block
- A piece of skin
- Threads
- Needles
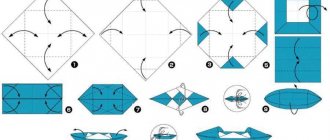
- Apply a thin first layer of wool evenly onto the template. There should be long edges on the sides, for convenience the wool should be folded. We lay out the second layer in the middle of the template, and do the same with the second future slippers.
- For convenience, we put on cellophane gloves, start rubbing, put a mosquito net on top, pour warm water through it, and then rub the wool intensively with soap. We hold the mesh with our hands and periodically lift it so that it does not stick to the workpiece.
- Turn over and carefully bend the wool without wrinkles. We carry out the same procedure with other slippers. Then, from the bend side, we evenly lay out a new layer of wool on two slippers and also rub it in with a mosquito net, and on the other side we bend the edges. We lay out the second layer, not on the fold side of the previous one, and rub it in with a mosquito net. Next, using tulle, we wrap the workpiece in it and, using gentle but strong movements, rub the slippers on all sides. Then we rub the top and bottom of the slipper through the mosquito net. Next, we roll one by one through tulle and a mosquito net until it becomes difficult to tear the wool off the workpiece.
- Afterwards we make a small, technical cut, retreat from the edge 6 cm, 3 cm in length. Use nail scissors to make a hole. After this, we take out the template, steam the slippers with warm water so that the wool fibers are better bonded.
- Then we wrap the slippers in a towel and bubble wrap, fasten them on the sides with rubber bands, and begin rolling our “candy” over the towel 25-30 times. We wrap it in the opposite direction, press lightly, since the workpiece is still poorly deboned. Next, we dip the slippers in water and begin to rub them with soap on the outside and inside.
- The cutout is enlarged and then we rub it intensively on all sides, outside and inside. Then we rub it on the bubble wrap and form the nose and heel of the slipper. Next, dip the slippers in water to smooth them out, wring them out, roll them into a bamboo mat, then into a towel, and roll them 50 times. Turn the slipper over and repeat the procedure. Then smooth it out using bubble wrap and a massager. Then we insert a homemade last inside, give it the shape of a leg, then trace it on a piece of leather with a slipper handle and cut it out.
- Then use an overcast stitch to sew the insole to the slipper. Let’s start decorating the slipper, mark the location of the flower, then carefully use a needle number 38 “star” to attach the leaves, which we made in advance using the wet felting technique. Everything you need can be bought at a sewing store or you can purchase a felting kit. Next, we attach the roses, the petals of which are made from two felting techniques. We sew the cutout with an overcast stitch.
Cloth
Felted clothing is popular among modern fashionistas. Many products made using this technique have become real masterpieces of art.
Scarf
The scarf is easy to make in the washing machine.
Step-by-step master class on its design:
- Pull the nylon from the nylon yarn and leave the fluff.
- On one side of a regular sheet, place the pulled threads and then the wool fibers.
- Weave cobwebs from the material.
- After this, a layer of wool is laid again, and finally a thick layer of nylon threads should be laid out.
- Wrap the blank with the free edge of the sheet and sew up the hole.
- Load the item into the washing machine, set the program to cotton at 400C and start it.
- The powder is used only for multi-colored fabrics.
- After 15 min. After washing, remove the craft, remove it from the sheet and dry it.
Beret
Special master classes will help you learn how to felt clothing from wool for beginners.
To felt a beret using the wet method, you should adhere to the following technology:
- Cut a circle from oilcloth, having first measured the circumference of the head. To the resulting figure, add 3-4 cm on all sides for shrinkage. Place the figure on the convex film.
- Place the wool of the selected colors on the oilcloth circle so that it extends slightly beyond the oilcloth.
- It is necessary to lay out 5 woolen tiers, perpendicular to one another.
- Cover the workpiece with gauze, then pour hot, clean water over it so that the threads get wet. Put gloves on your hands and help the material get wet.
- Remove the gauze cloth and turn the workpiece over to the reverse side. Wrap the protruding ends in oilcloth.
- On the reverse side, spread the wool using the same method. Then you need to easily rub the woolen part with your hands through the gauze.
- It is advisable to rub for 20 minutes. At times the fabric needs to be lifted so that it does not stick to the beret.
- It is necessary to rub the product on the other side, after which it is better to remove the gauze piece and continue to rub the beret, gradually increasing the pressure. A pancake should form.
- When the wool becomes difficult to tear off from the craft, you need to make an incision and pull out the oilcloth.
- Roll the headdress into a roll, then roll it in both directions and crumple it in different ways. These manipulations will help to produce shrinkage.
- Take it to rinse, make a cutout for the head and let it dry.
Skirt
Before felting the skirt, you need to create a pattern according to your measurements, and then proceed to the step-by-step process of making the product:
- Transfer the prepared template onto a convex film. Place scraps of semi-fine wool of the chosen color on the base. The layer should be thin, and the material should overlap - the first tier is horizontal, the next one is vertical. Make sure that the thickness is uniform. Lay the fibers 6-8 cm beyond the template, due to shrinkage.
- Wet the part with warm water using a spray bottle, then cover it with a mesh cloth. On the left side, it is recommended to add 2-3 cm in width and up to 25 cm in length for the allowance for the fastener. It is advisable to purchase a zipper measuring 20 cm.
- Wear gloves and carefully, without dislodging the fibers, moisten the future product with soapy water. Press the fabric well against the film so that the wool threads are saturated. Soak up excess liquid with a towel.
- Smooth and rub each segment of the craft. You can use a rolling pin or a special vibrating machine.
- Remove the mesh material, turn the product over and repeat the same process on the other side.
- Continue these steps until a dense, uniform piece of felt is formed.
- Rinse the part in warm, clean water until the foam disappears. Place it on a dry surface, while forming a fold under the fastener. The front panel is ready.
- In the same way you need to felt the back panel of the skirt.
- Allow the workpiece to dry.
- Iron the halves of the craft and compare them with the pattern. Trim if necessary, leaving seam allowances. Sew the sides and sew in a zipper.
- Smooth the top edge of the skirt with a glue strip to prevent stretching. Sew the lining.
Jacket
Master class on making a jacket:
- First, it is recommended to make a pattern from thick paper, taking into account your parameters (shelves, sleeves and back).
- It is advisable to choose viscose for the lining; it will help hold the fabric and prevent stretching.
- Place pieces of viscose material on the template and spray them with water.
- Place the prepared wool on top of the viscose, then cover it with a mosquito net and generously wet it with soapy water. Blot excess moisture with a towel.
- At this stage, you can optionally decorate the jacket. Alternatively, lay out various ribbons, braid, pieces of original fabric, colored threads or appliqués.
- After laying out the decorative elements, cover them with a mesh cloth and sprinkle with soapy water. Carefully smooth the surface with your hands.
- On the other side of the pattern, use the same method to lay out the material to form the shelves.
- Pick up a large needle and use it to prick wool threads over the entire formed surface. When the canvas acquires density and becomes like fabric, stop the tingling.
- It is necessary to ensure that the entire workpiece is carefully processed with a needle. You need to leave an allowance of 1.5-2 cm for the seams.
- When all the parts are ready, you should retouch the inside of the jacket - use a special grinding machine to remove all irregularities and lumps.
- Felt 2 sleeves in the same way.
- Sew the finished parts together.
- Finally, sew on the buttons.
Usually, for beginners, the process of making wool crafts seems very difficult. Having figured out how to felt things correctly, as well as having patience and perseverance, needlewomen will be able to make beautiful and unique crafts.
Article design: Natalie Podolskaya
Felting a bull from wool master class
2021 is the year of the ox, which means every craftswoman can’t do without this year’s main toy. What you need to make a bull from wool using the felting method:
- Wool of different colors
- Cushion brush or household sponge
- A piece of laminate backing
- Felting needles coarse 36 and fine 40
- Wooden handle
- Copper wire 0.4mm
- Doll eyes
- Flowers for decoration
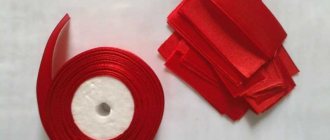
- Tape 0.3 cm
- Sliver
- Bells with a diameter of 1 cm
- Glue gun
- Scissors
- Awl or gypsy needle
(For wet equipment)
- Water
- Soap
The easiest way to buy everything you need is with a felting kit or go to a construction and sewing store. Step by step description:
- First, we fasten three coarse and thin needles with an elastic band, and after that we wrap the pillow brush with a backing. We tear off either white wool or sliver, chop it, mix it in our hands, give it the shape of a circle and place it on the brush.
- Using coarse needles, we begin to pierce the wool deeply, then take wool of a different color and apply a thin layer of it on the prepared base, the wool should completely wrap around the white wool. The dry felting technique is used with the help of notches on the needles, the result is a workpiece with a diameter of 7 cm, the wool is felted in half.
- We make a nose, take white wool or sliver, mix it in our hands and form a snout, start pricking it with needles, if the nose turns out to be too big, we squeeze it on the sides. We connect the nose and body with coarse needles, pricking deeply.
- We start with the legs, tear off four identical pieces of wool, mix one piece, put it on a brush and roll it into a tube. We repeatedly pierce the wool, leave the upper end unboned, we will use it to connect the body and limbs, before making the hoof we add more wool to the upper part of the leg, add brown wool, secure it first with coarse and then thin needles - this is the hoof, we make using a coarse needle on it straight. The leg should be hard and dense; when grinding, insert the very tip of the needle. In this way, we make all the legs of the bull, for attachment we open the non-felted tip.
- We make sure that everything looks aesthetically pleasing, we fasten the leg with needles, fasten the second one in line with the first, after that we fasten them more thoroughly, check whether the toy is supported on the legs, and go over the entire body of the animal with a coarse needle. Let's make ears on the frame, from the wire, cut off 13 cm and form an ear in the form of a drop, 3 cm long, and a twisted tail of 2.5 cm and also make a second ear. We tear off two small pieces of wool, prepare one in our hands, place it on the brush and chop off the frame in the wool, leaving the lower tip untied.
- Add shredded white wool and stuff the wool with a thin layer of needles number 40, thus creating a second ear. We open the tip so that the wool does not cling, trim the tip of the wire, make a hole for the ears with a coarse needle, then with an awl, make sure that the holes are on the same line, glue the wire into the hole, then pin the ears to the body, after that we pinch the ears and fix this position with needles.
- Next, we carefully treat the wool in our hands and pierce the toy with needles. Then we make horns and a tail, cut two 10 cm pieces from the copper wire and fold them in half, cut off thin long strands of wool, insert its upper bend of the wire, glue the strand to the frame, after fixing the wool, twist the ends of the wire, then wrap the wool around the wire with glue , leave about 2 cm of wire without wool, wind the remaining wool in a second layer, note that the horn at the bottom is wider than at the top, we also make a second horn.
- Let's make a tail, cut off 20 cm of wire, fold it in half, cut off several short strands of wool and twist each of them a little. We take a bunch of strands and insert them into the upper bend of the wire, fix them with glue - this will be a tassel, twist the ends together. Next, we take wool the color of the bull’s body and paste it over the frame of the tail, leaving 3 cm of the tip without wool, thus winding several more layers of wool without glue, so that the end is narrower and wider at the top.
- Let's work a little in the wet felting technique, dip the horns and tail of the bull in warm water, soak them, and then add soap and begin to roll between the fingers so that the wool does not stretch out; in the process, use the fingers of your left hand to move it to the right side, and felt it with the fingers of your left hand, We slowly increase the rolling force, the wool thickens. After that, the tail, dip the brush in water and hold each strand in your hands, then combine them and roll them together, roll the tail in the same way as the horns. We rinse the soap blanks and straighten the brush so that everything looks beautiful.
- After drying, we make the same holes as for the ears, carefully make sure that everything is on the same line, glue the horns to the holes, twist the horns as you like, then also attach the tail so that the transition is smooth, add wool around the tail and fasten it with thin needles on the sides carefully go through with one needle, twist the tail as you want.
- Now we make recesses for the eyes, pierce the wool at the location with coarse needles, put the wool in the holes so that the eyes are more expressive, attach them to glue, then fill the eyebrows with a thin needle, then use the same needle to make nostrils and a smile with a strand of wool. For decoration, we attach a flower to the smile and a bow made from a ribbon with a bell; to this felted wool bull, you can add some other New Year, winter crafts for school or room decoration.
Who is suitable for felting as a form of creativity?
This type of creativity is suitable for almost everyone - both adults and children. Psychologists consider felting classes as art therapy. The structure of the wool calms and puts you in a positive mood.
Children from three years old can practice wet felting. In addition to pleasure, it brings health benefits, promotes the development of patience, attention, and accuracy.
From three to seven years old, classes in the wet felting technique are recommended. At school age, dry is also suitable. By this period, fine motor skills have already been developed and the child can cope with sharp needles.
This type of creativity is not recommended for people who are allergic to wool or have serious problems with the spine and joints.
A simple and interesting master class on felting toys for beginners
Let's start small: learn how to felt a simple toy.
Most of us have been familiar with the Winnie the Pooh . A lover of honey and a philosopher with unconventional thinking - this is how we know him and will try to recreate him in a woolen toy.
During all the work, it is advisable to have an image of a bear cub before your eyes. This will allow you not to miss the details and will help convey the character’s character to the toy.
Materials and tools:
- Carded in four shades: white, light brown, brown and black.
- Felting needle No.38.
- Sponge for backing.
- Glue "Moment Crystal".
- Blanks for eyes (small black buttons).
Features of different needles
The secret to turning a simple shapeless skein of material into a high-quality dense figure lies in a meaningful approach to the choice of this tool. Needles vary in thickness and cross-section. The material for them is usually hardened steel with special notches that catch thin hairs of unspun wool, and then firmly intertwine them with each other. It is preferable to use a triangular section in the first stages of creating a figurine, while a star-shaped one shows itself well in finishing and working out small details.
Previously, the optimal needle numbers were given, but there is one important nuance. Numbering is done using two systems, both of which are still in use today. In international markings, a larger number corresponds to a thinner needle, but in domestic markings the opposite is true, that is, the thicker the instrument, the larger its numerical designation. For initial piercing, a needle No. 36 is suitable, and for intermediate stages of work, No. 38 has proven itself well. The final finishing, subject to the basic felting technique, is done using a No. 40 needle.