Sisal is a natural plant fiber. It is extracted mechanically from the long leaves of the agave plant, which grows in the subtropics. Since ancient times, residents of America and Africa have valued it for its durability and strength. Sisal is used to make threads, ropes, ropes, and create a variety of household items. Mattress padding and carpets are renowned for their quality. Ship ropes were woven from thick threads. However, natural fibers are gradually being replaced by artificial ones.
Handicraft masters use both threads and fabrics made from them in their creative works. In this article we will look at a master class on a sisal Christmas tree, different options. Readers will also learn how to create canvases and balls from threads on their own, and even use natural and undyed rope. Nowadays it is fashionable to decorate the interior with jute crafts and burlap, and here we use sisal. The color of the threads is lighter than jute ones, stronger and harder to the touch, you also need to know that they are prickly.
Some people use artificial sisal. However, these are just thin plastic threads. In our article we will describe a master class on a Christmas tree made from natural sisal, grown by the hands of workers in Brazil and Tanzania. The craft you make will delight you for a long period of time. After all, this material is durable and does not absorb dust and moisture. So you can make the version of the New Year's craft presented below as a gift.
Christmas tree made of threads
To make a Christmas tree from sisal with your own hands according to the master class described below in the article, you need to buy the following materials necessary for the work at a sewing accessories and handicraft store:
- foam cone;
- green sisal threads;
- golden ribbon;
- gold and red beads or half beads;
- red satin ribbon for the bow at the top.
You will also need scissors, PVA glue and a Christmas tree garland, it is advisable to buy a lightweight plastic one.
Forest beauty made of spruce and pine cones
Of course, not a single New Year's holiday is complete without tangerines and, of course, pine cones. So why not use that too. After all, such natural material is easy to collect in a forest or park, and then sit down and make it.
We will need:
- glue
- gun
- scissors
- cardboard
- bumps
- varnish in a can
Stages:
1. Make a cone from a sheet of A4 paper and glue the ends together. Let me remind you how to do this. Draw a circle, and then cut it in half, coat the walls with glue and let dry.
2. After starting to assemble the product, glue the cones to the workpiece in a spiral. So until the product takes on a finished form.
3. Coat with glitter varnish for durability.
4. Cut out a star from a shiny lid or any other material.
5. Decorate the top with it.
You can go another way and make such a forest charm from husks. Also glue a cone out of paper.
And it is on it that, using a glue gun, glue the particles in a spiral, one after another.
For completeness, decorate with beads or other decorations that are typical for this holiday. For example, tinsel and stars.
Master class on sisal Christmas trees
Apply a thick layer of PVA to the foam cone with a brush. The winding of sisal threads begins from the bottom up. They do this in a chaotic manner, the main thing is that the coating is of high quality and the foam is not visible anywhere. At the very top, the threads are wound tightly around some kind of rod, for example, take a thin knitting needle, which can later be easily removed. The upper part of the craft is made tight, and after removing the rod it is twisted a couple more times around its axis. To prevent the top from falling apart, add PVA glue.
The winding is secured with ribbons tied in a spiral around the Christmas tree. You can alternate a strip of golden ribbon and a garland with balls. The top requires reinforced winding to prevent it from unwinding. A small bright ball, secured with threads, is hung on the edge. The top thus tilts to one side. You can decorate the Christmas tree to your taste by attaching bright beads or pebbles along the ribbon. You can glue several balls, placing them evenly over the entire surface of the craft. Tie a red bow next to the top ball.
A sisal Christmas tree made according to our master class can be placed either on a shelf or in the center of a festive table. It takes up little space, but will serve as an excellent decoration for the New Year's holiday.
Spruce made from cotton pads: a craft for kindergarten children
Now let's get acquainted with a fairly simple craft that you can easily do with your child at home or in a kindergarten class. This option is so easy that it is suitable for any younger or older group.
For creativity, you will need to decorate cotton pads with green gouache. Let them dry completely. Then roll it into a petal and secure it with glue.
Since a Christmas tree is usually made for the New Year, let’s glue the snowdrifts on the blue background sheet first of all. And then arrange and glue the green blanks in the desired sequence in descending order.
You can also get creative and build a snowman or other character. Give free rein to your imagination and the souvenir or postcard will be ready.
It is with these triangular blanks that you can build other options.
The next option, for which you will need the materials you see in this picture. Make a bag out of cardboard, glue the parts with double-sided tape, and make the bottom even.
And then dilute the blue gouache in some water and dip a cotton swab in it. Draw dots along the outline of the disks.
Then glue the round pieces onto the cone, overlapping one on top of the other.
Then decorate the craft to your taste. Winter beauty is ready. What do you think of the idea? The truth is super and fast and cool!
You can go another way: fold each disc in half three times and fasten it with a stapler. Then glue these triangles onto the white cone. And then decorate the Christmas tree with beads and a star.
Or you can also go the other way, make a three-dimensional craft by cutting a cotton pad into four equal parts. See it all for yourself below:
The youngest assistants can be asked to do this kind of work.
Christmas tree made from individual balls
Now we will present to the reader a master class on a Christmas tree made from sisal balls. You can use your imagination in making this craft in different ways. Both the colors of the threads and the size of the twisted elements themselves vary. Additionally, both natural and artificial components can be included in the work of decorating crafts.
Cones and twigs, Christmas balls and tinsel, foam fruits and berries are used. Dried fruits look beautiful, for example, orange or lemon slices, cinnamon sticks or star anise. Sisal balls alternate with yarn pom-poms. Here everything is decided by the master working on the craft.
Stage 1
Whatman paper is taken, which has been pre-selected according to the future size of the Christmas tree, and is painted to match the tone of the purchased sisal. It happens that the chosen sisal is quite thick or, on the contrary, thin. This feature of the material makes it necessary to glue sisal in pieces or wrap it over whatman paper, leaving areas that are translucent. Therefore, a separate piece of advice would be to paint whatman paper in the exact tone of sisal, which will allow you to get a less noticeable translucency. After the material is painted, it should be allowed to dry for about 10 minutes.
How to make balls
Before starting the sisal Christmas tree master class, let's look at how to make balls correctly, because the threads have an unruly structure, they can stick out unattractively in different directions, they will definitely come apart after twisting. Before forming balls on a foam cone, craftsmen prepare them correctly.
First of all, a small part is torn off from the total pile of fibers and the shape of a ball of the required size is rolled in your hands. If it turns out small, don’t worry, you need to tear off a little more and roll the ball in your palms again. Then the element must be strengthened. The same PVA glue is used. Pour a little into the palm and roll the ball in the glue again. The finished part is left on a ceramic plate until completely dry.
When everything has dried, you can notice small imperfections, for example, threads sticking out here and there. This needs to be corrected before pasting the cone, cutting off all excess with scissors. Next begins assembling the components together.
Christmas tree made from candies (step by step instructions)
Do you like sweets? Oh, and I just love them. I propose to lay out the symbol of the New Year from them, and take a bottle of champagne as the base.
1. Glue the green fluffy tinsel onto the champagne in a spiral using a glue gun.
2. As soon as the first row of tinsel is glued, glue the candy wrappers (tips) at the same distance.
3. And then add something else, for example a bow.
4. Well, how do you like this wonderful idea? Cool, congratulations to the author! It’s not a shame to go on a visit with such a souvenir).
Assembling a Christmas tree from balls
As a base, you can use either a purchased cone or one you make yourself from cardboard. Let's consider this version of a sisal Christmas tree (read the master class with a step-by-step explanation below). Thick green paper is selected and rolled into a cone around the top corner. The sides can be glued together, but it is more reliable to fasten them with paper clips using a stapler. The inner part for weighting is filled with crumpled newspapers.
The lower part of the cone is leveled with scissors and placed on a piece of foam or glued to a saucer from a flower pot. Only it must first be painted or covered with ribbons of green or contrasting color.
Then the prepared balls are pasted over the entire cone, decorative elements are added - bows, cones, Christmas tree decorations, artificial snowflakes and much more.
Craft for the school competition “Tinsel Tree for New Year 2022”
Now we move on and perform the symbol of next year using ordinary tinsel. Still, such material is also an indispensable attribute. Do you agree? Plus it looks really beautiful and charming. Take a look for yourself.
We will need:
- tinsel of different colors
- cardboard - 2 pcs.
- glass or pot
- foil sleeve
- gypsum
- glue gun and PVA glue
- scissors
- thread with needle
- wire
- any decorations, lace fabric, bell, balls, etc.
1. Make a cone out of cardboard, take it green.
2. Then cut out a circle from another sheet, 1.5-2 cm larger than the diameter of the geometric figure.
3. Then make these slits on it.
4. On a round piece, trace a sleeve in the middle so that you can cut a suitable hole.
5. Glue the circle to the cone. This is what will happen in the end.
6.Wrap the sleeve with decorative tape and insert it into a cup of plaster.
7. Make a skirt out of lace, assemble it with a needle and thread to make it airy and fluffy.
8. Glue in two tiers to the green blank. Cut the tip of the cone and insert a wire with a bell into it.
9. Now take a glue gun and use it to fix the tinsel in a spiral.
10. Then glue on balloons and other decorations such as beads. Your magical miracle is ready. Create for your health!
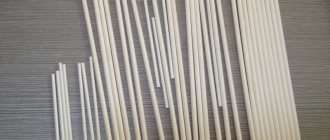
How to make a Christmas tree topiary from sisal
You have already read the master class on working with sisal fibers. Let's figure out how you can make a Christmas tree craft from sisal ropes, and even in the form of a topiary. It is best to use a foam cone as the base for the tree. A hole for the rod is pierced from below with a stick or branch. Also prepare a skein of natural thin sisal rope, a flower pot or any shaped container to hold our tree in an upright position. We will fix the base with a solution of gypsum and water, mixed in a separate bowl until it becomes thick sour cream.
To make the tops as curved as in the photo above, thick wire is used. The first step is to wrap the cone with rope or thick threads of sisal around the entire circumference. The wire is stuck deep into the cone (you can pour a little PVA into the hole), and also wrapped along the entire length.
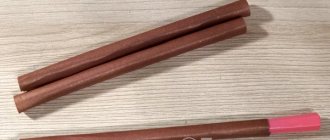
The rod (stick, thick even branch, wire) is wrapped with brown satin ribbon, the ends of which are glued to the rod from below and above. A hole of the appropriate diameter is pierced in the cone and a rod is placed on the glue. Its lower part is inserted into a pot filled with gypsum solution.
Creative spruce made from plastic bottles
I think that in any home there is a plastic bottle. Take it light green in color. The steps are quite simple, do it with your children to occupy your family leisure time.
Stages:
1. Cut out the middle of the bottles, and then cut it into pieces.
2. You should end up with rectangles like this. From which the branches for the Christmas tree will be made. Their sizes are:
- 8.5 cm x 6 cm – 6 pcs.
- 7 cm x 6 cm – 6 pcs.
- 6.5 cm x 6cm - 5 pcs.
- 6 cm x 6 cm – 5 pcs.
- 5.5 cm x 6 cm - 4 pcs.
- 5 cm x 6 cm – 4 pcs.
- 4.5 cm x 5 cm - 3 pcs.
- 4 cm x 5 cm – 3 pcs.
- 3 cm x 3 cm - 3 pcs.
3. Round each rectangle, bend the tip, and cut after the edge, as shown below.
4. For curl, scorch the fringe with a candle.
5. And then paint the fringes with acrylic paint or nail polish. Pollinate with glitter.
6. Thus, you should make this number of branches, and make a hole on each branch.
7. Then take a stick and stick it into the bottom of the bottle. This will be a stand for a souvenir. Make the hole using a drill.
8. Well, now all that remains is to assemble the Christmas tree, thread the branches onto the stick.
9. Looks chic and attractive.
10. Decorate with a bow and beads. Give such a masterpiece to your friends or keep it for yourself for the New Year's table. Product height 20-25 cm. Cool!
New Year's topiary
This souvenir is a small man-made tree trimmed in the shape of a ball in a pot.
Read also: Combination of colors in clothes (table)
Typically, a foam ball or papier-mâché sphere is used as a base. If you want to make a “Herringbone” topiary from sisal, then use the same cone as a blank as for a regular Christmas tree. In order for your Christmas tree to become what is called a topiary, you will have to make a stem, one end of which is fixed in a cone, and the other in a pot. This design is carried out as follows:
- Take a glass, pot or other suitable container.
- Pour some water and put plaster or alabaster. Mix the ingredients thoroughly. The consistency should resemble thick sour cream.
- Pour the mixture into the pot.
- Immediately, before the plaster has hardened, place a stick, rod, or a stem made up of several thin skewers in the center of the pot. Hold it so that it does not fall or move while the mixture hardens.
- When the mixture has become hard, cut off the top of the cup if you did not fill the plaster to the brim.
- Wrap the stem with decorative ribbon. It is better to do this at this stage, so as not to stain the decorated surface with drops of liquid plaster when installing the rod.
- Also decorate the pot, for example, with a satin ribbon.
- The surface of the plaster can be easily decorated with the same sisal, tinsel, beads or coffee beans.
- Attach the Christmas tree-cone to the rod, having previously cut a hole of the appropriate diameter in the base of the craft. Glue the joint with a heat gun.
If your Christmas tree is made of soft material wound around a metal rod, you will not need an additional stem. Place the finished structure directly into a pot of hardening plaster. The main thing is not to stain the product.
Alternative Christmas tree options
Who said that handicrafts only accept classic formats? A herringbone topiary can appear in a very interesting form if, for example, you decorate it with coffee. This product is used quite often in needlework, so this choice will not surprise anyone.
For these purposes, whole grains are purchased, which are patiently attached over the entire area. This process takes quite a lot of time, so when preparing a gift, you need to reserve time.
In order for the composition to be as harmonious as possible, you can use a number of secrets of leading craftswomen:
- It is better to choose grains of approximately the same size;
- If the Christmas tree is made of plastic, it is better to clean its surface first;
- Instant fixing glue is perfect for this work, thanks to which the grains will not slip.
With the help of coffee and thread, you can create a very stylish topiary that is in no way inferior to traditional compositions. In addition, it will look much more original.