Dolls based on the animated series Monster High are popular among girls all over the world. Making things for Monster High dolls with your own hands can become not only a hobby for a girl, but also a way to diversify the wardrobe of your favorites and arouse the envy of your girlfriends with your ability to make patterns and sew clothes like a real fashion designer. If a girl is not very comfortable with a needle and thread, her mother can come to her aid and help her in modeling clothing patterns for Monster High dolls, as well as in their further sewing.
Closet
So, how to make crafts for dolls? Like any doll, “Monster High” has many outfits. Therefore, a closet for clothes is simply necessary. To make it you will need:
- white cardboard – 1 sheet;
- colored paper (red and black) – 2 sheets;
- drawing supplies;
- scissors;
- glue.
On a sheet of cardboard, measure 2 cm from the top and bottom, draw a line, put 6 cm on the sides, draw more lines. Through the vertical lines at the top we make a line at a distance of 4 cm. On it we put 3 cm from the center to the edges.
Then we connect this point with the lower and upper points on this vertical line. We wipe off all the auxiliary strokes from the sides, mark the places where the shelves will be glued and the strips for gluing.
Now let's prepare the cabinet doors. To do this, draw a hexagon similar to the first one. The gluing strips will only be on the sides. Then we divide the hexagon in half. Next, we draw a drawing of the sides, the top of the cabinet and the bottom, also with gluing strips. All that remains is to cut out the parts along the marked lines and glue them together.
Before gluing the doors, you must first “install” the shelves. We attach two ribbons to the doors, which will act as a lock. Now the cabinet needs to be decorated: we cover the inside with black paper and the outside with red paper.
If you wish, you can use stickers that depict cartoon characters, or make your own drawings. So the wardrobe for the Monster High doll is ready. The crafts, photos of which can be seen in our article, are very diverse. Therefore, we will not limit ourselves to just the wardrobe.
How to sew clothes for Monster High
Clothing patterns for Monster High dolls are quite difficult to find on the Internet. A homemade outfit can be made using ready-made patterns, or you can create the pattern yourself. Since Monster High dolls have an unusual figure, some difficulties may arise in modeling clothes for them, which can nevertheless be overcome. You just need to know some tricks.
Tricks of creating a pattern
You can get rid of the head while working, since it can be easily removed and put back on. The body of the toy should be wrapped in cling film, and pieces of masking tape should be glued on top. Draw the future pattern on it: mark the armholes, length, collar neckline, and so on. Then, using small scissors, cut the tape along with the film into pieces so that the pattern can be easily placed on the paper. In places where lumps form, you need to trim with scissors and carefully unfold. These are the places of future recesses.
High chair
How to create crafts for Monster High dolls with your own hands? Let's look at the example of a high chair. Now let's make it for a doll. To make it you need to prepare:
- ice cream sticks;
- piece of wood;
- sticks for legs and back;
- carpentry and drawing supplies.
You will also need white paint and a “Black Rose” sticker.
We sand a piece of wood with sandpaper. Next, mark the holes for the legs and insert the sticks, having previously treated them with sandpaper. On the other side, we will make two holes for the back, insert ice cream sticks, and glue them. We paint the chair with white paint, and when it dries, glue the rosette.
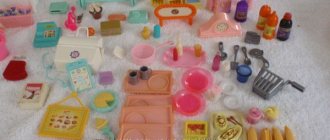
Together with your baby, we create the necessary kitchen utensils
Of course, for a real young lady, one living room is not enough. Many girls dream of a doll kitchen, where, like their mother, the dolls will create their culinary masterpieces. It is good for the kitchen to have not only furniture, but also cooking utensils. Pulpers and scoops, knives and graters - it’s quite possible to make all this yourself. Here's what we need:
- Lid from a tin can. It’s better to take one that opens independently, with a handle:
- Metal scissors;
- Small scraps of wood.
We need to cut knives and knives of different shapes from the tin. Handles for them are made from a piece of wood. If the wooden piece is not thick, then you can cut out the handles using a regular knife. We make slots in the handles for the blades and insert them.
We make a cutting board for a doll's kitchen from half a popsicle stick. Using a knife, give it the desired shape and cut a hole.
A brush for washing doll dishes can be easily made from a brush for cleaning between teeth, which is sold in pharmacies. We cut a brush of the required length from it and attach it to a piece of wood.
The whisk for the puree is made from a paper clip and, again, a piece of wood.
From the spring that is in the pen, a metal cap and other things that are unnecessary at first glance, other kitchen accessories are obtained.
And if you still have an old Soviet grater, then by cutting it with metal scissors, you can get a doll grater.
Such amazing things are created from seemingly unnecessary nonsense. Get creative and surprise your beloved children! Next you can find a video master class on crafts for dolls.
Bed
What other crafts can you make for Monster High dolls with your own hands? Now we will make a bed and bed linen.
For the craft we will prepare:
- fabric (black and pink);
- black lace;
- black beads;
- padding polyester;
- cardboard;
- cardboard box;
- sewing supplies.
First, we cut out a blank for the back from cardboard, cover it with pink fabric, and decorate it with beads. Now let’s make a pillow: we sew a pillowcase from pink fabric, stuff it with synthetic padding, and sew it up.
Let's start making the bed: we cover the box with pink fabric. Then we sew lace on the sides and stuff the top a little with padding polyester. Then we pull the fabric from below, fasten it, and attach the back.
We sew a bedspread from pink fabric, stuff it a little with padding polyester, sew it up, and decorate it with lace at our discretion. The sleeping place for the toy is ready.
Why is this necessary?
Masters of puppet transformations do not have a single answer to this question. Some people don’t like too bright makeup on toys - girls, in their opinion, should see an example of natural beauty with a minimum of makeup. For others, it's just a hobby, like painting or cross-stitching. As a rule, in the homes of such people you can see a whole collection of different modified dolls.
Still others make dolls to order based on a real prototype. These can be both celebrities and ordinary people for whom this product is intended.
The fourth decided, as they say, to combine business with pleasure and began to make money from their hobby by selling their skillful crafts. After all, it’s one thing to buy one of a million identical dolls in a store, and quite another to buy a handmade toy, being sure that no one will have a second one.
Armchair
What other crafts can you make for Monster High dolls with your own hands? For example, a chair. For work we take:
- fleece in different colors;
- padding polyester;
- threads;
- cardboard;
- sewing supplies;
- glue;
- plastic ball;
- white beads.
First, divide the ball into two parts. We take one part and put padding polyester inside. We cover it with green fabric on top and pink fabric on the inside. We decorate the joint with beads. We cut out a circle from cardboard, cover it with green fabric, and decorate the edge with green thread. We connect the parts of the chair and decorate the joint.
That's all, DIY crafts for Monster High dolls are ready. You can use them while playing with friends.
Why is this necessary?
Masters of puppet transformations do not have a single answer to this question. Some people don’t like too bright makeup on toys - girls, in their opinion, should see an example of natural beauty with a minimum of makeup. For others, it's just a hobby, like painting or cross-stitching. As a rule, in the homes of such people you can see a whole collection of different modified dolls.
Still others make dolls to order based on a real prototype. These can be both celebrities and ordinary people for whom this product is intended.
The fourth decided, as they say, to combine business with pleasure and began to make money from their hobby by selling their skillful crafts. After all, it’s one thing to buy one of a million identical dolls in a store, and quite another to buy a handmade toy, being sure that no one will have a second one.
Homemade crib
To make a doll bed you need to stock up on the following materials:
- plywood sheet;
- paper;
- foam;
- varnish;
- glue;
- cloth;
- acrylic paint;
- scissors.
On a piece of paper you need to draw the base and backrests for the future crib. We cut out the resulting parts. Using these blanks you need to cut out parts from plywood. We fasten them with glue. We glue foam rubber to the bed and cover everything with fabric. We paint the remaining parts and apply varnish.
How to make OOAK hair
Among customization fans, changing a hairstyle is called reflashing or rerooting. There are two options to implement it: one is slow and painstaking, but of better quality. The second one is much faster, but beginners don’t always succeed.
- Rerut OOAC: how to make it with a needle.
You will need an embroidery needle with a wide eye, pliers, hair and time, approximately two days. When everything is ready, you can begin the execution. Thread a strand 1-2 mm wide onto a needle and pierce the doll's head. It sounds creepy, but it turns out beautiful. Use pliers to pull out the tip from the inside, take out the strand and tie a knot on it.
So gradually stitch the entire head. Start at the edges from the temporal region, move to the back of the head, make a parting. Then fill the remaining space with hair.
2. Express flashing.
The tool for the second method will be an awl or the blade is first taken out of it and changed with the eye facing up. Prying each strand with an awl, insert it into the doll's head. There is no need to tie knots. When all the hair is inserted, pour Moment glue inside and massage. This will prevent your hair from falling out.
You can either make hair for the OOAC doll yourself or buy tresses. Home production is much cheaper. Acrylic threads of various colors and shades are suitable. They are silky and easy to style with an iron.
This completes the creative process. All that remains is to dress the doll and come up with suitable surroundings: chairs, houses, sofas. Creating OOAK is not only an art, but also a profitable hobby. Fashion dolls are successfully sold at auctions and in stores. Their approximate price is 100-200 dollars. Therefore, doing puppetry is good not only for the soul, but also for the budget.
Yesterday I tried to draw only with watercolor pencils and pastels (I kept thinking about beginners and decided to try this technique on myself), well, to be honest, it’s the best for students, everything is very simple and clean. Here I described the result: but don’t take it to heart, I joked a lot there, in fact everything is very simple. Materials.
I’ll tell you honestly, OOAC is a costly business in terms of materials.
Their purchase, even on the most modest scale, will cost 1500-2000 rubles. I will list only the most necessary: - Clear (mr. super Clear)
- there is no Russian alternative (forget about the “Idea” spray - this is such a g...), Clear is a primer and fixative, it is a liquid polyurethane with additives, it is terribly harmful for health, cannot be used at home and without a respirator (though I don’t have a respirator, I just don’t breathe when I use it, I can not breathe for 6-7 minutes) - the cost of 1 can is 750-850 rubles;
— pastel
, I have “Mungyo”, Chinese_))) soft and bright, I crumble it into a bowl with a designer knife, from where I pick it up with a soft brush and apply it to the doll’s face (sometimes I work with cotton swabs - depending on my mood) 64 colors - 500-600 rubles. ;
-
watercolor pencils
, I have “mondeluz”, to be honest, I just took medium-priced pencils and they turned out to be good_))) - approximately 250-300 rubles. (12 colors, regular cardboard packaging);
— klyachka eraser (to erase mistakes) — 40 rub., shading (can be done without it) — 100 rub., brushes: soft, medium thickness and thick (these are pastel brushes), designer knife — 80-100 rub., sharpeners ( It’s better to have a couple of pieces). -
white pencil for rubber, glass, plastic, metal, wood
- 32 rubles. sold in art stores.
— acrylic glossy varnish — 150. (I’m thinking of stopping using it altogether; it’s applied to dolls’ eyes and lips for a vibrant shine, but it sticks terribly to everything and collects dirt).
I forgot to post a photo of the result.
Renewing your makeup
Now that the doll’s face has acquired its original appearance, in which it was last seen only on the factory assembly line, and has lost its bright coloring, you can begin to embody your own vision of the doll’s makeup.
The sequence of actions in making an OOAC doll is as follows:
- Makeup base (it also acts as a primer during painting work). In our case, this is a colorless matte acrylic coating. It is applied by spraying the contents of the can onto the doll's face from a distance of 30-40 centimeters. You can’t get any closer—smudges will form.
- Now you can proceed directly to coloring. Use pencils for fine lines, and pastel crumbs for eye shadow and blush.
- To begin, outline the fine lines of the eyes and mouth. When you are happy with everything, apply another layer of acrylic base to secure it. Now what you have drawn can no longer be erased, while new layers can be adjusted as much as you like.
- Don't forget to apply spray paint from time to time, because if you don't, any awkward movement can ruin your entire makeup. One doll requires an average of 5-6 layers of coating.
- If you are happy with the result, apply the base one last time and then apply a final coat of matte varnish. You can cover the doll's lips with glossy varnish to get the effect of bright lipstick.
Let's look at original examples of ready-made doll rooms
Doll rooms are a true space for imagination. They can be very intricate and difficult to make, or they can be created quite simply. Purchased doll rooms, despite the high price, are often primitive. They are made of plastic, all accessories are the same color, most often pink. But if parents decide to let their children play in a makeshift room, they, as a rule, try to make it with love and bring its image as close as possible to real human habitation. An example of such a doll living room is DIY furniture for dolls made from foam plastic.
Coat or jacket
A checkered coat or a vanilla-colored jacket is made in the same way as a jumpsuit. The only difference is the decoration with buttons, zippers or adhesive tape. The lining under the coat or jacket must be worked out to make it as realistic as possible.
Coat pattern for Claudine Wolf
If you wish, you can even use cotton wool or padding polyester to make a real down jacket. The parts are sewn together according to the following instructions: first, the front and back of the product are sewn together, then the sleeves are sewn on. At the end, the product is decorated and decorated with a hood, if one is provided according to the scheme.
Jacket diagram
Accessories for dolls
It’s easy to make everything you need for a doll’s house and its owner with your own hands.
The doll has a lot of things, it's time to take care of their appearance. An iron will help her with this. To make such a useful electrical appliance you will need a plastic valve for juice or milk and a cap from a ballpoint pen. Cut off the plastic lid along the edges, leaving only the rounded inner part. With its shape it already resembles the sole of an iron; all that remains is to add details. Separate the narrow plastic part from the handle cap and shorten it so that the iron handle does not end up being very long. Glue the parts together and add a small heating control bead. Paint the bottom of the iron with silver varnish.
Travel suitcase. For such a cute craft, you will need a small box, four beads, a piece of fabric, narrow braid, a beautiful sticker and scissors with glue. Fix two rectangular narrow boxes in pairs with tape on one side and cover them with a beautiful fabric. Attach black braid to the other sides. Cover the top of the lids with beautiful paper and add stickers. Connect the suitcase with braid and attach bead wheels.
Exclusive image for cartoon babies
Even if you are not very handy with a needle and thread, try making a couple of things for your daughter’s favorite doll. The characters of the animated series "Monster High" are small and graceful, so you won't need some of the attributes of "adult" sewing - for example, a sewing machine. Since all the details of the dolls’ clothes are very miniature, it is more convenient to sew them with a thin needle rather than stitching them together. Besides:
- fabric consumption will be very small;
- You can also introduce your daughter to a useful hobby;
- To create a pattern, you only need to trace the contours of the little monster’s body, and it is not always necessary to measure volumes.
And, of course, the most important thing: no other doll will have the kind of clothes you sew!
Dollhouse
The necessary furniture, accessories, clothes and everything that the doll may need will be located here.
Required tools and materials:
- cardboard box (if the house is two-story, then there should be 2 boxes);
- cardboard for creating parts;
- stationery knife;
- stapler;
- ruler;
- pencil;
- paperclip or wire;
- White paper;
- markers;
- scotch;
- self-adhesive paper.
Stages of work:
1. You need to start work by creating a foundation. To do this, take a box and place it on the wide side so that you have a room with a ceiling and three walls. If you want to make a two-story house, then block the inside of the box with a sheet of cardboard. You can also take two boxes of the same size, fold them and glue them with tape.
2. We decorate the external and internal surface of the house. There may be several options here. You can cover all the walls and ceiling with white paper, and then paint them as you wish using felt-tip pens. You can stick stickers or printed drawings on white paper depicting the main characters, skulls, cobwebs, etc. You can also use self-adhesive paper. Make sure that the materials are made in suitable colors - black, pink, white and turquoise.
3. Using a ruler and pencil, draw the base of the windows, and then carefully cut them out using a utility knife. Make curtains from corrugated paper or pink fabric. Use double-sided tape to secure them.
4. Cut out the railings from cardboard and attach them to the top of the box using a stapler.
5. Each individual room can be decorated in a different style, because each of the dolls has its own taste preferences.
6. Decorate the ceiling and floor of the room. You can make beautiful rugs from yarn or fabric.
7. Make hooks from wire or paper clips so the dolls can hang something on them.
8. Furnish the dollhouse with furniture.
Sewing a dress
Monster High are dolls that are distinguished by their small stature and unusually refined shapes. You can design a dress for them using the patterns presented below. Sewing a dress is easy. First you need to transfer the paper templates to the back side of the selected fabric.
Scheme for creating a dress for Draculaura
The next step is to trim the finished parts of the dress with centimeter allowances for seams and fabric processing. If the dress emphasizes the waist or has a narrowed back, it is necessary to grind off the darts with a contrasting thread. Using these darts, create even seams using a sewing machine.
Then you need to tuck and baste the sleeves, remove the threads if they are in the diagram. Further, if the dress does not provide for the presence of a shoulder slope, then this point is not considered. Then you need to assemble the front of the product from pieces of fabric. Baste them together and then sew them together using a sewing machine.
Pattern for Claudine Wolf
After the front of the dress is ready and the sleeves, if any, are sewn on, it’s time to sew the darts on the future skirt and sew the finished bottom to the top.
Note! If desired, you can create additional decor, for example, sew on buttons, add adhesive tape or decorate the product with tulle.
Basis for Laguna Blue dress
For Barbie
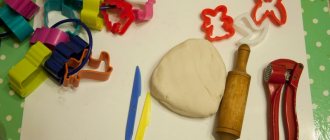
What will never go out of style are Barbie dolls. Probably every girl had or has this famous fashionista. Barbie always has a lot of outfits, she looks stunning and everything that surrounds her must be impeccable, including toy dishes and even food. You can make wonderful crafts for everyday use and games with your own hands from polymer clay or plasticine.
The technique of work is quite simple - we sculpt dishes, interior items, food from scrap materials, and then coat them with varnish, let them dry, and you can invite the Barbie doll’s friends to a tea party.
All these little things need to be stored somewhere. In this case, a very bright chest of drawers made from cardboard boxes will come in handy.