Application made of colored fluorescent paper “Eternal Flame”.
Master class with step-by-step photos. Olga Yuryevna Travneva, primary school teacher, KSU “Secondary school No. 21, village.
Saryozek" Osakarovsky district Karaganda region Kazakhstan Description: this master class can be used by kindergarten teachers, primary school teachers and parents in their work. The applique can be made with children 6-8 years old. Purpose: gift to a veteran, work for an exhibition. Goal: making an application from colored fluorescent paper “Eternal Flame”. Objectives: - to develop practical skills in working with fluorescent paper (self-adhesive), scissors, templates; — draw children’s attention to work culture and compliance with safe work rules; - develop aesthetic taste, creativity, fantasy, imagination, fine motor skills; — cultivate independence, patience, perseverance, accuracy; — to cultivate a sense of pride for the country, respect for veterans and people of the older generation. Materials and tools necessary for making the applique: - colored cardboard, colored fluorescent paper (self-adhesive); - scissors, pencil; - templates, sample work. Victory Day - the Great Day is celebrated “with tears in our eyes” not only by veterans of the Great Patriotic War, but also by their children, their grandchildren, their great-grandchildren. On this unforgettable holiday, we will once again remember the heroism, valor, patriotism and glory of all the defenders of our Great Motherland from the ordinary soldier to the marshal, and the no less feat of the home front workers who did not leave the factory machines in the cities for days; they plowed, sowed and reaped in the villages. The entire burden of exorbitant labor behind enemy lines during the hard times of war fell on fragile women’s shoulders and fragile teenage children. Victory Day is a holiday in honor of all those who defended peace on our land! Glory to them and our deepest bow. And to all those who gave their lives on the battlefields, who later died from wounds, who were tortured in fascist camps - eternal memory!
Sometimes there are no names left from the heroes of bygone times.
Those who accepted mortal combat became just earth, grass. Only their formidable valor settled in the hearts of the living. This eternal flame is bequeathed to us alone, We keep it in our chests. Vladimir Zlatoustovsky
Making the “Eternal Flame” applique.
I would like to suggest making an applique from colored fluorescent paper (self-adhesive). It is very convenient to work with such paper. We trace the part according to the template and cut it out. Then the protective film is removed and the part is glued to the cardboard. We will be working with scissors, so we need to remember how to handle scissors while working. When working with scissors, observe the following rules:
1. Keep your workplace tidy. 2. Before work, check the serviceability of the tools. 3. Do not use loose scissors. Use scissors with rounded ends. 4. Work only with serviceable tools: well-adjusted and sharpened scissors. 5. Use scissors only in your own workplace. 6. Watch the movement of the blades while working. 7. Place the scissors with the rings facing you. 8. Feed the scissors rings forward. 9. Don't leave scissors open. 10. Store scissors in a case with the blades facing down. 11. Don't play with scissors, don't bring scissors to your face. 12. Use scissors as intended.
Let's prepare the templates.
Using templates, we will prepare the necessary details for the application. For the fire, choose orange and yellow paper. For the star you need to take red paper. For numbers and flowers, you can use purple (blue) paper. For stems and leaves - green paper. You can choose the color of the cardboard to your taste, the main thing is that the application is clearly visible. Let's choose a sheet of cardboard for the applique. Place the applique horizontally. 1. Cut out a star and stick it in the middle of a sheet of cardboard. 2. Glue the fire: cut out and glue the orange part, overlaying it on the star; cut out the yellow part and glue it, overlaying it on the orange part. 3. Cut out flower stems and glue them to the bottom of a sheet of cardboard. 4. Cut out small flowers and glue them around the stems. Glue flowers around one stem. Glue it around the second stem. 5. Cut out and glue the green leaves. Glue the leaves onto the stem of the first flower. Glue the leaves onto the stem of the second flower. 6. Cut out and paste the years of the beginning and end of the Great Patriotic War. Let's paste the numbers 1941. Let's paste the numbers 1945.
The “Eternal Flame” application is ready. You can offer a slightly different color scheme. And for fire, you can take the second version of the proposed templates. The application will look like this.
Eternal memory to those who fell in the Great Patriotic War!
On May 9th? There are many craft ideas. Their main difference is only whether the work will be volumetric or flat. If in the case of a flat craft, everything is more or less clear (you can make an applique), then how to make a model of the eternal flame with your own hands so that it is voluminous? In reality, everything turns out to be simple.
Tools and materials
To make an eternal flame from paper you will need:
- star pattern;
- cardboard (large sheets);
- red napkins or tissue paper;
- scissors or stationery knife;
- red or bronze paint (it is better to use gouache);
- brush;
- glue;
- ruler;
- pencil;
- scotch;
- wallpaper with a marble pattern.
When you have stocked up on materials, you can begin the master class on how to make an eternal flame with your own hands, making each detail of the craft step by step, and then combining everything into one whole.
Stage 1 - star layout
Master class on how to make a model of a star for the eternal flame with your own hands:
- Take a large sheet of cardboard, scissors, glue or tape, pencil, ruler, paint and brush.
- Place a dot in the center of the cardboard.
- Draw two dotted lines through the point.
- Draw two more dotted lines that, when intersecting, form the letter “X”. They should be half the length of the first two.
- Connect all vertices with dotted lines. You will get a star.
- Place a point in the center opposite each side of the star at a distance of several centimeters.
- Connect the vertices and the assigned points with a solid line.
As a result, you should get a figure like the one in the picture above. Cut it along solid lines.
Beautiful brooch “St. George’s Ribbon” made of satin ribbons
I used to see that they tied the St. George ribbon themselves and pinned it to the collar with a pin. Nowadays, craftswomen and needlewomen create beautiful brooches using the kanzashi technique. Satin ribbons are used for this.
Ribbons of black and orange colors or ready-made St. George ribbons are used as a basis. These tones are required because they symbolize the fire and smoke that fills war.
But for decoration you can take the tricolor of our Russian flag: red, blue and white.
Or stick to one color scheme.
I also liked the idea of a beautifully folded ribbon that has a badge in the center.
You can roll it up according to this pattern.
Now see how you can make individual modules from satin ribbons using the kanzashi technique. Most often it is suitable for creating flowers.
Each module is made of squares that are rolled into a petal. There are a lot of folding schemes, I will give two.
The middle can be stitched, or it can remain with a hole.
You can use a sewing machine to connect the tips and sides of the petal, but it takes a long time; it’s easier to glue them together with hot glue.
And the second option for collapsing the module.
Another idea is to use the primary colors of the state.
There are a lot of decoration ideas, including ready-made artificial flowers, live carnations, a lot of beads and even bead embroidery. The flight of fancy is not limited by anything.
Stage 2 - star
Master class on how to make a star for the eternal flame with your own hands:
- Take the star design and cut it out.
- Bend the star layout along the long axes inward.
- Flatten the layout.
- Bend the star layout along the short axes outward.
- Flatten the layout.
- Give the layout a three-dimensional star shape using the resulting fold lines.
- Connect the protruding parts together, which should serve as a support for the star. This can be done either with glue, if the protrusions overlap each other, or with tape.
- Turn the star over and color it red or
Stage 4 - pedestal
Despite the fact that instructions have already been given on how to make an eternal flame with your own hands, the master class would be incomplete without mentioning how to make a pedestal. After all, it is also part of the layout. In our case, the pedestal consists of two parts: the first will stand, the other will lie. The star with the flame will be placed on the last one.
Instructions on how to make an eternal flame with your own hands - the first part of the pedestal:
- Take a sheet of cardboard, a pencil, a ruler and scissors.
- Place the sheet vertically in front of you.
- Draw a strip from the edge, small in width but long, covering the entire height of the sheet. You will get the first strip.
- Mark a distance from the line that will be equal to the width of the finished star (or will be slightly larger).
- By drawing this width, you will get a second stripe.
- Make another strip, which will be the same width as the first. Strip number 3 will come out.
- Draw a fourth strip, which is equal in width to the second.
- Make stripe #5 equal to stripes #1 and 3.
- Fold all 5 strips.
- Make a box along the folds, but without the top and bottom.
- Glue strips 1 and 5 together.
- Make small cuts on one side on the folds of the thin sides of the box.
- Close the box.
The first part of the pedestal is ready. It can either be painted or covered with wallpaper with a marble pattern.
The second part of the pedestal is made similarly to the first, only there are a number of features:
- The width of the second part should be equal to the width of the first.
- The height should be slightly larger than the first one. This is done quite simply: increase the size of the side walls.
- The second box should be closed on both sides.
After you assemble the second part of the pedestal, decorate it with paint or wallpaper.
Paper cards with children
Of course, we are used to giving cards to our loved ones. Homemade gifts are very valuable for each recipient, because they thought about him and wanted to do something nice. And it doesn’t really matter what occasion you make them for, whether it’s a birthday or Easter. Therefore, today we will make such crafts for grandparents. They can also be taken to an exhibition in a kindergarten or school.
Use numbers. Nine denotes the date; you can use the war years and 1941-1945. Look at the emphasis placed on the number itself.
All parts are cut out separately, then a composition is formed from them.
We also associate carnations, stars and St. George's ribbons with the holiday.
Using only these symbols you can quickly issue a congratulation.
A military helmet is also often found in images of the Great Patriotic War, so it can also be used.
Another option is to use flowers, a red star and a ribbon. You can specifically find shiny or velvet paper sheets in art and craft stores.
To make the letters seem three-dimensional, attach them with double-sided tape!
During the war, a map of the area was necessarily used, on which tactical actions were noted. This moment became a good subject for arranging congratulations.
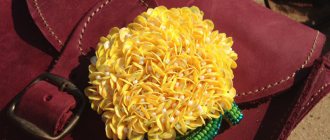
Now let's take a closer look at how you can make cloves. I will show you several options and you will choose the one that suits you. We will make the first option from ordinary white napkins.
Open it and tear it off in the middle to make two rectangles. We wrap each one vertically in an accordion.
Fix with wire or thread in the center.
We paint the edges with a water marker or watercolor. And let them dry. Do not use a lot of water, otherwise the workpiece will become soggy and turn into porridge.
Now we straighten the accordion, forming petals.
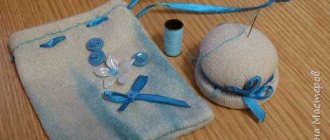
We will make the second option from prepared parts. Use a cotton pad to measure out an even circle.
Trace it and cut out 4 circles. Each of which you fold several times in the middle. Using scissors, give the edge of the workpiece a jagged shape.
We take the wire and string our levels onto it. Look at the instructions, it shows the sequence of actions.
Another option for a simple postcard using a number and a flower.
I’ll tell you in more detail how to make such an application. You will need a white piece of cardboard for the base and colored paper in orange, green, black and red.
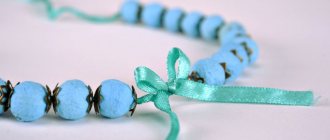
The highlight of this composition is the carnations, so let's start with them. The scheme is similar to that described above. Only for one flower we use 2 circles. It will be more beautiful if you use corrugated or crepe paper for the petals, then the petals can be curled and fluffed a little.
Glue the finished flower.
The entire craft will stick well to PVA glue, especially since it is considered the most harmless.
For the ribbon you will need one wide strip (it is better to take it about 3 centimeters wide) and three black narrow ones of the same length.
All that remains is to fix it in the right place and write down memorable years.
Look at the options for placing the inscription: horizontally, vertically, diagonally.
Volumetric cards also always attract attention.
If you are into quilling, you will love the following idea.
First, modules are made, then they are assembled into flowers.
This card has tulips glued on it using the origami technique. I wrote how to make them here.
You can depict a laurel branch as a sign of victory and spring. And also a red three-dimensional star, which was a symbol of the USSR army.
An interesting double craft.
Of course, you can use not only paper, but also improvised materials. For example, it is now popular to use buttons in creativity. They can be of different sizes and colors.
More ideas from first and second grade students.
My child and I often make plasticine applications using the stretching technique. When a small piece fills a small element on the paper. For example, you can print themed coloring pages and fill them out.
Or just color it.
Cut out patterns from them that you can use in your creativity.
You can also fill them with colored semolina, which is glued to PVA.
Stars, a tank, shoulder straps, orders and many more symbolic images can become the center of your composition.
Stage 5 - collecting all the parts
When all the components - the flame, the star and the two parts of the pedestal - are completely dry, you can begin to assemble them.
Operating procedure:
- Place the second part of the pedestal on a table or other surface.
- Place the first part on the second, close to the edge. You can secure it with tape.
- Make a small hole in the center of the star. The most convenient way to do this is with a thick needle or awl.
- Insert the flame into the resulting hole. This must be done carefully so as not to tear the parts. To do this, you can help yourself with a needle or toothpick.
- Place the star in the center of the lower part of the pedestal, having previously lubricated its support with glue.
- Spread the flame.
The eternal flame is almost ready.
Completion of the “Eternal Flame” craft
The given master class on how to make an eternal flame out of paper with your own hands step by step also involves decorating the craft with flowers and inscriptions.
Instructions on how to make paper carnations:
- Take red corrugated or tissue paper in red and green colors, wire.
- Wrap the wire tightly with green paper, securing it at the ends with glue. The stalk is ready.
- Fold several sheets of red paper into a stack (three to five pieces).
- Fold the paper like an accordion.
- Wrap the stem around the middle of the accordion.
- Trim the edges of the accordion into a sharp shape.
- Gently spread out each accordion layer.
- Fluff the flower.
One clove is ready. Make a few more according to the given scheme.
Now you can decorate the pedestal with an inscription.
Operating procedure:
- Take cardboard, a ruler, a pencil, scissors and red paint with a brush.
- Draw two on cardboard, taking into account that the distance between them is equal to the size of the future letters and numbers.
- Draw the following numbers between the resulting lines, which should be the same in width: 1, 9, 4, 1, 1, 9, 4, 5, P, O, M, N, I, M, G, O, R, D , I, M, S, I.
- Cut out all numbers and letters.
- Paint the parts with red paint.
- Let the parts dry thoroughly.
- Print out an image of the order with the St. George ribbon or find such an image on postcards.
- Cut out the image along the outline.
- Glue the numbers and letters in the correct order on the pedestal (for example, as in the photo), and also place a picture of the order and the St. George ribbon.
Place the carnations next to the star. The “Eternal Flame” paper craft is ready! To prevent the craft from spoiling:
- Place it on a flat board.
- It is better to wipe dust from crafts not with a cloth, but with a special brush. Then the parts will not be damaged.
- Choose a place where the eternal flame will stand, without straight lines. Otherwise, the paper will burn out and lose its brightness.
We hope that everything is clear to you in the step-by-step description of how to make an eternal flame with your own hands. The master class is over!
Add your own ideas when making crafts, for example, print out pictures of soldiers, stick them on cardboard and cut them out, leaving a support. Place the resulting figures next to the eternal flame.
If you, as parents or because of your profession, are involved in creative work with children, then new ideas and work options are always needed. The article discusses how the “Salute” applique is made from paper in different ways. It can be used to design a postcard, gift panel or packaging for Victory Day, New Year or other holidays. Explore possible ways. Choose the one you like. Create gifts and souvenirs with your own hands.
DIY crafts for Victory Day for school
You can make a craft for May 9th for school or class from various available materials: cardboard, colored paper or ordinary white napkins. Both teachers and classmates will certainly be impressed by interesting craft options: a festive Victory flag or a dove of peace.
Victory Flag
Create with your child one of the main symbols of the 1945 victory.
What you will need:
- a sheet of red paper;
- yellow cardboard sheet;
- ruler;
- PVA glue;
- a simple pencil;
- scissors;
- markers;
- a stick for attaching balloons or another sufficiently long stick;
- scotch;
- St. George Ribbon.
Step-by-step instruction:
- First, you will need to cut a rectangle from a sheet of red paper: the width of the rectangle should be approximately two-thirds of the whole sheet.
- Cut a triangle from one side of the resulting flag blank.
- Cut out the number “9” from yellow cardboard and glue the number to the future flag (you can use glue or double-sided tape).
- Next to the number “9” write the word “May” with any bright felt-tip pen.
- If you have enough space, you can write “Happy Victory Day!” with a felt-tip pen of a different color.
- Using tape, attach the resulting flag to a balloon stick or other stick of suitable size.
- Tie a St. George's ribbon to the stick.
Video instruction:
Dove of peace made from white napkins
A craft that is easy to make and looks very impressive.
What you will need:
- a sheet of white paper;
- white napkins;
- a simple pencil;
- scissors;
- PVA glue;
- black paint and brush.
Step-by-step instruction:
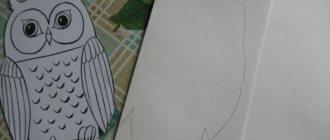
- Draw the silhouette of a dove on white paper and cut out the silhouette with scissors.
- Cut the napkins into squares approximately 1.5*1.5 centimeters in size (the larger your pigeon, the more napkins you take).
- On the head of the future pigeon, mark the eye with black paint and paint the beak with the same paint.
- Distribute the glue over a small part of the craft (for convenience, you can use a brush).
- Roll napkin squares into rose shapes using a pencil or brush.
- Glue “roses” from napkins to the glued area of the craft.
- Fill the entire silhouette of the dove with “roses” according to the same principle: treat a small area with glue, attach the “roses”, and move on to the next area (so that the glue does not have time to dry).
Video instruction:
How to make the “Salute” applique
Any work performed using this technique involves gluing pre-made elements onto the base. A flat surface, for example, a sheet of cardboard, is often used as a blank for decoration. In addition, a postcard, packaging (box), as well as a decorative object in the form of a vase are suitable. The “Salute” applique can be made from paper, thread, plasticine, fabric, cereal, grains, beads, buttons. Paper is the simplest material that even small children can work with.
Crafts for May 9 from salt dough
Salt dough is a material that is pleasant and easy to work with. For the festive exhibition, you can make original crafts from salt dough: a composition on the theme of the Great Victory, a star, an order and much more.
Composition for Victory Day with doves
What you will need:
- salty dough;
- modeling stack;
- water;
- ruler;
- paints and brush;
- White paper;
- PVA glue.
Step-by-step instruction:
- Take a piece of salt dough about two-thirds the length of a standard landscape sheet.
- Roll the dough into a ball, divide the ball into two equal parts.
- Give one part of the ball a flat shape, make vertical cuts on both sides: the cuts should take up about a third of the piece you are working with.
- Fold the dough in half, forming the silhouette of a dove - the part with the cuts will become the bird's wings.
- Use the stack to shape the pigeon's tail.
- Roll out another piece of salt dough for the base of the craft.
- Attach the dove to the base using water; you can make eyes for the dove from any suitable material.
- Make another dove, attach it to the base - the birds should be opposite each other.
- Use a ruler to measure the distance between the birds, and use a piece of salt dough to make a rectangle of the same size.
- Cut out a rectangle of the same size from white paper, draw orange and black stripes on it to depict the St. George ribbon.
- Attach the paper rectangle to the dough rectangle.
- Apply oil to the bottom edge of the rectangle, attach the rectangle to the base - it should stand vertically.
- Paint the base of the craft with blue paint.
For other ideas for works made from salt dough that are easy to create based on a sample, look at the photo:
Image source
Materials and tools
The techniques used vary: from very simple to complex. In accordance with the chosen method, you will need several devices for processing it. So, if you decide to make a fireworks out of paper, the application will require the use of the following:
- Colored paper (thin office or designer paper).
- A pencil.
- Scissors.
- Hole puncher (regular or with a figured cliche).
- Knitting needles, skewers, toothpicks for creating elements in
- Basics for applique (sheets of cardboard, boxes, postcards).
- Glue.
As you can see, nothing complicated is needed. If the work will be done by small children, the paper blanks must be cut out in advance by adults (parents or educators).
Manufacturing from round blanks
The Victory Salute applique can be made from large parts created according to one template from different colors of designer paper. This is one of the easiest ways.
To make such a decoration for a postcard, wall panel or other decor, follow these steps:
- Take several sheets of different shades, or better yet, surface textures. Metallized and pearlescent thick paper or cardboard will look great.
- Prepare a template (or several) from a regular sheet. Make a round blank of the required diameter. Choose any size. It can be from 2-3 cm for a postcard to 10 cm for a wall panel.
- Cut out several circles from prepared sheets of paper one template at a time. Make cuts on each one from the edge to the center; you can even decorate the outer circle in the form of a wave or teeth.
- Glue the cut out parts onto the base, preferably a dark color. Arrange the elements so that the small circles are at the bottom and the larger circles are at the top or to the sides. This will make a more realistic picture by creating the illusion of perspective.
As you can see, this kind of work is not difficult to do. The child can handle the task on his own if he already knows how to handle scissors.
Paper crafts and applications for May 9
Paper crafts for the Victory Day are a good solution when you don’t have a variety of materials for handicrafts at home. Such crafts look attractive and require a minimum of skills - you can actively involve even a small child in the work.
Composition for May 9
An original idea for a holiday theme.
What you will need:
- a disposable plate for the background (can be replaced with a sheet of thick white paper or cardboard);
- blue gouache and brush;
- a sheet of white paper;
- red, pink, green paper;
- scissors;
- a simple pencil;
- glue gun or PVA glue;
- St. George's ribbon (if any);
- hairspray and some beads (optional).
Step-by-step instruction:
- Color a disposable plate or other background with blue gouache.
- Wait until the gouache dries; for better fixation, you can treat the background with hairspray.
- Next you need to draw and cut out the silhouette of a dove and several small flowers from white paper, a few more flowers from pink paper, the number “9” from red paper, and leaves for the flowers from green paper.
- Glue the St. George ribbon and all the paper blanks to the plate or other background, place the flowers along the edge of the background.
- You can place a bead in the middle of each flower, and treat the leaves with glue, imitating dew drops.
Applique with carnations
A good craft option for a child attending kindergarten or for an elementary school student.
What you will need:
- paper of different colors: black, orange, blue, yellow, green, dark red;
- scissors;
- PVA glue.
Step-by-step instruction:
- Leave the blue leaf whole for the base of the craft.
- Cut a sheet of yellow paper along the edges - cut about 4 centimeters on each side in width and 1.5 centimeters in length.
- Glue the yellow sheet onto the blue one - the background is ready.
- Cut the red paper into circles with a diameter of about 6 centimeters - make as many circles as you plan to place carnations on the background.
- Use green paper to make stems for carnations.
- Cut a wide strip of orange and three narrow black stripes to create a St. George ribbon.
- Fold each red paper circle in half and make cuts using scissors.
- Glue the red circles onto the yellow background and glue the green stems on top of the circles.
- Glue three narrow black stripes to a wide orange one - you get a St. George's ribbon.
- Glue the St. George ribbon under the carnations - the applique is ready.
For a variant of an unusual application with a voluminous tent for May 9, see the video tutorial:
We make fireworks from small circles and threads
This option is simple as it does not require the use of scissors.
To make parts you will need a hole punch. An ordinary stationery tool that makes two round holes will do. The work done using elements made using a figured stamp looks even more impressive. Such hole punches are used in scrapbooking and other types of decorative activities. The “Fireworks for May 9” applique can be made from many stars, and for a birthday or other holiday - from flowers or hearts. The decoration looks even more impressive if two hole punches were used, which make blanks of different sizes.
This decor is performed in the following sequence:
- Make a lot of blanks from multi-colored paper. If you use a regular hole punch, you will get something similar to confetti.
- Draw the approximate location of the parts on the base.
- Apply glue to the surface of a postcard, panel or other object. Create a composition by applying colored blanks. Add glue if necessary.
- After the fireworks “caps” are formed, cut threads of the corresponding colors and glue them in the form of bunches, diverging from bottom to top.
The composition will be spectacular. It can be supplemented with sparkles and painted details.
DIY postcards for May 9
Postcards are a universal craft for an exhibition, competition or gift.
A very simple postcard for Victory Day
Even a small child can make this craft with a little help from an adult.
What you will need:
- a sheet of green cardboard;
- glue stick;
- St. George's ribbon and a red five-pointed star - bought in a store or made from colored paper yourself.
Step-by-step instruction:
- Fold a piece of green cardstock in half to create the base of the card.
- Attach the St. George ribbon vertically to the outside of the card using glue.
- Glue a star next to the ribbon.
Video instruction:
Three-dimensional postcard for May 9
The work is more difficult for older preschoolers and schoolchildren.
What you will need:
- sheet of blue cardboard;
- golden-colored cardboard;
- White paper;
- red paper;
- ruler;
- a simple pencil;
- scissors;
- glue dots (can be replaced with PVA glue);
- red felt-tip pen;
- red braid or narrow satin ribbon for fastening the card.
Step-by-step instruction:
- Cut out a square measuring 21*21 centimeters from blue cardboard.
- Fold the square in half to create the base of the card.
- Cut out a square of 10*10 centimeters from golden cardboard.
- Draw a five-pointed star on golden cardboard, then cut out the resulting star.
- Make another star from a square of red paper measuring 7.5 * 7.5 centimeters.
- Using glue dots or glue, first glue a golden star to the blue base, and then a red one on top of it.
- On white paper with a red felt-tip pen, write “Happy Victory Day!”, cut out the inscription and glue it under the stars.
- Fold a square of red paper measuring 10*10 centimeters into a triangle four times, cut off the excess.
- Make cuts along the entire lower part of the triangle, straighten the triangle - an image of a three-dimensional flower will appear.
- For convenience, make a cut anywhere in the flower, roll the flower into a cone and straighten it.
- Make three more such flower parts - you should get four parts in total.
- From a green square measuring 7*7 centimeters, make the same flower detail as the red details.
- Make a stem and leaves of a flower from green paper, glue it inside the card, place the stem at the junction.
- Glue one green and four red pieces to the top of the stem to form a flower.
- Make a hole at the edge, in the center of the folded card, using a hole punch or scissors, thread the ribbon through the hole and tie it.
Video instruction:
Application "Salute" in kindergarten from crumpled paper
The easiest option, which even kids can do, is done without scissors and hole punches. You will need thin colored paper that the child can tear into small pieces on his own. If the baby does not yet know how to handle glue, you can use plasticine. Such work will turn out beautiful, and the process of creating jewelry itself will be useful. Such actions develop fine motor skills of the fingers, which is very important for the baby.
Such an activity can be easily carried out at home independently with a child or in an organized group, timed to coincide with a holiday, for example, the New Year, which can be easily explained at an accessible level even to small children.
Volumetric ideas
Three-dimensional crafts look as realistic as possible - for Victory Day, you can make a three-dimensional Eternal Flame or a three-dimensional carnation, almost indistinguishable from a real one.
Volumetric Eternal Flame made of cardboard and napkins
What you will need:
- yellow and red napkins;
- sheet of colored cardboard;
- a sheet of white paper;
- glue stick;
- scissors;
- ruler;
- simple pencil.
Step-by-step instruction:
- Create a star from white paper for the base of the craft: you will need to cut out a square measuring 16*16 centimeters. Fold the square so that you get a star (see photos and videos for how to fold a square correctly).
- Transfer the resulting star template onto cardboard.
- Cut out a star from cardboard.
- Draw fold lines with a pencil: from each obtuse angle to an acute angle diagonally - you should get 5 fold lines in total.
- Sequentially fold the star along each fold line and straighten the resulting part.
- Using your hands, straighten the designated fold lines so as to give the star volume.
- Roll a strip of white paper—approximately as tall as the width of the star—into a cone shape using a pencil or finger.
- Cut the napkins into strips 1 centimeter wide, paste the strips over a paper cone in several layers - you will get an image of fire.
- For greater realism, you can slightly tear the edges of the strips that form the fire.
- Use scissors to make a hole in the middle of the star and place a fire in the hole.
Photo instructions for making a star for the base of the Eternal Flame:
Image source
Volumetric carnation made from napkins
An unusual craft idea for the May 9 holiday for a competition and exhibition. During the work, the adult will need to help the child correctly measure the required amount of paper if the child does not yet know how to handle a ruler.
What you will need:
- green paper for the stem;
- one red and one burgundy carnation napkin;
- scissors;
- cocktail tube or thin pencil;
- ruler;
- a simple pencil;
- glue stick or PVA glue;
- if you have them, use curly scissors (you can get by with regular ones).
Step-by-step instruction:
- Prepare the material for the stem: from green paper you need to cut one strip 7 centimeters long and 5.5 centimeters wide, another strip 29-30 centimeters long and 7 centimeters wide.
- Wind a long green strip onto a cocktail tube, secure it with glue, and bend it slightly at one end to create a bend in the stem.
- Straighten the napkins and fold them together.
- Fold the napkins first from the bottom to the middle, then from the top to the middle.
- Use scissors to cut the resulting stack along the fold.
- Remove the two resulting strips from the napkins, and also cut the remaining ones along the fold.
- Fold all the strips in a stack, cut along the edges along the length with curly scissors or regular scissors, forming a wave.
- Fold the napkins like an accordion.
- Attach the stem to the middle of the napkin accordion by the bend and secure with glue (or a stapler).
- Spread the napkins so that you get a voluminous lush flower.
- Make carnation leaves from the remaining green strip: you need to fold the strip in half and cut out the outline of the leaf with curly or regular scissors.
- Glue the two resulting leaves to the stem of the flower.
Video instruction:
Fireworks of small stars
It is this form of the element that will be more natural and at the same time decorative. The most effective “Festive fireworks” applique will be obtained if you use hole punches with cliches of the appropriate shape (discussed above). However, if it is not possible to purchase this tool, you can cut out the parts with scissors. It is worth considering that the smaller you want to get the blanks, the less tools you will need to create them. The easiest way is to use a plastic stencil so as not to draw the outline by hand. If you have a template that you can trace around the outer edge, this will make the job much easier. It will be enough to simply cut out the part along the contour without first drawing the contour with a pencil. It’s easy to cut such a blank yourself, you just need very thick cardboard or other suitable material.
To quickly cut out many small parts with scissors, you should use this method of bending the sheet the required number of times. To do this, you can cut out a strip and fold it like an accordion so that your template fits on the resulting plane. By cutting out its outline once, you get several finished parts at once. This will significantly reduce the time required for preliminary work. All other steps are performed in the same way as in the case of making stars with a hole punch.
Applications “Dove of Peace”
One of the symbols of the holiday is the Dove of Peace. Most often it is depicted in white with a twig in its beak. But a twig can be replaced by a carnation or St. George's ribbon.
Let's start with the simplest option for making these cute birds. To create it you need to trace a child’s palm. All fingers need to be well extended so that the thumb is away from the index finger.
We add a beak and eyes to it. We will need two of these parts, because we will insert a stick in the middle. It can be replaced with a straw for cocktails or a skewer for kebabs. Write a wish for veterans on your palm.
Another option is pigeon. The scheme is the same, a stick is used. But for the body we took the usual template and also made two parts. They were connected to each other, and a stick was fixed in the middle. The wings need to be folded back.
Take this template option. The wings are separately fixed to the body. The dotted lines indicate the bend locations.
You can also make simple little doves from disposable plates.
You will need two wing pieces. To make the beautiful plumage visible, grab the ribbed edging of the plate.
A simpler variation from disposable tableware.
One plate yields one bird.
Nowadays there are many materials for creativity; you can use foamed soft sheets or cardboard.
Use this diagram.
Transfer it to cardboard and cut out all the details.
The wings are inserted into the slot. They can be covered with braid or ribbons to hide small defects and the design itself.
I liked the knitted dove. Praise and honor to the craftswoman who created it.
For little ones, you can make the task easier and offer to make an applique.
Baby birds can be decorated with napkin balls, cereal, cotton wool or foil balls.
Also, any of the above ideas can be used in postcards or wall newspapers.
We cut out large blanks in the shape of stars
Everything that was said in the previous section is also suitable for creating large figures. Only you will need much less of them.
Here the work will be structured as follows:
- Cut out several (you can limit yourself to 3-5) blanks from colored paper in the shape of stars.
- Make smaller ones in larger quantities.
- Glue large parts onto the base.
- Complement them beautifully with small elements.
- Using a brush or gel pen of the appropriate color, draw lines diverging from bottom to top in the direction of each large star.
The application on the theme “Fireworks” is ready. Fast and easy.
Crafts for a competition at school
The best works are taken to the competition and exhibition. They are often quite voluminous, large in size and labor intensive.
I would like to offer you a few ideas so that you, too, can take part in this venture, and even win a prize. And joint creativity with the child will benefit the whole family if the parents are patient.
We will need a cardboard base in the shape of a star.
We cover it with green leaves.
And filled with corrugated paper roses.
Another very painstaking but beautiful idea using pasta. We have long realized that the various forms of these products allow us to make very beautiful crafts.
Use unusual objects, such as a vinyl record. After all, it is so characteristic of those years.
And create a whole composition as a fragment of a story or a certain event.
A battle of soft tanks. The basis is taken from dishwashing sponges.
Various equipment also directly relates to war times. The cardboard tank is made very carefully and can easily be sent to the competition.
It is done according to these step-by-step instructions.
The orderlies' car is also made very realistically.
A similar plane was made in this article.
Of course, we will not forget the sailors and call their ships memorable names.
You can use a military helmet as a basis for a competitive craft. The easiest option is to use the papier-mâché technique.
The basis will be an inflated balloon, onto which you will apply pieces of newspaper using glue.
The theme of the eternal flame is also perfect for an exhibition. A cardboard box or polystyrene foam is suitable for the pedestal.
I was impressed by the cute plasticine craft. All lines and transitions are very carefully observed.
The 4-layer volumetric screen is also interesting in its idea.
First, an ornament is applied to each A4 sheet. The width of the frame is the same everywhere. The number and the tank are cut out immediately from a single sheet, and are not glued on separately.
The base is made of a white sheet on which fireworks are depicted. We bend the edges like an accordion, each bend is 1 centimeter.
These are the preparations we should be able to achieve.
Decorate the front frame.
and begin gluing the edges of the frame onto the sides of the accordion.
Also don’t forget the option of wall newspapers. a lot of them have also been invented. I liked this one, assembled from different fragments in the form of a symbolic number.
I remember that every year at school we made very colorful wall newspapers, and my classmate composed poems especially for this holiday. It's a pity that we didn't think about taking pictures of them, I would love to look at them now.
Working with quilling technique
This is the most difficult option presented, but the result will be very impressive. This method is suitable for older children, as it will require not only more perseverance and patience, but also certain finger skills.
The sequence of actions will be as follows:
- Whatever elements you choose to create a fireworks display (rings, curls, triangles, etc.), you will need to cut many strips of colored paper approximately 5 mm wide. You can buy ready-made ones, but it will be difficult to choose colors that match your design. Often strips are sold in sets, where a certain amount of one or another shade is present. It’s easier to make it yourself from the paper you chose. Use scissors, but a stationery cutter is best, which, for example, is used to make business cards at home or in small printing houses.
- Take a toothpick, a knitting needle, a skewer or a special one and wind the strip onto a stick. Give the parts the required shape and glue the parts in the right places.
- When the required number of parts have been made, proceed to arranging and gluing them to the base.
- The finished composition can be supplemented with sparkles, lines, additional drawings or a brush, although usually such works turn out to be completely complete and do not require additions.
So, you have learned how to make the “Salute” applique from paper. Choose the appropriate option and create spectacular gifts while engaging in a fun creative process with your children.
We remember! We are proud! The Great Patriotic War has not been forgotten. It is extremely important that the younger generation knows about the feat of their ancestors from a very early age. There is still an opportunity to meet with participants of the Second World War, to whom, by the way, you can give a handmade craft for May 9th. For example, the eternal flame.
Materials and tools:
Cardboard box; - colored cardboard; - office paper; - colored paper - corrugated paper; - felt-tip pen; - scissors; - stapler; - pencil; — ballpoint pen refill; - ruler; - stencil; - glue.
Military children's crafts from plasticine
It is most convenient to make tanks and other military-themed equipment from plasticine - schoolchildren will be able to cope with the work on their own, and kids with a little help from an adult.
Plasticine tank
A simple craft for preschoolers and first or second grade students.
What you will need:
- plasticine of different colors: red, white, blue, brown, green, dark green, black;
- a yellow sheet of paper or cardboard for the background;
- simple pencil.
Step-by-step instruction:
- On a yellow background, draw the outline of a tank with a flagpole and a flag.
- Form small circles from green and dark green plasticine, glue the circles inside the entire outline of the tank, including the barrel and track wheels.
- Mark the boundaries of the tank wheels and the wheels themselves using black plasticine.
- Cover the flagpole with brown plasticine, the flag with white, blue and red, similar to the Russian flag.
Video instruction:
Airplane made of plasticine
A bright craft for a thematic exhibition or competition.
What you will need:
- plasticine of different colors: red, yellow, purple, blue, black;
- modeling stack;
- three toothpicks.
Step-by-step instruction:
- Make a cone-shaped airplane body from red plasticine.
- Knead the yellow plasticine, pulling it out, to form a wing.
- Using a stack, trim the edges of the wing so that it is even.
- Cut the wing down the middle to create two wings.
- Knead a small ball of yellow plasticine and form a trapezoid for the base of the plane's tail.
- Form a rectangle from purple plasticine, cut the rectangle in half diagonally - these will be two more parts of the tail.
- Connect all the resulting elements.
- Roll blue plasticine into the shape of a drop, mold the same drop from purple plasticine, connect both drops - you will get the basis of the cockpit for the pilot.
- Form a flagellum from purple plasticine and mark two compartments of the cabin with it.
- Attach the cockpit to the aircraft body.
- Make a square of purple plasticine, divide the square in half diagonally with a stack, you will get two triangles - racks for the landing gear.
- Make three wheels out of black plasticine and attach one wheel to each landing gear strut.
- Attach the struts to the back of the wings.
- Place the third wheel at the rear of the plane.
- Form a cone from purple plasticine, put the cone on a toothpick - this will be the base of the screw.
- Divide the remaining two toothpicks in half to create four mounts for the blades.
- Form blades from yellow plasticine and place each blade on half a toothpick.
- Connect the blades and the propeller.
- Attach the propeller to the plane.
Video instruction:
T-34 tank made of plasticine
Legendary equipment from the Great Patriotic War. Quite a complex craft, suitable for children 10 years and older.
What you will need:
- plasticine of dark gray or other dark color;
- red plasticine;
- stacks for modeling;
- ruler.
For step-by-step instructions on how to create a T-34 tank from plasticine, watch the video tutorial: