Handmade products are at the peak of popularity today. Even the most ordinary and, at first glance, unnecessary things can turn into an original, beautiful interior decoration. Glass bottles are a klondike for creative ideas that can turn into a bright item for a walk-around or serve as an original holiday gift. To decorate them you will need a small set of materials (for example, rope, lace, paint or cereal) and a little imagination.
Decorating bottles with twine
Beautiful decor of glass bottles with twine
Idea for decorating bottles with twine
Types and ideas for decorating glass bottles
There are several ways to decorate a bottle. The interior design is suitable for bottles with transparent walls. For any method, you must first prepare the container for processing:
- remove stickers and labels;
- wash;
- dry;
- degrease with a special liquid or alcohol.
Below is a table with some simple options for interior decoration of a glass container.
| Idea | Materials | Execution principle |
| Salt decor | Fine salt; Heat-resistant dishes; Fork; Acrylic paint; | Divide the salt into several portions and mix each portion with acrylic of different colors, mash with a fork; Place the resulting mixtures in an oven heated to 100C for 1 hour; Mash the “baked” salt with a fork and sift through a sieve; Pour the resulting colored sand into the bottle in layers using a funnel, alternating colors. Cover with lid and decorate as desired |
| Cereal decor | Black and white beans; Peas; Corn; Buckwheat; | The essence of the work is very simple: you need to pour the grains into the bottle in layers as you wish. The nuance of this process is that small grains must be at the bottom, otherwise there will be no clear boundaries. |
| Decoration with paints | Acrylic; Lattice; | This method is as simple as possible and is perfect for bottles with embossed walls. It is necessary to pour the paint into the container and distribute it evenly inside. Fix the container in a vertical position upside down on a wire rack so that excess liquid flows out of it. After the first layer has dried, repeat the procedure again. |
External treatment can be used on containers of any color and size. It can be made in decoupage style or using improvised materials such as rope, threads, cabochons.
Decorating glass bottles with twine
Bottle decor with twine
See also Landscape design for a site on a slope, photo.
Concrete vase made of burlap
The idea of how to make and how a concrete vase made of burlap would look in the garden was prompted by a photograph found on the Internet of four concrete flowerpots.
The third, largest of the flowerpots seemed especially interesting. The traces or the burlap itself, impregnated with cement mortar, are most clearly visible on it. For the rest, it is very difficult to determine their connection with burlap and most likely they were made using large plastic bags.
If this is so, then the process of their manufacture is as follows. An ordinary concrete mixture is prepared (1 part cement + 3 parts sand), water is added little by little and the mixture is brought to the state of liquid sour cream. To save cement, you can add fine stone chips or coarse sand. Next, pour the mixture into a plastic bag and insert a suitable sized plastic bucket, lubricated with a release liquid, into the mixture. We tie the outside of the bag with a rope. Instead of a separator, you can use a thin plastic trash bag or plastic wrap. You need to pour wet construction sand into the weight bucket.
Judging by the photograph (the inner wall is very smooth), a separator was still used, otherwise traces of the folds of the film would have been visible.
Step-by-step instructions for decorating with twine
Decorating bottles with twine should begin with preparing all the materials:
- Glass bottle of any shape;
- Leg-split;
- PVA Glue;
- Scissors;
- Glue gun;
- Additional accessories (cabochons, beads, dried flowers) upon request.
The glass bottle must be cleaned of inscriptions and labels, washed, dried and the surface degreased with alcohol or vodka. This design idea involves completely wrapping the base with thread. To do this, silicone glue is applied in thin spiral strips a few centimeters one after another from the bottom to the neck, and twine is glued to it. Since this type of glue dries quickly, the procedure should be quick.
It is important to ensure that the thread lies evenly on the surface, tightly adhering to the glass.
Once the wrapping process is completed, you can begin decorating with additional accessories.
Decorating bottles with twine
Beautiful decor of glass bottles with twine
Idea for decorating bottles with twine
See alsoZoning and choosing decor for the manager’s office, photo.
Satin ribbons for the kitchen
Required:
- satin ribbons;
- brocade ribbons (with the addition of shiny inclusions);
- glue “Moment”;
- additional decorative decorations.
To make the decoration successful and the bottle to become an excellent souvenir, it is advisable to take a product with gold foil without adding any inscriptions. The amount of tape used depends on the width of the material. To make bottle decoration easy and the result to be excellent, you need to decorate according to the following scheme:
- To implement each layer, you must first apply the tape to the required place without gluing, and then cut off the excess.
- Dots are placed on the surface of the bottle with glue. There is no need to use a lot of this substance.
- The tape is glued close to the surface and stretched. Each subsequent layer is adjusted in length.
- When gluing the tape, a kind of pigtail is formed at the joints. You should always cross the edges of the material in one direction to ensure an even pattern.
- When narrowing the tape towards the neck, make sure that it is absolutely even.
- After you have finished gluing the bottle with the base decorative layer, you can decorate it with any additional elements.
Video: how to decorate a bottle for a wedding with ribbon
How to decorate bottles using ribbons for a wedding:
The flat (wide) part of the bottle must be sealed with even strips. The result will be a sloppy seam. It is covered with a ribbon threaded across it.
Decoration with different threads and lace
Everything you need for work:
- Multi-colored threads;
- Lace;
- Glue;
- Cabochon or artificial crystal;
The format is as follows:
- Wrap the bottom and top 1/3 of the bottle with threads, alternating colors;
- Cover the middle part with lace and glue the cabochon onto it.
Decorating glass bottles with twine
Bottle decor with twine
See alsoHow to make blinds from wallpaper with your own hands
How to properly wrap a glass container with twine?
Decorating bottles with twine with your own hands is not done in any order. When “winding” bottles you need to follow several rules:
- You need to start from the bottom. Apply glue to it and simply roll the thread “snail” from the center to the edges of the bottom. The twine must be laid tightly and evenly so that it turns out neatly and looks beautiful. You also need to put a thread on the edge of the bottom so that the container does not lose stability.
- Then the bottle is decorated with twine from the bottom up to the neck. In this case, the rope should lie parallel to the bottom. If at least one layer “tilts,” then the rest will be laid more crookedly each time. Twine decor will be a disastrous idea.
- The neck is wrapped last. The thread must be secured well so that it does not unwind later. The twine decor is ready.
Decoration with crystals
Necessary materials:
- Leg-split;
- Lace;
- Thermal gun;
- Large rhinestones or small crystals of the same color;
First you need to divide the bottle into 5 equal horizontal stripes, each of which will be decorated with a separate element:
- The first layer should be wrapped with thread using silicone glue;
- Next is a lace strip;
- The middle one includes the most painstaking work: gluing rhinestones. To facilitate the process, you can use rhinestones on the ribbon. In this case, you just need to cut a strip of stones of the required width and glue it to the glass surface;
- The fourth is lace;
- Fifth – twine;
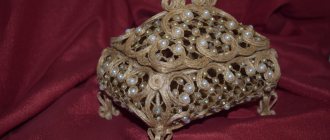
You can leave an empty distance of 1-2 centimeters between the layers, so the finished product will not look sloppy. Another variation of this design is to reduce the layers to three, where the middle one consists of wide lace, and one strip of rhinestones is glued in the middle.
Decorating bottles with twine
Beautiful decor of glass bottles with twine
Idea for decorating bottles with twine
See also: DIY decorative plates for the wall
Souvenir in the form of a turtle
Beautiful new crafts made from twine are opened with toy souvenirs, for example, a turtle. It's done simply:
- Draw the outline of the turtle or print out a suitable template from the Internet.
- In accordance with it, we cut out a piece of foam rubber.
- Glue both parts together.
- We wrap the paws, head and tail with twine.
- The upper cardboard part is coated with glue, onto which a thread is laid in circles, imitating a turtle shell.
- We draw the eyes and decorate them.
Bottle decor with twine and salt
For this type of creativity you will need the following materials:
- leg-split;
- white acrylic;
- silicone and PVA glue;
- colored fine salt and semolina (made independently, as in the internal salt decoration).
First you need to paint the bottle with acrylic. After it dries, glue the thread in layers, leaving a distance of about 5-7 centimeters between them.
Coat the empty spaces with glue and sprinkle tightly with colored salt, let dry.
You can also additionally decorate the bottle with beautiful decorative elements.
Instead of salt, you can use semolina or beads.
Decorating glass bottles with twine
Bottle decor with twine
See alsoDecorating a bottle of cognac for a man with his own hands for his birthday and February 23
Cereals (semolina, millet, buckwheat, rice)
One of the interesting and original interesting ideas is decorating with cereals. In addition to a variety of cereals, you will need special corrugated paper, two types of glue: PVA and hot. To decorate a bottle beautifully, you need paint with a dispenser. The standard procedure for gluing a bottle looks like this:
- a beautiful bottle is selected and cleaned of fat;
- cereals are glued in the form of clearly defined zones, patterns or protrusions;
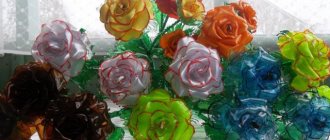
- Roses are made from corrugated paper by rolling. It is advisable to form them in different sizes;
- when all the elements are glued, you need to let them dry;
- the bottle is covered with paint. It should be applied evenly and everywhere.
Flat semolina, buckwheat, rice, millet can be complemented with shaped pasta. Additionally, you can cut out various shaped elements and add various decorations.
Decorating bottles with paints
It is best to use glass bottles for such creativity, since this material is much more durable than plastic. The following types of paints are suitable for work:
- acrylic;
- regular waterproof;
- aerosol;
- universal;
When painting, you can use a nylon brush. It will be the best option if the final goal involves roughness and some unevenness. A sponge will allow you to achieve an even coating, but to achieve this, painting should be done in several layers. Aerosol cans allow you to achieve a dense and even coating the first time, and they also dry quickly. Below are some options for decorating a bottle using paints.
Decorating bottles with twine
Beautiful decor of glass bottles with twine
Idea for decorating bottles with twine
See also: How to properly decorate an aquarium
Option 1
The easiest way to process a bottle this way is to use acrylic and electrical tape. To do this, you need to wrap the container with electrical tape, leaving free space, and cover it with paint. After complete drying, you need to remove the tape, and the original pattern will remain on the bottle. You can also use stencils and paint the container in different colors.
Decorating glass bottles with twine
Bottle decor with twine
See alsoHow to decorate a glass balcony
Option 2
Glitter decoration will become a beautiful accessory for a festive table and will serve as an original gift. Initially, you need to paint the bottle the same color as the glitter. After complete drying, coat the surface well with PVA glue and sprinkle it with glitter. When working, you should use rubber gloves so that glitter does not remain on your hands.
Decorating bottles with twine
Beautiful decor of glass bottles with twine
Idea for decorating bottles with twine
See alsoCreating an interior with your own hands
Making a decorative vase master class
Let's start making a vase. For a vase, take 2 jars, remove the bottom of one jar with a can opener to make a cylinder.
Glue the jars together with hot glue to create a vase.
To ensure that the twine sticks well and easily and to make the joint less noticeable, cover the vase with several layers of masking tape. If the tape is wide, you will get 4 layers.
Cover the vase with twine, gradually coating it with glue. Start pasting with twine from the inside, make several turns of twine.
Without cutting the twine, cover the vase completely.
Also, without cutting the twine, cover the bottom.
You can cut the twine and start gluing the bottom from the middle, it will be easier. Let the glue dry. Hot glue a lace ribbon along the top and bottom edges of the vase, with an overlap of about 1 cm.
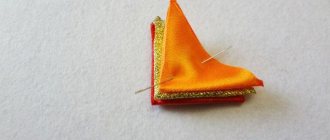
Let's start making roses and leaves from burlap. The burlap must be prepared in advance, dipped in PVA glue, and squeezed out the glue. Allow the glue to dry completely. Using a ballpoint pen, trace around the tin jar from which the vase is made, or make a template out of cardboard with a diameter of 8 cm. Cut out 5 circles from the burlap, from which to make roses.
Cut the circles in a spiral, since the diameter of the circles is small, there are 2-3 turns and the turns should not be narrow.
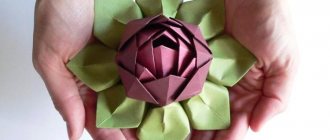
Twist the spiral into a flower. Coat the bottom edge of the spiral with hot glue when twisting. Make 5 roses.
Draw 5 leaves on the burlap using a template or by hand. Since the roses turned out to be small, the leaves should also be small: the length of the leaves is 5 cm and the width is 2 cm. Cut the leaves from burlap.
To give the leaves volume, make veins on them using twine. To do this, cut 10 pieces of 4 cm each from twine, 2 per sheet. Coat the twine with instant glue and stick it onto the leaves to create veins, cut off the excess twine.
For each leaf, cut 8 cm of twine. Coat it with glue and stick it on the leaves in the middle.
Cut 5 pieces of 15 cm each from the twine and glue along the edge of the leaves. Instead of cutting the twine into pieces, you can glue it from a reel and cut off the twine at the end. Allow the glue to dry each time you glue.
Roses and leaves are ready. Let's start decorating the vase. Hot glue the leaves onto the vase. The upper and lower leaves cover the seams on the lace.
Also hot glue 5 roses near the leaves.
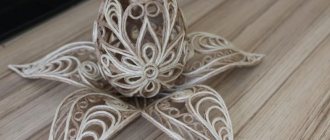
Decorative vase made of twine
ready for storing combs.
You can put combs in it.
Head: Natalia Aleksandrovna Tarasova
Trushina Lida Tarasova Natalia Aleksandrovna
| Comments to the news “Decorative vase made of twine. Master class” is already 0:
Interesting on the web:
E-book “The best handicraft master classes.”
After that, click the “Get book” button.
"Masterclasses" 2011-2017
. All articles on the site are copyrighted, copying is strictly prohibited. In case of partial citation, a direct indexed link to the “Masterclasses” website is required.
Attention! It is forbidden to use expressions in the form of obscene and insulting. HTML tags and URLs are not allowed
Bottle decoration decoupage
To create a decoupage bottle you will need:
- polyacrylate based paint;
- three-layer napkin with a suitable pattern;
- decoupage glue or PVA, diluted with water in equal proportions;
- synthetic brush;
- acrylic lacquer.
First, prime the surface with several layers of acrylic and dry thoroughly. Further actions:
- Cut out the desired design from the napkin using nail scissors, and carefully separate the top layer from the napkin.
- Glue the drawing onto the glass surface.
- Treat the glued pattern with diluted PVA using a synthetic brush.
- After complete drying, coat the bottle with acrylic varnish.
Decorating glass bottles with twine
Bottle decor with twine
If desired, you can decorate the surface with additional elements. Such a beautiful accessory will serve as a wonderful gift for any occasion.
Such decorative bottles can be used as a vase or an element of interior decor. And also everyone is pleased to receive an original, beautiful and functional handmade gift for the holiday.
See alsoHow to decorate curtains with your own hands
Combined vase with twine decor | Master Sergeich
Hi all!
Friends, today we will make a very beautiful and unusual vase. It is unusual in that it is made in a combined way, that is, from different materials, namely paper and glass.
Plus, for the external decoration of the vase, jute twine is used - a noble material that can be combined with almost any interior.
To make a vase you will need:
- Balloon;
- Glass bottle;
- Newsprint;
- Paper tape;
- Jute twine;
- Ear sticks;
- Yarn;
- Hot glue;
- PVA glue;
- Acrylic paints.
Step 1.
In a shallow container, make an aqueous solution of PVA glue. Do not pour too much water so that the glue concentration is sufficient.
Step 2.
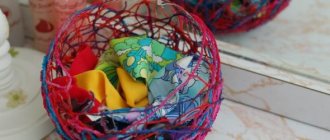
We inflate the balloon of the desired size, but so that it is less than the height of the prepared bottle. Then, we cut the newsprint into pieces and, soaking them in the solution, cover the entire surface of the ball with them in several layers (the well-known papier-mâché technique). The number of layers is at your discretion - the more, the stronger the craft will be, but without fanaticism))). We wait for the glue to dry completely.
Step 3.
We take a glass bottle and, in the place where the ball had a nipple, mark a circle equal to the diameter of the bottom. Cut out the marked circle. After which, the bottom of the resulting sphere must be made slightly flat so that the vase is stable.
Step 4.
Apply a layer of hot glue to the bottom of the bottle and, inserting it into the hole of the paper sphere, glue it inside.
Step 5.
Using pieces of paper tape, seal the gap between the hole and the neck of the bottle, applying slight tension.
Step 6.
Also, using the papier-mâché technique, we cover the visible part of the neck with pieces of newspaper with tape. Dry the glue.
Step 7
Apply a little hot glue to the top of the neck and, having glued the first turns of twine, begin the spiral winding of the entire vase, including its bottom. As you wind it, you need to periodically fix the turns with hot glue, you can even do it every time.
- Step 8
From the ear sticks, we cut off the parts with cotton wool, lightly dilute acrylic paint of the desired color with water and, immersing the cut parts in the solution, paint them thoroughly. After which, we lay everything out on newspaper to dry.
- Step 9
Using a thin brush, draw leaves on the surface of the twine, then, using hot glue, glue strands of yarn between them to imitate stems. Next, to the upper parts of the “stems”, also with hot glue, we glue the painted parts from the ear sticks, in the form of flowers. If desired, the flowers can be additionally painted and the cores can be glued in; in this case, their role is played by glass crystals.
- The vase is ready and, since there is a glass bottle at the base, it is quite possible to pour water into it and place a living flower.
Friends, don’t forget to share your favorite articles on social networks! Thank you! All the best to you, peace and goodness!
Source: https://www.youtube.com/channel/UCV4c4hulnbuVPm-mjd3AFjg
Fruit bowl with stem
Here's a close-up photo.
Sources
- https://vplate.ru/podelki-iz-dzhuta/vse-o-vazah/
- https://kamsaddeco.com/miniatjury/vaza-iz-meshkoviny.html
- https://FB.ru/post/interior-design/2020/1/22/178595
- https://tvorchestvovpodarok.ru/vaza-dlya-fruktov/
- https://gidrukodeliya.ru/podelki-iz-shpagata
[collapse]
But still more interesting: how is a large vase made of burlap made?
Several manufacturing options are reviewed here.
First option . We soak a burlap bag in liquid cement. Next, insert a plastic bag into it and pour the concrete solution. Then we repeat the procedure (see above) with a plastic bucket and tie a rope on the bag.
Second option . At the first stage, a large vase made of burlap is made in the same way as the production of small flowerpots was planned. Once the concrete has hardened, the polyethylene can be cut and removed from the casting. Then we apply a thin layer of fresh concrete to the surface. After a few hours (check on a small area of the surface), when the concrete mixture stops sticking to your fingers, you can use a piece of burlap to stamp a design on the surface of the vase. You can speed up the waiting process by sprinkling dry cement on the wet surface.
Third option . As in the first option, first soak the burlap itself well in cement mortar. Then we insert a plastic bag into it. Pour wet construction sand into the bag. Adding and compacting sand, fill the bag completely. We tie the bag with a rope. In this state we leave it to dry. After a couple of days, when the burlap has hardened, pour out the sand and take out the plastic bag. Next, we prepare a concrete solution (as in the previous options), pour it into a frozen bag and insert a plastic bucket into the solution. We are waiting for the mixture to harden. After a couple of days, we take out the bucket and the concrete burlap vase is ready.
Of the three options, choose the last one
Of course it's not the easiest. But at the same time, it is also the most interesting for experimentation. I would like to say that several ideas have already been born for using the option using sand in new samples.
So the choice is made, let's move on to the search for burlap. A small bag would be suitable for the experiment. And soon one was found among the old spoiled toys. This toy was called “Pig in a Bag” (see photo).
Previously, when the toy was still working, by pulling the tail, the bag began to jump and scream in a cat's voice. It was not difficult to remove the contents from the bag.
Composition of the cement mixture
Next, the bag is soaked in the prepared cement mortar: cement + water in a 1:1 ratio (very liquid sour cream). To ensure that the color of the burlap does not change, pigments are added to the solution: 1% brown and 2% yellow (by weight of cement). After this, a plastic bag was inserted into our soaked bag, into which wet construction sand was poured. After tightening the bag with a rope, the sand was compacted: the task was to remove the folds of the fabric and pretend that it was tightly stuffed with something.
To ensure that the future burlap vase does not crumble and is properly petrified, cover the bag with a plastic bucket. Two days later, a suitable plastic cup was found that fit freely into the frozen bag.
Pigment is added to the concrete mixture for filling the bag (1 part cement + 3 parts sand) in the same ratio as when impregnating the burlap. Add enough water so that the mixture resembles sour cream of medium consistency. Next according to plan: pour the prepared concrete mixture into the bag and insert a glass. By pressing it, we squeeze the solution up along the walls of the vase. Pour wet sand into a glass for weight. We cover the entire structure with a plastic bag for two days. After two days, take out the glass. A miniature vase is made from burlap. This is what ended up happening.