The animated series "Fixies", created by the Russian animation studio "Airplane", has a huge number of fans throughout Russia. Over the years of the cartoon's existence, children have managed to fall in love with the active Simka, the inquisitive Nolik and other equally wonderful characters. Kids love to play with fixie toys, wear clothes with the cartoon logo, draw and color these little people, and sing lively songs along with fixie toys. But since the main characters of the cartoon are Simka and Nolik, the greatest attention of children is focused on them. Therefore, it is not at all surprising that often on the eve of one or another children's holiday, children ask their parents to prepare fixie costumes for them. Boys, as a rule, want to be “Noughts”, and girls “Sims”. That is why today we decided to pay attention to making the costumes of these characters with our own hands.
Fixies Nolik and Simka.
Jumpsuit for Simka and Nolik
Both characters' outfits should consist of overalls, mitts, shoes and a wig cap. We suggest starting to create a costume by preparing the overalls, since this element of the outfit is almost the same for Simka and Nolik. The only difference between the clothes of these characters is the color scheme. So, Nolik’s suit should be blue with blue stripes, and Simka’s suit should be orange with red and yellow stripes.
You can make a jumpsuit in the following two ways:
- Buy a ready-made jumpsuit
in blue or orange (depending on which character the costume is being created for) and sew blue or red “patches” in the appropriate places, and on the chest the corresponding logo - the so-called “Tydysch” sign. - Sew a jumpsuit yourself
. Of course, this method is more labor-intensive and requires special skills, but if you have the necessary knowledge and equipment, then perhaps it will be easier for you to sew a jumpsuit than to look for a ready-made one. And of course, it is important not to forget about additional details, including the logo, belt and patches.
Fixie suit.
In order for the clothes to be as similar as possible to those worn by fixies, when decorating them, you should look at the picture with cartoon characters.
Wig hat for Nolik
The hat-wig for Nolik and Simka's costumes is one of the main details. It is this item that allows you to see a cartoon character in the created costume. However, you will have to work hard to create the right wig cap for Nolik, but nothing is impossible, the main thing is to know how it can be made.
So, let's start with Nolik's hat. To make it you will need foam rubber, 1 cm thick, and scissors. First you need to glue the cap, which will become the basis for the future product. To do this, a rectangle is cut out of foam rubber, the length of which will be equal to the volume of the head of the owner of the suit plus 2 cm for the “seam”. The height of this rectangle should be approximately 20 cm - depending on the size of the head. After the rectangle is cut out, a horizontal line is drawn on it at a distance of 10 cm from the bottom edge. Then, isosceles triangles are drawn from this line to the top edge, which are subsequently cut out. Next, the resulting part is glued into a circle, resulting in a product that resembles a crown. In order to make a hat, the triangles in the upper part of the “crown” must be glued with their sides facing each other. Now the base for the wig is ready!
Nolik's hat.
Now you need to glue pre-prepared elements resembling triangles to the base. To make them you will need thicker (5-7 cm) foam rubber. There should be so many parts that they cover the entire surface of the cap. However, they need to be cut out gradually, since it is necessary to ensure that they fit well together, and for this the elements must be of different sizes. The image of Nolik from the cartoon will help you arrange the blanks so that you get the desired product.
At the final stage of making Nolik’s wig cap, it needs to be painted blue. To do this, you can use either spray paint or gouache.
Fixie costume Nolik.
Snowman Olaf
This hero of the Disney cartoon “Frozen” quickly won the love of not only children, but also adults.
The snowman created by Elsa is very charismatic, kind, cheerful and cheerful. Elsa created a cloud for her friend so that Olaf could live in the summer. We invite you to sew a non-melting snowman from a cold heart.
To sew Olaf the snowman we need to prepare:
- white felt for the main parts;
- small pieces of brown and orange felt;
- threads matching the color;
- decorative “running” eyes Ø 8mm;
- filler;
- transparent glue;
- sewing tools.
Description
First we will make a template for the snowman. Patterns can be made according to your own drawings or printed ready-made on A4 format.
We place the cut out templates on felt and secure them with a pin to prevent them from shifting.
We mark the contours of the parts.
Number of parts - see patterns. The mouth part will be made of brown felt, the remaining elements will be made of white.
We cut out the detail of the mouth.
By hand, using small stitches, we sew the mouth to the head part.
Glue the teeth to the upper edge of the mouth.
We sew the upper part of the lip only along the lower edge, leaving the upper edge in the form of a pocket.
We put filler in the “pocket”, adding volume.
We sew up the upper edge of the “pocket” with hidden stitches.
We cut out a nose from orange felt. The workpiece has the shape of a regular triangle.
Fold the piece in half and stitch the edge with a blanket stitch.
We fill the internal volume with filler, using any narrow object for convenience.
Sew up the open part. We fasten the thread, but do not cut it.
We firmly sew the nose in place so that Olaf does not lose it.
We connect both parts of the head with pins.
We sew them along the contour with a blanket stitch, leaving a free area.
Fill the head with filler.
Next, let's start making Olaf's torso.
We sew the parts together along the contour using a blanket stitch, leaving a free area.
Place the filling inside.
Sew up the left gap.
We do the same with the legs of the toy. The difference is that the free area does not need to be sutured.
We insert the body into the open area of the legs and sew a seam along the contour.
We cut out handles in the form of sticks from brown felt.
Glue them to the upper part of the body.
We place the second piece on top and stitch them along the contour using a blanket stitch. Don't forget to leave an area for stuffing.
We place the upper part of the body on the lower part and sew it with hidden stitches.
We sew the head in the same way.
Let's start designing Olaf's face. To do this, glue on the eyes and embroider the eyebrows.
For a fun hairstyle, we’ll cut out a piece from brown felt. Let's cut it into strips - strands, and sew it on the top of the head.
We cut out three circles of black felt and glue them to the body. Please note that the circles do not have to be perfectly shaped if we want to make Olaf like in the cartoon. If desired, you can replace them with buttons or beads.
The snowman is ready! You can make pendants for it and use the craft as a New Year's toy.
Hat-wig for Simka
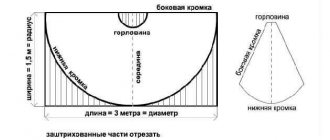
If you decide to create a Simka costume, then you also need to know how to make a wig cap for this character. As in the case of the hat for the zero, you will first need to make a base. To do this, it is necessary to cut a rectangle from foam rubber 1 cm thick, the length of which will be equal to the volume of the head plus 2 cm for the “seam”, and the height – approximately 30 cm. Next, three horizontal lines must be applied to this rectangle - the first at a height of 9 cm from the bottom edge , the second - 20 cm, the third - 22 cm. After this, on each of the lines, as well as along the upper edge of the rectangle, you need to make markings in increments of approximately 4 cm, and it is important that all “steps” are the same. Then, focusing on these points, you need to draw isosceles triangles with the vertex on the third line between the first and third lines. The same triangles should be drawn between the top edge of the rectangle and the second line. The top of these triangles should be on the second line. So, the vertices of the upper and lower triangles will intersect between the second and third lines. Upon completion of the marking, it is necessary to cut out the shapes so that they are connected by vertices.
Simka's hat.
When work on the workpiece is completed, you can proceed to gluing. First you need to glue the resulting part into a circle, and then the lower parts of all the elements together. That is, the result should be a hat with a “tuft.” Next, in order to make a ponytail like Simka’s, the upper elements of the cap must be glued to one another like an accordion. The hole formed on the top of the head must be sealed with a “star” cut from foam rubber in the same shape.
Now all that remains is to make the hair strands. To do this, cut out two triangles from foam rubber with a base of 4-5 cm and a height equal to the height of the cap to the top of the head. Then these triangles are glued into a corner and attached to the base. The entire front part of the cap is covered with similar blanks. Next, two side strands are made in the same way - they should be 10-15 cm longer than the first ones. After this, we move on to creating the back part. Starting from the sides and ending at the back of the head, the length of the strands should be gradually shortened. The last two strands located at the back of the head should be flush with the base. When all the parts are in place, you need to cut out blanks that can be used to close the resulting holes. All that remains is to paint the product with orange paint and you can use it for its intended purpose.
DIY fixie suits.
How to sew a life-size doll with your own hands quickly and easily
Materials:
- Izolon
- Foam rubber (pieces of different thicknesses will be required)
- Needle punched fiber
- Velosoft (specifically for a tiger cub), fleece, fur, stretch velvet, velor, stretch velor, knitwear, lycra (for other dolls, including dolls with faces)
- Glue for ceiling tiles (for gluing isolon and foam rubber)
- Glue gun (for gluing fabrics to foam rubber)
- Plastic eye bowls
- Oracal - self-adhesive film for the eyes
- Banner mesh or car curtains
- PVC
- Acrylic paint for pupils
It’s great if you have the opportunity to work with an airbrush. Dolls made with its help look more natural and lively.
In the photo we see the tiger cub doll that should be the final product:
Initial sketch of the tiger cub:
“Humanized” sketch in Corel:
We set the person's height to 17cm (1:10)
If it turns out that the tiger cub does not match the size of the human figure, then it needs to be adjusted to the size of the figure.
There is no need to touch the person; he has already been given the required size. The output should be the same picture as it was before the person’s height was set. Now let's count the tiger, it is already the right size on a scale of 1:10. We look at the height of the head on the grid in Corel, multiply by 10, we get the height of the doll’s head. Same width. Now you can estimate how many layers of isolon you need to take. Example: head width 55cm, isolon thickness 4cm. 55:4=14 layers, 7 on each side. Patterns
.
Take a standard overalls pattern two sizes larger than needed. However, the pattern should initially have allowances for a loose enough fit. Two sizes are added due to foam rubber. To create the body, 2 cm foam rubber is best suited. We remove the darts, because the tiger cub does not have a waist. The armhole needs to be lowered, like the seat - by 10 cm, since the tiger's legs are not long. For the belly - an increase in the hips and tummy. We increase the length of the rear seat by 3 cm.
A layer of foam rubber is needed to even out the layer of needle-punched fiber. After this comes the fabric. The inside is lined with cotton jersey. We reduce the width of the patterns for the lining, because the volume inside is small, and besides, the knitwear stretches. Where the lining separates from the foam rubber, it must be glued directly to the foam rubber. With careful and leisurely fitting, the lining will fit no worse than the front side. The face also needs to be adjusted.
When everything is adjusted, a fitting is needed to exclude defects.
It is better to duplicate all the details: fabric-sintepon-mesh (lining). Stitch and overcast. Then, based on the sketch, the patterns are finalized: add a tummy somewhere, a butt somewhere, maybe lower the seat so that the legs appear shorter. For the belly, take a circle from isolon (1 cm) with a diameter of 50 cm. We divide it into 8 segments, identify 8 darts that do not reach the middle, glue them together and give them an oval shape. Paws
.
Outsole, foot cutout, six side and four middle elements.
You can sew on a sole, then the tiger cub can walk along the street.
Gloves are usually drawn by eye, padding polyester, foam rubber and lining are inserted.
Head
.
You will need 7 patterns. The largest one is the central one. Its contour should follow the contour of the head section. We already know the height, and for the width we can take the width of the tiger cub’s head (55cm), because it is round. You can build a rectangle with a given width and height, and based on it, draw the outline of the central pattern.
When the first outline is made, we place the human head pattern into it. When making the head, it is recommended to enlarge this area when the layers are already glued together. Now for the fitting, you need to determine whether there is enough room for your head. The first pattern is ready.
The drawing with multi-colored patterns is just an example of gradation. This is not a guarantee that each subsequent pattern will follow the contour of the previous one.
The contour of the second is 1.5-2 cm smaller than the first. However, the head cutout is the same. The third is even smaller. And so on.
There is no need to make a big difference between the patterns; it is better to cut off the excess in the process. The latest patterns are usually obtained in the form of small ovals (the most prominent point is at the cheeks).
The tiger cub's head is not made of isolon, but of extruded polystyrene foam. It is good because it is processed with sandpaper (which means a thin layer of foam rubber is not needed, because everything can be sanded quite smoothly). The material is wear-resistant. If you are making a head for the first time, and you do not have the skills and ready-made patterns, then it is better not to experiment with this material. We use isolon, then cover it with thin foam rubber for leveling.
Glue the parts of the head together to create two halves.
Inside the head, foam rubber 1 cm thick should be glued. Then we glue the lip separately - insulation made of isolon.
To create eyes and eyebrows, you need to look at which fabrics that are available will be suitable for a particular case. The place for the eyes is cut out, the edges are sanded.
The eyes can be made from a plastic bowl purchased from a store. They are cut out according to the sketch using a stationery knife heated over gas. Conveniently seal with oracal (self-adhesive film). But gluing it onto a convex surface is quite difficult, you will have to practice. Here's a secret. If you heat it up a little (with a hairdryer or over the stove), it becomes more elastic, but it does not cool down yet. And it cools down very quickly.
Shoes and mitts for fixies
The final details in Simka and Nolik’s costumes are mittens and boots. Simka's mittens should be pink, and Nolik's should be blue. You can either sew these items of clothing with your own hands along with overalls, or buy them separately. As for shoes, the easiest way to make them is from indoor felt boots of the appropriate color. It is important not to forget to decorate your shoes with blue or red stripes.
You can familiarize yourself with the assortment in more detail in the catalog of our online store.