How to make wings for a Ladybug costume?
To make the Ladybug costume more realistic, you need to make wings. To do this, follow these instructions:
- Use pliers to shape the wire into the desired shape and wrap it with electrical tape.
Frame
- Attach the frame of the wings to tulle and red corduroy. Cut out the pieces.
- Connect the tulle and corduroy pieces using pins. Sew all seams using a machine.
Stitching
- Place the formed parts onto the frame and sew. Sew suede circles to the wings.
Sew on the circles
- Make straps from elastic so that the wings are well attached to the back.
The idea for creating the costume was the child’s favorite rubber toy, Mila the ladybug. The daughter takes Mila with her for a walk, to kindergarten, to visit. The toy is bright and memorable, just like a child’s New Year’s costume should be. The costume will consist of a dress, headband and wings - this is my debut work.
Required materials for the Ladybug costume:
— red corduroy — length 50 cm; — white corduroy — length 20 cm; — black suede — length 20 cm; — black bias tape — length 1 meter; — red tulle — length 50 cm; - threads of red, black, white colors - 1 spool each; — red lightning — length 20 cm; — red hat elastic — 2 meters; - flexible wire - 4 meters.
Necessary tools: - sewing machine; - pliers; - electrical tape; - measuring tape; - patterns; - tracing paper (baking paper); - scissors; - pins, needles; - ruler; - pencil; - chalk (soap); - a thin stick (brush) with a blunt end.
The cost of materials was 400 rubles.
The remaining materials and tools were found on the farm.
Making a dress for the Ladybug costume
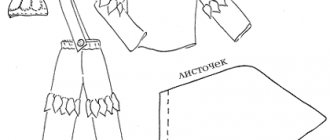
1. Constructing a pattern. I took existing dresses in sizes 86-92 as a basis, drew a pattern on paper and cut out the details.
2. I prepared red corduroy and used a bar of soap to transfer the details of the back.
I also cut out the front of the dress.
I transferred the sleeve pattern onto fabric. I cut everything out taking into account seam allowances. 3. I made a split back. I pinned the back pieces and the zipper together.
Then I basted everything and sewed it on the machine.
4. I cut out the collar pieces on white corduroy and brushed them away.
I sewed the seams on the machine, turned them inside out and ironed them.
5. I pinned the collar pieces to the front.
I pinned the collar to the back in the same way.
I swept it and stitched it on the machine. 6. I sewed the shoulder seams. 7. I finished the neckline with black bias tape.
8. I pinned the details of the sleeves and armholes, swept them, and sewed them on the machine. The edges of the sleeves were finished with a double hem with a closed cut.
9. I pinned the side seams, basted, and machine stitched. 10. Determined the required length of the dress after trying it on.
I folded the edge of the hem, pinned it, basted it, and machine stitched it.
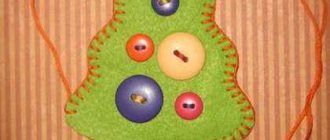
11. I prepared black suede, traced the outline (bottom of the glass) of future circles with a bar of soap, and cut it out.
Ironed it. I sewed the circles to the dress by hand using a stitch stitch.
Our dress for the ladybug costume is ready. Front view.
Dress for the ladybug costume. Back view.
Making wings for the Ladybug costume
1. I prepared the wire and pliers and gave the necessary shape to the frame of the future wings. I wrapped duct tape around the joints in several places.
2. Prepared tulle and red corduroy. I outlined the frame with a bar of soap and cut out parts from the fabric.
3. I pinned the tulle and corduroy parts together.
I sewed it on a typewriter.
4. I pulled the fabric wing parts onto the frame and secured them with pins.
I hand stitched the stitch forward with the needle.
5. I sewed the suede circles to the wings by hand using a stitch or “forward needle” stitch.
6. I made straps from red hat elastic and hand-sewed them to the inside of the wings.
Making a headband with horns for the Ladybug costume
1. I used a children's headband as a basis. I prepared the wire and pliers, gave the desired shape to the future rim, and bent the horns. I wrapped duct tape around the joints in several places.
2. I prepared black suede and outlined the horns with a piece of soap.
I cut out the pieces and sewed the edges by hand. I turned the workpiece right side out, helping with a thin stick. 3. I cut out a strip of suede 1 cm wide and 50 cm long, attached a headband, marked places for the horns and made slits.
I placed the strip on the horns, secured it, and sewed the edges by hand. 4. Decorated the horns on the headband with tulle ribbons.
Your DIY Ladybug costume is ready. Front view.
Back view.
Author of the material: Tatika
How to make a headband for a Ladybug costume?
A ladybug should have antennae. To complete the Ladybug costume, you need to take a hairband and decorate it like this:
- Make small horns from wire and attach them to the headband. Wrap sharp joints with electrical tape.
- Place the horns on the black suede and outline them with soap. Cut out all the elements by hand and sew the edges.
- Cut a strip of suede fabric half a meter long and 10 mm wide. Place it on the headband and mark the places where the horns will be. Make slits.
- Place the strip on the horns, secure, and sew with thread and a needle.
- Decorate the horns with tulle ribbons.
Mustache Costume Trying
DIY ladybug antennae
We’ll start by making such necessary and important parts of the costume as mustaches.
In order to get these funny ladybug antennae you will need: black decorative wire (ordinary wire will do), a hairband and a small piece of thin ostrich feather boa (you can use tinsel or black faux fur) .
Screw a wire in the form of two tendrils to the hairband. And drape the place where the wire antennae are attached to the hairband with a boa, tinsel or faux fur.
New Year's "Ladybug" costume for a girl with a skirt
If you decide to make a Ladybug costume for a girl with a skirt, you will need:
- red tulle – 1x1.5 m;
- wire – 1.5 m;
- black fabric;
- insulating tape;
- threads, lighter, needle;
- satin ribbon in two shades – black and red. The size of the black tape is 1 cm by 3.5 m, and the red one is 5x10 cm;
- sushi stick, glue, chalk;
- hair bands in the shape of a ladybug;
- plastic card, pins, tape measure and pliers.
Step-by-step instruction:
- Cut 2 pieces of red mesh. Their optimal size is 40x20 cm. Fold each piece in half and draw a circle on them with a diameter of 20 cm.
- Sew the seams in a circle, leaving a margin of 2 cm.
- Turn out the wings.
- Determine the circumference of the wing using a tape measure. Measure a distance from the wire that is 10 cm greater than the circumference of the wing. Bend the edge of the wire and insert it into the wing. Repeat the process with the second wing.
- Use the remaining ends of the wire to connect the 2 wings. Wrap sharp edges with electrical tape.
- Attach a black satin ribbon between the wings. Cover all imperfections with a red satin ribbon.
- Cut out circles from black fabric that will serve as spots on the wings.
Wings
- Start making a skirt. 2 pieces from red fabric To cut 2 m fabric, align the width of the opposite fold to the width of the plastic card. From the center of the ribbon, make counter pleats using a card.
- Secure each fold with pins.
- After attaching the folds, measure 100 cm of satin ribbon. Sew to the top of the skirt. Before doing this, connect the center of the skirt and the ribbon.
- To make the skirt more full, make 2 skirts of different colors.
- Finish the edges with ribbons. This element of the costume does not need to be worn over the head. Just tie a bow on your belt.
- Make black circles from fabric scraps and sew them onto the skirt.
Skirt
- To make a magic wand, apply glue to a sushi stick. Wrap it in red cloth. Decorate the top of the stick with rubber bands with ladybugs depicted on them.
- In addition to the suit, you will need black tights and dark socks.
Costume
The process of making the Ladybug costume is quite simple. Materials for the outfit will always be found in the house. If you need to purchase individual tools and fabrics, then their cost is not high. The total cost of purchasing parts will be much less than buying a ready-made suit. Making your own costume will not only delight your child, but it can also bring you two closer together. Ask your daughter to help create an outfit. She will definitely enjoy the process.
We will also tell you how to make a costume:
- "Night"
- Mice
- Carlson
- Puss in Boots
- Firefighter
- Bees
- Clown
- Crows
From balls
To make a ladybug from balls you need to take:
Any oval or spherical object is suitable for making an insect. This example uses golf balls. Take sandpaper and polish the rough edges on the ball, then prime it with a spray. After the primer has dried, apply red paint. Then, with a brush, we apply the main elements of the insect’s appearance: wings, spots. For the eyes we use white paint. To protect them from environmental influences, we will cover our bugs with transparent varnish.
We place our creations on our site and surprise our loved ones.
To make a ladybug from a helmet with your own hands, we will take, in fact, the helmet itself, paints of a suitable color and brushes. Suitable for construction, mining and even children's. Buying them is not difficult, but some craftsmen still prefer children's bicycle or toy helmets.
Let's paint our plastic blank with one color. Then draw a stripe in the middle with black paint. This will be the point where the insect's wings meet. Decorate the rest of the space with black spots.
The front part is painted like a muzzle - a mouth and eyes are drawn. Let our work dry thoroughly and fasten it to a wooden surface with small self-tapping screws.
To make a ladybug from a bowl, you need to perform the same manipulations as with a helmet, due to the similarity of these two objects.
Read also: Can rabbits have bran: what is the benefit, how to give it
Master class No. 3: Kanzashi butterfly made from ribbons of three colors
To make such a butterfly we will need ribbons of three colors, beads and fishing line:
We cut the ribbon burgundy (5x5 cm - 4 pcs), yellow (5x5 cm - 4 pcs), red (4x4 cm - 4 pcs), yellow 2.5x2.5 cm - 2 pcs).
We make two wings from burgundy ribbon using the master class
We fold the yellow and red triangles, place them on top of each other and fasten them with a needle.
We wrap the side corners of the red ribbon to the bottom edge.
Glue the resulting round petals into narrow burgundy petals.
Place the burgundy, yellow and red triangles on top of each other and fasten them with a needle.
And in the same way, wrapping them towards the middle, we make two round petals.
Today we will look at a detailed master class on making a ladybug from satin ribbons. This ladybug can be glued either to a children's hoop or to a hairpin. Such an unusual accessory will perfectly complement any outfit of your little princess, and at the same time will look very unusual and quite original. Handmade jewelry is considered quite valuable and unique in the modern world.
What do we take for this creation: Red satin ribbon 5 cm wide, two meters; Black satin ribbon 5 cm wide, about 0.5 meters; Lighter; Sharp scissors; Ruler; Pencil; Tweezers; Glue gun; Thick cardboard for the base, a small cut.
So let's get started. We take a red satin ribbon and measure out equal squares measuring 5 by 5 cm. We should get 38-40 of them. We’ve cut it, now we take a lighter and trim the edges on each square so that the ribbon does not unravel.
Popular articles Easter 3D flowerbed
We get ready-made red blanks for the petals.
Now we take a black satin ribbon and cut it into squares, also 5 by 5 cm, approximately 12-13 pieces.
We also take a lighter and process the edges. We get black blanks for the petals.
Take one red square and fold it diagonally.
Then fold it diagonally a second time. And also for the third time.
Now we take tweezers, insert the petal into it, and squeeze it. Using sharp scissors, cut the petal obliquely, as in the photo below.
Use a lighter to carefully process the petal sections.
We unfold it carefully and straighten it, we get this red petal
We also make a black petal in the same way as the red one. Fold diagonally once.
Then we also insert the second and third into tweezers and cut off the edges. In black petals, the cuts can be made a little larger, and accordingly the petals will be a little smaller than red ones.
We burn the cuts with a lighter and straighten the petal.
This is how we make all the petals from red and black squares. Cut out an oval from red pearlescent cardboard. We cut off one side at the top, this will be the cow's head.
Making the head of a ladybug. I made it from cotton pads in several layers, and then covered it and trimmed it with black tape. You can also use a button or a ready-made half-bead. Glue the head with a glue gun. Now we take the petals and glue some of them together in pairs, you can even glue three petals together. Now we spread the petals evenly and glue them to the cardboard base with a gun.
In each row we gradually add one petal. As you work, it becomes clear how many petals you need to add. Place black petals in the center. So we completely glue all the petals and form a ladybug. All that remains is to glue either a clip-clip or a hoop and the ladybug is ready. If desired, you can add a few green petals as a base, if you allow it to match the color of the outfit. Thanks everyone and good luck!
Master class Kanzashi butterfly, dragonfly and ladybug
Master class No. 1: Kanzashi butterfly made from ribbon of the same color
To create such a butterfly, we will need two squares of satin ribbon (here 5x5 cm), beads, sequins, a small piece of fishing line:
Lubricate a piece of tape with glue and, folding it in half, glue it together. Make sure the edges match:
Fold the resulting triangle in half and bend the tip, as shown in the photo:
Glue the curved end. We also fold the second piece of tape.
Front and back view
Popular articles Lush rose made of corrugated paper
It turns out that the bent edge is, as it were, raised in the middle. We cut out small indentations at the fold.
And burn the edge, making it slightly wavy.
We do the same for the second wing.
We attach a small bead or seed bead to the fishing line using glue. We string larger beads and fix them with glue.
Antennae for a butterfly can be made according to the master class
We cover a piece of cardboard with fabric and glue beads on a fishing line on top. This will be the body of our butterfly.
Glue the wings of a butterfly to the body, with the curved edge up.
We decorate the wings of the Kanzashi butterfly with beads or sequins.