Selection of materials
For work, purchase any finely ground salt without additives or additional components. The larger the granules, the more capricious they are when painting, because it will be more difficult to saturate the particles of the substance well. Absolutely any pigments and dyes are suitable for the “Extra” brand product, since they are immediately mixed with the base and give it a uniform color. Food coloring, watercolor, gouache, pastel and crayons are best suited for this purpose.
Evaporation salt Extra
For coarse salt, gouache is used, and a larger amount of paint is used to make the color sufficiently saturated. If you want to give the powder a soft, light, translucent shade, use watercolor, and crayons will even paint it in pastel colors.
Recipe for salted modeling dough with PVA
Craftsmen have noticed that crafts made from dough mixed according to the following recipe are stronger and more durable. In addition to the usual ingredients, you also need to prepare PVA glue.
First, dissolve a tablespoon of thick glue in half a glass of cold water. When the solution turns a cloudy white color, like in the photo above, add a glass of fine salt and stir until dissolved. At the end, add a glass of wheat flour and knead the dough. According to reviews from experienced craftsmen, kneading such a dough takes a long time, from 10 to 15 minutes, so be patient. If the dough sticks to your hands, grease the surface of the skin with vegetable oil.
First painting method
Colored salt can be easily made using food coloring, which is found in Easter or confectionery kits. To work, you will also need the salt itself and a thick plastic bag (or several bags). Since the brightness of food pigments is approximately the same, to obtain a rich color of the powder you will need 100 g of the main product and 4 drops of liquid dye. They act this way:
- salt is poured into a bag;
- drip the dye inside the bag, tie it tightly;
- knead the mass until it is evenly colored;
- Untie the bag and use the substance for its intended purpose immediately.
Set of food colors “CHOCOLATE”
Due to the small amount of liquid in the composition, such salt does not have to be dried, and it is immediately ready for use. If too large a portion of the substance is prepared, it can be stored in a hermetically sealed bag, which will definitely not get wet, in a dark, dry place.
Drawing with salt in kindergarten
In addition to the classic one described above, there are several original salt painting techniques, and all can be used in different age groups of kindergarten. Let's look at the most popular ones.
Painting with salt crystals
If you use salt of different fractions, you can achieve interesting visual effects. To make a semblance of haze or a blanket of snow, take the smallest crystals and sprinkle them on damp paper.
Drawing with volumetric pigment
This technique is suitable for the average group; it is simpler than the classical one. The advantage of volumetric paints is that the surface of the sheet does not need to be covered with salt; it will be contained in the pigment extracted from the jar.
For drawing you need:
- drawing cardboard sheets;
- watercolor or gouache paint;
- PVA glue in a container with a narrow neck;
- table salt;
- white flour;
- glass of water.
Take flour, salt and water in equal proportions, add paint in the amount necessary to obtain a certain color, stir until smooth. Pour the resulting mass into a convenient jar. It is better to apply the finished paint not with a brush, but with a syringe without a needle, this will ensure a more accurate application to the adhesive contour.
Floral elements and abstraction come out great in the technique described.
Frosty patterns in watercolor
If you use magnesia powder rather than table salt for drawing, you can draw frosty patterns on a sheet of paper of extraordinary beauty. Magnesia is sold in pharmacies. When the powder dissolves in water, hydrate crystals form, reminiscent of a real frosty pattern on window glass. The technique is applicable for working with preschoolers in the preparatory group.
We tell you step by step how to draw with magnesia:
- Dilute the required amount of paint with 2 large spoons of water. Add one and a half large spoons of magnesia.
- Place the resulting solution on the stove. Heat while stirring continuously until the powder dissolves. Usually 5 minutes is enough.
- Immediately paint the landscape sheet with the prepared solution. The better the paper is wetted, the more noticeable the pattern will be, so for drawing in this technique it is preferable to use loose drawing sheets.
- Wait for crystallization. Usually it occurs within 2-4 minutes.
When the paper sheet dries, the crystalline pattern will disappear. To prevent this, apply varnish to the drawing.
Second coloring method
This option involves painting salt powder for decoration using gouache or watercolor of the selected shade. The paint, no matter what type it is, is diluted with water in advance to the state of a semi-liquid paste, and then proceed as follows:
- pour the product into a plastic bag;
- paint is introduced inside (the more liquid is added to it, the less bright the shade of the finished decor will be);
- using a stick or brush, mix the salt with the pigment, distributing it evenly;
- tie the bag, thoroughly knead the contents again;
- pour the colored crystals onto a piece of paper and send them to dry.
Since the salt mass turns out wet, it must be dried, otherwise it will not be suitable for subsequent creative activities. The easiest way is to pour the powder onto paper and put it on the battery: it will dry out within a few hours. You can get the result faster in the oven - here you need to hold the colored powder for an hour at a temperature of about 100 degrees. It is possible to achieve complete drying of the mass even faster by using a microwave. The salt will dry in 3-10 minutes, depending on the power of the device.
As heating completes, the product will clump together in clumps. To use colored salt for holiday decorations, it must be ground again. The easiest way is to knead the mass with a fork, pestle, or pour it into a bag and roll it with a rolling pin. To ensure that the crystals are approximately the same fraction, they are sifted through a sieve before use.
Bottle with salt: colored mound with colored salt - master class
First, let's prepare a bottle into which we will pour colored salt. To do this, soak the labels by immersing the bottle in a bowl of warm water. Perhaps over time the paper elements will come off on their own, but the glue with which they were attached often does not come off so easily. And if you got a bottle like this:
its surface must be wiped with a cotton pad soaked in alcohol or solvent until the surface acquires a clean and even shine.
Now let's start making colored salt. To do this, sprinkle a little sea salt on a sheet of white paper.
Apply chalk and roll it over the salt, like a rolling pin.
The more intense the desired shade, the longer you need to roll. That is why you need to pour salt onto a sheet of paper in small portions. Convenient to lay a path.
You can paint the salt and then form a mound, or you can paint it as you go and not bother with saucers - whatever suits you.
Let's move on to forming the mound. Roll a piece of paper into a cone so that there is a small hole in the narrow part. You can use a ready-made funnel, but a paper one is more convenient, since it can be positioned the way we need, while a ready-made one will strive to stay in the center.
We will need to position the funnel so that its hole is directed towards one of the walls of the bottle - then we will get the necessary mounds. So, we position the funnel as convenient for us and add some of the colored salt.
Then we move the hole of the funnel to another wall and pour in salt of a different color. I think the principle of operation is clear. The main thing is not to shake the bottle, otherwise there will be a fuzzy line at the junction of the 2 colors.
Thus, by tinting the salt and pouring it into the bottle using a funnel, we fill the entire container to the end. Now we compact the top layer with a spoon and add more salt - the bottle should be filled flush with the top edge of the neck.
Let's close the bottle with a lid - now you can shake it and rearrange it. If you have compacted the contents tightly enough, there is simply nowhere for the colored salt to spill.
If you are not satisfied with the color of the cap, you can paint it with acrylic paints, choosing a color that matches one of the colors of the contents of the bottle.
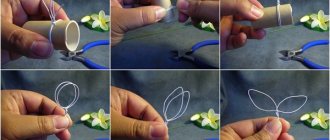
I knitted a “hat” from white iris; I threaded a ribbon into it, attached beads to the ends, and tied the ends of the ribbon in knots.
The final touch is to add a few drops of essential oil to the salt. If a bottle of salt sits for 2-3 days, all the salt will be saturated with aroma through and through.
The bottle of salt, aka a mound of colored salt, is ready.
Eva Cascio
especially for the site Handicraft master classes
The third painting method
You can prepare colored salt using crayons. This task will be quite long and troublesome, so it will require a lot of free time and patience. Salt is poured in a thin layer onto the paper and rubbed with colored chalk, holding it in your hand. Periodically pour the powder into a pile and continue similar actions.
After painting the first batch, pour in a second one, using the same or a different shade of chalk. To speed up painting, you can first crush the chalk with a grater, rolling pin, mortar, coffee grinder, and then simply mix it with salt. This technique does not require drying, so you can use the finished material immediately.
In addition, there is the option of coloring the product with pastels, which are similar to crayons, but are softer:
- pour some salt powder into the pan;
- grate the pastel and add it to the container;
- Place the product in a water bath for 5 minutes with constant stirring.
Common technique
Many needlewomen prefer to decorate bottles and glasses themselves using regular “Winter Mood” sea salt. This topic is especially relevant in the cold season, when there is a lot of snow and severe frost outside. To create a cozy atmosphere in your home with your own hands, you need to start with decorations. Various spruce branches, bright garland lights, themed decorations, as well as interesting toys will not leave anyone indifferent. To work, the craftswoman needs to prepare the following materials:
- Regular PVA glue.
- Empty wine bottles.
- Sea salt.
- Nail polish remover with acetone or alcohol.
- A can of white paint, as well as a primer.
Top 10 delicious dishes from leftovers in the refrigerator
Only after preparing all the necessary materials can you begin the most important process. The principle of bottle decoration consists of the following points:
- At the initial stage, it is necessary to prepare the item to be decorated. For these purposes, you can use nail polish remover or alcohol. If the craftswoman works with glasses, then they do not need to be subjected to such manipulations.
- You should carefully spray the paint from the can onto the object. If the layer is transparent, then it needs to be allowed to dry before it can be coated again.
- When the paint is completely dry, you can apply a layer of PVA to the bottle (glass) and then roll it in sea salt. Only those areas that are ultimately expected to be snow-covered must be processed.
- The decorated item must be left out of the reach of children and animals so that it can dry thoroughly. To be completely sure that the salt will not crumble over time, you should apply another layer of glue.
Following this technology, you can decorate absolutely any glass containers: make very original snow-covered candlesticks or even roll various Christmas tree decorations in salt. To make it more aesthetically pleasing, the craftswoman can combine several colors at once.
"Salty" drawings
How to use colored salt powder in New Year's creativity? The easiest way is to sprinkle it on finished drawings to give the effect of volume and shine. Salt with silver paint is ideal for creating frost, snow, frost and other winter pictures. In order for the powder to securely adhere to the surface, you need to apply thin strips of glue to the drawing and sprinkle them, and after a couple of minutes shake off the excess.
Learning different drawing techniques is useful
Mastery of different drawing methods expands the scope for children's imagination. Children can choose exactly how they want to realize a creative idea: with a simple pencil, paints, stamps, salt, soap bubbles, prints of a bag, threads, palms or feet... Unconventional drawing techniques help develop originality and unleash creative potential. They foster independence and curiosity. In addition, unusual creativity always captivates children.
Preschoolers study many types of fine arts in kindergarten. But to consolidate the material, it is useful to conduct a variety of creative activities at home. Salt painting is recommended to be studied in the preparatory and senior groups of preschool educational institutions, as well as in primary school.
"Rainbow" made of colored salt
You can make an original souvenir from colored salt to decorate your home or apartment. You will need a transparent jar or bottle with a lid and salt powder in several shades. The container is filled with salt layer by layer so that the layers do not mix with each other (7-10 colors in total). When the composition is ready, screw the lid on the jar.
Jars with colorful salt
Bright salt candlestick
The base - the simplest and most inexpensive candlestick - is coated with office glue or PVA, and then sprinkled with colored powder. If desired, additionally sprinkle the accessory with sparkles or glitter. If you want to paint only the edges of the candlestick, carefully dip them in glue and sprinkle them.
By placing candles in such a product, you can get an original and romantic decoration for the holiday table. Colored salt gives a lot of ideas for creativity and allows you to fantasize with children and other family members, brings you closer together and gives you a great mood
How to make snowflakes from glue and salt with your own hands
Using PVA glue you can create beautiful snowflakes. A huge plus is that you can involve children in the process, since PVA is non-toxic, comes off easily, and if applied sparingly, it is not fragile.
You can decorate snowflakes with sparkles, then they will turn out colorful and shiny. These snowflakes are perfect for window decoration.
Draw or print a stencil sheet. The stencils must be placed in a file and traced over the transparent film with a thick layer of PVA glue. The glue should be thick, for example Attache. Tulip Glue paint is also great. The most convenient way to do this is by putting glue into a syringe or dispenser. Make sure that the glue is not applied flatly, but rather in a thick enough layer.
You can mix glitter and a little paint into the glue, but don’t overdo it - the snowflakes can become brittle. You can also sprinkle glitter on the finished drawing and make small “stains” of paint.
Next, we remove our glue drawing to a safe place to dry for 24 hours, and after drying, remove the snowflakes from the film - they separate very easily. Apply it carefully to the glass and smooth it out.
It is better to take drawings without many small “internal” details and rather large ones, since the glue spreads a little and you can get a solid spot instead of an elegant pattern. Ideally, these should be completely painted figures, like Christmas trees, balls, etc. This is especially true when working with children.
It doesn’t matter if the picture is “blurred” in some place; after drying, it can be easily “corrected” with scissors; PVA is easily cut in a dried state. For the same reason, it’s not scary if the baby goes beyond the edges of the picture when coloring the sticker or smearing the glue, all the excess will be cut off.