History of the art of making dough products
Even in Rus', when the New Year was celebrated on September 1, and at the same time weddings were celebrated, it was customary to give figurines made of salt dough. It was believed that any craft made from salt dough found in the house is a symbol of wealth and prosperity in the family. The plastic properties of salt dough have long been known. Our great-grandmothers sculpted from it figurines of various birds and animals, the so-called “larks” with whom they welcomed spring, bagels, gingerbread “roes”, which they presented to their friends and relatives on New Year and Christmas, on their birthdays as a sign of love and respect . Dough products were used as children's toys.
But before they turned into children's toys, dough figurines had ritual significance. Rituals associated with grain and bread, traditional for the peoples of Russia, Ukraine, Belarus, Poland, Bulgaria, and the Czech Republic, have long been known. In accordance with these rituals in the spring, before the arrival of the birds, shaped dough products were baked, most often in the form of a stylized bird. The figures were called “larks”.
In Ukraine, such dough products were made not only for spring rituals, but also for winter holidays, as well as weddings. The figurines were given along with wishes for health, prosperity, wealth and good luck.
The art of making dough products is not dead today, and handmade souvenirs are in great demand. This is a wonderful gift for any celebration and holiday. Both children and adults enjoy modeling.
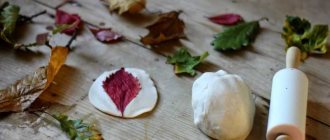
From salt dough you can make simple figures and products, such as leaves, mushrooms, apples, and quite complex options - trees, figures of animals and people, as well as various multifaceted compositions.
"Live" magnets
There are a lot of master classes on how to create refrigerator magnets with your own hands. There are completely unusual ones, like this one. Of course, the magnets will be conditionally alive, or more precisely, they will be mini-pots for the same miniature plants.
You need to take wine corks. It would be good if they were a little thicker in diameter and non-standard. Use a sharp knife to cut a hole in the cork.You need to act carefully, as the cork may crumble. Pour soil into the hole, water it and plant a money tree shoot, a small cactus or aloe.
Of course, such a magnet in a single copy will not make an impression. And a composition of such pots will look quite attractive. It is better to remove other magnets so that the composition attracts attention.
Products and tools for making salt dough crafts
Flour
Flour is a natural product, and its quality can vary depending on the degree of grinding of the grain, and even on the weather conditions under which the grain ripened. For salted dough, inexpensive varieties of flour that have not been subjected to special processing and without additives, emulsifiers and leavening agents are best suited. After all, the presence of vitamins and microelements in flour is not important for modeling. Wheat flour is best suited for making salt dough. But in dough made from rye flour, more pores are formed, it is more difficult to dry, and it is harder when molded. Different types of flour can be mixed, for example wheat and rye flour.
Salt
Salt is added to the dough solely to protect against mice and harmful insects. Therefore, in essence, a large amount of it is not required. Too much salt can make the dough brittle and brittle after drying, which leads to the formation of cracks in the product. You can use any salt, even the cheapest one. Coarse salt is easy to grind in a coffee grinder.
It should be noted right away that to work with salt dough you need a certain temperature regime in the room. The optimal air temperature is 20°C. If the temperature is higher, the dough dries out quickly, making it difficult to process and join the parts.
For the test:
- Flour - 2 parts,
- “Extra” salt - 2 parts,
- water (necessarily cold) - 1 part,
- plastic bag for storing dough
To work with the test we will need:
- a jar of water to wet your fingers and brushes,
- stacks or plastic knife,
- modeling board or baking sheet,
- rolling pin for rolling out dough,
- brushes,
- paints,
- toothpicks,
- nail scissors and scissors with rounded ends.
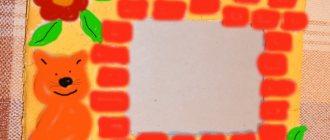
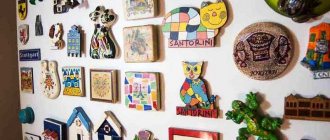
Photo frames
The refrigerator door is perfect as a photo gallery. On it you can place magnet photo frames with photographs of household members, a favorite pet, a significant event for the family, or pictures of nature.
Such an exhibition can always be replenished with new photos. You can entrust its updating to children. They can make refrigerator magnets with their own hands.
This way, they will have an interesting activity - selecting photographs, and good taste will develop. You can make small photo frames yourself using cardboard as a basis.
The frame itself can be created from anything: eggshells, pebbles, foil stars.An interesting idea is to cut off or saw off the tips with lead of the same length, for example, 2 cm, from colored pencils, and glue them around the perimeter of the frame with the tips facing out.
Photos of DIY refrigerator magnets will give a clearer idea of the variety of ideas. And implementing them is not at all difficult.
Recipe and preparation of salt dough
Mix 1 cup flour and 1 cup salt. Then pour in 125 ml of water (the volume is approximate, since the amount of water may depend on the type of flour we used for the dough). Stir this mass again with a spoon, and then knead with your hands until a homogeneous consistency. Water can be replaced with jelly made from potato starch (dissolve 1 tablespoon of starch in 1/2 cup of cold water. Then pour another 1 cup of boiled water into this liquid, stirring. When the jelly thickens and becomes transparent, remove from heat. You have a paste ). The dough will only benefit from such a replacement - it becomes more plastic.
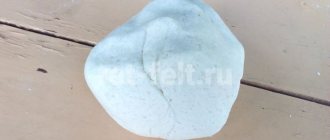
If the dough turns out to be too soft, knead it with a small amount of additional flour and salt mixture. The salt dough should be dense.
Place the salted dough in the refrigerator in a plastic bag for 2-3 hours. You can simply store it there for future use.
Making crafts
It's best to sculpt on a baking sheet or board - this is a good place to dry. The drying itself is carried out at a temperature of 80ºC in the oven for an hour, or on a radiator (in winter). The drying time depends on the thickness of the figurine.
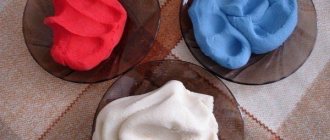
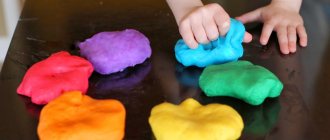
If we need colored salt dough, then it can be colored either at the kneading stage, using food coloring or gouache; or paint the finished product after complete drying.
Surface treatment of salt dough products
Glazing of products with salt solution and browning.
When the product is dry, it can be glazed. Glaze the product for an hour.
Since the “salt glaze” is formed by salt crystals, products treated in this way do not need to be varnished.
Color
White color.
The product will remain white after air drying or oven drying if the firing temperature does not exceed 125°C.
Brown color.
During the last hour of drying at a temperature of 150°C, brush the products with beetroot syrup diluted with water.
Coloring and varnishing salt dough products
Coloring.
Finished products can be painted in whole or in part. However, if you need to completely paint the product, it is recommended to use acrylic paints. After drying, they do not stain your hands or smear. You can also use watercolor paints for coloring. Works painted in this way must be secured with varnish. Gouache paints can also be used for coloring. In this case, you should add a little PVA glue to the gouache. To color the finished kneaded salted dough made from wheat flour, you need to add food coloring to it drop by drop. If the product is monochromatic, paint can be added when kneading the dough, and if the product should be multi-colored, then the finished, kneaded dough should be divided into parts according to the number of colors.
Varnishing.
To prevent paints from fading or drops of water accidentally falling on the surface of the product from spoiling the work, the figures are varnished.
Drying salt dough crafts
Drying
- a very important stage in the manufacture of salt dough products.
Outdoors at room temperature.
You can dry the craft outdoors in a dry place. The thicker the product, the longer it will take. But this method is the most economical.
Drying time in an electric stove oven: 1 hour - at t 50°C, 1-2 hours - at t 75°C, 1 hour - at t 100-125°C, 0.5 hour - at t 150°C. Larger pieces will require more time to dry.
Note. The black baking tray heats up more, and at all stages of drying the temperature is reduced by 25°C.
After we have dried the salt dough figures in the oven, we need to cool them. If a slight bulge appears on the product or the product bulges slightly, the temperature in the oven is too high, in which case cracks may form on the back of the product.
Swollen crafts cannot be fixed, and cracks are easy to cover up. To do this, dilute a little flour with water, add PVA glue, mix well and apply this mixture to the crack, then rub the mixture into it with a glass or your finger.
The product should not remain damp. Its readiness is determined by its sound. By tapping the finished product with a finger, we will hear a ringing sound. If the sound is dull, the product needs to be dried.
For large items, you can use combined drying: first for several days in the air, then in the oven.
Browning
After we have made sure that all the products in the oven are completely dried, the temperature in it can be increased to 200°C.
CHAPTER
II SEARCH FOR AN OPTIMAL SOLUTION
Bank of ideas and suggestions
Option No. 1 Kittens on the refrigerator
(see Appendix 2 Fig. 1)
The work is labor-intensive, as many small details of the kittens must be carefully completed.
Option No. 2 Composition “Hedgehogs”
(see Appendix 2 Fig. 2)
Even more painstaking work, since there are a lot of needles to make. The work takes a lot of time. There is nowhere to put it in the interior of my room, since the room is small.
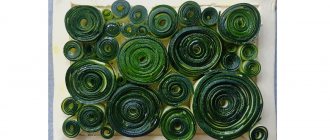
Option No. 3 Panel “Butterfly”
(see Appendix 2 Fig. 3)
For such a panel you need a very beautiful frame. Working on the panel requires perseverance and accuracy, because the butterfly must be symmetrical.
Option No. 4 Fridge magnets
(see Appendix 2 Fig. 4)
Anyone who knows how to sculpt can make such figures. I love to sculpt, this is work for me.
Design analysis
After researching all the options listed, I decided to make refrigerator magnets. Since this is my first time working with salt dough, I need to start with a not very difficult job so that everything turns out beautifully and neatly. This will increase interest in further work with salt dough. There is a place for my magnets on the refrigerator.
CHAPTER
III TECHNOLOGICAL STAGE
Project execution sequence
1. Take 200 g of flour, 200 g of salt, about a glass of water.
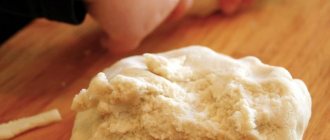
2. Pour salt into a wide bowl, add water, then flour. Mix everything well. You can mix salt and flour well, gradually add cold water, mix until smooth. The prepared dough should not stick to your hands or crumble. To prevent the salted dough from tearing and crumbling during modeling, it must be kneaded and kneaded well until it becomes elastic.
The dough should be elastic and quite stiff. Place the dough in a plastic bag to prevent it from drying out for 2-3 hours.
3. We make a fish, a bird, a rooster from the dough.
4. Dry the craft for two days, first in the open air, then in the oven at a temperature of 50°C, gradually increasing the temperature, but not higher than 150°C. If the temperature is too high, the product may swell, sometimes even cracks appear. Swollen crafts cannot be fixed, and cracks can easily be covered with dough
Decorative dough plate
A beautiful and bright plate with vegetables will become a real decoration for your kitchen apron. For work, you should select a plate of a suitable size and a standard set for creativity in advance. Step-by-step making of crafts from play dough:
- Mix the dough ingredients in a container and stir thoroughly to remove air bubbles.
- Food coloring can be added directly to the dough at this stage, or you can decorate it after drying the finished product.
- On a cutting board, roll out a layer of the working mass to the proper thickness.
- Using a plate, a deep impression is left on the layer.
- Using a sharp knife, I trim off the excess dough.
- The decorative plate must be supplemented with fruits and berries from the dough. To do this, they sculpt a bunch of viburnum or grapes, an apple, a pear (any fruit at the discretion of the master).
The plate is sent to the oven until the product completely hardens. Immediately after cooling, begin decorating the surface. Apply gouache and then clear acrylic varnish.
Using salted dough, you can create the most vivid and unusual images: figurines to decorate a wall clock, your favorite mug for tea and coffee, souvenirs for the mantelpiece. New Year's crafts made from salt dough with your own hands are very popular.
Magnets in the form of huts
Making these adorable little houses can be quite challenging for a beginner. But this is a great incentive to try something new and achieve good results.
For work we will need:
- salty dough;
- acrylic paints;
- gouache;
- tassels;
- stationery knife;
- toothpicks or needles;
- magnets;
- board for work;
- clear varnish;
- pencil;
- scissors;
- paper;
- felt;
- sponge;
- PVA glue;
- rhinestones;
- dots;
- white glitter (optional).
First, we draw or print huts. Cut out a stencil from thick paper.
Salt dough can be purchased at a craft store or made with your own hands. Roll out a not too thick layer of dough and place the hut template on top. We press it and cut off the excess. Roll it out and form a thin strip. We cut it into several parts and place it in the form of logs on the house.
Using a needle or toothpick, carefully draw lines on the logs to make them look more natural. From the remaining dough we form two more strips. Lubricate with water and transfer to the roof of the hut. Using a dot or toothpick, we make small indentations, as shown in the photo. We make a small ball, flatten it and cut it into two parts. We attach it to the house and make indentations.
We make a very thin and small strip of dough, grease it with water and attach it around the window.
We form the main window in the form of a rectangle and attach it to the house. We divide a small strip into several parts and attach it in the form of a frame. If desired, you can make indentations with a dots or toothpick.
Let's start creating the Christmas tree. We cut out three small pieces in the shape of a trapezoid. We round each of them and lightly cut into three parts. Using a toothpick, round off the edges. We form a Christmas tree on the side of the hut.
On the other side we make a slightly smaller Christmas tree. We make indentations in each of them, as well as snow on the windows and roof.
Let's start creating the second version of the hut. First, we repeat the same thing, but slightly change the shape of the roof and window.
We form a thin strip of dough and place it above the window. You can flatten it slightly with a knife.
We repeat the same thing at the bottom of the window. We also make shutters from dough. We form three balls of different sizes for the snowman. We flatten them and attach them to the house, as shown in the photo. Don't forget to make a hat, scarf, as well as a nose, arms and legs.
Leave the workpieces until completely dry. We cover them with black or brown gouache. When it is completely dry, wash it off so that the figures become embossed. Carefully paint the huts with acrylic paints.
Apply a little white and blue paint to the windows, quickly mix and distribute. We paint the snowman and add white paint to the Christmas trees.
We cover the figures with transparent varnish. We cut out the back side of the hut from felt. Where we painted the snow, apply a thin layer of glue and sprinkle with glitter. After it dries, you can add a few more rhinestones.
We glue a piece of felt to each hut, and a magnet on top of it.
Beautiful, original salt dough magnets are ready!
Hedgehog
Unlike the previous master class, this one can even be used to work with children.
Let's prepare the following:
- 125 ml water;
- a glass of flour;
- ½ cup salt;
- sieve;
- glass container;
- black paint or black pepper;
- board;
- nail scissors.
First, sift the flour, and then repeat the same with fine salt.
Gradually add water, constantly stirring the dough.
Knead the dough and add flour or water if necessary.
We form the body and face of the hedgehog, as shown in the photo.
To make the dough black, add black pepper to it and mix well. You can also form white eyes and a nose, attach them and then paint them with black paint.
Using nail scissors, carefully make small cuts and lift the corners, as shown in the photo. We shift the next row a little so that there is a checkerboard pattern.
It turns out such a cute hedgehog. If desired, you can paint it or make it shiny with varnish.