Time runs inexorably forward and now white flies are flying outside the window, slowly falling to the ground and covering everything around with a snow-white fluffy blanket. However, despite the cold, my soul is warm and joyful. And all because suddenly appearing snowflakes herald the coming of the New Year. The most important holiday of the year is already very close, which means it’s time to think about New Year’s decor, gifts and, of course, crafts.
The days are getting shorter and the evenings are getting colder and longer. What to do with yourself, and especially with your little fidgets, when it’s too dark for outdoor winter fun? Well, of course, crafts. New Year's crafts can be made from the most unexpected materials: cotton pads, pine cones, dough, pasta, cocktail tubes and much more. But there are also more traditional materials, such as paper. In this article, we have collected for you more than 60 step-by-step master classes on making paper crafts for the New Year. If you still think that only appliques can be made from paper, then drop everything and carefully look at our article! Well, for those who are looking for something unusual and know what miracles can be created from ordinary paper, we can only advise them to immediately begin the process of creating New Year's paper crafts using our patterns and templates.
Paper garlands - making your own New Year's decor
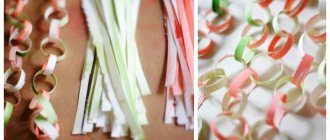
Simple New Year's garland made of paper rings for children
One of the simplest New Year's paper crafts can rightfully be considered a garland. We all remember well from our childhood how we decorated the Christmas tree with such paper garlands not only at home, but at school or kindergarten. Making a paper garland is very simple: colored paper is cut into strips of the same width, the first strip is glued into a ring, and each subsequent one is threaded into the previous ring and also glued. This paper craft is ideal for 4-5 year olds.
DIY paper circle garland
If the task of entertaining children is not important, but you need to decorate the house, then here is another option for a paper garland. It is even easier to do than the previous one, but you will need a sewing machine. So, to create such a New Year's paper craft you will need: many circles of different diameters (the number depends on the size of the garland), a sewing machine. Sew circles through the center using a machine and hang the garland. Such a garland will “come to life” from any gust of air.
Volumetric New Year's garland DIY lanterns
So, if you have decided that the issue with garlands is closed and there is nothing more to come up with here, we hasten to upset you - this is only the very tip of the iceberg. Simple paper garlands are an activity for beginners. Professionals prefer more complex tasks, for example, voluminous paper crafts. Below is a master class on making a three-dimensional garland in the form of light bulbs.
Paper lanterns for a glowing garland + Scheme
By the way, you can decorate an ordinary LED garland with paper lanterns. This New Year's paper craft looks very cool, especially if you decorate a wall with this garland.
Interested in a garland? Then look for more ideas.
Garland of colored paper “Christmas light bulbs” + diagram
Make this cool garland using the papercraft technique. Print or redraw the template, cut out the bulbs from colored paper, glue and thread. All is ready!
Father Frost
If you want to give a gift, add a postcard with Santa Claus. To begin, download and print the cutting template. We will decorate it ourselves.
We cut out along the contour and paint each detail or glue it with colored paper. You can hide a piece of paper with congratulations or candy under your beard.
By the way, such a handmade New Year's paper toy is suitable for a competition for school or kindergarten.
Christmas wreath made of paper - DIY paper decorations for the home
An original New Year's wreath made of colored paper - simple and quick
Since we are talking about apartment decor, it would be strange not to mention Christmas or, as they are also called, New Year’s wreaths. Anyone can make such a paper craft; in addition, a New Year's wreath made of paper is a reusable decoration that will not deteriorate or lose its appearance over time.
New Year's wreath made of paper roses - master class with photos
A very cool paper craft for the New Year - a wreath of roses. You will have to work hard to create such a craft, so if you decide to make yourself such a paper wreath for your door, be patient and in good spirits!
How to make a New Year's paper wreath for a Hawaiian party with your own hands
If you are planning a themed party for the New Year, say in a Cuban or Hawaiian style, then you will definitely need some kind of decoration to create the atmosphere. This simple but very original paper wreath will come in handy!
New Year's wreath made of paper palms - making New Year's decor with the kids
Surely your child at school or in the garden was asked to make a Christmas wreath together with his parents. Ostensibly for a competition, but the main goal of this task is to force parents to spend time with their children. But maybe you shouldn’t wait for assignments from school, but spend time with your child yourself. In addition, with such a New Year's craft you can decorate your home in a very original way, and most importantly, get a lot of positive emotions!
Need a New Year's wreath? See more ideas here.
Do-it-yourself three-dimensional pig, master class
Every time on New Year's Eve we try to decorate our home in a special way. Most often, the style and color scheme of the festive mood is set by the symbol of the coming year. The coming 2019 is the year of the Yellow Earth Pig. Therefore, one of the elements of New Year's decor should definitely be a wonderful pig, wild boar or pink plump pig.
The pig symbol is primarily associated with prosperity in the family. Therefore, we offer you a master class on creating a piggy bank.
Our craft will be made using papier-mâché technique.
To create a piggy bank we will need:
- Newspapers (toilet paper);
- PVA glue;
- acrylic putty;
- acrylic paints;
- inflatable ball;
- masking tape;
- a piece of foil;
- foil sleeve;
- a piece of wire.
Let's get started!
- Inflate the balloon to the desired size. Mix PVA glue with a small amount of water. We dip the prepared pieces of newspaper into our solution, and then begin to paste over the ball. We apply several layers so that the body of the future pig is sufficiently dense and strong. Let it dry:
- Next we coat our pig with papier-mâché mixture. We get the mass by mixing small pieces of toilet paper with glue. Let it dry. Then we carefully burst the ball inside and take it out. Carefully seal the hole using masking tape. Apply a lot of papier-mâché, leaving a hole for money:
- We divide the prepared sleeve into equal four parts - these are the future legs of our piggy. We attach them to the body with masking tape and coat them with the mixture. For stability, it is better to weight our legs with sand, cereal, and metal parts:
- Take a piece of foil and form a pig snout. Coat with papier-mâché:
- We make eyes from the remaining mass. And we form a tail from the wire and coat it with papier-mâché. Let it dry thoroughly:
- Cover the entire finished pig with paint putty. And to smooth out the barrel of our pig, we wipe it with a dampened cloth:
- Let's move on to painting. For the best effect and shade, first coat it with dark paint. Next, shades of pink and white are applied with a sponge. Our piggy bank is ready:
We think that such a cute, plump pig will delight you all year long. And he can also save up a small fortune for you.
DIY paper Christmas trees
Do-it-yourself voluminous Christmas tree made of paper - a simple craft for children
So, we continue to decorate the apartment. There is a garland, there is a wreath. Something is missing? Oh, of course, Christmas trees! If you prefer to display a large forest beauty for the New Year holidays, it doesn’t matter. By the way, read where to buy a live Christmas tree in Minsk. Small paper Christmas trees will be a great additional decorative element, and they can also be used as small souvenirs for guests!
Christmas tree toy “Christmas tree” - decorating the New Year tree with children
A paper Christmas tree doesn’t have to be on a table or somewhere in the house. You can make a craft out of paper, which you can then hang on the Christmas tree itself, and if there is no Christmas tree, then you can simply hang such voluminous paper Christmas trees around the house. The pattern for making a Christmas tree is quite simple, but if you don’t quite understand what the point is, or you simply don’t have time to figure it out, then you can download a ready-made template.
DIY corrugated paper Christmas tree for the New Year
A very cute Christmas tree can be made from corrugated paper. This paper craft looks very realistic, and is quick and easy to do.
Making a Japanese-style Christmas tree with your own hands
If you are still interested in a paper Christmas tree, but want to make something unusual, then take advantage of this master class.
Christmas tree garland for the ceiling - how to make it yourself
The Christmas tree does not have to stand on the floor; it can also be hung from the ceiling. An excellent Christmas tree garland can be made from plain paper.
Miniature Christmas trees made of paper for New Year's table decor
How to distinguish a New Year's table from a regular holiday one? Everything is correct! By thematic decorative elements. Find out how to make a suitable New Year's dessert here.
Making a movable Christmas tree with your own hands from paper
Do you want more master classes on making a Christmas tree out of paper? See this article.
Do-it-yourself three-dimensional snowman craft, master class
New Year, like any other holiday, has its own history, its own characters. One of the main characters of the New Year's fairy tale are Father Frost and Snow Maiden. But there is an irreplaceable assistant to Santa Claus. Who is this? Certainly! It's Snowman!
This is the kindest, a little naive and a little clumsy helper, but he is so loved by all the children. Let's try to create such a wonderful hero with our own hands from available materials.
We will need:
- Plastic cups (disposable);
- cardboard (black, yellow, orange);
- office stapler;
- tinsel rain;
- red paint and brush;
- New Year's hat.
- Our cups, using a stapler, need to be fastened together so as to give the shape of a ball first to the body and then to the head. Each ball will consist of hemispheres.
- To do this, we lay out our cups on the floor in the shape of a circle of your chosen diameter. The rims of the cups should face the outside. We fasten our cups together.
- Place the next circle on top. When you fasten the cups together, you will see for yourself how a hemisphere will be formed. We recommend leaving the tops of the hemispheres unfinished. This is necessary so that the snowman stands stable and it is easier to attach the head.
- We prepare the second hemisphere in exactly the same way.
- We fasten the two parts into a single ball. This will be the torso.
- Using the same scheme we make the head.
- We connect the head with the body.
- The frame is ready. Now let's dress up our snowman.
- We make a cone out of cardboard - this will be the nose. And cut out two circles - eyes.
- You can make a belt or buttons from cardboard.
- We can put a New Year's hat on our head.
- We tie a rain scarf around our neck.
- If desired, we can paint the bottom, under the belt, with red paint. So to speak, put our snowman in pants.
This kind of helper will bring comfort, warmth and kindness to our home.
New Year's bouquets made of paper - decorating the house for the New Year with paper flowers
Simple paper flowers
In winter, wildflowers cannot be found, even in flower shops. But there’s nothing to worry about, you can make flowers out of paper with your own hands. And our step-by-step master class will help you with this.
Corrugated paper flowers
You can make a wide variety of flowers from paper, the whole secret is in cutting out the ends.
Making paper roses with your own hands
Craft paper flowers - how to make them yourself
A New Year's gift must be in beautiful packaging. In my opinion, the gift itself is not so important as the intrigue around it. After all, it is this intrigue that will remain in the memory, this pleasant expectation and unfolding of the paper. Use our DIY paper flower making pattern and decorate gifts for loved ones.
Simple garlands
The best option to quickly give a festive look to a room of any size is to hang paper garlands for the New Year. It is worth considering that you can decorate with whatever is at hand (for example, figurines of roosters, pigs, dogs), so creating an original product will not be difficult.
Garland of paper balls
Crafts made from light paper weigh little, so they can be of any length. Multi-colored balls made from stripes look airy and weightless. To assemble the ball, cut 3-5 identical strips. To form a sphere, several strips are connected, glued together in the form of circles.
Garland of flags
A craft familiar to everyone since childhood. To add a little something new, you can change the shape of the garland. Triangular flags are glued to a ribbon 1-1.5 cm wide. If this ribbon is twisted several times, the garland will take on an original three-dimensional look.
Garland of figurines (snowflakes, snowmen, ballerinas)
Non-standard decorations are obtained by using different materials and New Year's figures. When creating a snow garland, you can string openwork snowflakes onto a transparent fishing line - the effect of weightlessness will appear. A great idea is to attach figurines of ballerinas with voluminous skirts made from thin napkins to the ribbon.
Figures of cheerful and mischievous snowmen, cut out of thick paper, are best fixed on tape with colored clothespins. This will give the snow-white garland bright accents.
Flower garlands
These crafts look massive, so they should be strung on strong ropes. Short garlands attached along the doorway or around the windows will give a harmonious look to the New Year's atmosphere. To make the decor have a New Year's look, you can combine snow-white artificial flowers, green twigs and small silver or golden balls.
Magic lamps
New Year's lanterns are a win-win option, giving the room a festive look. It is not at all necessary to specifically buy elegant decorative lamps. It is enough to make several multi-colored lampshades with your own hands.
Lantern made of stripes
Probably many people know this popular craft. Assembling lanterns is a great way to get kids involved in decorating your home. The process of creating a product is very simple: a rectangular sheet of paper is folded in half and cut perpendicular to the fold line. One side is glued together to create a light and wonderful New Year’s decor. Lanterns are hung on the Christmas tree and garland.
Chinese lantern
This delicate Chinese lantern is created using the same principle as a paper lantern. An important nuance: in order for the product to retain its beautiful voluminous appearance for a long time, it is recommended to insert a paper cylinder of any length inside. The lower and upper parts of the flashlight are glued to the cylinder. A composition of several red or golden lanterns of different sizes, mounted at different levels, looks especially elegant.
sky lattern
A fun activity on a festive night is launching lanterns. It is not difficult to create a craft with your own hands. You will need cocktail tubes, wire, rice paper, a candle, and glue. Work progress:
- A wire is threaded through the straws.
- A cube is formed, the sides of which are covered with paper.
- Only the bottom edge is left open, on which a wire cross is fixed and a small candle is fixed.
This craft is quite a fire hazard, so it is recommended to experiment with starting it outside.
New Year's stars made of paper - step-by-step MKs
Composite volumetric star made of paper - MK + diagram
A composite paper star will be an excellent decoration for the New Year. You can download the ready-made template for gluing below.
A simple volumetric star made of paper + diagram
Nowadays, you won’t surprise anyone with ordinary paper cutouts. Volume crafts are much more delightful. This master class describes a step-by-step scheme for creating a simple three-dimensional star. You can download a ready-made template with a large, medium and small star using the link below.
DIY double-sided paper star + Scheme
It’s quite difficult to imagine New Year’s decor without all sorts of variations on the theme of stars. In this master class you will learn how to make a three-dimensional double-sided star out of paper with your own hands. You can download the finished diagram below.
DIY New Year's star using origami technique
Step-by-step diagram for creating an origami star with your own hands. You can decorate the top of the Christmas tree with such a star, you can simply create a festive atmosphere in your home, or you can combine it into one large garland.
You can make the base yourself, as in the first picture. Or you can download a ready-made pentagon blank and depending on the size of the pentagon the size of the finished star will change.
Making a big star out of paper with your own hands
If you want to make a large New Year's star to decorate a wall from paper tubes, then this master class is especially for you!
Do-it-yourself New Year's three-dimensional crafts for school, step by step
Since the beginning of December, everything around reminds us of the approaching New Year. Throughout the city, shop windows are decorated in lush decorations, beautiful Christmas trees appear in almost every shopping and entertainment center. Employees of various institutions are trying to create a bit of a New Year's fairy tale at work.
This month everyone at school is also preparing for the holiday. They decorate classrooms and corridors and hold exhibitions of thematic works. Children take an active part in the preparation. In labor lessons or at home, with the help of parents or independently, schoolchildren prepare New Year's crafts. Therefore, it is worth preparing several ideas in advance for creating an original three-dimensional craft.
Depending on the age and capabilities of the child, you should choose a simpler or more complicated version of the work.
We offer 3 options for New Year's crafts. And we think that your baby will definitely be able to do one of them.
Option #1:
Using a regular plastic bottle, cotton balls, black electrical tape, buttons, a piece of red and orange fabric, and glue, we will create a cute Snowman.
- We fill our empty plastic bottle with cotton balls to the top.
- Just above the middle, wrap the bottle with a piece of red fabric. This will be the Snowman's scarf, which will conditionally divide the bottle into the head and body.
- Using buttons, we will make the Snowman's eyes and mouth, and from orange fabric we will cut out a triangle - the Snowman's nose. Glue on the finished nose.
- Glue a few buttons under the scarf.
Close the bottle with a lid and wrap it with black electrical tape. Our Snowman is ready!
Option No. 2:
Let's make a symbol of the coming year - a pig. To create it we will need a regular light bulb, acrylic paints, a piece of cardboard and a piece of fabric.
- First of all, we degrease our light bulb.
- We paint the face with acrylic paints.
- Cut out ears and heels from cardboard. Glue these parts to the head.
- We make a cap from a piece of fabric or a sock. This is such a funny little pig we have. We can decorate the New Year tree with this toy.
Option #3:
Well, where would we be without the hero of the occasion? Let's start creating a forest beauty from available materials.
Required material:.
- Starch (to create a paste);
- a ball of green thread;
- thick cardboard;
- cling film;
- beads, sparkles for decoration
- We prepare a paste from starch.
- We make a cone out of thick cardboard - this will be the frame for the future Christmas tree.
- Wrap the cone in cling film to prevent it from getting wet.
- Let's start creating a Christmas tree. We dip the thread in the paste, and then we wrap our cone along the diameter. Let our craft dry.
- Then remove the cardboard cone from the middle, followed by the cling film.
- The matter remains small. Using beads or rhinestones we decorate the forest dweller. These are examples of Christmas trees you can get.
Paper cones for the Christmas tree
Do-it-yourself corrugated paper cones - step-by-step MK
A very themed New Year's craft made from crimple paper. This paper cone looks very natural and is quite difficult to distinguish, especially if it is used as decoration. With our master class you can easily cope with such a paper craft.
Cone made of colored paper
There is another technique for creating a paper cone with your own hands. This method is more labor-intensive and will take you longer. In addition, to create such a New Year's craft you will need: paper, foam blank, a lot of safety pins, ribbon and beads for decoration. However, if you have the time and desire, then pay special attention to this pattern for making a cone, especially if you want to make an impression.
New Year's craft cone made of paper circles
In continuation of New Year's paper crafts, I would like to offer you another scheme for making paper cones. In addition to paper circles, you will need an oval or round blank, glue and spruce branches for decoration.
Cone made of paper strips folded like an accordion
Beautiful ideas for New Year's crafts for children 5-6 years old
These crafts are unique: they are made from scraps of A4 sheets. When we cut a square out of a rectangular sheet, a small strip remains. This is what we use for our work. We will make bookmarks for books. We have already made many such corner bookmarks, and now we will make them with the symbol of the year.
We bend the edge of the strip to the bottom. Let's cut it off. This is our square.
We can make another blank from the remaining part for a second bookmark for a friend.
Place the workpiece on the table with a rectangular angle down. We bend the left and then the right corners down to a rectangular corner.
We bend the bent parts and turn the workpiece over with the angle up. We bend one part of the workpiece with a rectangular edge down towards the base.
We bend the corner on the right and the corner on the left towards the middle. We get a blank that looks like an envelope.
We bend the side corners. And we hide each corner inside the workpiece, behind the upper fold line.
And we get a square pocket.
We cut the piece of paper that remained after we made 2 blanks in half.
From one piece we cut out the mouse ears. We decorate the ears.
We decorate the mouse's face: draw a nose, eyes, eyelashes, mustache and cheeks. We decorate the nose and cheeks.
Glue on the ears.
From the scraps of the part that remains from the ears, we make 2 legs and glue them to the workpiece.
Such bookmarks can be prepared as a gift.
Beautiful ideas for New Year's crafts with the symbol of the year for children 5-6 years old https://www.youtube.com/watch?v=Wvl16hF0eNU
New Year's paper balls
Christmas ball made from strips of paper
It is customary to decorate the New Year tree with toys, but these toys do not necessarily have to be purchased. It's even better if they are made by yourself. What could be easier than making a paper Christmas tree toy? Use our step-by-step instructions and make your own Christmas ball out of paper.
Volumetric ball for the Christmas tree made of paper circles
New Year's ball using origami technique step by step
You can make very special crafts from paper using the Japanese origami technique. Our step-by-step master class will help you create a New Year's ball out of paper, which can be used to decorate both a room and a Christmas tree.
DIY prickly paper ball
DIY volumetric ball for a Christmas tree made of paper circles
Easy-to-make New Year's decorations can be made from paper. Our master class gives an example with a ball, but these can also be other shapes: hearts, stars, Christmas trees and much more. You can download ready-made templates below.
A ball of paper strips - a diagram for making a craft with a photo
Want more Christmas ball ideas? See:
DIY window decorations for the New Year in kindergarten and school
And I would like to make a separate thematic selection of paper decorations for educational institutions. After all, our children rejoice most of all at the coming of the holiday. So schools and kindergartens should not only organize matinees, but also magically decorate the premises.
I hope that with the help of the vytynankas I have proposed, you will be able to create an unforgettable and wonderful atmosphere in your home. Involve children and the whole family in creativity. Let there be a holiday in every home! With coming!
Paper snowflakes
A simple diagram of a three-dimensional snowflake made of paper - step-by-step MK
Openwork volumetric snowflake made of paper + diagram
New Year's snowflake on a window made of colored paper
How to make a voluminous paper snowflake with your own hands - step-by-step instructions
At your service is a step-by-step diagram for making a three-dimensional paper snowflake. Follow the instructions and you will definitely get such a miracle.
Do-it-yourself large volumetric paper snowflake
Another great option for decorating an apartment with your own hands is a large voluminous snowflake on the wall. There can be not just one snowflake, but a whole ensemble. Plus, this Christmas background will make for great photos!
By the way, you can find more ideas for Snowflakes in this article.
New Year's balls
To get New Year's balls for your Christmas tree, you will need a minimum of consumables. It is important to be patient in this matter, since you may not get the perfect toy right away. But don’t be upset, just continue and the result will definitely please you.
Balls have always been considered universal Christmas tree decorations. They can be made from cardboard or colored paper. As a result, they turn out to be no less effective than store-bought ones.
Cardboard balls
Any thick paper will do here: cardboard, postcards. Such toys keep their shape perfectly. They are unusual and look good on the Christmas tree, especially when they are of different sizes. It is better to hang them chaotically, then the picture will be more impressive.
How can you quickly make this decor:
- Cut 20 circles from cardboard, 3.5 cm in diameter
- Now separately make a triangle template with equal sides that will clearly fit into the circle
- Attach the template to the back of the round piece and trace with a pencil. Make even bends along these lines using a ruler.
- Then drip a little glue onto the folds and glue the pieces together. Just after connecting the top of the toy, do not forget to immediately make a loop. Only then glue the bottom
- It will take 5 rounds each for the bottom and top. And to connect them you need a round valve in the middle - it needs to be glued together from the remaining ten parts. Glue the lower and upper halves to this valve
The finished toy can be coated with glue and sprinkled with glitter.
From stripes
Sequence of steps:
- From colored or any other decorative paper, cut a lot of strips (the more there are, the more voluminous the ball will come out) and two circles of small diameter,
- Then take a large bead with holes, thread a thread through it and insert both ends into a needle,
- Thread a circle and all the strips from one edge onto a needle,
- Next, put a paper tube, a bead and a second circle on the thread,
- After this, pin strips on the needle from the opposite edge, bending them into an arc,
- Then you need to give the toy a finished look. To do this, arrange all the details in a circle and decorate the toy according to your mood.
From circles
Instructions:
1. Cut out 4 circles from paper of three different shades. You can use a glass as a template. There should be 12 parts. 2. Stack the rounds, alternating colors, and then fold them in half. Now straighten and draw the designated line along the ruler.
3. Along the marked line, fasten the workpieces with wire (wrapping it around) or a stapler. You can stitch it on a machine.
4. Glue the petals together in 2 pieces: one on top, the other on the bottom. The result is a voluminous ball.
Christmas tree decorations made of paper
DIY Christmas tree crafts - step-by-step master class + diagram
Simple Christmas tree toy DIY paper lantern
Very simple, but incredibly cute three-dimensional lanterns can be made from ordinary colored paper. Even children can handle this craft, so feel free to get to work if you have little helpers. Well, if not, then you can handle it yourself!
Christmas tree toy made of paper rings - step-by-step MK
Christmas tree toy House made of paper
New Year's Christmas tree decorations diamond crystals + diagram
Download ready-made patterns and make your own diamond crystals from paper.
New Year's deer on the Christmas tree - master class and diagram
Paper Christmas tree lanterns step by step with photos
Mini angel made of paper for a Christmas tree with your own hands
Cute DIY paper angels - MK with diagram
Do-it-yourself geometric Christmas tree decorations made of paper + diagram
A wide variety of decorative elements can be made from plain paper, just download the ready-made diagram, print it, cut it out and glue it. A wonderful New Year's paper craft is ready!
DIY New Year's lantern: decorate the New Year's tree with paper toys
You can make a simple and original Chinese lantern with your own hands using our ready-made diagram.
Miniature wreath using origami technique for a Christmas tree
Master class: do-it-yourself voluminous paper house for a Christmas tree
See even more paper Christmas tree decorations here.
Quilling decoration
How to make a paper toy using quilling technology? Just! We present below a step-by-step master class.
As we understood from the video, quilling requires only scissors and glue, and crafts for the New Year using this technique can be made from both colored and white paper.
- DIY wall decor: original ideas and examples for creating decor
- How to make a Christmas tree with your own hands from scrap materials for kindergarten
- How to make New Year's boots for gifts with your own hands
New Year's crafts toys from paper cones: templates
Make simple paper cone toys with your kids. All you need to do is print the template and glue it together. If it is not possible to print the blank, make a toy yourself: roll a cone out of paper, after painting it.
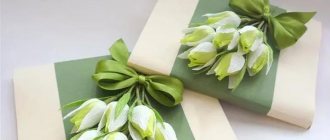
DIY Christmas packaging
Gift packaging “Big Candy”
You can make completely unexpected crafts from paper, including gift boxes. And not just boxes, but in the form of delicious sweets. For such a gift box you will need: a cardboard cylinder, colored paper, glue, scissors, satin ribbon.
Original packaging from a regular paper bag
Continuing the question of gift wrapping, we would like to offer you another budget, but very charming option. You can make such a gift elf with your own hands using our master class.
Festive packaging “Santa Hat” – step-by-step photo master class
Here is another option for original DIY New Year's gift packaging.
Need more gift wrapping ideas? See this material.
Diy Santa Claus craft with your own hands, step by step with photos
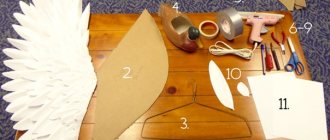
While preparing the interior decoration of our home before the coming New Year, we created many different decorations and decorative elements for you. Among the ideas for New Year's crafts was a beautiful Christmas tree, several Christmas tree decorations, bright garlands, and a symbol of the coming new year. But they have never mentioned the main character of the New Year's fairy tale, who with one wave of his staff can light the lights on the Christmas tree and create a cheerful festive atmosphere. Who is this? Our beloved Grandfather Frost. And I offer a very simple, and at the same time, original way to create it from improvised means.
We will need:
- Cardboard sleeve (the wider it is, the larger Santa Claus will be);
- plastic cup (red);
- felt (any thick fabric) red, white and black;
- red pompom;
- button;
- yarn for felting (sintepon);
- a pair of eyes;
- glue;
- scissors.
- Cut out two rectangles from red and white felt. We make the white strip thinner. We glue these two pieces of fabric to our cardboard sleeve around the circumference:
- Glue a red plastic cup on top (on white felt):
- Lubricate the bottom of the cup with glue and attach the pompom:
- On the white half of our sleeve we attach the eyes and nose:
- We cut out a thin strip from black felt, which will become a belt on the clothes of our Santa Claus:
- Glue a strip around the circumference, and attach a button to it:
- And we shape the beard. Carefully apply glue around the face. Using felting yarn we create a beard:
We have such an interesting Santa Claus. In case you need to quickly create a hero from a New Year's fairy tale using improvised means, this idea will come in handy.
What else can you make from paper?
Carnival masks made of paper
The list of New Year's paper crafts must include carnival masks. Well, what New Year's party can do without masks? That's right, none! In fact, there are a lot of options for making paper masks, and if you use your imagination, you can make a lot of wonderful crafts!
Sample
More ideas for New Year's masks here.
New Year templates for a photo shoot
Note! The templates are very large and of good quality, so downloading may take some time.
DIY paper vase: diagram + step-by-step master class
You can decorate your house not only with standard snowflakes or stars. You can make such a wonderful vase out of paper. Download the finished diagram and assemble the vase following the instructions in the master class.
Decorating New Year's candies: Santa Claus's reindeer
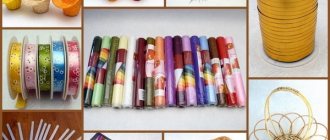
New Year's paper craft Bow - step-by-step MK with photo
Paper bow for decorating gifts - diagram
Volumetric bow using origami technique for decorating New Year's gifts
Original DIY New Year's card
You can make not only flat or three-dimensional crafts from paper, but also movable ones. With our ready-made scheme, you can make a postcard with an encrypted greeting or message. Such an unusual gift will delight not only children, but also adults! You can download the finished diagram below.
By the way, we have a cool article on How to make New Year cards with your own hands.
Volumetric paper craft Heart using origami technique
Origami snowman - step-by-step diagram with photos
There are never too many snowmen. More crafts here.
Easy paper craft for kids - Santa star
Santa Claus made of colored paper
Or this cool craft can be made from ordinary colored paper.
DIY Christmas craft paper ball “Mistletoe”
You can make this mistletoe ball out of paper with your own hands using ready-made cutting templates. Be patient and have a New Year's mood!
Snowflakes: volumetric, protruding and 3D
Snowflakes are most often made to decorate interiors and Christmas trees. And not only because they are beautiful and “winter”. For children, this is perhaps the most interesting activity - cutting out paper and decorating windows with snowflakes or hanging them in garlands from the ceiling.
They are also easy to make. To make them, you only need to stock up on glue, scissors, a stationery knife and multi-colored sheets of paper. Even old newspapers and magazines are suitable for original retro-style snowflakes.
Schemes and templates for protruding snowflakes are usually downloaded or copied from the Internet. But if a child shows desire and imagination, he can always independently come up with and draw a pattern on paper. In these snowflake models, the main thing is to correctly fold the paper for the base. This is usually done according to different schemes.
Then a pattern is drawn on the blanks, which, after cutting and unfolding the paper, turns into an openwork snowflake.
Snowflakes are three-dimensional and in 3D format, a little more complex in their technique and require more perseverance from the child. But following step-by-step lessons in pictures or watching the process on video, it is much easier to cope with this task.
New Year's wreaths
This wreath will look equally beautiful on the doors to the children's room and on the front door. Made in different techniques and styles, wreaths will perfectly complement the holiday decor in your home.
This wreath will be easy to make. You will need a large pizza box and white printing paper. Well, of course, and glue, scissors, pencil and stencils downloaded in advance from the Internet. It is not necessary to make exactly such a drawing, the main thing here is a hint for the idea, and not blind copying.
On a pizza box, use the lid of a large pan or dish to draw a circle, and inside it is another circle. Cut it out to make a ring. This will be the base of the wreath.
If you know how to draw, then stencils will not be necessary. After all, drawing the silhouette of a Christmas tree, a house or a gingerbread man is easy and without any special skills. You just need to fold the piece of paper in half or like an accordion and draw, and then cut out only half of the figure, and the rest will appear when you unfold the structure. Like that.
You will also need to cut out a white ring, but smaller in size than the base. Next is a matter of technology. Glue a round dance of figures onto the base of the wreath, stepping back a few centimeters from the inner circle. To make it even, draw another circle, onto the base of which you will glue the silhouettes. Glue a ring of white paper on top of the figures, covering only the lower part. Hang a wreath on a beautiful ribbon on your child's bedroom door.
There are a lot of options for flat wreaths of this type. Use your imagination, call on a good mood to help you, and everything will turn out just fine.
Here are a few ideas for paper wreaths, but in voluminous shapes.
Paper garlands
Garlands are as traditional for the New Year holidays as snowflakes. They decorate the room and the Christmas tree. It is clear that garlands with smaller segments are used for the forest beauty than for interior decoration, but the manufacturing principle is the same. There are several types of garlands.
- All figures or snowflakes are cut out separately and then strung on a string, braid, or ribbon.
- All elements of the garland are fastened together with glue and form a single whole.
By the way, making such a chain of colored stripes is very simple. We think children will enjoy the process of making it.
Try making a garland like this from thick paper or one of those in the photo below.
Garlands of multi-colored snowflakes will look very beautiful.
Garlands can be hung horizontally or vertically, in one or in several layers.
And lanterns will look beautiful in garlands.
Flashlights
Lanterns have long been firmly established as a New Year's tradition. The classic flashlight, which we have been able to make since childhood, as shown in the diagram in the figure below, has long been passed down from generation to generation.
But it has already been joined by many other different versions of flashlights, made in different variations and techniques.
There are options for lanterns made of cardboard, in which it is quite acceptable to place a candle, and also use such a lantern both as New Year’s decor and as a lamp.
It turns out beautiful and practical. But it’s still not worth leaving such a lantern burning for a long time. And even more so - putting it in a children's room.
Volumetric figures
Three-dimensional figurines of New Year's characters can serve as interior decor. They are placed under the Christmas tree, hung on the branches of the Christmas tree, they are used to create a Christmas nativity scene or make up installations. Figures are made in different ways. As an example, look at the video on how to make a Christmas tree and a gnome out of paper.
We think that the youngest children will love the figures made from toilet paper rolls. For example, these are such funny bunnies.
The tube is either covered with colored paper (in this case, scrapbook paper), or painted with paints (gouache) and painted. Make the eyes either paper or buy ready-made ones. The craft is quick and simple to make, but what fun little bunnies you get! But it will be more difficult for a child to make a snowman from white papercraft paper. But if you like the idea, then make it for the child yourself. And let the child provide all possible assistance.
To make it easier, print out the templates for the head and torso and use them to bend the paper into three-dimensional polygonal balls.
In addition to the Christmas tree, snowman and hares, many other three-dimensional New Year's crafts are made from paper: angels, Father Frost and the Snow Maiden, deer, penguins, northern polar bears... In general, everyone associated with the New Year and Christmas holidays, winter and cold.
Firecrackers
If the baby is not the shy type, then he will definitely like a loud cracker filled with confetti or scraps of shiny paper. Moreover, making them yourself is not so difficult. The photo shows a step-by-step option for creating two different firecrackers.
For the first option you will need:
- tuba;
- balloon;
- 3-4 tbsp. spoons of confetti;
- tape, scissors;
- wrapping paper and tape or braid.
Tie the hole in the ball with thread, cut the other side with scissors and pull it onto a tube of toilet paper or napkins. Pour confetti into a tube and wrap it all in beautiful paper. Confetti will fly out of the cracker if you pull the “tail” of the ball and then quickly release it.
For the second option - candy-shaped crackers, you just need to cut the tube in half and pour confetti inside the halves and wrap them in corrugated paper. The ends of the “candy” are tied with a beautiful braid.
All you need to do is break the cracker in half so that multi-colored pieces of paper will shoot out of it.
Carnival masks and caps
Be sure to give your child a mask. See how easy it is to make it from a regular disposable paper plate. You just need to correctly measure the distance between the child’s eyes so that the mask does not cross-eyed.
For older children, for the New Year's ball at school, try making a different version of the mask, a more adult one. Using scrap paper and lace, you get a simply magical mask. It’s not a shame to show up at the carnival with this one in Venice.
Not confident in your capabilities and talents? Download a mask from the Internet and color it yourself.
To ensure that the mask is not flat, but three-dimensional, it should be drawn with special cuts along which it will then be glued together.
You can decorate a carnival mask made of cardboard and paper for a child with anything - confetti, glitter, feathers, lace, etc. Doesn't your child want a mask? Make a New Year's cap for him and him.
The cone for the cap and the entire cap as a whole are made according to the following template.
Christmas tree toys
They hang so many things on the Christmas tree! But toys made of paper, although not as durable as those made of glass, do not break if suddenly a baby or cat decides to drop the Christmas tree. It’s quite possible to place a small version of a New Year’s tree with such toys made of cardboard and paper in a children’s room, if the footage, of course, allows it.
“Fan” versions of toys look very nice on a large Christmas tree in the yard, when the paper is folded into an accordion, and then straightened and glued two fans into a circle. However, see for yourself how this is done, and take these ideas for yourself.
Toys made with an accordion or from strips of paper look very interesting. Even kids can handle these options for Christmas tree decorations. Mothers will only help them download templates of faces from the Internet or draw them themselves, but children of five or six years old are quite capable of making everything else on their own.
Paper balls that do not require gluing will also look great on the Christmas tree. The pattern and strips of paper (download the templates) are simply intertwined here, and the result is a beautiful sphere.
Paper crafts using the origami technique do not require gluing.
This Santa Claus will feel great both on the Christmas tree and under it. It's just a matter of size.
New Year cards and gift boxes
Everyone loves to receive New Year cards, especially if the card is made by hand. Originality and simplicity in execution are only two of the many advantages for making such a card for your little brother or older sister.
Kids will surely love this simple card with a Christmas tree. An older child will certainly appreciate a 3D postcard in the origami style.
Not only Christmas trees can be depicted on a postcard. When looking for ideas, look at the photo in Yandex. There is a lot of interesting stuff on this topic.
You don’t have to be a great artist to draw such cute New Year cards on paper for your child.
Applications and paintings made of paper on a New Year theme
As a child, everyone had to cut, glue and draw, and again cut and glue. Applique is perhaps one of the three most common types of creativity for children after drawing and modeling.
There are several types of applique using paper. An interesting option is made from finely chopped paper or paper balls.
To make such a winter New Year's landscape, you will need:
- two sheets of paper - white and blue;
- glue, scissors and black felt-tip pen;
- sequins for stars.
Glue stars to the top of the blue sheet, and draw a forest and a bunny on the white sheet.
Cut out the outline of the forest and paste it onto a blue piece of paper. Trace the picture with a felt-tip pen.
Cut the rest of the white paper finely and sprinkle it onto the outline of the forest, greased with glue. It turned out to be a great picture! If you put this applique in a frame, you won’t be ashamed to hang it in your child’s bedroom. At least for the winter. And in the spring a new, “warmer” plot will come to mind and replace the New Year’s applique with, for example, the eight-March theme - the first flowers, young grass, the sun.
Have you forgotten about the beautiful gift wrapping? If you like the ones in the photo, catch their patterns and get to work. The New Year is already looming on the horizon!
In general, dealing with paper is pleasant and useful. Therefore, parents make New Year's crafts from it together with their children or for children - everyone in the family will definitely enjoy it. Don't be lazy and cheer yourself up by decorating your room with handmade crafts and decor! And then the New Year will be a real magical holiday for the whole family, despite various harmful viruses and unpleasant price increases.