A kanzashi box will decorate a dressing table or chest of drawers; you can store jewelry and all kinds of small items for handicrafts in it. Jewelry, whether it is a gift from a loved one or created with your own hands, needs to be stored somewhere.
It is not necessary to buy storage devices in the store; use our master class to make a kanzashi box with your own hands. If you're completely new to the technique of making ribbon flowers, take a look at our post on this hobby to learn the basics.
We invite everyone else to immediately start creating ribbon beauty!
Kanzashi for beginners: technique, master classes, step-by-step photos
Recently, the kanzashi technique has been gaining momentum in popularity, which is not difficult for beginners to master. There are a large number of master classes on the Internet, where each stage is described in detail and with step-by-step photos. This allows you to quickly and effortlessly create real masterpieces. In fact, kanzashi are flowers made from satin ribbons. They served to decorate the hairstyles of Japanese girls. Today, this technique is used to make hairpins, headbands and various decorative elements.
We recommend reading:
On a note! Since geisha were forbidden to decorate the Japanese traditional costume, as well as their arms and neck, the girls were left with the only area for self-expression - their hair. That is why they tried to decorate their hair in a more interesting way, creating kanzashi from silk ribbons with elements of silver and gold.
Varieties of kanzashi
Several varieties of kanzashi are known. In domestic countries, Hana Kanzashi . Such jewelry is made on the basis of hairpins, hairpins, and sticks.
Flowers made of satin or silk ribbons are attached to them. Jewelry varies in size, material, shape.
A subspecies of Han Kanzashi is Shidare , which is a structure from which flowers hang on threads or chains.
When flowers are formed into a round shape, Kusudama . This decoration is rarely found in domestic countries, but has taken root in Japan.
We embroider a wonderful box with ribbons
Draw a sketch according to the size of the box lid. We take the gift box and peel off the excess thickness from the inside of the side of the lid and from the outside of the box wall. This needs to be done, because when gluing the sides they will thicken so much that they will no longer be able to close.
Transfer the design to the fabric. Use a special felt-tip pen for this, which can be easily removed with a wet brush or disappears on its own within a couple of days.
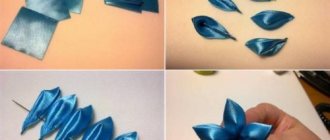
First we embroider small, non-voluminous details.
Using a brush and water, wash off the remaining felt-tip pen from the finished embroidery and dry it with a hairdryer.
Then we embroider larger and more voluminous ones.
From a thin lining fabric of a suitable color, cut out a bias tape, approximately 5 cm wide and length equal to the circumference of the box. We glue the bias tape along the inside of the box to a depth of about 1.5 cm. I used glue very reminiscent of the Soviet BF6 glue. It doesn't get wet through.
We wrap the free edge onto the front side of the box and do not secure it with anything. It will secure later when I glue on the main side trim.
We take the main fabric and glue the top cover in the same way. Only when gluing the inside side, we very carefully adjust the bias tape to the very joint, there should be no gaps left, finishing work.
We cut out a “double” cover from very thick cardboard.
We glue a couple of layers of padding polyester onto the cardboard blank.
We carefully cut the embroidery in a circle. Along the edge “forward with a needle” we sew the edge of the embroidery so that we can then cover the cardboard blank. We take very strong threads!
We place the workpiece with sitnepon inside the embroidery and tighten it on the wrong side. We straighten the embroidery on the workpiece on the front side, making sure that there are no distortions. We tighten it very tightly on the wrong side, tying a strong knot.
The reverse side looks like this. Apply hot glue only to the middle of the part.
We quickly place the part on the lid, position it correctly and press it. We wait like this for one minute.
Insert the glue gun about 1 cm deep into the crack and add hot glue. It's better to do this 2 times. First glue half of the lid - press down, let it harden, then the other half.
Apply hot glue to the edge of the lid.
And we lay the decorative braid along with hot glue, make sure that the braid lays down without wrinkles, pull the braid! It’s better to glue it in three or four steps too.
Having already reached almost the end, we cut off the excess braid and quickly and carefully place the end of the braid on hot glue. Using a needle or tweezers, we lay out all the threads of the braid ornament so that the cut is not noticeable.
You can also lay a second layer of braid.
When closed, measure the sidewall.
Cut out a “double” sidewall from cardboard. We glue a thin layer of padding polyester and cover the workpiece with the main fabric.
Glue the blank to the box. We make sure that the glue also grabs the bias tape along the side.
Glue the finishing tape.
This is what it looks like in the end.
We cover the inner walls and the bottom with the lid with decorative self-adhesive film. If there are wrinkles somewhere, you can heat it up with a regular hairdryer and the wrinkles will smooth out on their own.
Ready!
Master class on kanzashi: mastering easy technique from scratch
The original art of creating accessories from fabric with your own hands is gaining more and more popularity. With the help of simple tools and materials you can make your own jewelry.
In this article you will find a detailed description of several products and the technique of their implementation, as well as the main elements that you can use to realize your own ideas.
Kanzashi master class is the best find for beginners!
Let's start simple
If you are the first to encounter the kanzashi technique, then first let’s define the basic requirements.
Like any type of needlework, here you first need patience and perseverance, the desire to achieve an ideal result.
MK: Heart-shaped box made from tape reels
Hi all! Today I want to tell you how you can make a fairly roomy and very cute heart-shaped box from tape reels.
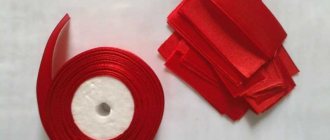
For this we need:
- 2 reels of wide tape,
- a sheet of chipboard measuring 30x30cm. and 2 mm thick. (you can use beer cardboard, etc.),
- - glue (I have Moment Crystal),
- - designer paper (or fabric) for finishing the outer and inner surfaces of the box,
- - tape for securing the lid,
- twisted cord, flowers, chipboard cutting, semi-pearls, etc. for decoration.
So let's get started.
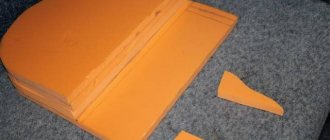
We take a ruler and mark the cutting lines on the reels strictly at right angles. This is an important point for smoothly connecting the two parts of our box.
After cutting both bobbins, carefully straighten each one on one side. To make the halves of the heart symmetrical, we place the parts on top of each other and adjust.
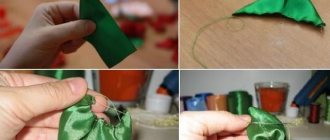
Now we glue the seams. If the heart is not entirely symmetrical, you can tighten it with thread or an elastic band (photo 7), give it the desired shape, sprinkle with water and leave for several hours to dry.
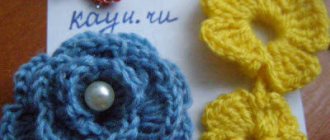
And at this time we prepare the bottom and lid of the box.
We take a sheet of chipboard and trace our heart from the OUTSIDE. Then, retreating 2-3 mm, we outline another contour (red line in photo 7).
You should get 2 contours (as in photo 8). We will cut along the outer contour. We make 2 such parts. (for the bottom and lid).
In order for the lid of the box to be fixed and not move, we will make another part, but of a smaller size. Those.
We outline the walls of the box from the INSIDE, draw a parallel outline of 2-3 mm. smaller (green line in photo 7) and cut along the inner contour.
We cover all the parts with designer paper (or cover them with fabric). Glue the bottom and begin assembling the lid. To make it look neat, cut out another heart from cardboard of a suitable color, which will cover all the irregularities on the inside of the lid (photo 11).
We make cuts at the fastening points and thread ribbons through them (folded in half for strength). Glue the ends of the tapes to the wrong side of the cardboard, turn it over and glue it to the inside of the lid.
Glue the third smaller piece on top (in photo 15 - the inner side of the lid, in photo 16 - the outer side). We glue the free ends of the ribbons to the walls of the box.
In photo 18 the box is turned upside down and you can see what the mount should look like from the outside.
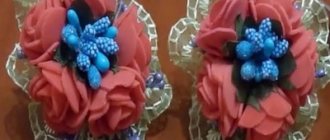
OK it's all over Now! The box is ready. Now all that remains is to decorate it to your taste.
I used twisted cord, chipboard cutting, different flowers, stamens, leaves and half-pearls. The inside was covered with velvet paper.
This MK was written specifically for the Scrap Magic blog, where I participated in the task of decorating tape reels