Required materials and tools
First, you should take a look around to see what materials you have at home. To recreate a high-quality shooting range, you will need the following materials:
- carbon steel sheets, thickness from 5 mm;
- grinder with attachments;
- welding machine with electrodes;
- rods;
- universal door hinges;
- canvas (for example, foam);
- a can of primer.
A box measuring 100x80x50 (cm) will be assembled from metal sheets. You can use wooden planks, self-tapping screws, a screwdriver, a jigsaw (hacksaw), but then the design will not be reliable. Even if this is not available, you can ask for a regular box at the grocery store.
Print the Boar target on A4, A3 and A1
How to glue a large target from A4
The “Running Boar” target is intended for shooting from a rifle at a distance of 50 m. You can also use other types of hunting weapons, since the target has original parameters with a running boar. To get a full-scale wild boar target, you need to print out the required format and glue the sheets together according to the instructions.
Dimensions of the "Running Boar" target
The manufacturing process of a pneumatic shooting range
The work consists of 3 stages:
- Box assembly;
- Cover assembly;
- Applying primer.
Learn more about each step.
Assembling the box
First, a large metal box is assembled under the canvas (catches bullets), a target. To do this, metal sheets are cut with a grinder. You should get 4 segments: 2 measuring 100×50, the remaining ones – 80×50. All parts are connected by welding, and the seams are sanded (for aesthetics). Finally, a 100x80 sheet is welded - the wall of the shooting range.
Cover assembly
The first step is to make a frame. It is desirable that the material be dense, but if there is no suitable material, 5 mm metal sheets are used. You need to get 4 segments: 2 – 80×10, the rest – 100×10. The parts are connected by welding. Using a grinder, a shooting range cover with dimensions of 100×80 is cut out from the resulting structure, then installed on the box.
Applying primer
All that remains is to take care of protecting the portable shooting range. A primer is applied to its outer and inner surfaces. Then the box is left for a day to allow the paint to dry. In order not to waste time, you can cut out the canvas to catch the projectiles according to the markings, and later place them in the shooting range. The work is finished.
Important.
If you decide to make a shooting gallery out of wood, then you should not use composites because of their fragility. The procedure for making a wooden lid is similar to the example earlier. It is better to treat the surface of the box with stain and varnish instead of primer paint.
Pneumatics and the law
DIY signal flare.
what kind of rockets there are and how to make a working model with your own hands. general design of flares, principle of operation Despite the fact that air rifles and pistols with muzzle energy up to 7.5 J are not subject to weapons laws, judicial practice on them is contradictory. Very often, local judges bring sporting pneumatic shooting under Article 20.13 of the Code of Administrative Offenses of the Russian Federation. This article defines administrative penalties for shooting in unauthorized places and for violating the rules of shooting in permitted places. For example, according to it, for shooting in a populated area there is a fine of 40-50 thousand rubles with confiscation of weapons and ammunition. At the same time, the state of alcoholic intoxication is an aggravating circumstance in which the fine increases to 50-100 thousand rubles.
In other words, if you want to shoot on your own property, you need to take every precaution and equip your own shooting range where you can only shoot at targets. This home range will be the “other designated shooting area” referred to in the law.
But despite this, if you receive complaints from neighbors, you may still need a good lawyer, and this is something to keep in mind.
It is also important not to forget about the existence of “Article 245” of the “Criminal Code of the Russian Federation” on cruelty to animals, which, in addition to gigantic fines, implies imprisonment for up to two years
Making falling bullet targets
Testing an air rifle or pistol at home can no longer be avoided, as can nerve-wracking your four-legged pet under the sofa. The main thing is to ensure the safety of property and prevent bullets from ricocheting around the room. Falling targets with foam or geotextile fabric will cope with the task. They have another name - tipping. After each hit, the shooter re-sets the objects (targets).
Why is all this needed?
A bullet catcher for pneumatics solves several of the problems mentioned above at once - it prevents itself from being made holes and breaking something behind it, eliminates ricochets, and also guarantees the collection of bullets in one place, instead of uniformly replacing all your hard-to-reach corners with them.
Such devices are produced both on an industrial scale for shooting ranges and shooting ranges, and in makeshift home conditions. An example of a factory bullet catcher can be seen in the following video.
Due to the relative weak power of hardball pneumatics, a homemade bullet catcher can help relieve the nerves of a bored, tough hardball player. From this moment begins our story about how to make this mysterious device with your own hands.
Step by Step Actions
The process of making falling targets consists of 3 steps:
- Cutting packages.
- Filling for catching projectiles.
- Support assembly.
It's simple.
Cutting packages
For 1 purpose, 7 cardboard packages with a volume of 1 liter are enough. They must be clean and dry. The corners of several packs are torn, then the top is cut off - these are elements of the body of the future target.
Filling for catching projectiles
The filler will be the remaining empty juice or milk cartons. All the tabs are torn by fingers, and the boxes are flattened. Use stationery scissors to cut off the top and bottom.
The blanks are straightened and cut in half with scissors to form corners. All that remains is to fold the resulting parts like an accordion, then place them evenly inside the box (1 part of the target body). The result was a filler of 8-10 layers. Finally, the remaining box (2nd part of the body) is put on top.
Assembling the support
Additionally, you need to assemble supports for the goals. To do this, pieces of hardboard are secured to the end of each wooden plank with self-tapping screws. Flip target stands with bullet catcher are ready. Additionally, you can stick on paper sports markings.
Important.
The height of the support depends on the shooting position: standing - from 1.5 m, lying down - no lower than 40 cm. The resource of falling targets is limited to 25-30 shots: they are not suitable for long-term training. The density of the packages may not be enough, so it is recommended to use thick cardboard as filler.
Types and sizes of targets for practical shooting, made by yourself
- Pneumatic target.
How to make an optical sight at home. We repair optical sights with our own hands
This photo shows a target that is used for shooting from an air rifle from a distance of 10 meters. The center of the target, the so-called “bull’s-eye”, is indicated by the number 9.
- Paper Bow Targets
The best way to practice is to shoot a bow or crossbow at a paper target.
- Shields shield for crossbow and archery
In order for the arrows to last longer, it is recommended to purchase an arrow shield. During practical shooting, the shield will allow you to keep the arrows in their original form. In addition, the shield can withstand hits from any weapon.
- Children's shooting target
In addition to specialized targets for shooting ranges, there are also children's shooting targets. Children's targets are a target printed on a metal sheet. For children's purposes, bows or crossbows with arrows on suction cups are used.
Homemade paper targets
Sports markings made of paper are a simple option. All you need to do is find the desired drawing on the Internet, download it to your hard drive and print it out. Paper format – A4 (standard). It will be a classic sports marking, or an image of an animal - it all depends on the shooter’s imagination.
If you don’t have a printer at home, it’s time to remember drawing.
Materials and accessories
You will need the following materials and tools:
Manufacturing process
- A sheet of A4 paper is folded in half; to determine the central point, mark it with a pencil.
- Use a ruler to measure 10 cm from the center (or apply a compass to the measuring accessory).
- A compass with a given pitch is installed with a needle on a point. A clear circle is drawn.
- The step of the compass is reduced by 1 cm, then the next oval is drawn.
- The process is repeated until the target is completely ready.
The finishing touches are to draw the numbers with a marker and paint over the “bull’s-eye”. Different colors are used. Paper targets are fixed with pushpins, tape, and universal glue.
Print target for bow and crossbow on A4
Archery outdoors is performed at five types of targets, indoors at four, but there are only three main targets:
- with an outer diameter of 1220 mm for shooting at distances of 90, 70 and 60 m;
- with an outer diameter of 800 mm for shooting at distances of 50, 40 and 30 m;
- with an outer diameter of 400 mm for shooting at a distance of 18 m.
Below you can download these targets for printing on A4 format, and then gluing them together.
Target for bow and crossbow on A4
Improvised targets
If you don’t have the desire or time to prepare paper targets, you can use improvised means: glass jars, water bottles, tin lids, etc. However, it is better to shoot at such objects on the street.
The advantage of improvised targets is accessibility. The disadvantage is that debris remains, and sometimes even a puddle (when shooting at bottles with liquid). It is better to use ballistic gel, which effectively catches flying projectiles.
What you need
You need to prepare:
- pan;
- form for filling the composition;
- gelatin;
- water;
- paper towel (waffle).
Preparation of ballistic gel
Simple calculations determine the volume of the selected form. The pan is filled with the required amount of warm water, then gelatin is poured in in a ratio of 1 to 10.
Mix the mixture thoroughly for 10-15 minutes, then put it on low heat. Cook until done.
While the pan is cooling, lay out a paper towel (waffle or other material that absorbs moisture) on the table. The form is fixed on a laid table, then the future ballistic gel is poured into it.
The form with the gel is placed in the refrigerator for a day. The final stage is the removal of the jelly-like target for pneumatic shooting.
Human targets
Targets are produced not only in standard, but also in more original versions. Is it possible to shoot a person? This is a real crime. But sometimes, after a hard day at work, everyone involuntarily thinks about the prospect of becoming a serial killer. Human-shaped targets can be a great way to relieve stress and relax.
Target "Killer" in A4 format
Why not try yourself as a horror movie hero. Only now the maniac in a hockey mask with a chainsaw does not pose a threat to you. You have your own weapons and can easily send the scoundrel to the next world. The target is distinguished by detailed drawing and zoning, which will help determine your success in shooting. You will not only be able to shoot, but also have a good time.
Target "Man" in A4 format
The target is made in a minimalist style and is devoid of additional attributes. As a result, you can engage in shooting without being distracted by details. The presence of zoning will allow the shooter to aim and determine the level of his success. Shooting at such a target, you can involuntarily feel like the hero of a crime thriller.
Target "Fighter" in A4 format
The realistic target is made in the shape of a person who clearly threatens your safety. By shooting at such a target, you can give free rein to your imagination and imagine yourself in the role of a secret agent. You have to fight a dangerous enemy and perhaps save the world. What could be more important than this? The target is equipped with zoning, which will allow you to accurately aim and determine your success.
Target "Hostage" in A4 format
An unusual target will allow you to play out a very dramatic scene. Here is a killer who has put the trigger to the head of someone you care about. Perhaps your future life will depend on it. Remember that there is no room for error. The task is complicated by the fact that you can accidentally shoot the victim. You will have to make an effort to save an innocent person.
Mechanical targets
Mainly used in shooting ranges or competitions. They have a number of advantages over paper ones, for example, it is easier to notice a hit, since the affected part will fall or wobble. This could be a simple axis, with a target attached to it, which simply falls when hit.
Video shows shooting at mechanical targets with pneumatics
With bullet catcher
This is a small container that is located directly behind the target. It helps avoid unnecessary debris and also saves the wall if shooting is carried out indoors.
For biathlon
This is a modernized model of mechanical targets. It has two interesting features:
- The front solid panel has five holes with a diameter of 45.5 mm; when hit, they are closed with a small lid;
- When hit, a sensor is triggered, which sends a signal to the computer. Thus, the athlete always knows whether he hit or not.
For dueling shooting
This type of target is quite diverse. This can be a growth target, a circle with a diameter of 45.5 mm and other types. However, they all must meet certain requirements: be positioned symmetrically for both participants and, when hit, fold, fall, or rotate 90 degrees (perpendicular to the shooter).
Electromechanical
There are several types:
- Actually the biathlon target which is described above.
- Shooting ranges often use paper targets that are attached to a rope. When shooting is completed, the target is pulled up for viewing by simply pressing a button. And, in the same way, they move away and set the required distance.
- Folding or rotating targets. In the first case, these are targets that rise after a certain command and fall down automatically after being hit. In the second case, these are targets that turn 90 degrees (edge-on) after being hit.
advo › Blog › home shooting range
um, well, in general, the topic of pneumatics has been worrying me for a long time, I also had thoughts about Flaubert...
but somehow I didn’t have to deal with them so closely and now, someone’s time has come...
I borrowed the 651st Baikal from a good friend, although it was quite problematic, but that’s not the main thing.
The essence of my idea was to repair it and buy it from the owner.
the autopsy showed that the patient was more of a goof than a rip.
the silumin body was burst along the perimeter,
in short, no amount of machinations with repairs helped, but I did not lose heart.
I put everything together and simply tightened the bolt above the trigger.
So, it’s decided, let’s move on to a 12 gram euro cylinder:
what is needed for this? everything is very simple: since the difference between the valves for the cylinders is only in the “depth” of the needle, you just need to make a spacer (yeah, to widen the track xD)
in short, take a 9mm punch (measured with a barbell)
voila, the transition to 12 grams has been successfully completed!
Well, the results: power increased, accuracy increased, shots fired from one cylinder increased to
100 bullets. and RECOVERY appeared!
You just need to shorten the clamping screw, but these are minor things. I think we’ll make it secret at the same time)
so I recommend it to everyone!
but there is one caveat: after firing 2 drums (16 rounds), be sure to heat the cylinder on the battery.
the power of the shot will not drop as much, and there will be no loss in the number of shots.
Why? because when fired, the cylinder cools itself very much, and the pressure drops accordingly.
Children who are not very good at physics explain this by saying that “the pressure is coming out, and there is less residue in the balloon,” well, this is naturally nonsense.
oh, and by the way, it wouldn’t hurt to turn up the heating for street fights either. but that's a completely different story)
Source
Let's start production
I was sitting at the table after work at home. There is 100 grams of cognac playing inside, and my gaze rests on a five-liter water bottle.
A pattern begins to form in my head. What should a harder do alone at home? In winter. In Tynda. In winter with a pistol in his hand. Of course, I want to shoot. I begin implementing the scheme that arose in my head the next day.
To make this product we will need: a five-liter bottle, a knife, a stapler, pliers, an old T-shirt. That's all.
We cut off the top part of the bottle with a knife, not forgetting to cut out the small ears, they will then hold the target.
Don't forget about the "ears"
At the bottom of the bottle we put a T-shirt, undershirt, panties, in general, which is not a pity. Using a stapler, we secure the upper part, turn it upside down into the lower part, and bend the brackets with pliers. We push two brackets into the ears; the target will be attached to them using magnets.
In principle, this completes the assembly. However, after conducting the first test, out of a series of five shots, two bullets flew back to me. In short, the bullet catcher for pneumatic guns didn’t catch them. Tune to version 1.02 took me a couple of minutes. To do this, without disassembling the structure, I cut out the neck of the bottle.
The two magazines shot in the second approach confidently settled in the womb of the product. Based on the test results, version 1.02 was found suitable for use and accepted for use.
The device is easy to store, takes up little space and allows you to conduct shooting training without leaving your home. I think few people will fail to place bullets from 5-7 meters in a circle of 16 cm (bottle diameter).
I wish you all good luck, hone your shooting skills.
Let there be HARD, said the hardman and loaded his guns.
Making a bullet catcher from cardboard
This bullet catcher design is quite simple to assemble yourself. To make it, you will not need to use expensive materials. The main material for this is cardboard. Thick packaging must be used.
Advantages
The main advantages of making a bullet trap from cardboard boxes are as follows:
- the assembly procedure will take no more than half an hour, including unpacking the boxes;
- can be done almost for free;
- saving steel bullets due to their secondary use. If the bullet trap is full, you just need to open the device and remove all the ammunition. Cardboard is a fairly soft material, that is, there is no particular deformation of the bullets, this allows you to leave a reason for re-equipping them;
- If one part of the structure is clogged with cartridge holes, you can unfold it and start using it again. This bullet catcher alone is enough for infrequent shots for several years, and during regular sporting training shooting it can be replaced much less frequently.
Materials for production
To make a bullet catcher of this type you will need:
- thick cardboard from milk or other products purchased in several copies.
- thin boxes from the same batch of products (approximately 5-7 pieces), taking into account the size. They must be opened before use.
- Scotch tape, it is best to choose thick products.
- To cut the tape you will need scissors or a construction knife.
Execution order
Any of the laid out cardboard packages must be placed in an accordion. This element of the bullet catcher must exactly match the bottom of the main box used. If the dimensions do not fit, you need to turn the cardboard over, mark the extra size and cut off the unnecessary parts.
Another unfolded package is laid out like an accordion, taking into account the first one, but placed on the bottom in the opposite direction. It is precisely this direction of the lines that needs to be changed equally in order to distribute this load inside the bullet catcher.
Elements arranged in an accordion are inserted into the structure, one by one changing the arrangement in the opposite direction. A number of modules will be needed that will be sufficient to fill the containers to the upper volume.
The cardboard flaps must be tightly closed and sealed with tape, securing the main joined seams. The latter must be applied crosswise in 3 areas. To make the structure durable, it is necessary to cover parts of all sides with insulating material and carefully apply this element to the sides.
The future bullet catcher can be covered with any material, even with multi-colored patterns. In some cases, shooting instructions, rules for use with air guns, or basic notes that are not even related to the topic of the gun are attached to the surface. Paper targets can be applied on top of any installed decorative materials. To fully ensure safety, you need to install a bullet catcher near a thick wall.
Homemade bullet catcher for pneumatics
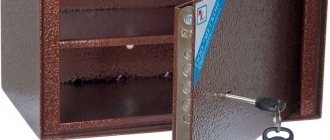
When I bought my first pneumatic gun, I still didn’t know whether I would like this kind of shooting or not. And the toad crushed me into paying another 500-600 rubles for a metal bullet catcher, like in the picture on the left
.
Shooting in a house without a bullet catcher is not an option at all. I made my own farm from whatever came to hand. Some kind of canister, a strip of tin, a couple of magnets. Practical time tests went well, the bullet catcher withstood more than 5,000 hits.
In the first version, I didn't use magnets, but rather a clip on the top of the canister to hold the target. And such a clamp is particularly unlucky; just one hit is enough and it breaks. When I broke the 7th such clamp (and that was today =)), two things immediately dawned on me:
- there was no need to place it in the vertical center. I get caught in the clamp because the pistol’s power fluctuates; from a full tank the bullets fly higher. I forgot to adjust the sight - minus the clip.
- You need to completely replace the clamp with magnets.
As a result, the second version turned out like this:
Use an old sheet as a damper.
All this, thought up in a hurry, turned out to be a very convenient solution. Only the bullet catcher window needs to be made a little smaller than the target, I made it wider in the second version, but in vain. Now the damper falls out.
The target holders look like this:
Inside there is a toroidal neodymium magnet and a screw, everything is covered with PCL. There was no need to make a metal platform, but I yawned and two lonely magnets met. And they fell into pieces. Now they can’t hold on any other way.
The actual final view of the bullet catcher:
This design has a lot of advantages: it’s convenient to carry by the handle, quickly change targets, and shake out spent bullets through the neck. Targets can be anything, not necessarily standard 140x140mm. And most importantly, the clamps no longer break. Even a direct hit to the holder is not scary, the PCL will withstand it.
A few words about the target. Here the toad did not press me. But after shooting at various printed targets, I came to the personal conviction that I don’t need all this.
For me there is only “hit/miss” and not “two in seven, two in 8, one in 10.” Therefore, I only need one ten circle. My ten has a diameter of 16mm, when shooting from 10 meters it’s normal. In addition, my wife has a bunch of half A4 sheets at work. A worthy solution.
Animal targets
Targets for sighting for pneumatics can be produced not only in the form of figures or people, but also animals. Such a target will allow you to engage in safe hunting and hone your skills.
Target "Running Rabbit" in A4 format
Perhaps this rabbit is running to find Alice in Wonderland. Or maybe he just saw you as a dangerous enemy. Using a rifle, you can improve your skills and feel like a real hunter. True, here you don’t have to kill the poor animals. Zoning will allow you to aim accurately and determine your successes.
Target "Crow" in A4 format
The target is made in the shape of a gloomy and creepy crow, which involuntarily brings to mind thoughts of haunted houses. True, the crow will not harm you if you manage to shoot it. The drawing has a high degree of detail, which will allow the shooter to be completely immersed in the process. And zoning will give you the opportunity to determine your success.