A wedding celebration is an event that everyone looks forward to: the newlyweds themselves, their relatives and friends. Relatives of newlyweds, as a rule, spend a lot of time choosing a gift, a holiday bouquet and a postcard where they write wishes to the newlyweds. Not a single congratulation is complete without the last thing, and therefore the invited people always go to specialized stores in search of it. An alternative to this is making an original postcard with your own hands. Let's figure out how to make a greeting card yourself.
We create wedding cards with our own hands using templates
If you set out to make such a wedding card quickly and easily with your own hands, then first of all you need to purchase hydrangeas (for scrapbooking) or simply cut out petals from paper. Hydrangeas or petals should be of different sizes. We put the petals on top of each other according to the principle of the arrangement of the petals in the bud and glue them to each other.
Next, cut out a strip of lace, make stitches along the top edge and tighten it until a circle is formed. Glue it to the bottom of the paper flower.
Under the layer of lace we glue another row of paper petals so that they slightly peek out from under the lace.
Place a bead on glue in the center of the flower.
Next we draw patterns in embossing style. For this we need two powders of different colors. Mix a small amount of them on paper.
Next, we put an imprint on the card with embossing ink and apply a mixture of powder. It is better if, before applying the imprint, the place for it is pre-marked with a pencil. Then remove the remaining powder.
Heat the powder with a hairdryer until it melts.
You can make such a card on any paper, but it is better to choose thin cardboard, glue or sew gift paper onto it, after having tied it in the middle with a lace ribbon.
You can make a simpler card:
To make it you will need a minimum of time and materials.
We take colored paper (plain and colored), an artificial flower and a narrow ribbon.
Cut out a piece of plain paper equal to a folded postcard. Let's bend it. We will also cut a thin strip from the same paper and set it aside for further work.
Then we cut the colored paper into two rectangular pieces with a length equal to the length of the folded postcard.
We tie the ribbon into a bow and attach a flower on top. To do this, you can use either glue or thread and a needle. You can make one flower with a ribbon, or you can make several. Everything is up to your taste and discretion.
Lay out a rectangle of colored paper so that it lies across the postcard. Glue a bow with a flower into the corner of the rectangle.
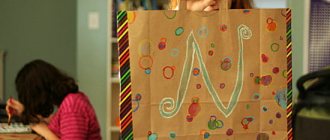
From white paper we cut out a strip where the names of the bride and groom will be written, and paste it onto a set aside piece of plain paper. The edges of the monochromatic piece should protrude slightly from under the white paper. Paste the resulting inscription diagonally onto the postcard.
We print the text of the postcard and paste it inside.
Postcard with tulle
If you know the bride better than the groom, you can give her a personalized card. Girls like receiving such gifts much more than men. How to make a DIY wedding card for the bride? You can capture a delicate image on paper. If you know the bride well and have already seen her dress and have an idea of the hairstyle that the girl will do, it will not be difficult for you to transfer the imaginary image to paper. There is no need to draw everything accurately. Exaggerate the imaginary picture. You need to make something like a stylish fashion illustration. The dress and hairstyle in the picture can be duplicated with fabric. Glue pieces of tulle so that they become a harmonious addition to the skirt and hairstyle. By the way, you can also make your hair voluminous. For example, make it from threads. You can insert a natural flower into the bride’s hands or use a plastic blank.
Making a gift using quilling technique
Quilling is used not only to design postcards, but also to create unique paintings or decorate gifts, photo albums, and jewelry. Using rolled pieces of paper, you can create a creative greeting card. It will be one of a kind and will certainly appeal to young people. As for materials for work, modern stores offer a wide range of paper of different densities, textures and colors. There is room for your imagination to run wild.
To make a greeting product you will need:
- Thick paper of a light shade - 1 sheet.
- Small pieces of thin paper of different colors. To simplify the work, you can use ready-made quilling kits. The kits include ready-made strips of various papers that are ideal for rolling.
- Paper sheets for scrapbooking.
- Ribbons.
- Pencil.
- Small beads.
- Knife.
- Ruler and scissors.
- Tool for rolling paper strips. This tool can be purchased at the store or replaced with ordinary skewers or toothpicks.
Work progress:
- From a sheet of thick paper or cardboard you need to cut a rectangle, the dimensions of which will be 15 and 20 cm, respectively. The base of the future greeting card must be folded in half.
- Paper for scrapbooking should also be cut into a rectangle, its dimensions should be 10 and 15 cm.
- If you have selected a ready-made quilling kit, you can proceed to the next stage. If the set is not at hand, then you need to cut paper of several colors into thin strips. You will need 16 strips to work.
- The next stage of work will be twisting the prepared strips with a skewer or a special tool. One end of the strip should be fixed with glue. All strips should be tightly twisted and not unravel. To prevent an already twisted decoration element from unwinding, it can be additionally fixed.
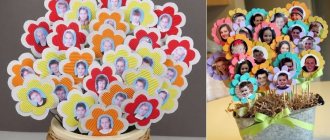
- You need to glue a rectangle of scrapbooking paper onto the prepared base of the paper product. It is worth considering that the element must be glued in the middle of the base with equal distances from the edges. To do this, you need to first measure the distances and try them on before gluing. The finished twisted elements must be pressed on both sides so that they look like flower petals. Using petals, we decorate the title page of the card with flowers. One flower will consist of 5 petals. The middle will be beads.
- Sequins and ribbons will help complement the flower arrangement. You can place a small satin bow at the bottom of the card. The wedding card for congratulations is ready. This card can also be given to parents for a silver wedding.
Important additional elements in scrapbooking
If you are going to periodically make your own wedding anniversary cards for parents and friends or make this hobby a source of income, you need to carefully study the range of consumables, tools, and devices for such work.
Learn to choose cardboard, paper, glue, and decorative tape wisely. The work will require a special mat on which it will be convenient to cut materials with a stationery knife. It’s good if you have a variety of curly scissors in your arsenal. They will help you create original edgings and elements. A border hole puncher will come in handy. It will help create beautiful raised edges.
Border hole punch creates beautiful raised edges
Scrapbooking uses single-sided and double-sided cardboard. Beer material is considered the best option. The paper can be plain or colored with prints. You can make original materials yourself if you have a printer at hand. Many experienced needlewomen use wallpaper in their work.
Scrapbooking paper with prints
To create your own wedding cards or for another celebration you may need:
- chipboards,
- brads,
- stamps.
The use of chipboards allows you to expressively convey the mood, character, and meaning of the composition. These are three-dimensional elements that are produced in a huge variety of shapes and themes.
Wedding themed chipboards
Braces are used in fixing objects. They are equipped with attractive hats and can themselves serve as decoration elements. Using brads you can secure textile and paper products.
Brads are used to fasten objects
When creating your own wedding, birthday or anniversary cards, you can apply various symbols, effects, and inscriptions to them using special stamps.
Various symbols and inscriptions are applied using stamps
What types of wedding posters are there?
A wedding is not only the solemn day itself, but also the preliminary preparation for it, the bachelor and bachelorette parties. Modern men, of course, are difficult to imagine with pencils and markers in their hands, unless there are professional artists among the friends and relatives of the future newlyweds
As a rule, the female half is responsible for designing wedding posters, but even this is not so important. It is important to approach the process creatively and patiently, and then the poster will turn out stylish, bright, and memorable
Photo of the original wedding competition poster
Let's start with bachelorette party posters. Usually, cheerful bridesmaids prefer to draw wall newspapers and create wedding collages with their own hands - this is a fun pastime that is sure to result in a great result. There are no specific rules for making such posters, but the inscriptions should be large and bright, no gloomy tones (unless it is a Halloween or Goth wedding), the posters should be diluted with photographs of the bride and her bridesmaids for the entire period of their acquaintance - even from kindergarten times .
Wedding posters should be bright, words and phrases legible, and the use of magazine clippings and photographs is encouraged.
In any wedding poster, it is recommended to take into account the theme of the girls' party or wedding celebration: retro style, exotic, marine, African, etc. should be reflected in the design of the premises. Then the wedding will look extremely stylish, professional and harmonious
Cool inscriptions and funny phrases should be chosen carefully so that there is not even a hint of vulgarity and vulgarity
Wedding posters for the bride's ransom are a traditional decoration of the doors and walls of the entrance, as well as the bride's apartment, from which the groom takes her, thanks to generosity and ingenuity, symbolic gifts and participation in interesting competitions. The beloved will not go anywhere, and funny posters or banners with the names of the bride and groom will remain in the family for a long time.
Photo of wedding poster for redemption
In some cases, buyout posters can become the basis for an interesting competition. For example, you can invite the groom, with his eyes closed, to draw his future mother-in-law on a blank sheet of paper: such a portrait is unlikely to have any beautiful features, but it will be funny for those present - that’s for sure.
The simplest posters will not require much time to complete. Make a background and a bright frame, add slogans. For example, the classic: “We wish the young couple to live until their golden wedding!” and “I got married myself, help a friend!” Or a more modern one: “Everything should be shared equally in a family: a fur coat for the wife, a tie for the husband!”) - here is a poster for your home, cafe or restaurant and it’s ready! A stylishly designed poster with photographs of the newlyweds will perfectly decorate the walls of any room for a wedding celebration.
Don't know how to decorate your wedding party or don't have enough time to decorate the room? Another option for creating a poster is with the hands of the guests: you just need to make a beautiful frame on a blank sheet of whatman paper and invite the parents and those present at the wedding to leave their wishes to the couple. The newlyweds will certainly keep such a poster for wishes for a long time, because it is symbolic of nascent family relationships, very romantic and pleasant.
Scrapbooking and origami
Very beautiful invitations made with your own hands are made using the scrapbooking technique. There is only one drawback - if you want to invite a fairly large number of guests, then you will need a lot of time for preparation.
Let's look at how to make a card with silk ribbons - ties.
Postcard using scrapbooking technique
What to cook?
Postcard using scrapbooking technique - preparing details
You will need sheets of thick cardboard (colored, double-sided), scrap paper, ribbon lace, fabric, double-sided tape, glue, silk ribbons, scissors, ruler, pencil, cutter, additional decorations - if desired (lace napkins, rhinestones, sequins, etc. ).
Making blanks for invitations
For the base you will need a sheet of cardboard 30x10 cm and two cardboard rectangles 15x10 cm each, respectively. For the cover, cut out rectangles 10x6 cm and 5x3 cm in different colors from thick scrap paper or colored cardboard. We cut the silk ribbon for the ties, unroll the lace and cut it into pieces of 13-15 cm. Iron the fabric and cut it into rectangles 13x9 cm.
Collecting an invitation card
Postcard using scrapbooking technique - assembling the inside
Take the first, largest sheet of cardboard 30x10 cm, fold it in half. We attach silk ribbons - ties - to the inside of the cardboard with double-sided tape.
Take two 15x10 cm rectangles and glue them onto the inside of the postcard. This way we will increase the density and at the same time hide the fastening of the tapes.
We paste a piece of paper with the text of the invitation or sign it by hand. For decoration, you can additionally use stamps, seals, pieces of openwork paper napkins, and themed stickers.
Postcard using scrapbooking technique - assembling the cover
Let's move on to the cover design.
We cover a piece of cardboard 10x6 cm on both sides around the perimeter with double-sided tape. We stretch the fabric (13x9 cm) over the tape and fold the edges.
We take the lace, distribute it horizontally over the fabric, wrapping the edges on the back side of the cardboard and securing it with tape or glue.
We take the smallest piece of cardboard/scrap paper 5x3 cm, process its edges with curly scissors or a hole punch and paste it in the center, on top of the lace.
We firmly fix the resulting “sandwich” in the center of the cardboard - the base (we use glue or tape).
All that remains is to print small cards on colored paper with the word “Wedding Invitation” and paste them into the center of the smallest rectangle in the center of the card.
We decorate the cover with rhinestones, stamps or any other way, tie the ribbons into a lush bow and go to present a beautiful invitation to the guests.
A wedding invitation made using the scrapbooking technique can be complemented with a beautiful three-dimensional insert on the spread. To do this, cut out according to the template, bend and paste the desired shape into the card, then decorate the paste with sparkles.
Option for a three-dimensional insert for a postcard - invitation
Options for making gifts
Let's take a step-by-step look at how to make some wedding anniversary gifts on your own.
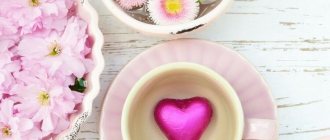
Coffee couple
To decorate the cups you need:
- coffee cup;
- coffee beans;
- threads;
- cotton pads;
- glue;
- brown and gold acrylic paints;
- lace ribbon.
Manufacturing steps:
- Attach the disks to the cup with glue.
- Tie the cup tightly with thread.
- Cover with brown acrylic paint.
- Glue the coffee beans in two layers. You can't leave empty spaces.
- Draw a gold heart.
- Decorate with lace ribbon.
Drinking coffee in the morning in such a mug is twice as pleasant
This is also interesting!
Tips for needlewomen: creating a gift for your loved ones with your own hands
Heart shaped lollipops
To make lollipops you will need:
- rose wine – 1.5 tbsp;
- honey - 3 tbsp. l.;
- salt - a pinch;
- sugar – 150 g;
- silicone molds in the shape of a heart;
- sticks.
Preparation:
- On the lowest heat, reduce the wine to 1/3 volume.
- Remove from heat and let cool.
- Add other components.
- Heat the mixture to 150 degrees and pour into molds.
- Insert chopsticks.
- The lollipops will be ready in a day.
Heart made of threads
This gift option will fit into any interior. To make it you will need:
- wooden board. It can be painted in any suitable color;
- scarlet thread;
- silver paint;
- nails;
- heart cut out of cardboard.
Manufacturing steps:
- Place a cardboard heart on the board.
- Drive nails along the contour of the heart at a distance of 2 cm.
- Write the wedding date in the center with acrylic paint.
- Tie a thread to one nail and weave from one nail to another in disarray.
Candlestick
You can use glasses, jars, bottles, etc. as the base of the candlestick. Let's look at how to make a candlestick from spices. To make it you need:
- Take a wide glass.
- Pour sugar and any spices that smell delicious into it.
- Cover the glass with cinnamon sprigs and tie a beautiful ribbon.
- Place a candle in a glass.
- While the candle is burning, the room will smell pleasantly of spices.
Cute and touching candlesticks for romantic evenings
Candy cake
To make this gift you will need:
- cardboard;
- corrugated paper in two different colors;
- candies 31 pcs.;
- threads and scissors;
- pencil;
- double sided tape;
- satin ribbon;
- artificial flower.
Work process:
- Make the sides of the cake using cardboard. Size 7*15.5 cm +1 cm for connection on each side.
- Make a base. Size 7*8 cm + 1 cm.
- Using double-sided tape, glue the parts of the cake with sides 7 cm long with a train.
- Make a triangle.
- Place the resulting figure on the cardboard and trace it with a pencil. Then cut.
- Make the sides of the cake top and bottom.
- Cover them with green paper.
- Take yellow paper and cut strips 2.5 cm long from it. Make an accordion and glue it along the perimeter of the triangle.
- Make strips of tape on the top and bottom of the cake. Glue candies to the tape. Bend the tails of the candies.
- Tie the cake with a satin ribbon and decorate it with a decorative flower.
Gifts made in-house are much more valuable than store-bought ones. Such a gift must be beautifully decorated and a congratulations card attached.
A creative gift - a DIY painting for a wedding anniversary, see how to make it in the video:
Video instructions for making an unusual paper cake for a couple’s anniversary:
Article read: 730
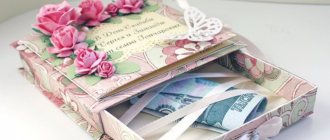
Wedding treasury
This accessory is used to store cash gifts, and can also be used in wedding competitions with money or when selling a wedding cake. The hole for money should freely pass envelopes of any size, including those made by yourself. If it turns out to be too large and wide, you can visually reduce it and hide the contents of the treasury using lace sewn around the edges.
The treasury can be made in the shape of a heart, box, chest, house, cake, etc. The decor can be made from ribbons, organza, lace, corrugated paper, flowers, rhinestones, half beads and half pearls, beads, shells. The sides can be decorated with photographs of young people, thematic drawings - doves, swans, hearts, rings, cats on the roof.
Ideas for creativity:
Step-by-step making of a wedding treasury on video:
Types of existing postcards
Next we will talk about the postcards that guests prepare, what options there are, their purpose and design.
Regardless of the purpose for which the greeting card will be used, they are divided into two types:
- Purchased;
- Made by hand.
Beautiful wedding day cards are made in two versions, but will a purchased leaflet be so expensive to store in a home archive? Will she talk about the warmth and respect for young people, like the one she did with her own hands? This is worth deciding personally.
In case the choice is made on a homemade postcard, first of all you should specifically understand what it is intended for:
- As an envelope for a cash gift;
- A token of attention and addition to the main gift.
You can make a card from a ready-made template, adding only a congratulation, or based on the one presented, create something original, unique and gentle, which will take into account the individuality of both the creator and the newlyweds.
French Provence in a wedding invitation
Romanticism, simplicity and sophistication are the main components of the Provence style. And, of course, invitations in Provence style will undoubtedly delight and amaze guests with their grace and taste.
A gentle and romantic version of a postcard in Provence style
A lavender trace, as the main motif of this style, must be present in the invitation - in color, in smell, in drawings, or you can put the lavender flower itself.
Provence style invitations must meet the following criteria:
- colors and shades of lavender;
- delicate pastel colors and smooth lines;
- minimalism and simplicity (without glamorous, bright and unnecessary details);
- wicker parts, straw;
- lace accessories, floral ornament;
- decorative elements with an antique effect;
- calligraphic font.
Making a postcard in Provence style.
The master class shows the main points of production, now all you need is a creative impulse, a little imagination and your Provençal invitation card will be able to delight and surprise your guests.
Top original gifts
1. A traditional solution can refresh the original presentation of a gift. A good and, most importantly, very necessary gift for a young family can be an original cake made in the form of a hut, in which the keys to an apartment or house are hidden in the sponge cake. The same gift giving can be done with car keys, replacing the concept of the cake form from a hut to a Ferrari. In terms of cost, relevance and necessity for young people, such a gift can be placed at the top of the gift rating.
You can develop the idea of giving a cake in the form of a hut or a car in this direction
2. Second place can be given to a romantic trip to a desert island or simply to a very picturesque, exotic and secluded corner. You shouldn't give cruise tickets to young people. Sea motion and even a light storm can become a real nightmare for lovers.
A great gift - a trip to a romantic and picturesque place for two
3. Wedding gifts for newlyweds have always carried a certain meaning or a hint. Most often, the bride and groom were made to understand that their grandparents were expecting grandchildren from them. In third place you can put such an original wedding gift as a sheet for Kama Sutra classes, a pacifier, booties or baby onesies. It is better to pack these things according to the matryoshka principle. Young couples have to unwrap the gift for a long time to get to the contents.
An original gift with a hint from potential grandparents - a sheet for practicing the Kama Sutra
4. The fourth place can be given to the glass “family jar”. It’s easy to buy a transparent piggy bank at a souvenir shop or make one yourself. Anyone can make such a piggy bank with their own hands. An ordinary glass jar is rolled up with a lid in which a slot is made. Banknotes dropped into it can become the initial capital for building a family nest.
5. The idea of an original wedding gift can have its origins in distant and forgotten traditions in modern life. Fifth in the ranking can be placed a barrel of honey with the official obligation of the newlyweds to eat the product in the first three months of family life. It is this period of time at the beginning of family life that is called the “honeymoon.”
6. A samovar and personalized tea service can hint to spouses about quiet family evenings. These things can be ranked sixth in the ranking, along with photo albums and photo frames.
A samovar with a tea set is a timeless classic among wedding gifts
7. The seventh line of the rating can be given to all kinds of star and lunar gifts. Everyone enjoys having their own plot of land on the Moon or a planet named after lovers.
8. Lovebird dolls can take eighth place. They personify the strength of the family union. Together with figures of elephants or money trees, such a gift can bring not only prosperity to the house, but also love with consent.
Paired lovebird dolls represent the strength of a family union
9. Ninth place is given to gifts that hint at the responsibility of fulfilling marital duty and maintaining fidelity. The groom is given a whip to keep his wife in strictness, and the bride is given a frying pan and a rolling pin. Traditional utensils have always been a good means in the hands of a wife to remind her husband of his responsibility to take care of the family.
10. A large book of family chronicles, made in an original design, can take its honorable tenth place. You can accompany such a gift with quite ordinary things - a camera or video camera.
11. Eleventh in the ranking of wedding gifts may be the gift of a flight to “seventh heaven.” This could be a ride in a hot air balloon, an airplane, or a romantic dinner at the Seventh Heaven restaurant of the Ostankino TV tower.
12. Spouses who love extreme sports may like gifts such as zorbing, swimming with dolphins or something similar.
13. Romantics will enjoy a good collection wine.
14. Wine can be accompanied by scented candles and a bouquet of red roses. He fully deserves the fourteenth place.
Instead of wine with a bouquet of red roses, as a gift to the newlyweds, you can choose this wedding basket with champagne, flowers and wedding attributes
15. The fifteenth line can be given to the tango training subscription. Such a joint activity can significantly strengthen the union of lovers and awaken in them the hidden potential of unbridled passion.
Unusual approach
In this section we will look at a special type of postcard.
Such congratulations are most suitable for people who, due to current circumstances, were unable to share the joy of this event, but consider it their duty to congratulate the children on their marriage. I won’t bore you for long – these are video greetings, musical and animated cards. Also, audio and video congratulations are in great demand as a wedding gift for a husband or wife. Very often, newlyweds record a video with a romantic song performed by them. To create them, you just need to come up with an original scenario (romantic or humorous), and then it’s a matter of technique. If you have skills in working with computer programs such as ProShow, Nero or Windows Movie Maker, then you already have half the success in your pocket. If this is your first time hearing about this, don’t be upset, it’s not complicated, but there’s a lot of interesting stuff. A master class on creating cool videos and animated clips will instantly make you a first-class director.
Such a message, of course, can be sent by email. But it will be much more interesting if you save it on a flash drive and present it in an original way as a gift.
Another creative idea is unusual wishes in English. Such creations are very appropriate at international weddings (as you may know, they are not uncommon now). In this regard, I can give you a couple of ideas on how to do this.
Quilling
Quilling involves forming curls of various shapes and sizes from strips of paper, from which various compositions are created.
This technique requires a person to concentrate and be careful. The manufacturing process involves folding paper strips and shaping them using finger pressure.
To work, use both colored and plain paper, as well as a toothpick and glue. The toothpick acts as an axis around which the paper strip is wound.
The finished spiral must be removed from the base, and the free end glued, after which the workpiece is given the required shape with your fingers.
The quilling technique is easy to learn and therefore children are delighted with it and do it with great pleasure. Moreover, all this does not require large financial expenditures; it is enough to purchase everything you need.
Master class on decorative balls
Balloons made from paper or fabric are easy to create, affordable, bright, and unique in their own way for decorating a wedding hall. These multi-colored bright pompoms are placed near the ceiling, mounted on walls, fixed on stands and installed in floor vases instead of flowers.
Making this decoration with your own hands is quite simple. This work does not require significant material costs and time. The master will need to prepare:
- paper or fabric (preferably several color options);
- glue gun;
- scissors;
- stapler;
- needle and thread;
- a narrow satin ribbon for a sling.
If you plan to make new pompoms from fabric, then you will need cardboard, a simple pencil and a saucer or plate that will serve to create identical circles. Having prepared everything you need, you can start working. Paper pompoms are made from multi-colored napkins or crepe paper:
- As many sheets of A4 paper as possible are folded like an accordion.
- Having marked the middle of the strip, tie it tightly with tape or wire.
- The edges are trimmed to the desired shape. It can be a semicircle or cloves.
Now comes the most crucial moment
The master needs to carefully and accurately straighten all the petals to form a three-dimensional ball. The ends of the ribbon or wire that held the accordion together in the middle are used to tie the pompom in the right place
Another option is balls made of fabric. To make this decoration you will need:
Draw identical circles on two sheets of thick cardboard. For this purpose, you can use a saucer, plate or even a large dish
The choice depends on how large the pompom should be. In the middle of each finished circle, draw another one of smaller diameter. The inner circle is carefully cut out, being careful not to damage the cardboard. Having folded two finished circles, you can immediately lay a narrow satin ribbon between them. Now they begin to create a blank for the pompom, wrapping the selected fabric around an improvised “donut”. This is done until there is no free space left in the middle of the circle.
By inserting scissors between the sheets of cardboard, you need to carefully cut all layers of fabric. The next step is tying the middle of the pompom
The cardboard is carefully pulled apart, and the found ends of the ribbon are tied into a tight and strong knot. You can get rid of the cardboard, and the fabric will straighten itself.
No less bright and original decoration of the hall will be balls made from a foam base, satin ribbons, paper flowers and decorative pins necessary for fixing the flowers. The finished foam ball must be braided with a satin ribbon, the ends of which are fixed with a glue gun.
Original balloons for wedding decoration can be made using ordinary balloons and coarse thread or multi-colored synthetic threads. For this you will need:
- balloons;
- PVA glue and brush;
- threads;
- scissors.
The balls are inflated so that they all turn out to be different sizes. Having tied them, use a brush to apply a layer of PVA glue to the entire surface and begin wrapping them with threads. Density depends on what effect the artist is trying to achieve
After the glue has dried, the ball inside the cocoon is pierced and carefully removed
Such balls are used not only as a regular hall decoration, but also as lamps when decorating a wedding on a summer area.
Materials and tools
You can make a unique gift for any occasion with your own hands at minimal cost. The “quilling” style involves creating various compositions from rolled paper. On sale you can find special kits for making postcards using this technique, including everything you need. But you can prepare the tools yourself.
To make a DIY quilling postcard you will need:
- Strips of multi-colored paper.
- Convenient small scissors (regular and curly).
- Tweezers.
- Safety pins.
- A ruler is a template with holes in the form of geometric shapes.
- Glue (preferably PVA).
- Cardboard or pastel paper as a base for the card.
- An awl with a forked needle.
- Stationery knife.
- Paper cutting mat.
The main elements of the composition are strips of paper rolled into a roll (rolls), from which flowers, patterns, butterflies and other decorations are created. To twist the roll, grab the paper strip with a special awl and wind it layer by layer to the required diameter (you can select it using a ruler-template), the end is fixed with glue. The number and color of rolls are determined by the idea of the composition, which needs to be thought out in advance.
When all the rolls are prepared, they are glued to the workpiece using PVA glue. The composition is complemented with an inscription, and a unique gift is ready.
Photo shoot for a wedding anniversary: how to make photos stylish and bright
Whatever wedding anniversary you decide to capture in the frame - 3, 5 or 10 years, there are general trends and ideas that are relevant for any photo shoot. These are, first of all, various accessories and accents that will further emphasize the solemnity of the moment. What could it be?
Numbers
Be sure to indicate somehow the number of years you have lived together. They can be depicted in various ways:
- write with chalk or draw in the sand;
- make a print on clothes;
- make huge numbers out of paper or balloons;
- build a metal structure, decorating it with fresh flowers;
- make cute appliques from buttons, colored paper, dried flowers.
Wedding photos
A very original idea for a photo shoot is matryoshka photographs, when a couple holds in their hands a photo from their wedding or from a previous anniversary. So, during the “calico” shoots, the couple holds in their hands a photograph directly from the wedding itself. On the “paper” ones there are photos from the chintz ones, which already have a wedding photo. And so on.
Wedding clothes
If you have managed to maintain your “pre-marital” figure, and you have the bride’s wedding dress and the groom’s suit in your closet, feel free to put them on and go for a walk, for example, to the place where you once met or celebrated your marriage.
And one more important nuance. If there is a new addition to your family, your children should definitely take part in the photo shoot. Do you have pets? Why not invite them into the frame too!
A photo shoot for every wedding anniversary is not only about pleasant memories and positive emotions. This is a great way to create the history of your family, says the wedding portal www.svadebka.ws.
- 34 photos
Creating a postcard design project
The quality of the finished result, the sharpness of the impression of a hand-made wedding card largely depends on the preparatory stage. There are experienced, talented needlewomen who can create a wonderful masterpiece spontaneously, without special preparation. Creative ideas are born during the manufacturing process. But beginners shouldn't rely on inspiration. You need to set aside time to develop a design project for the future postcard.
You will find many inspiring ideas on the Internet.
Ready-made examples of hand-made wedding cards can be a good help in choosing the general nature of the image, location and type of elements. You can find many such options on the Internet. But you shouldn’t copy even the most attractive products. The main value of such products lies in their uniqueness. You will create congratulations and invitations for specific individuals, which can be reflected in a postcard. When choosing shades, style, elements, you should consider:
- recipient's age;
- individual tastes, interests of the addressee;
- status and theme of the wedding;
- special moments.
When choosing a design, it is necessary to take into account the individual tastes of the recipient
For example, if you make your own wedding anniversary cards for parents and friends, you don’t have to use symbols typical of newlyweds. The design of such congratulations usually emphasizes the symbolic meaning of this anniversary: chintz, leather, porcelain, etc.
Various elements are used in the decoration of wedding cards. Traditionally, such products are decorated with flowers and bows, hearts and rings. Lace gives tenderness, satin - aristocracy, pearls - luxury, rhinestones - chic. You can use all these decorative items, the main thing is to maintain a sense of proportion and avoid the feeling of clutter and chaos.
Graceful lace adds tenderness
If a photo of the newlyweds is used in the design of the postcard, it is the main accent; the decor should be a worthy frame, an addition.
Original wedding card with photo of the newlyweds
Wedding anniversary: the best ideas for a photo shoot
Each wedding anniversary has its own name. Based on this, you can choose a location for shooting, images for the newlyweds, as well as accessories that will help create the necessary atmosphere and emphasize what anniversary the couple is celebrating.
One year - chintz wedding
A photo shoot for a 1 year wedding anniversary always turns out to be romantic. Chintz, which is actively used in photography, helps to emphasize her tenderness. Its simplest use is when a couple dresses in cotton clothes. This fabric is also used as decoration. If the photo shoot is planned for the warm season and will take place outdoors, tablecloths and bedspreads made from this material would be appropriate as accessories.
Two years - paper wedding
The wedding anniversary calendar continues with a paper wedding. Various paper figures can serve as accessories for this photo shoot - and there are a lot of ideas here! These could be: boats, airplanes, garlands of hearts, cranes, butterflies, paper snowballs, etc. Even the process of preparing for such a photo shoot will give you a lot of emotions, and joint creativity will bring you even closer.
Three years - leather wedding
A photo shoot for a leather wedding is, first of all, a cowboy theme. Leather boots, hats, jeans – it’s easy to create an image for filming. It’s also easy to choose a location for filming, for example, a field, meadow or forest. But the most ideal option is a stable. An alternative option could be a photo session in the style of bikers or superheroes.
Four years - linen wedding
One of the best ideas for such a wedding anniversary could be a photo shoot in a traditional Russian style. Creating an image for a couple couldn't be easier. For the bride - a linen sundress, a wreath in her hair and a bouquet of wild flowers, light makeup. For the groom - an embroidered shirt, a national belt. If filming takes place in the summer, then there will be no problems with choosing a location. For a winter photo shoot, you can rent a studio.
Five years - wooden wedding
This first small wedding anniversary can be celebrated by filming in the forest. But this is the most banal option. There are better ideas for a photo shoot for a wooden wedding. For example, you can arrange it in a bathhouse or against the background of a woodpile. Such photo sessions are especially interesting in winter. But in the warm season, you can capture how spouses plant a tree as a symbol of their love and fidelity.
Six years - cast iron wedding
An outdoor picnic is a great theme for this anniversary. You can support it by using cast iron pans, pots and other utensils as attributes. A grill or barbecue would also work!
Seven years - copper or wool wedding
When choosing accessories for a photo shoot for your seventh wedding anniversary, start from its name. On the one hand, these can be objects made of copper - dishes, candlesticks, coins. On the other hand, wool can be used here - for example, one blanket for two.
Eight years - tin or poppy wedding
Here the idea of a wedding anniversary photo shoot also lies on the surface. Products made of tin, as well as simply sparkling objects similar to them, will become the main accessories for shooting. If a floral theme is closer to you, then a poppy field is a great place for this process. The photos will certainly come out bright and stylish.
Nine years - faience wedding
A photo shoot for this wedding anniversary can be themed around drinking tea together. Earthenware dishes, as well as cute figurines and candlesticks will add an appropriate atmosphere to the photos. You can organize shooting anywhere - outdoors, on the embankment, in a coffee shop or even at home.
Ten years - pink or tin wedding
When choosing ideas for a photo shoot for your 10th wedding anniversary, start, first of all, from the color that symbolizes this first serious anniversary of your life together. The options here can be very different. For example, you can go to a botanical garden and take beautiful pictures with rose bushes in the background. Or rent a “pink” studio. The best wedding anniversary gift for your wife will be a boat ride, when in the rays of a pink sunset you can convey all your tenderness to each other.
DIY wedding cards for newlyweds
When creating a wedding congratulations card with your own hands, you should fully demonstrate your design talents.
Typically, such cards are made folding: on the cover there is a drawing or appliqué (you can supplement them with a short wish, for example, “Congratulations!” or “Happy Wedding Day!”), and inside there is a detailed wish, often in poetic form. One of the parts of the postcard is folded inward in the form of a wallet into which you need to invest money.
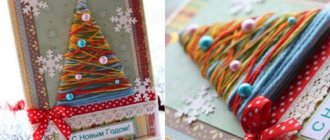
Artificial flowers made from satin ribbons look beautiful. The folded colored ribbon resembles a rose. The center of an artificial flower can be fixed with a bead, pearl or rhinestone. Flower arrangements can also be created from beads strung on threads.
To decorate the outside of a homemade postcard, simple cross stitch on canvas is also suitable.
A non-standard “envelope” for a postcard looks like a chest. It is easy to make from cardboard: cut out the sides, bottom and lid, make holes in them with an awl or gypsy needle, sew them, seal the seams with decorative tape, decorate the front and lid with an applique of satin ribbons.
Rich, rich colors will look good on white cardboard: red, blue, green. You can put money and a postcard in such a chest. A larger chest will easily solve the eternal problem that arises at weddings: it is very convenient to put all the invitations and donated money into it.
Computer design
Are you a person who keeps up with the times? Then make your own wedding card on the computer. You can download the template and edit it a little. A standard form will look interesting if you successfully combine it with fonts and decorative elements. It is advisable to create a postcard in the color scheme of the newlyweds’ interior. In this case, you can be sure that your creation will take pride of place on the shelf, and not at the bottom of the drawer. Download a postcard template for Photoshop, insert the necessary names and wishes there. If necessary, change the color scheme and add a few decorative flowers. You need to print such a creation on glossy or matte photo paper.
Creative gifts
If you decide that money is money, and the memory of a gift should last a lifetime, then it’s enough to apply a little imagination. You can use one of the following ideas:
- If the wedding takes place in winter, then the issue of congratulating the newlyweds can be resolved in this way - by ordering for them an ice sculpture in the form of a heart, cupid or rings.
- Write a song that will be performed by an invited musical group or record it yourself on a disc and play it during the holiday.
- Create a film about the life of the newlyweds before marriage. It may consist of photographs or videos from the family archive. Another version of the film is when all the relatives and friends will say their wishes to the young people on camera. And if you also ask passers-by, the newlyweds will be doubly pleased. It is especially touching if you manage to find those with whom the young people studied at school or university. If you have the opportunity to shoot from different cities, it will turn out very interesting and beautiful.
- For a bride who loves sweets, you can order a bouquet of chocolate, marzipan or caramel flowers.
- Draw or order a picture depicting the newlyweds.
- Another idea on how you can congratulate newlyweds on their wedding day is to make a comic first aid kit, accompanying each medicine with a wish.
For example, like this:
- I give you effervescent aspirin so that your love will be burning;
- take a bandage as soon as possible so that there are no offenses in the family;
- and so that you have a baby boy, I put some brilliant green in the medicine cabinet;
- and in order to give birth to a girl, I want to give iodine;
- so that you live richly, I will put cotton wool in the first aid kit;
- so that your love is eternal, here are heart drops and others.
- Make a calendar or album about your honeymoon. To do this, cut out different pictures from magazines about what they should do every day of their honeymoon.
- Give an underwater photo shoot. So that guests can also take part in it. The bride can wear a veil, the groom can wear a tie, the guests can wear balloons, flowers and fruit.
- Prepare a dance with the guests.
- Order posters with various inscriptions and pictures from the printing house. For example, on a poster of the bride’s idol, write that they thought she would marry him, but she marries someone else (find the funniest photo of the groom) and so on. If your imagination doesn’t want to help, then you can watch the movie “Love Actually.”
- Order jewelry with engraving, or two halves of a heart, or a lock and key, or a heart and a key.
- Give fireworks.
As you can see, there are a lot of ideas for gifts, but you can come up with something of your own.
Photos
Many weddings now have a special photo zone. A large frame that imitates a Polaroid photograph will look impressive. Your guests will have funny photos as a keepsake, and you can prepare everything for the photo zone in less than an hour.
To do this you will need very thick cardboard or a thin sheet of plywood. You need to cut a hole in the center in the shape of the photograph and make a commemorative inscription on the bottom. For example, the names of the bride and groom and the date.
And, of course, there is nothing more touching in decorating a hall than printed photographs of the bride and groom. And not from a specially held photo shoot in advance, but from a real archive: joint trips, holidays and ordinary weekdays.
But hanging full-length photographs of the newlyweds around the hall is not the best idea. Yes, this technique has been used before. But now it looks outdated and too pretentious. So it’s better to stick with the small corner version with photos.
Transactions with contractors
Contracts can be concluded with anyone you need. They should indicate how non-standard situations will be resolved, indicating the guarantees and rights of the parties. This way you can protect yourself from unscrupulous entrepreneurs and ensure the opportunity to recover your due if a conflict situation arises.
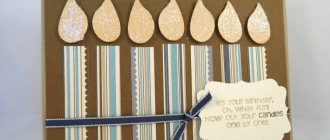
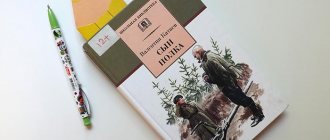
Wedding card tied with coarse thread, hand-decorated with hearts on white paper.
Of course, all this will take time, but it is better to sacrifice half an hour for drawing up and signing a document than to waste time later sorting things out. If you use the services of an organizer, he will do whatever you say. Most importantly, do not forget to read all contracts.
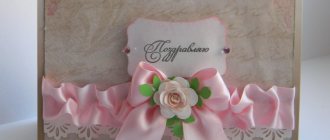
DIY wedding card with ribbons for the bride.