not found!
send a request
In every field there is a layer of people who try to do everything as cheaply, conveniently and quickly as possible. The so-called "life hackers".
Sometimes their decisions are so extraordinary that others can only be surprised. If the life hacker’s “experiment” is successful, then life hacks immediately go to the people. This is what happened with the ideas we write about below. At the dawn of the popularization of guitarism in Russia in the 90s and 00s, perhaps every musician heard about these “tricks” that could save time and money.
Cooking strings
Strings have always been a consumable item - and therefore, the longer they lived, the happier and richer the guitarist was. Dust, dirt and corrosion will inevitably accumulate on the windings, no matter how well you take care of them. If you want the strings to sound like new, then you can... boil them in water!
Despite the absurdity, this procedure really helps - by the way, we talked about it in detail in the article “When do you need to change the strings on a guitar? Why and how to weld strings?
Catch the cooking recipe:
- Twist the strings into a ring (separately);
- Put water on fire;
- Add a couple of tablespoons of salt, vinegar or soda (pepper to taste (just kidding)) to the water;
- Before boiling water, you need to lower the strings into the water. Cook for 5-10 minutes.
- After cooking, rinse the strings in cold water and wipe dry.
Congratulations! Now your strings sound like new. But such a procedure can be repeated no more than once, since the second time the strings are likely to die.
Making Floyd Rose Easy to Use
Owners of guitars with the Floyd Rose system can only sympathize, because replacing strings turns into a real nightmare.
You can greatly simplify the process of changing strings if you place a wooden block, a battery, or any hard object under the tremolo that can fix the bridge. Changing strings will become easier and you can even lock the tremolo system in the same way. However, you will have to forget about the Floyd Rose lever - although you will be able to tune the guitar using the pegs while performing.
Despite the disadvantages of tremolo systems, they have many advantages. For example, if your string breaks, you can use it again. All you need to do is first thread the string through the pegs and lock it into the tremolo system (the locking ring on the string should be at the peg). But at the same time, you need to wrap the string around the peg so that if the string breaks, you have a reserve length. If a string breaks, rewind the string and fix it.
MasterGitar.com
In this article we will consider the maximum option for repairing, or rather remaking, the neck of a Soviet guitar. Illustrations from the topic of our forum member Evgeniy from Simferopol, who was the first to carry out this repair on the forum.
The neck of a Soviet guitar is usually made of beech. The material is suitable for the job. There are plywood vultures. Such bars are quite rigid and can be left with a minimal amount of operations done on them. For a complete remodel, it is better to find a solid neck. They can often be found at flea markets. The old Soviet fingerboard is also good because over the years of use the wood has already been stretched with strings and there will be no unnecessary fatigue deflections.
The basis is taken from an absolutely ordinary beech neck from a factory guitar.
Everything possible was done to gain experience working with the fingerboard. You can take for yourself only some part of what has been done.
Main goals
Of course, the appearance of the neck is important for a guitar, but the main reason for a major overhaul is to enhance the functionality of the neck. The main indicators for which the whole round dance is:
- Lengthening the neck means increasing the scale, more power in the sound.
- Widening the fretboard - moving closer to the classical guitar.
Other indicators, such as the condition of the frets, for example, are not discussed - this is a mandatory repair in any case, whether you just want to put the neck in order or completely redo it.
Lengthening the neck to increase scale length
We lengthen the guitar's scale from the standard 630mm or even 620mm to 640mm and in some cases to the classic 650mm.
It is difficult to place 650 mm on the body of a Soviet guitar. (To do this, remove the stand so that no stain remains, i.e. by soaking or cutting. This will make it possible to glue it back much lower than its old position.)
Fingerboard lengthening is achieved:
- Manipulating the position of the zero fret. We change the pickguard, which means we can move the zero fret.
- You can glue a piece of wood to the end of the neck of the neck at the heel. This insert will hide in the dumpling.
- We are moving away from the concept that the 12th fret must run along the edge of the body.
Points 2 and 3 will make it possible to move the heel to lengthen the neck.
Increasing the width of the neck
The classical guitar has a slightly wider neck than was used on Soviet guitars. You need about 51-52mm. The fingerboard (often a pseudo-fingerboard) of the Soviet fingerboard is sometimes inexplicably ground down at the edges or skewed. There is some kind of hole on the neck of the neck under the first fret.
You can expand the neck in two ways:
- If just a little is missing, then you can physically cut down the old cuts under the frets and glue a new pickguard .
- Saw the neck in half lengthwise and glue it with a wide insert.
Option 2 is quite complicated, but provides several useful additional things:
- The insert strengthens the neck.
- You can change the shape of the head, which will make the guitar unrecognizable. New classical mechanics are installed normally.
- It will help in giving the bar a normal cross-section.
Neck overhaul
Now let’s take a closer look at the operations and how all this is done.
Remove everything unnecessary from the neck , frets, and tuning mechanisms. Do not leave remnants of screws; they need to be picked out with a small chisel or drilled out with a pipe drill.
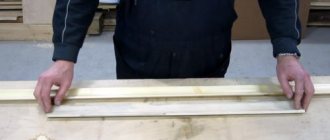
Saw off the petal or tongue , the part that hung above the soundboard. Saw off at a distance of 1 cm from the heel along the red line in the figure, it may come in handy.
Kick your heel . From the end, place the plane knife on the gluing approximately along the green line and hit the knife with a hammer, it should come off easily along the gluing.
Next, to the end that is adjacent to the body, you can glue an additional piece of dense wood (sawed off petal) into the corner where you left a 1cm indent. This piece will hide in the depths of the dumpling, and the heel itself can be glued with a shift from the relative old position and the neck of the neck will become longer.
Saw the neck in half lengthwise . If you do not need a large expansion, you can skip this operation. A new pad may be enough.
Try to cut as smoothly as possible. Before sawing, make sure that the head is properly glued into the neck, confirm this after sawing.
Seal the holes for the tuning mechanics . You need to use wood of similar density. The best thing to do is to buy a reamer, clean and calibrate the holes and insert the same even rods.
The halves need to be frayed . Sandpaper stretched over glass works well for this. There is also a technique for fitting parts using carbon paper or chalk.
The insert must be made of dense, seasoned, radial wood. Intuitively, you shouldn't lose more or less in sawing than the insert compensates for. We are still expanding the neck.
It is convenient to tighten the bag with rubber . Place the lining down on a flat stick that is slightly narrower than the width of the bag. Something like a narrow lining. Tape it to this shelf with rubber. On one side, the rubber pulls the halves together, on the other, it presses it to a flat surface and prevents it from moving.
Make sure that everything is level, some slipping is possible. You can protect yourself from displacement with sharpened nails.
The head is compressed with clamps, do not break the cheeks of the head. As a matter of fact, you need to insert something into the slots in order to press the middle properly.
After re-gluing with a reinforcing and expanding insert, you need to treat the surface of the neck and remove the old cuts from the frets .
Glue an additional piece to the end of the head from above. Process the planes of the head. Glue the cover plate onto the head and give the head a new profile . Gluing the headplate will allow you to move the zero fret.
Expand the recesses for the mechanics. Install new mechanics .
Deciding on the final length and position of the bar
The body and neck of the Soviet guitar are a little short for the full-scale version of 650mm, but the 640mm scale fits perfectly.
- We decide on the position of the zero fret.
- We set aside half the scale from the position of the zero fret and get the position of the 12th fret on the neck.
- Starting from the expected and possible place of the guitar's nut, we find the position of the 12th fret already on the body of the guitar. Don't take it as an axiom that the position of the 12th fret should be in line with the body, this is not necessary. There are guitars with the 13th fret along the edge of the body.
- Obviously, the 12th fret on the neck should fall on the 12th fret of the body and we can clearly find the final length of the neck.
- We decide on the new position of the heel. It is possible that only a few millimeters will remain from that inserted piece at the very beginning.
Many photos of the repair of this neck were missed, but here's what happened.
If the bar is installed in its old body, then do not change the installation principle, let it be as it is, it is not necessary to do dovetails, practice next time.
After the operations performed, you essentially have an almost classic bar and a lot of experience behind you.
Mikola Rudenko
Budget straplocks
Straplocks are expensive. Even Chinese analogues. Of course, it’s better to buy something cool once, like Schaller straplocks, and forget about the problem. But if you are sorry for the money, but want a reliable fastening, then we recommend just sewing up the belt.
It is necessary to sew in the place above the hole for fastening. You just have to make this hole as narrow as possible once - and the belt will never come off. True, you need to use strong threads - and remember that you will no longer be able to quickly remove the belt.
We take care of cables
To make the belt last longer, do not allow it to bend near the plugs. Try to purchase angled cables.
We also recommend threading the cable through the belt or wrapping the cable around it. Firstly, the cable will not fly out of the socket at the most inopportune moment. Secondly, the cable will not dangle right under your feet.
Some advice may seem humorous and even crazy. But this is exactly how poor aspiring musicians lived just 15-20 years ago! Now, most of these life hacks have lost their relevance - the online store Strunki.ru offers strings, accessories and guitar fittings at extremely reasonable prices. Order your products today and participate in our discount program, which allows you to get a lifetime discount of up to 10%!
Materials for making a guitar
The most commonly used woods for acoustic guitars are cedar and spruce, but you can experiment with different types of wood to create your own sound. Walnut wood is a very common wood and is popular in Western guitars. We recommend starting with these materials as they are the easiest to work with.
Also, pay attention to the quality of the wood. It varies from A to AAAA, and this greatly affects the price. For the first time, take medium-priced wood, and later start purchasing the most expensive options. This way you will protect yourself from losing money due to unsuccessful production.