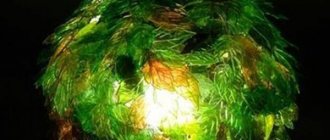
An unusual and stylish street lamp can be made from grapevines in the fall. We will need an inflatable beach ball as a template. We wrap the vine around the ball, securing the intersections with wire to strengthen the structure.
After our improvised ball of vine is ready, we deflate the ball and carefully pull it out.
Inside such a ball you can place it as a solar lamp, and wrap it with LED strip for outdoor lighting. Such strips often have a color switch, then using the remote control you can change the color of your street lighting.
flower bed
What could be more beautiful than a bright flowering flower bed in the garden? The stump left from the tree will be an interesting solution for decorating a flower garden.
To do this, make a 10-20 cm recess in the central part of the stump (leaving about 8 cm sides). At the bottom of the recess, at an outward angle, drill several holes for water drainage. Drainage should be placed at the bottom of the depression (fine gravel is fine). Fill the hole with the required potting mix.
Choose plants that suit the style of your garden. These can be either flowering or herbaceous species.
Petunia, nasturtium, ornamental strawberries and other climbing plants are an excellent option for such a flower bed. A young tree or fern will look stylish.
Wildflowers suitable for a “wild garden” are cornflowers, tagates (marigolds), and phlox. If you want to cover the entire stump, you can plant plants around it. Such a flowerbed will not go unnoticed.
Unusual street lamp “Drop”.
A glass flask for watering flowers plus an old water tap - and you are the happy owner of an unusual street lamp in the form of an amazing drop of light.
A glass flask can be purchased at a houseplant store. We will also need a stand for the crane and metal wire for the solar LED strip.
We wrap the LED strip around the wire and fill the flask with it.
We install our structure on a flowerbed.
And we admire our wonderful street lamp!
Hemp flowerbed
You will need: a dry stump, a chainsaw, an axe, a piece of polystyrene foam, a ruler, an antiseptic, paint, soil, sand, flowers (which ones are best to use are described in the master class in paragraph 7).
Master Class
- Trim the bottom edge with a chainsaw to create a level base.
- Draw contours on the surface of the stump, retreating at least 5 cm.
- Make 10-20 cm indentations in the stump using a chainsaw and an axe.
- Treat the inner walls of the stump with an antiseptic or paint it. This way the stump will last longer.
- Using a chainsaw, drill a hole for drainage to prevent moisture from accumulating, then insert a piece of foam.
- Mix store-bought soil with garden soil and add sand, then pour it into the stump.
- Plant flowers. Flowers with a small root system are best suited, such as: tulips, begonia, petunia, geranium, daffodils, oxalis, purslane, pansies, primroses, marigolds...
- Water your flowers regularly and take care of your flower bed.
The hemp flower bed is ready! I recommend watching this video!
Do-it-yourself flower bed at the dacha from a block of wood
I recommend viewing a photo gallery of ideas for creating flower beds on a stump!
Methods of decorative wood processing
- Application of paintwork. Several types of compounds that perform different functions are used to process wood.
Important! To apply to lamp parts, you should use products intended for interior work.
Types of materials for protecting and decorating wood products:
- Protective impregnations against climate, insects and fire.
Antiseptic for wood
- Primers. These compounds are applied to the wood before painting and form an additional protective coating that improves adhesion to the paint.
Primer for wood
- Paints and enamels. They are used to apply a decorative coating to wood.
Wood paint
- Stains. With the help of these compositions you can achieve the desired shade for the lamp that is required for interior decoration. After treating the wood with stain, it is necessary to apply varnish.
Shades of stains
- Lucky. These compositions can be glossy, matte, semi-matte, and also have a tint (tinted varnishes).
Tinted wood varnish
- Oil. An environmentally friendly, easy-to-apply coating that protects wood well and gives wood products a matte and velvety appearance.
Wood oil
- Aging of wood. Often, when decorating interiors, vintage furnishings are used, for example, those made from aged wood. This surface texture looks stylish and noble. Currently, there is a way to artificially age wood, namely, wood brushing.
Ceiling lamp: artificially aged wood
Brushing technology:
- This method takes advantage of the difference in hardness of the wood layers. At different periods of a tree’s life, its tissue grows in different ways: if in the spring more thin and loose tissue is deposited, then in the summer and autumn hard fibers are formed.
- Using special hard brushes, the surface of the wood is mechanically processed, resulting in the removal of loose and soft fibers. At the same time, solid fibers remain and form a beautifully outlined relief, protruding on the surface.
Wood brush
- Wood species with a clear structure and a pronounced division into hard and loose layers, such as pine, oak, larch, ash, and walnut, are suitable for processing in this way. Beech, maple, alder, and birch wood, which has poorly defined layering and a fine-fiber structure, is not suitable for brushing.
- In order to emphasize the beautiful structure, they are treated with paints. Moreover, the paint is applied unevenly: the places where the fibers were removed, that is, the hollows, are painted in darker tones, and the protruding areas are highlighted in light shades.
- You can do the following: apply paint, for example, gray, to the wood and after a while, while it is still wet, smear it from the textured surface.
Painting brushed boards
As a result of using this technology you can get:
- wood protected from moisture and damage by insects;
- stylish and fashionable items that can decorate any, even exclusive, interior;
- decorative elements that look expensive and exotic, but made from cheap and accessible raw materials.
- Firing with a burner. This technology allows you to obtain wood of an interesting texture and color and protect it without the use of impregnations with antiseptics from moisture and insects.
The essence of the method is to process the wood with a gas burner for 8-10 minutes.
Wood burning
After this, the burnt wood is placed in a container of water and washed. Carbon deposits are removed using a metal brush. The thickness of the resulting charred layer can reach 5 mm. After the workpiece has dried, it can be used.
Wood after firing
The color of the resulting part depends on the duration of firing. It can be grayish or even black.
Various degrees of wood burning
After such heat treatment, the wood can be impregnated with varnish or oil.
Crafts from stumps
- Similar materials
- Comments and reviews
Crafts made from stumps look quite beautiful and unusual. You can even make such decorative items with your own hands. This article is especially suitable for those who have old stumps left on their summer cottage after cutting down dried trees. When a sufficiently large number of ownerless stumps remain in the garden, they can easily be turned into some beautiful landscape element of a summer cottage. You can give old stumps another life, then they can serve you for many more years, bringing both beauty and practicality to your garden interior every day.
In the sections of this article we will look at what crafts you can make from old stumps and driftwood for your garden and dacha with your own hands. Below will be attached a photo that clearly shows ready-made decorative products that will decorate your yard in the country.
Branch chandelier
Gather carefully selected small branches together so that some of them are perpendicular to the ceiling. Next, you need to attach the lampshades to the ends of the branches, and carefully wrap the wires around them. Instead of branches, you can use real rhizomes if you are lucky enough to find one in the forest.
Find and implement your own ideas - wood gives you a lot of opportunities to experiment using your imagination. You will be rewarded for your creative impulses by receiving a designer product that will become an interior decoration.
Making crafts from a stump with your own hands
Making crafts from tree stumps with your own hands is, in principle, not such a difficult task. In addition, on the Internet you can find ready-made products and make everything according to the sample. This will be especially useful and convenient for those who do not want to bother creating their own idea for a long time, as well as for those who have their day scheduled down to the minute. We offer you several ideas for making crafts from stumps for the garden with your own hands.
Flowerbed
From old tree stumps you can make a beautiful flower bed, on which a variety of flowers will then grow. To do this, you will need the following:
- First you need to remove a small section of the core (about thirty centimeters) from the tree trunk using a chisel and a hammer.
- After this, a ten-centimeter layer of expanded clay should be poured into the hole in the stump, which will later serve as drainage.
- Then you need to pour fertile soil on top of the expanded clay so that its layer is twenty centimeters.
- That's all. Your stump flower bed is ready.
Climbing plants grow well in such flower beds. For these purposes, you can plant petunia, ornamental strawberries or nasturtium. And to make your flower arrangement look complete, you can plant flowers around the stump, which can then completely hide the stump.
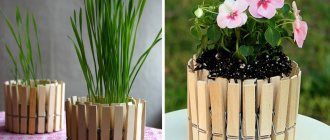
Flower stand
From the stumps you can make a craft in the form of a flower stand. If you do not want to uproot the core and then grow flowers inside the stump, then you can simply make a pedestal out of the stump, on which pots of flowers will then stand.
Forest decor for the garden
The stump will also be used to create handmade garden decorations. It can become a mushroom if you put a cap on top of it. Any old basin painted yellow-brown will look like this. A pair of plastic pipes with smaller bowls placed on them will expand the composition.
We also recommend reading about the use of pine trees in landscape design of the site.
There are also other design ideas:
- Using available materials, attach eyes, a nose and a mouth to the stump, and you will get a cheerful forest man.
- A tall stump will become a stand to which flower pots are attached. If you plant flowering summer plants in them, it will also be very attractive.
- Attach a ladder to it, put on a roof, add windows and a door made of small slats, and you will get a fairy-tale mansion.
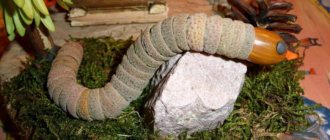
- You can make an octopus from a small stump by adding tentacles from a hose.
Master class on making luminous chairs
In this section, we would like to offer you a master class on making a craft from a stump in the form of a glowing seat, which can stand in your yard at the dacha or in the garden. So, to make a decorative, beautiful chair from an old small tree trunk, you will need the following materials:
- old, unnecessary stumps;
- sandpaper;
- luminescent paint (you can use any shade that you like best).
After all the materials have been collected, you can begin to create an interesting craft from a stump. Experts who are involved in garden interior design recommend following this master class on making luminous seats from old stumps:
- First, you should prepare the stumps so that they are the same in height and have a smooth surface.
- Next, you need to clean the top of the old stumps. To do this you need to use sandpaper.
- After this, the surfaces of the stumps need to be painted with paint of any color and wait until the paint dries thoroughly.
Once the fluorescent paint has dried, the stump seats will be ready for use. Remember that this craft glows best at night.
As you can see, creating crafts from stumps with your own hands does not cause any difficulties. Moreover, all the materials for creating a decorative product can be found in any hardware store. Therefore, get creative and try to make original and beautiful crafts from stumps that you can use to decorate the interior of your garden. We are confident that you will succeed and will not stop there.
Advantages and disadvantages of wooden lamps
Firstly, wood is wood - it is an environmentally friendly material (except perhaps OSB boards).
Wood products, including lamps, are more pleasing to the human eye, so a room with a lot of wooden elements is always cozy and comfortable.
Of course, if you pick too hard, you can find shortcomings. For example, wood is a flammable material (just like plastic), and this material is also susceptible to the formation of fungus and mold.
However, all these shortcomings can be “cured” if you use special antiseptic impregnations and protective agents - against fungus and mold, for protection against moisture and for fire resistance.
Hemp lamp
You will need: dry stump, lamp with socket, wires and plug for the socket, clear wood varnish, brush, chainsaw, hammer, chisel, sandpaper, soldering iron.
Master Class
- Prepare the stump and remove the tree bark.
- Sand the stump with sandpaper.
- Take a chainsaw and make 2 cuts at a distance of 1 cm, then knock out the core with a chisel and hammer. In this way, make 5 cuts on the stump in a circle.
The hemp lamp is ready! I recommend watching this video!
How to make a wood lamp / How to make wood lamp
General rules
There are a huge number of ideas for all kinds of lampshades, chandeliers made from branches, driftwood, and boards. In general, the process of making a chandelier comes down to making a frame, providing wire connections for sockets and elements for fixing the product to the ceiling.
To make the wires invisible, you can make grooves in the wood. Secure the wiring with special plastic ties or staples. If it is invisible from the outside, then there is no need to make grooves. Sometimes the wires are left completely visible - this is a design decision.
Wood must be used without rot or wormholes. If you find some branch or snag in the forest, then inspect it; perhaps it has begun to rot and collapse. This type of wood is completely unsuitable for a chandelier, unless it can be trimmed.
Some people are interested in how to make a beautiful chandelier from driftwood. One idea is this. The driftwood must first be cleaned, peel off the bark if there is any, cut off all excess, and sand the surface. It is best to use such a figured tree for a lamp stand. If you want to make a chandelier, you can hang a piece of driftwood on chains from the ceiling and run a wire to it, threading it through the links. In this design, hollow cylinders can be cut out of wood for cartridges.
You should not pile up a lot of branches, as this will make the chandelier heavier. In addition, such a product does not always look harmonious. A large volume chandelier is better suited for spacious rooms, while in a regular kitchen small lampshades will look more impressive.
flower bed
What could be more beautiful than a bright flowering flower bed in the garden? The stump left from the tree will be an interesting solution for decorating a flower garden.
To do this, make a 10-20 cm recess in the central part of the stump (leaving about 8 cm sides). At the bottom of the recess, at an outward angle, drill several holes for water drainage. Drainage should be placed at the bottom of the depression (fine gravel is fine). Fill the hole with the required potting mix.
Choose plants that suit the style of your garden. These can be either flowering or herbaceous species.
Petunia, nasturtium, ornamental strawberries and other climbing plants are an excellent option for such a flower bed. A young tree or fern will look stylish.
Wildflowers suitable for a “wild garden” are cornflowers, tagates (marigolds), and phlox. If you want to cover the entire stump, you can plant plants around it. Such a flowerbed will not go unnoticed.
Crafts from stumps
- Making crafts from a stump with your own hands Flowerbed
- Flower stand
- Table
- Decorative mushrooms
- Lamp
- Similar materials
- Comments and reviews
Crafts made from stumps look quite beautiful and unusual. You can even make such decorative items with your own hands. This article is especially suitable for those who have old stumps left on their summer cottage after cutting down dried trees. When a sufficiently large number of ownerless stumps remain in the garden, they can easily be turned into some beautiful landscape element of a summer cottage. You can give old stumps another life, then they can serve you for many more years, bringing both beauty and practicality to your garden interior every day.
In the sections of this article we will look at what crafts you can make from old stumps and driftwood for your garden and dacha with your own hands. Below will be attached a photo that clearly shows ready-made decorative products that will decorate your yard in the country.
Making crafts from a stump with your own hands
Making crafts from tree stumps with your own hands is, in principle, not such a difficult task. In addition, on the Internet you can find ready-made products and make everything according to the sample. This will be especially useful and convenient for those who do not want to bother creating their own idea for a long time, as well as for those who have their day scheduled down to the minute. We offer you several ideas for making crafts from stumps for the garden with your own hands.
Flowerbed
From old tree stumps you can make a beautiful flower bed, on which a variety of flowers will then grow. To do this, you will need the following:
- First you need to remove a small section of the core (about thirty centimeters) from the tree trunk using a chisel and a hammer.
- After this, a ten-centimeter layer of expanded clay should be poured into the hole in the stump, which will later serve as drainage.
- Then you need to pour fertile soil on top of the expanded clay so that its layer is twenty centimeters.
- That's all. Your stump flower bed is ready.
Climbing plants grow well in such flower beds. For these purposes, you can plant petunia, ornamental strawberries or nasturtium. And to make your flower arrangement look complete, you can plant flowers around the stump, which can then completely hide the stump.
Flower stand
From the stumps you can make a craft in the form of a flower stand. If you do not want to uproot the core and then grow flowers inside the stump, then you can simply make a pedestal out of the stump, on which pots of flowers will then stand.
To make a stump look beautiful, it can be refined by decorating the surface of the tree trunk with various details of different sizes. You can also paint the stump in any color, but it is best to use brighter, more saturated shades.
If you want a tree stump craft to serve you for a long period of time and not collapse, then the stump must be cleaned in advance, the surface treated with specialized chemicals, and then covered with a layer of varnish and permanent paint.
This design will look quite beautiful and original on your summer cottage.
Decorative painting and mosaic
In order to apply decorative designs to tree stumps, all you need is paint and a little artistic talent. The surface of the stump must be cleared of bark and sanded. Then they draw a sketch with a pencil and paint it with paints. After which the surface is varnished. You can also apply a mosaic to the stump. Its upper part is suitable for this. A mosaic can be a pattern or an abstraction without any meaningful design.
Get to know the weigela shrub and its uses in landscape design.
Covering the stump with mosaic:
- Sand the surface. It should be perfectly flat.
- Apply waterproof sealant to it. It is necessary that the finished product does not lose its volume due to changes in humidity. Otherwise, the mosaic will crack.
- Now draw a drawing on the surface with a pencil.
- Buy a mosaic from a craft store or break the tiles into pieces and then lay them out in a pattern on the surface of the tree stump that has been pre-coated with glue. Distribute the glue gradually so that it does not have time to dry while you lay out the mosaic pieces.
- Allow the product to dry for 24 hours.
- Wipe the surface with a clean cloth soaked in white vinegar.
There can be many design solutions for using wood. Each has its fans, so if you still have a stump from an old tree or an ordinary log from a trunk, then do not rush to destroy it. Using imagination and a little work, you can create a number of beautiful products for your garden.
Master class on making luminous chairs
In this section, we would like to offer you a master class on making a craft from a stump in the form of a glowing seat, which can stand in your yard at the dacha or in the garden. So, to make a decorative, beautiful chair from an old small tree trunk, you will need the following materials:
- old, unnecessary stumps;
- sandpaper;
- luminescent paint (you can use any shade that you like best).
After all the materials have been collected, you can begin to create an interesting craft from a stump. Experts who are involved in garden interior design recommend following this master class on making luminous seats from old stumps:
- First, you should prepare the stumps so that they are the same in height and have a smooth surface.
- Next, you need to clean the top of the old stumps. To do this you need to use sandpaper.
- After this, the surfaces of the stumps need to be painted with paint of any color and wait until the paint dries thoroughly.
Once the fluorescent paint has dried, the stump seats will be ready for use. Remember that this craft glows best at night.
As you can see, creating crafts from stumps with your own hands does not cause any difficulties. Moreover, all the materials for creating a decorative product can be found in any hardware store. Therefore, get creative and try to make original and beautiful crafts from stumps that you can use to decorate the interior of your garden. We are confident that you will succeed and will not stop there.
Inspiration from professional designers and amateur craftsmen
Wood is one of the most democratic materials. To process and finish it, you can use the simplest techniques that are accessible even to children. When skillfully working with carpentry tools, real works of art are obtained from stumps.
Children's crafts from decks
Children's favorite subjects are fairy-tale houses. In your work, use decorative fences for flower beds, multi-colored stones, and old pots. Doors and tiles can be cut from linoleum. The composition will be enlivened by figurines of gnomes or animals.
Houses on plots - photo gallery
Fairytale house with a moss roof
Forest palace on a garden plot
Cozy manor
Charming house with a “lake”
The chaga mushroom makes an original roof
Children also enjoy inventing characters. Old shoes, ties, gloves, and unnecessary buttons will be useful for decorating crafts. We recommend using acrylic paints to paint details. They have a non-toxic composition, dry quickly, and are not afraid of moisture and sunlight.