Many people like to do home crafts, including making crafts from polymer clay. This activity is enjoyed not only by adults, but also by children. You can make many interesting things from plastic material. But such products in stores are expensive, so it doesn’t hurt to know how to make polymer clay with your own hands. It's not that difficult to prepare.
Make your own polymer clay
Polymer clay is an excellent thing for creativity and creating a variety of crafts, toys, and decorations at home. Polymer clay is made from plastic, it is not cheap, and it is a good idea to create it yourself with your own hands. It will be a little different from the store-bought one, but crafts made from it will be just as beautiful and durable.
Do-it-yourself polymer clay, prepared by cooking in a saucepan or cold method, then it will be cold porcelain, from which crafts are also made.
Polymer clay from starch and glue
When making crafts from this clay, you should remember that it dries out a little faster than store-bought clay. She loses about 30% of her starting weight.
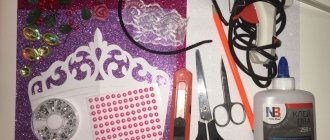
Tools:
- PVA glue – 1/2 cup.
- Corn starch - 1 cup.
- Mineral oil – 2 tablespoons.
- Lemon juice – 1 tablespoon.
Preparation method:
- Pour a cup of cornstarch and 1/2 cup of PVA glue into a non-stick pan (do not turn on the heat yet).
- Mix the ingredients until smooth.
- Add lemon juice and mineral oil, mix the mixture well.
- If you want the clay to be a specific color, food coloring should be added at this stage, just a little so as not to change the texture of the clay.
- Turn on the heat, heat the clay over low heat, stirring constantly.
- Stir the clay until it resembles mashed potatoes.
- Remove the pan from the heat.
- Add a little mineral oil to the pan and place the clay on the table. Knead and knead the clay like dough.
- You need to knead the clay while it’s hot; you can wear gloves to avoid burning your hands.
- Knead the clay until smooth, then roll it into a ball.
- Store sealed clay in the refrigerator.
Helpful Tips:
- If you don’t have PVA glue, you can use regular children’s glue for creativity, but then the clay will be more liquid.
- Instead of mineral oil, you can use baby or motor oil (just not jelly-like).
Cold porcelain without cooking
A plastic material that is well suited for modeling dries within 1 – 2 days.
Tools:
- Vaseline – 1 tablespoon.
- Starch - 2 tablespoons.
- Baking soda – 10 grams.
- PVA glue.
Preparation method:
- In a bowl, grind Vaseline and starch together until smooth.
- Add a little baking soda and stir the mixture.
- Add PVA glue gradually, 1 teaspoon at a time, until the mass becomes soft.
- Mix the mixture well and place on a table sprinkled with starch.
- Lubricate your hands with Vaseline and knead the mixture until it becomes homogeneous and plastic.
Helpful Tips:
- You can add sparkles and glitters to cold porcelain to diversify the color palette or mix two portions of different shades.
- If you use potato starch, the clay will be denser; if you use corn starch, you can subsequently mold the workpiece thinner and its elements will be more transparent, which is good for creating flower petals.
Make your own polymer clay
The glycerin contained in polymer clay will prevent future crafts from cracking.
Polymer clay made from glycerin and glue
Tools:
- PVA glue – 2 cups.
- Water – 1/4 cup + 100 ml.
- Glycerin – 2 tablespoons.
- Corn starch – 100 grams.
Preparation method:
- Mix PVA glue and 100 ml water in a non-stick pan.
- Boil the mixture for two minutes, stirring constantly.
- Remove the pan from the heat.
- Mix water and cornstarch in a bowl.
- Pour starch and water into a saucepan with glue, mix the mixture thoroughly.
- Pour in glycerin and stir.
- While the dough hardens, it needs to be covered with a lid.
- Sprinkle the work surface with cornstarch, lay out the dough and knead well.
- Knead the dough, adding cornstarch until it stops sticking to your hands.
- Finish kneading the dough when it becomes elastic and soft.
Helpful advice:
- To prevent the dough from drying out prematurely, you can wrap it in cling film and put it in the refrigerator.
Wallpaper polymer glue
These are vinyl (more expensive) and cellulose wallpaper adhesive.
Its cost (dry powder) averages about 500 rubles/kg ($7).
According to the manufacturer's recommendation, to obtain ready-made adhesive of increased strength (for heavy wallpaper), 300 g of packaging is diluted in 5 liters of water.
This means that from 1 kg of dry wallpaper glue you can get 16 liters or 16 kg of ready-to-use glue.
Thus, the cost of 1 kg of finished glue is 500: 16 = 31 rubles/kg ($0.4).
Professional PVA glue costs about 300 rubles/kg (4 $).
The difference in price is an order of magnitude.
Let's check both in our experiments with polymer clay.
Let's remember about starch and gypsum plaster. Starch is a filler. Plaster also contains a binder (gypsum) and filler (chalk).
Therefore, for testing we will take potato starch and MTD-2 construction chalk. It is also used in the production of paints and varnishes.
The cost of chalk is 10 rubles/kg. Starch costs 200 rubles/kg.
How to make polymer clay soft
Often in the process of our creativity we have to work with hard polymer clay. They could have sold us something with a long release date. Long-lasting scrap. The brand is too hard. All these are the main reasons for the rigidity of the polymer.
Is it possible to knead the clay so that it is comfortable to work with? Are there any effective ways?
Nothing is impossible. In this article, we will look at all the methods of softening polymer clay in the most detailed way.
Why knead polymer clay at all?
At its core, softening polymer clay is the process of preparing the clay for work.
In most cases, this process is done only by hand. The warmth of our hands, combined with the efforts to stretch and knead the polymer, provides the necessary softness and pliability. The clay begins to change its structure and becomes suitable for modeling. Besides:
- softened polymer clay becomes more flexible and sticky
- the ability to break when bending is eliminated
- you can easily roll it out into a thin layer
- allows you to sculpt more detailed creations.
Some types of clay are so soft right out of the package that we don’t even need to knead them much, they are already ready to work, but this is an exception to the rule rather than a constant pattern. Basically, you first need to knead the clay.
An easy way to knead clay
The simplest, and also the surest way to soften the polymer is to knead it with your hands for several minutes. It is better to take a piece of clay that will be comfortable to hold in your hand and gradually begin to knead it with your fingers. When heated from the warmth of your hands, the clay will begin to soften.
You need to crush and knead a piece of clay for several minutes until the clay becomes plastic.
As a rule, the better the polymer clay is kneaded, the easier it is to create with it. Colors blend better. The individual parts fit together better.
Understanding how long it takes to knead the polymer and the degree of its readiness comes with experience.
The time may vary depending on the type of clay used, the amount of clay used, or the temperature (room or hands). On average, it takes from three to ten minutes to knead clay under normal conditions.
Is it possible to speed up the process of kneading polymer clay?
The process of preparing polymer clay for work can take a fair amount of time and effort, especially if your hands are weak or the clay is very hard. However, there are several ways to speed up this process
You can start softening by placing the polymer in a warm place for 15-20 minutes. Warning: Excessive heat or sunlight will render the clay unusable. The ideal place for preheating is the radiator.
It is easier to work with small chopped pieces by kneading them. By kneading several pieces, they can be combined into larger volumes.
- There is a special thinner for polymer clay on sale - essentially, it is a liquid that, when added a few drops, makes the clay more pliable and soft.
- Mixing with softer clay, adding up to a third of the main volume, will allow you to average the properties of both types. Then knead everything again and knead thoroughly.
- Add a few drops of water. Do not overdo it, otherwise the clay will become unusable.
- It is not advisable to use any other means, for example, Vaseline or greasy cream, as this can only spoil the clay. A visual experiment on softening a polymer using various impurities is in the video below.
Is it possible to overdo it with softening polymer clay?
It happens that by adding too much thinner, the polymer becomes too soft for the technique we want to use. This is also not a problem.
- First, you can let the clay cool slightly by placing it in a cool, dark place or in the refrigerator. Not for long, about 30 minutes.
- Secondly, you can use paper. Having flattened a piece of polymer into a layer, it is placed between two sheets of white paper (without drawings or printed text) and left overnight. The paper will absorb excess plasticizer, and the clay will become a little harder.
Unfortunately, even reanimated polymer clay is sometimes not suitable for the chosen technique. Still, it is better to use fresh, unspoiled polymer.
However, even reconstituted clay can serve well, for example, as a base or individual elements of creative solutions.
How to make polymer clay recipe
Many people think that making this modeling material themselves will not work, this is not so.
Polymer clay made from corn starch
What is necessary:
- 15 grams of fatty cosmetic cream;
- lemon juice a few tablespoons;
- PVA;
- a packet of corn starch;
- You will also need a microwave;
- temperature-resistant glass container;
- cling film or bag;
- plastic spatula.
Now we’ll tell you, as promised, how to make polymer clay at home. We work according to the following steps:
- The first thing you need to pour out is corn powder.
- Pour in PVA and add cream. Mix the ingredients and pour in the juice. Mix well again with a blender or mixer. After mixing, you should have a lump-free mass in front of you. We put it in the microwave for half a minute. The heating temperature should be maximum.
- After the time is up, take the mixture out of the microwave, stir the mixture, and let it cool for half a minute. If a film appears on the surface during the heating process, it must be carefully removed.
- Next, lubricate the surface of the table with cream or Vaseline and spread the mixture. Mix the composition well, just like you do with dough. Kneading time is about five minutes.
- All is ready. If necessary, the finished substance can be painted in any suitable color. For this, a variety of paints are used.
Now you know how to make polymer clay at home. The manufacturing process is not that complicated, and only takes ten minutes of your time.
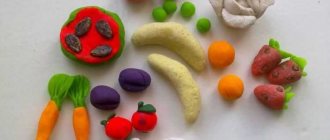
Other crafts
Let's look at thematic sites to see what you can do with your own hands from clay. The following options exist:
- easy-to-make toys in the form of a cube, ball, house;
- more complex options in the form of a car, a Christmas tree, a man;
- several toys that correspond to the general theme.
This way you can make toys yourself and teach your child how to do it.
How to make polymer clay without cooking
Many people are interested in how to make polymer clay at home without heat treatments. This question is relevant, since heating in a water bath or in a microwave is inconvenient for many and the process requires following safety precautions.
Manufacturing without heat treatment
The recipe for preparing polymer clay in a cold version is practically the same in the technology for making the composition, but it differs in some ingredients.
To prepare this recipe, you must have:
- corn starch one package;
- PVA;
- one tablespoon of Vaseline oil;
- two large spoons of Vaseline (or replace with hand cream);
- 20 grams of perfume.
Having collected all the components, you can begin manufacturing. By the way, in this case you can involve your child, it is quite safe, just like the modeling itself.
- Pour glue into the selected container, add petroleum jelly and, if desired, perfume. Mix the composition.
- Next, add a little starch and mix the material. While mixing, add corn powder. Mix thoroughly. Add fatty cream (if it is not there, replace it with Vaseline).
- Mix everything and pour out the rest of the starch. Now mix the mixture thoroughly. You can add watercolor paint and get the desired color.
So you learned how to make polymer clay at home without needing to heat or cook anything. To make sure that unusual things can be made from the material produced, for example, very beautiful jewelry or dolls.
Testing samples made from different polymer clay compositions
To carry out the experiments, we will use all the previously listed ingredients (except flour).
Additionally, we include white kaolin clay in this list. This is interesting because sometimes kaolin is added to the mixture to produce the rich white color of the mixture. Although this can be done by adding TiO2 dye.
The cost of kaolin is the same as chalk - 10 rubles / kg.
The physical and mechanical differences between chalk and clay are that chalk, like starch, does not absorb water. Chalk has the same particle size - about 20 microns.
Kaolin is interesting for cement compositions, as it contains 46% SiO2 and 36% Al2O3.
Microtalc can be used. It is a little more expensive - 18 rubles / kg, but has better reinforcing properties due to its structure.
When preparing a new recipe, a good guide is the composition of the window putty. It includes chalk and drying oil. The putty is very plastic, hardens quickly and withstands difficult climatic influences well.
Therefore, using a small amount of vegetable oil or cream when working with polymer clay does not lead to significant deterioration.
Test results for homemade polymer mass
During the tests, one and a half dozen different mixture compositions were prepared.
On small products the difference in basic characteristics is insignificant.
Thin parts bend easily and keep their shape. When dropped from a height of 1 m onto a hard base, they do not break. Dries in about 1 day. No cracks are observed in the body of the product.
Completely different manifestations on large products. Mixtures behave very differently.
There are products that do not have cracks and retain their shape.
And others, on the contrary, have large defects.
As a result of analyzing the results obtained, the optimal price-quality ratio was obtained using chalk and wallpaper glue Moment Ekon.
And this is quite understandable. Chalk is the main filler in gypsum plasters. And Moment wallpaper glue includes ingredients that are also included in plaster.
These are starch esters and cellulose derivatives (MC, CMC and KMC).
Vinyl wallpaper adhesive (for our purpose) has worse performance, since it additionally contains polyvinyl acetate (PVA). It has been verified that a mixture of PVA glue with starch, most often found in recipes, does not behave the best in large products.
In such cases, additional reinforcement is usually recommended. For this purpose, they even suggest using toilet paper or shredded newspaper. But it is perfectly acceptable to use other fibers.
But this topic, like colored homemade polymer clay, is for a new article.
Polymer clay from soda and starch
- 1 part baking soda;
- 1 part cold filtered water;
- 1 part corn starch (if replaced with potato starch, the color will be gray).
This mass is perfect for beginners. It is easy to prepare and easy to sculpt.
- Mix the ingredients in a thick-walled saucepan.
- Cook the mixture over medium heat, stirring continuously until it thickens.
- Place the finished mixture from the pan onto a silicone mat and cover with a slightly moistened towel. Wait until it cools down a little.
- Knead the mass vigorously until it becomes sufficiently elastic and suitable for modeling.
Polymer clay from glue with glycerin
- 400 g of PVA wood glue (wood glue);
- 180 g water;
- 200 g starch (preferably corn starch);
- 40 g glycerin;
- dyes if necessary.
Products made from cold porcelain according to this recipe dry within half an hour. But before using it, you need to let it rest.
You can wait overnight, or better yet, keep it in the refrigerator for a week.
- Combine glue and 100 g of water in a thick-walled or non-stick pan. Place over medium heat and cook for about 2 minutes. Remove from stove.
- In a clean container, mix the starch with the remaining water and pour into the still hot mixture. Mix everything well until smooth.
- Cover the mixture with a towel and leave until cool.
- When the mass has cooled sufficiently, place it on a table surface sprinkled with starch. Knead the mixture with your hands, adding starch if necessary.
- When the cold porcelain becomes smooth and elastic, transfer it to a dry container with an airtight lid.
Will need
- PVA construction adhesive.
- Potato starch (or other).
- Flour of the highest grade.
- Salt.
- Tea spoon.
- Dye (optional).
- Plastic cup and stirring stick.
- A sealed plastic bag (preferably with a zip-lock fastener).
Self-hardening paste recipe
A popular polymer clay recipe often used for crafts in Latin America.
Tools:
- PVA glue – 1 cup.
- Water – 1/2 cup.
- Corn starch - 1 cup.
- Glycerin – 1.5 tablespoons.
- White vinegar – 1.5 tablespoons.
- Cold cream with lanolin – 1.5 tablespoons.
Preparation method:
- In a heavy-bottomed saucepan, combine half a cup of water with 1 cup of cornstarch.
- Heat the mixture over low heat until the starch has dissolved.
- When the starch has dispersed, add PVA glue.
- Add 1.5 tablespoons each of white vinegar, cold cream and glycerin.
- Heat the mixture over low heat until it begins to pull away from the sides of the pan and takes shape.
- Place the clay on a flat surface and knead it well with your hands.
- Cover the clay with a damp cloth and let it cool.
- When the dough becomes homogeneous and smooth, it is ready to use.
- Store in a cool, dark place in an airtight container.
Helpful Tips:
- When the dough begins to pull away from the walls of the pan, it should be immediately removed from the heat; if it overheats, it may become excessively hard.
- Glycerin can be purchased in the baking department.
Making mass
First, prepare and mix the bulk ingredients. Place two teaspoons of starch, one teaspoon of flour, and half a teaspoon of salt in a plastic glass. If you need a mass of a certain color, add dye. So, after mixing, we begin to gradually add PVA glue.
DIY electronics in a Chinese store.
Mix.
You should have the structure of a tough dough. If the mass turns out to be liquid (if there is too much glue), you need to add starch. As soon as the mixture begins to stick to the walls of the glass and the stick in large lumps, you can shake it out of the glass into your palm and knead it with your hands.
Now that the mass is almost ready, add about one cube of glycerin with a syringe, or by eye.
This will give the mass additional elasticity. We intensively knead the mass for another five to seven minutes. With that, the mass is ready. If, after using it in any task for which the mass was made, you have some amount of this mass left, do not rush to throw it away - it is perfectly preserved in sealed packaging. Place leftovers in a sealable plastic bag and refrigerate.
It poses absolutely no danger to food. Without access to oxygen, it does not lose its qualities and properties for a very long time. Personally, I successfully used the remains preserved in this way, a month and a half after production. This material dries until completely hardened, approximately 20-25 hours. It all depends on the thickness of your product. After production, I left a small sample on the paper, and after 24 hours I decided to conduct several strength tests with the hardened mass.
I broke it, drilled it, sawed it, sharpened it.
The result is very good! The hardness is similar to the dense plastic from which housings for household appliances are made. Also, in terms of strength, it resembles a frozen two-component “cold welding” adhesive. It just doesn't stink!
sdelaysam-svoimirukami.ru
Durable polymer clay
Do-it-yourself polymer clay using this recipe will turn out to be very durable; if you drop a craft made from it from a height of 1 meter, it will not break.
Tools:
- PVA glue – 1 cup.
- Stearic acid – 0.5 tablespoon.
- Citric acid – 0.5 tablespoon.
- Vaseline – 1.5 tablespoons.
- Glycerin – 1.5 tablespoons.
- Corn starch - half a glass.
Preparation method:
- In a non-stick pan, mix half a tablespoon of citric and stearic acid, petroleum jelly and glycerin, and PVA glue.
- Place all ingredients on low heat.
- Gradually add cornstarch to the pan, stirring continuously.
- Knead the clay until it begins to separate from the sides of the pan, even when it becomes difficult to do so.
- Place the clay on a flat surface and knead with your hands for 20 minutes.
During the sculpting process, the clay should become smooth, not sticky and without lumps.
If after kneading the clay is still a little hot, let it cool, then pack it in a sealed bag, releasing all the air from it.
Helpful Tips:
- It is recommended to sift the starch before adding it and add it little by little to avoid lumps forming.
- Before making crafts, the clay must dry for at least three days.
Cold porcelain for flowers
Cold porcelain looks very much like polymer clay; beautiful flowers and delicate objects can be sculpted from it.
Tools:
- PVA glue – 1 cup.
- Glycerin – 1 tablespoon.
- Starch - 1 cup.
- Vaseline – 1 tablespoon.
- Citric acid – 1 teaspoon.
- Vanillin.
Preparation method:
- Dilute citric acid in a small amount of water.
- Pour water over the starch, stir and add a little vanillin.
- Pour glue into a separate bowl, add glycerin and Vaseline to it, mix.
- Add starch water and citric acid to a bowl, mix everything until smooth.
- Heat the mixture in the microwave, removing it to stir every 20 minutes.
- Remove the mixture from the microwave when it thickens.
- Cover the table with film, place a lump of the mixture on the surface and begin to knead well.
- Cool the porcelain, then create crafts from it.
- Store in the refrigerator in cling film.
Helpful Tips:
- To prevent the mixture from sticking to your hands when stirring, you can lubricate them with hand cream.
- To paint a finished frozen porcelain product, you need to apply dry food coloring to the figurine and hold it over the steam of a pan or kettle so that the porcelain absorbs the paint on its own.
Pros and cons of homemade clay
Products made from homemade clay are practically no different from products made from purchased clay. It has quite a lot of advantages:
- products made from it dry from 30 minutes to 24 hours depending on the size of the product;
- the ingredients for cooking are not very expensive and are found in almost every home;
- finished crafts can be painted with acrylic or gouache paints;
- prepared clay can be stored in an airtight container in the refrigerator for quite a long time;
- the products are neat and retain their shape well;
- finished products are durable and can be stored for a long time in dry rooms.
But it has some disadvantages:
- preparing it is quite long and difficult;
- it may not work out the first time;
- not any glue is suitable for making polymer clay;
- the result may not always meet expectations;
- products may crack or dry out;
- During cooking, you can damage the dishes.
Polymer clay, prepared at home, is ideal for creative activities with children or creating small amateur crafts. But if you want to create jewelry professionally, then it is better to use purchased polymer clay.
It has a convenient consistency and makes more accurate crafts.
Craft “Doll”
Let's look at how to make a clay doll with your own hands. A certain sequence should be followed:
- You need to start with a drawing of the future craft. We select a sketch or make it ourselves.
- We make the frame from wire, which allows us to achieve the integrity of the craft.
- We prepare the clay, knead it and bring it into an elastic state.
- From the prepared clay on top of the frame we sculpt a doll according to the appropriate proportions.
- After finishing the modeling, we start baking it in the oven.
- We paint the finished craft using paints.
When working independently, a person receives many advantages. He can make a unique craft that will become a real decoration for your home interior.
Reasons for poor quality crafts
We figured out how to make polymer clay at home, but often in the process of sculpting from this material, the finished products quickly deteriorate. In this case, everyone blames the wrong recipe for preparing the material, but in reality this is not the case.
Such qualities are influenced by many factors, including errors that were made during the design of the figures.
Incorrect timing
This factor contributes to the violation of the properties of the manufactured material. As everyone knows, during the process of baking a product in the oven, plasticizers are released from the main composition, and thus the clay craft becomes hard.
If the material is not baked, the tenacity will be weak and the finished craft will begin to break.
Therefore, experts recommend baking each layer of clay for 20 minutes, so that all the plasticizer will evaporate from the material and the product will become strong. If the time is not the same, the finished product will be fragile and will quickly break.
Incorrect temperature selection
A polymer clay craft that is baked at the wrong temperature becomes fragile after completion. Experts recommend observing precise baking temperatures in this process.
Also note that most kitchen stoves with ovens have a thermometer installed, which has an error in the readings.
Basically, the readings differ by 10-20 degrees. Of course, for preparing delicious dishes these indicators are not critical, but for clay crafts these indicators will carry a large error.
Experts recommend using a special thermometer. Its readings will be more accurate, this is important for finished products.
It is also recommended to allow the product to cool on its own after baking. Do not take the craft outside or water it with cold water.
By following these rules for making crafts from manufactured polymer clay, all items will be of high quality.
Processing irregularities
Often, finished crafts begin to break after heat treatment. Many in this case, sin on low-quality base material. Of course, another mistake could be the cause of the breakdown, but still mistakes were made during processing.
When processing the material, do not act on the product with brute force, and you will succeed.
Incorrect baking temperature
It is recommended to take into account the exact baking temperature limit. Otherwise, the product becomes fragile and breaks.
Please note that in some ovens the thermometer has some error. The error can be up to 20 degrees.
For baking a clay product, this is a critical difference, leading to destruction. It is recommended to use a separate thermometer with the most accurate readings.
The finished product cannot be cooled sharply; this will also lead to destruction. It should cool down on its own at room temperature.
Improper storage
The last reason affecting the quality of finished polymer clay products is considered to be improper storage conditions of the material. You should not store prepared polymer clay in the sun, and it is also not recommended to store manufactured items in the sun.
During such storage, the ingredient that is responsible for the adhesion of the material evaporates.
It is advisable to store the finished substance in an airtight container, which will be placed in the refrigerator. Plastic containers or plastic bags can be used as such an item. But you should not completely close the container; when closed, the clay may dry out, unless, of course, it is used immediately after production.
If polymer clay and the craft itself were made in compliance with all requirements, you can use it without fear that it will break. This product can withstand being dropped on the floor and will serve you for a long time.
As you have seen, making polymer clay at home is not at all difficult, just like making various crafts from it. The main thing during production is to comply with all requirements.
The cost of polymer clay (cold porcelain) depending on the components
Approach: We use the simplest methods and ingredients to conduct experiments and collect samples.
Requirements: homemade polymer clay must be self-hardening, without heat treatment, without cooking or frying.
Food ingredients must be absent and used for their intended purpose.
As market analysis has shown, the cheapest ready-made polymer clay and the most expensive homemade clay cost approximately the same.
Therefore, first you need to weigh and think about everything. Do you need to bother making such a plastic mass yourself? Maybe the quality of purchased clay will suit you quite well.
Now about the prices.
At the beginning of the article, the main ingredients used when mixing homemade clay were listed. A little about each of them.