Reads: 1,498
Reading time: 8 min.
no comments
With the onset of spring warmth, every lady wants to give her image a touch of airiness and lightness, touching and tenderness. Jewelry that subtly completes any image and emphasizes all its advantages will come to the rescue in this matter. Beautiful earrings made of polymer clay are an accessory that anyone can create.
This material is famous for its inexhaustible possibilities. In particular, its unique flexibility in processing is striking, thanks to which all kinds of figures can be formed from it. A needlewoman who decides to start creating a masterpiece on her own will need a minimum of experience, more patience and perseverance, and, most importantly, mandatory adherence to the instructions and advice of the masters.
Information for Beginners
It is not necessary to buy bright and sophisticated jewelry in stores, because many needlewomen have long been providing themselves with jewelry made by themselves.
This approach allows you to receive accessories in a single copy, which eliminates the possibility of meeting a woman wearing similar earrings. Therefore, some girls are thinking about mastering the technique of working with this clay. Before moving on to the process of creating beautiful products, it’s worth getting to know the material better:
- In its consistency, it resembles the familiar plasticine. It is just as easy to work with, but clay is more plastic and hardens after heat treatment, turning into durable plastic.
- There are many types of this material, they all differ from each other in texture and variety of different colors and shades. They can be mixed with each other to obtain new colors, and also diluted with paints and small glitter.
- Polymer “plasticine” is absolutely safe and non-toxic, so it’s not scary to give it to even children for creativity.
- With the help of this material, craftswomen bring many ideas to life. It can be used to make various jewelry such as earrings, bracelets, pendants and rings. Also, some girls create refrigerator magnets or small flower arrangements from clay to decorate their apartment.
- Clay helps to show creativity, since the main condition when working with it is not great knowledge of handmade, but good imagination. Animals, abstract and geometric elements, fruits and flowers, as well as human figures - this is not the whole list of products that can be created using such material.
Before purchasing clay and sculpting tools, you can consult with the seller. He will tell you which manufacturer’s material is in great demand. He will also tell you which devices you can refuse, and which ones you should definitely acquire.
Tips from experienced craftswomen
To learn how to work with polymer clay, it is important to listen to the advice of more experienced colleagues. For example, avid fans of this material give beginners the following advice:
- For sculpting, it is better to purchase a set with standard colors; as you work, you can mix them with each other to get new shades. Also, special tools will be useful in this matter, as they will facilitate the creative process. They can be found in craft stores.
- You should not immediately buy several bars of material from a new manufacturer. It’s better to get one and try it in action: bake it, mix it with other colors, paints and glitter. Then evaluate the texture, the result and make a conclusion whether it is worth stopping at this clay or looking for better options. Good material will not crack or change color when baked.
- Before you begin, it is important to choose a good clay. It can be expensive or cheap, sold in individual bars or only in sets. Particularly popular are the materials Fimo and Pardo from German manufacturers, as well as Kato, the brainchild of a US company and artist Donna Kato. The first holds its shape well, the second has a rich and varied color, and the third produces very durable products. Porcelain lovers should pay attention to Cernit clay, this is exactly the effect it gives after baking. However, these materials are not only of good quality, but also of a rather high price. Therefore, it is better for novice needlewomen to look at cheaper domestically produced analogues.
- The clay must be handled carefully so that dirt and dust do not stick to it, as this will change the color of the material. Therefore, it is recommended to work on a clean surface and wear gloves.
- How long and at what temperature to bake the finished product can be found on the packaging of the material.
- To make jewelry from polymer clay, you need to purchase additional accessories, for example, decorative and fastening parts, clasps, earrings and hollow beads for making some elements.
Features of the material and tips
Polymer clay is a material that resembles plasticine in its consistency, which, due to heat treatment, hardens and turns into plastic.
There is a wide variety of polymer clay colors and textures. Moreover, colors can be mixed, and paints and glitter can be added to them. This material is non-toxic and therefore even children can work with it.
From polymer clay you can create jewelry such as earrings, beads, pendants, bracelets, etc. With the help of clay, you can bring any ideas to life. It all depends solely on your imagination.
Tips for beginner needlewomen:
- First you need to choose a material manufacturer. Clay can be both expensive and cheap, with a wide range of colors, and can also be sold as a set or individual bars.
- Don't buy different colors at once. To begin with, you can purchase one block and try it at home: you need to check its texture, mixability with other plastics and paints, and also bake the resulting material. High-quality clay should not crack or change color too much.
- For modeling you need standard colors, which can then be mixed. You will also need tools and a small electric oven.
- On the packaging of polymer plastic it is usually written how long it needs to be baked until cooked and at what temperature.
- It is worth noting that you need to work with clay carefully. In order not to disturb the purity of the color, it is necessary to work with rubber gloves and on a clean surface.
To create earrings from plastic, in addition to clay, you will need accessories: earrings, connecting and decorative elements.
Stars and butterflies
Another option for the simplest accessories is stud earrings or studs. They can be made in the form of stars. To simplify the process, use a laser printer to print stars of the required size on paper. Take a piece of white plastic and roll it out on the work surface on which the pieces will be baked into a layer 1.5 cm thick.
Place the paper with the pattern on the clay slightly moistened with water (the front side is facing the plastic), roll with a rolling pin without pressing too hard, leave for a couple of minutes so that the paint is imprinted on the material.
Carefully, without leaving black lines, cut out the stars with a thin cutter - blanks for earrings made of polymer clay, bake in the oven.
After this, form two balls from white plastic, attach fittings to them - nails with metal bases - flatten the balls with your fingers. Then attach these plates with cloves to the stars right in the center and bake again.
Using the same principle, you can make simple butterfly earrings using a polymer clay template.
Next, moisten the brush in silver paint and carefully, without leaving streaks, paint one side of the stars at once, and after drying, the other. Gradually paint the side edges.
To achieve an even and rich silver color, you need to paint it at least 2 times, and preferably 3. Cover the products with a special varnish, let them dry - and you can wear hand-made “star” stud earrings from polymer clay with any outfit.
Technique
Anyone can create plastic products with their own hands if they wish. Moreover, it can be purchased freely in specialized stores. Parquet varnish is better suited for coating the finished product. There are different techniques for making polymer clay products. Here are a few of them:
- Mixing colors. Basically, they use this method. You can mix two colors and several paints at the same time;
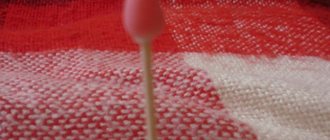
- Using the salty technique of clay modeling, the product can turn out to have an unusual texture. The method is that the product is rolled in coarse salt, which is pressed into the product, as shown in the photo. After the product has been in the oven, the salt must be washed off with water;
Popular articles New Year's lamb made of fabric
- Sausage technology. This is also a very common way to work with plastic. Several sheets of clay of different shades of plastic are layered on top of each other and then rolled into a tube, as shown in the photo. This produces a drawing. Experienced craftsmen can create very interesting patterns made up of several elements;
- “Kaleidoscope” is a sculpting technique that is similar to the previous method. Only this roll, made of polymer clay, is pressed, creating geometric shapes, as shown in the photo;
- Watercolor technique. In this case, a smooth transition of colors occurs. Three rolled sheets of material are prepared: white, black and any color. Then these layers are placed one on top of the other and rolled out a little. After cooling, the clay is cut into pieces, which are used in making products.
Lilac flowers
To make hanging earrings that resemble purple lilac inflorescences, you will need to prepare materials and tools for work, consisting of:
- White, yellow, lilac polymer clay.
- Modeling stack.
- Scalpel or nail scissors.
- Needles, awl or regular toothpick.
- 32 pins with balls.
- Chains.
- 2 shvenz.
- Kruglogubtsev.
- Gloves.
How to make earrings yourself from polymer clay is demonstrated in the master class with photos and a detailed description of the work process:
Take lilac and white clay in a 1:2 ratio, mix them thoroughly until an intermediate, uniform shade is obtained.
Knead the lilac clay with your hands until it becomes as elastic as possible and form 10 drop-shaped shapes, no more than 5 mm in diameter.
Make the same droplets in the amount of 10 pieces from clay of an intermediate color, obtained by mixing lilac and white.
Take a scalpel (nail scissors) and make a criss-cross cut on each teardrop shape from a wide edge.
Using a modeling stack, or rather its sharp end, begin to form flowers on earrings made of polymer clay: move the 4 segments resulting from the cut to different sides.
Next, use the side surface of the stack to press each segment towards your finger and roll it out a little to create 4 thin petals. Do this procedure with all 20 cut drops.
Take 20 pins with balls, stick each metal ball with yellow clay. Insert one pin with a yellow center inside each flower.
Take a needle (an awl or a toothpick) and press its edge crosswise into the yellow core of the recess.
Like real lilacs, the buds with flowers on polymer clay earrings should become thinner towards the bottom. For this purpose, take white polymer clay, form 12 drops of slightly smaller diameter from it, cut them crosswise along the larger edge, move the segments apart, insert one metal pin inside at a time, but without forming petals, but closing them again into buds.
After all the preparations are made, send them to bake in the oven according to the instructions indicated on the clay packaging.
Take the pliers and form loops from the pin stems that protrude from each flower. Secure all the flowers to the chains, then attach the earrings. Look at the photo to see how rich the resulting polymer clay earrings look.
Unusual decoration
The next type of earring creation is more labor-intensive, but even an inexperienced craftsman can do it. Among other ideas for making earrings, this is the most unusual, let's look at it.
Take 4 pieces of clay and roll it out. 2 pieces should be white, 1 pearl and the last one should be wrapped in silver sheets, like gold leaf.
Using a special device that resembles a hole punch, we cut many round pieces, as in the photo below.
Then we insert a wire into each circle for further fastening.
We finish the mugs treated with silver so that they are covered on all sides.
We treat white clay mugs with glitter.
We bake the finished products. We look for the required temperature and time on the manufacturer’s packaging. We take wire cutters and twist the loops at different distances.
You get the following elements:
Now we need accessories for creating jewelry - connecting rings. We string the resulting parts onto them.
We attach the shvez and the unusual earrings are complete.
Create a simple version
First, let's try to make an easy version of earrings for beginners.
To work, you need to take red, green and beige clay, a knife and a rolling machine.
Progress:
- Take a small piece of red clay and roll it into a roller.
- Then we roll out a layer of beige clay on a machine and wrap a red roller in it.
- We do the same with green clay.
- Next, roll out the workpiece so that the layers are connected. The result is a sausage, which must be placed in the refrigerator for 30 minutes so that the layers do not move apart during further work.
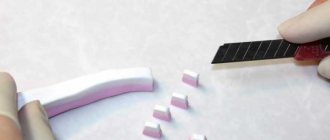
- Cut a thin piece and cut it into two equal parts.
- Now we take a needle and make holes for fastening.
- We bake the finished products. We look for the required temperature and time on the manufacturer’s packaging.
- All that remains is to draw the seeds using a black marker.
- We attach the earring and the earrings are ready.
What is polymer clay
Clay is a plastic flexible mass for modeling. Working with the material is simple and convenient. Plastic, as polymer clay is often called, looks like soft plasticine.
In operation, the material behaves approximately the same. The plastic is easy to knead, it warms up well from the warmth of your hands. Clay presented in the craft departments comes in a wide variety of colors and shades. If necessary, you can also mix different colors to achieve the desired tone.
Making crafts from polymer material is very interesting. Plastic allows you to create the most miniature products, which cannot be said about plasticine. Having tried their hand at sculpture once, both adults and children become interested in creating cute trinkets.
The undeniable and main advantage of clay is the ability to bake crafts. The product is formed from raw material and then placed in a preheated oven. The temperature and “cooking” time depend on the manufacturer’s recommendations, which can be read on the packaging.
The baked craft turns into a durable solid product. It is no longer possible to change its shape, since plastic products harden forever. This allows you to make jewelry from clay. The products are bright, unusual and quite practical.
Imprint patterns
In this master class we will look at the method of creating unusual patterns using the imprint method.
- Select clay and roll it out.
- We take the mold and make the required number of blanks.
- Now we cut off a small piece and place it on a special plastic sheet with a pattern. Roll it out and the pattern appears. Then we cut out a circle with the shape.
- To make the product rounded, take accessories for a brooch.
- To do this, apply clay with a pattern and press lightly.
- If you want, you can add color transitions or cover it with paint.
- We bake directly on the brooch fittings.
- Apply a layer of liquid clay.
- We attach fastenings for earring fittings. And then we fix it with a part without a pattern.
- Cut off the protruding part of the unbaked clay using a knife.
- Now you need to smooth the edges with your fingers and walk over the surface with a mesh to get rid of unnecessary prints.
- We bake the finished products. We look for the required temperature and time on the manufacturer’s packaging.
- All that remains is to cover it with a shiny layer.
Hair decorations made of polymer clay
- Polymer clay can be used to decorate hair clips, headbands and garters.
- You can attach the elements to the base using special glue or invisible fishing line
- For any products consisting of several elements, you need to make a sketch, because imagination does not always correspond to the result
Delicate flowers for decorating hairpins and headbands
- We will need: polymer clay and stacks (you can use a toothpick)
- Knead a piece of clay of the desired color and roll it into an oval
- We make cuts, the same number as the number of petals planned
- Now we make each petal, bending it using a stack
- We give the flower the desired shape, trim off the excess plastic
- The middle can be decorated with yellow plastic stamens or simply filled with paint
- These flowers can be used for all types of decorations. They are very reminiscent of apple or apricot flowers
Flowers for polymer clay jewelry
DIY earrings made from plastic bottles
Here's a fun and easy project to make your own earrings. You don't need to draw pretty, just some chaotic lines and you'll end up with a cute decoration! These decorative elements can be used for both earrings and necklaces or wherever you want. They are made from a plastic bottle (plastic No. 6). The instructions below are for making two earrings. Since plastic changes so much when melted, you can try a piece first and see how much plastic you use and what color you get. Or start making it right away. It's just trash!
Making your own earrings
Step 1. Materials
• Plastic: Plastic marked #6 is required. Used plastic bottles are suitable for the job. Look at the triangle stamp number on the container. I took salad boxes from a pizzeria.
• Markers of various colors and plus black
• Scissors
• Punch
• Microwave or simple oven, heated to 120 degrees
• Polyurethane for fastening (optional)
Step 2. Cut!
Note: All instructions below are for a pair of earrings, so cut out two pieces. If you only want one, cut one.
Cut 2 pieces of flat plastic, size and shape of your choice. Mine was about 7.5cm by 5cm. You can also cut out a circle or other shapes, but be sure to round any corners as they become even sharper when made smaller.
Note:
The plastic doesn't melt the same way and stay the same proportions, so cut both pieces the same way. For example, if you are making two rectangles, cut out one large one and cut it in half. If you are making circles, make sure the holes are in the same place.
If the plastic has any stamps on it (#6 or words), you can paint it and it will disappear when melted. But be aware that this will require some effort.
On each piece, use a punch to make a hole in the center at the top.
Step 3: Draw a Doodle
Draw chaotic lines on each piece in black. The lines don't have to be the same, more imagination. Several different shapes and lines. You can practice on spare parts first. And you can also draw something on paper and then transfer it to plastic. Remember, melting hides all errors.
Use light colors for coloring. During melting, the colors become more saturated. Black paint will stain other colors when touched. But melting will hide many problems.
Paint the front side and turn the workpiece over. Color it there too. Don't worry about different coloring. However, make sure to leave no gaps between the colors. Otherwise, you will get gaps after melting. You can also paint the entire piece one color if you want something simple.
Step 4. Time to cook!
Place your painted blanks on a sheet of parchment on a tray in the oven (heated to 120 degrees). Look at what's happening. Don't worry...the plastic will curl, over and over again. Then it will decrease.
If your oven is already hot, this will happen immediately and the entire process will take 30 seconds. Watch!
Sometimes if you have a long, thin piece, it may curl up. That's okay, just flatten it.
Step 5: Remove from oven
Attention! It's going to be hot!
If the piece is not completely flat at the end, you will straighten it by pressing with your finger. Note, depending on the plastic, you may not end up exactly what you started with.
Step 6. Pin (optional)
The surface of the jewelry can be scratched, and if you want to fix the surface, it is better to dip it in polyurethane and let it dry. I also got cracks around the hole when I made the teardrop decoration.
You can also coat the piece with nail polish, some have said it works!
If you do not want the colors to fade, do not seal the surface with sprays containing acetone. Although this can have an interesting effect.
Step 7: Enjoy your work
Attach to a chain, place on an earring hook, attach to a keychain!
Sausage method or orange crafts
When working with plastic, a variety of techniques are used. The sausage technique is considered the most popular and very interesting.
Using this method, you can make unusual crafts in several identical copies, which is very convenient when creating bracelets and earrings.
Step-by-step instruction:
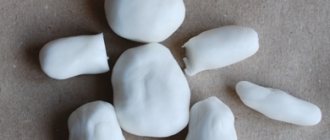
- The orange plastic is rolled out into thin sausages of equal length.
- After washing your hands with soap, heat white clay in your palms and roll out layers, the thickness of which should be minimal.
- Each orange sausage is “dressed” in a white casing, cutting off the excess parts.
- When all the sausages are placed in white clothes, each of them is given a triangular shape. To do this, simply press the sausage onto the table with three sides one at a time.
- A thin rod is rolled from white clay.
- Triangles are stuck around it, forming a flower.
- The resulting block is wrapped in a sheet of thin white clay.
- A layer of orange is placed on top.
- The resulting sausage is rolled so that all layers stick together.
- Using a stationery knife, cut the sausage into even pieces approximately 5 mm thick.
Popular articles Selection: knitting cat
Using the described principle, you can make not only oranges, but also lemons, grapefruits and other citrus fruits.
A metal pin of the required size is placed on the side of the lobules. The product is baked, and then an earring hook is attached to the ring of the pin. By placing two pins in one piece of orange, the crafts can be assembled into a cute summer bracelet.
Miniature cake earrings
You can make miniature sweets from clay, which can only be distinguished from real ones by their size.
Instructions for creating cakes for decorations:
- Choose the clay that will serve as the dough for the cake, as well as the color of the plastic for the cream.
- Both colors are heated and rolled into 2 mm thick plates. To do this, you can use a glass bottle without a label.
- There should be several layers. All of them are stacked one on top of the other, pressing a little on top.
- Using a metal bottle cap, cut a circle from the resulting stack. The lid should have smooth edges. You can use a small diameter cutter to cut out cookies.
- Next, the cake needs to be decorated. It can be wrapped in colored glaze from a different color of plastic. You can decorate the product with flowers or other elements.
- The resulting cake is cut exactly as a real cake is cut into pieces.
- The sections of each piece are lightly pierced with a toothpick to obtain the porosity of the sponge cake.
- Pins are inserted into the cake pieces and the product is baked.
Polymer clay earrings “Turquoise flowers”
Step-by-step master class on creating jewelry from baked thermoplastic
The fashion trend of the season is the turquoise color, which is why I chose this shade to create earrings made of polymer clay. Turquoise color is very universal and filled with warm positive energy, and in combination with white or blue, you get a wonderful tandem in a marine style - in memory of summer, the time of vacations, splashing in the salty sea, bronze tanning and romantic night walks along the coast. Thanks to polymer clay, simple tools and your skillful hands, you can create amazing jewelry in just a couple of hours!
For work we will need the following tools and materials:
- Polymer clay in three shades: mint, white and blue;
- Liquid plastic (gel);
- Acrylic rolling pin or pasta machine;
- Broths of a color close to the blue or mint shade of clay;
- Stack with a ball;
- Blade or stationery knife;
- Two earrings and two long pins;
- Cutter or plastic die cut in the shape of a five-leaf flower;
- Foam sponge;
- Varnish for polymer clay;
- Round nose pliers.
So, let's start sculpting:
Knead the mint and blue plastic very carefully in your hands - it should become soft and elastic. The ratio of mint clay to blue clay should be 2:1. Lay two shades of clay diagonally to each other and form a rectangular layer.
Using a pasta machine or an acrylic rolling pin, you need to make a layer with a smooth color transition from a two-color layer.
The resulting mint-blue strip must be folded like an accordion as shown in the figure.
The rectangular cane needs to be compressed and rolled out to a diameter of 1 cm, and then pinched on the mint-colored side with your fingers so that the cane is shaped like an elongated triangle.
Now the triangular cane needs to be cut into 20 pieces. Each flower will consist of ten petals: five large ones in the bottom row and five small ones in the inner row. Ten cuts must be made 4-5 mm wide - these will be large petals, and 10 cuts must be made 2-3 mm wide.
Each of the sections must be flattened with your fingers and given a rounded shape to the future petal.
Now we place the petal on the porous surface of the foam sponge and, using a stack with a ball, stretch out the edges and make a depression in the center so that each petal has the shape of a boat.
We place five large petals in the shape of a fan and connect them in the center with a stack with a ball, smoothing out the seams and places where the petals overlap.
We close the circle of petals, align them with a stack in the center and get the bottom row of the flower.
Similarly, in the shape of a fan, we place five smaller petals in the center of the flower, and close the inner row of petals. We also smooth out the center of the inner row with a stack and a ball and completely get rid of the joints.
We form a small ball from blue plastic - this will be the core of the flower.
Using the blunt side of the blade, we make notches on the surface of the ball that intersect in the center of the core.
Generously coat the core of the flower with liquid plastic (gel).
Place the blue core on the liquid glue exactly in the center of the flower.
Sprinkle a scattering of broth around the blue core and place the flower blanks in the oven for firing. Follow the firing time and temperature according to the instructions for the brand of clay you worked with.
Prepare a layer of white clay 3mm thick using a rolling pin or pasta machine. Using a cutter or plastic die in the shape of a five-leaf flower, cut out two identical blanks.
Popular articles Flower pot decor
After firing on the back side of the flower, attach a small piece of white clay exactly in the center and press a metal pin loop into it.
Cover the top loop of the carnation with a five-leaved white flower and use the edge of a needle to imitate veins on the surface of each petal. Place the flowers in the oven for re-firing.
After firing, the product can be coated with water-based varnish if desired, and using pliers, you need to make loops from the protruding rods and fasten the earrings in them.
All!
The original and airy “Turquoise Flowers” earrings made of polymer clay are ready! In order not to forget the page address and share with friends, add to your social networks:
Cross earrings
Earrings in the shape of crosses are quite simple to make. To begin, cut out a cross from a sheet of notebook paper. Then roll out a layer of black plastic, attach a template to it, and cut it along the contour with a sharp cutter. Cut out the second piece in this way. Screw a metal pin with a ring at the end into each cross to attach the earrings. Place the blanks on earrings in the shape of crosses made of polymer clay to bake, then sand them with a nail file, remove the pins and place them on the inside with glue for reliability. Coat the earrings with varnish, dry them, attach connecting rings and earrings.
Watch the master class presented in the video: earrings made of polymer clay can be complemented with a bracelet that harmoniously matches them:
For it you need to create 1 cross according to the principle described above, but screw in the pin not only from the top, but also from the bottom. Next, attach a connecting ring to the pins, insert pieces of black cord into them and weave shamballa, decorating the free ends of the cord with black balls. Earrings and a bracelet with crosses made of polymer clay are ready.