Today we want to tell you how to make a keychain from polymer clay in the shape of fruits with your own hands. Agree, few people nowadays don’t have a decent bunch of keys, and in order not to lose them, you need a good keychain! So why not make a cute plastic keychain yourself, especially since it’s not at all difficult? And a detailed description of the work with photos will tell you how to make it correctly.
Macaroni
A polymer clay keychain in the shape of a dessert beloved by many takes literally 30 minutes to make. If you bought material of a suitable delicate color, consider yourself lucky. If your polymer clay, as it is also called plastic, does not match the desired shade, you can create it by mixing any color with white. Having received the necessary material, you can begin making pasta. Roll out the plastic on the table. Now, using a thimble or another round shape, cut out 3 circles. One of them should be white - this will be the filling.
The two remaining colored blanks need to be processed along the edges. This can be done with a special knife; if you don’t have one on your farm, you can make a torn edge using a regular knife. Glue the parts together in the required sequence. Now we bend the edges of the top and bottom cakes so that they are smoother. To achieve the effect of an airy filling, you need to apply a corresponding pattern to the white layer with a toothpick. In order for the product to harden, it must be baked in the oven for 30 minutes.
Penguin
Anyone who knows how to sculpt from plasticine can make such a keychain from polymer clay. We make a small bob from black plastic. Roll out white polymer clay. It is best to cut out circles with something that has a round shape, rather than trying to create an even geometric shape by hand. The penguin's tummy can be made with a thimble, and the eyes with the back of a pencil from which an eraser has been removed. Glue the circles to the black base. There is no need to use any glue, the adhesion occurs by itself. Now we make two small balls and two small sausages from black polymer clay. We glue the pupils of the penguin, we make wings from sausages, flattening them a little from the bottom. We form a beak from a piece of yellow plastic. It should be shaped like a cone. Roll two balls out of yellow polymer clay and flatten each of them a little in your fingers. These are paws. We glue all the details onto the penguin. We mount the keychain mount to the head, then put the figurine in the oven.
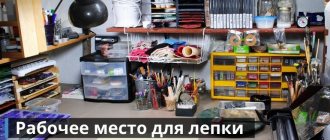
Components required for operation
To comfortably carry out work on creating plastic products, you must have:
- A comfortable work surface made of glass or tiles, pre-lubricated with non-greasy hand cream;
A specialized sharpened knife capable of cutting material without lubricating it;- A wooden or metal rolling pin for rolling out a homogeneous mass;
- Wooden toothpicks are necessary for making small holes and drying small parts;
- Various accessories for decorating crafts;
- Sandpaper for sanding products and removing fingerprints;
- Thick cloth for polishing products;
- Water-based acrylic varnishes.
To work with the finished material, it is strictly forbidden to use a knife and utensils that are used for cooking. Although the material is non-toxic, if it enters the body it can cause health problems.
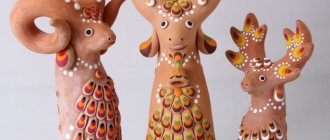
Zebra
Only a person who has a good sense of shape can make such a keychain from polymer clay. If you violate the proportions, the zebra will take on a cartoonish appearance. Roll out white polymer clay and cut out the outline of the head of a striped animal from it. Now, using a stack, you need to separate the mane and head from the neck. We form the eye socket. Give your mane a tousled look. We cut it along the edge with a knife. We form the face of the animal, do not forget to make the mouth and nose. Ears should be sculpted from two circles. A hole should be made in the mane, where you will then need to insert a chain. We bake the preparation. After you remove the product from the oven, you need to give it time to cool. After this you can start painting. Using brown acrylic we paint stripes on the zebra. We highlight the muzzle in black. The final step is to glue the bead into the eye hole. By analogy, you can make any keychains from polymer clay with your own hands.
Making a “Paris” keychain from polymer clay
Let's make a keychain!
With macarons By the way, I personally don’t like them (real ones, I mean), but they are wildly photogenic!
Well? Shall we begin?
So, we need:
1. Polymer clay (I have white, red and green). You can have any one you like! Just remember that macarons are usually beautiful “marshmallow” shades
2. Acrylic rolling pin.
3. Knife (blade) - in this case, not so necessary, but convenient for cutting off the required amount of clay from a large piece and separating the buns of future cakes from the table.
4. Fimo-gel.
5. Varnish for polymer clay (optional).
6. Mold (I have a cap from some cosmetic product).
7. Cling film or plastic bag.
8. Needle.
9 Some kind of spatula for applying the “cream” (you can get by with a toothpick).
10. Accessories for assembly (keychain ring, rings, pins, beads, pendants).
11. Good mood!
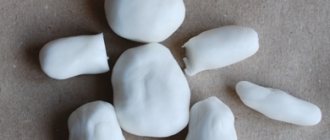
1. My macarons will be pink and light green. Therefore, I mix plastic White + green and white + red. You can easily change the brightness to your taste. Just first take a small piece of colored plastic. It is well pigmented, and you always have time to add color.
2. Mixed.
3. Roll out one of the balls into a layer about 4 mm thick.
4. Cover with cling film.
5. And cut out two circles.
The film allows you to make the edges of these cakes more streamlined.
The diameter of my mold is 2.5 cm.
Attention: the smaller the diameter of your mold, the thinner you need to roll out the layer.
6. We do the same with the green ball.
This is what happened.
7. You can leave it like this, but I still loosen it a little along the very edge with a needle to make a “skirt”.
9. Now we put a small thin cake on one of the halves Just so that the future “cream” has thickness.
10. Now about the cream.
In order to make a cream, you need to combine fimo-gel with plastic. The color of the cream will depend on the color of the plastic, since the fimo-gel itself is transparent.
Pour the gel into a glass container (about a teaspoon), knead the plastic thoroughly in your hands and add small pieces to the gel. Knead it all very well with some kind of metal spatula (the handle of a teaspoon works perfectly).
It’s hard to say how much plastic to add. Refer to the photo. A good “cream” should be homogeneous and stretch slowly.
*This cream can be stored for a very, very long time! But in a glass jar with a lid. I've had it for months. When I run out, I simply add the gel and plastic to the same jar and stir again.
11. Apply cream.
12. Connect the halves. Place the macaroons one on top of the other and carefully pierce them with a pin.
13. Place this design in the oven for 30 minutes (baking temperature 110 degrees).
While the macarons are baking, prepare everything you need for assembly.
This is the set I have.
So, half an hour has passed. We take the workpiece out of the oven, let it cool and proceed to varnishing.
I am careful with varnish and don’t cover everything. Only what should shine should shine. In our case, this is cream.
It is the cream that we cover with varnish.
Well, then - pure creativity. You need to connect all the components using rings and pins. This is elementary, so telling how to do it makes no sense.
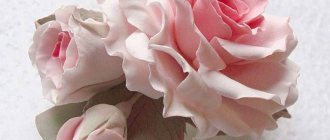
And here is the result!
I hope that the master class will be useful to you.
Have fun creating!
And now I have a key fob. Finally
Pumpkin
If you have been working with polymer clay recently, then you need to start with making simple forms. For example, from a pumpkin. How to make a keychain from polymer clay with your own hands? Roll a circle out of orange material. Using a stack, we crush 9 or 10 depressions in it. The “body” of the pumpkin is ready, now let’s move on to making the “top”. From black polymer clay you need to form a cone and give it a twisted shape. The stack should cut through the veins in the tail. Using an awl, you need to make a hole for the chain. The product is baked in the oven, and after it has completely cooled, it can be coated with clear varnish.
Materials for production
A handmade keychain is not just a thing, it is a kind of talisman and amulet that can bring good luck to those who really believe in it. Most of the materials can be found at home, among them will be:
- paper:
- beads;
- threads;
- textile;
- ribbons;
- plasticine;
- rubber bands.
Suitable materials for making: straps, corks, buttons, leftover pencils. Fantasy will be your main assistant in your work. Thanks to her, you will get an unpredictable, long-awaited result.
Decorative keychain
Even a child can create such a product. After all, the form here is not so much elementary, rather arbitrary. How to make a keychain from polymer clay? Roll out the material and cut out any shape from it. Now the edges need to be folded up so that they curl into waves. If you can’t get beautiful curls, you can make the edge a little thinner with your fingers. We place beads in the middle of the product. Cut out another arbitrary shape and glue one side of it to the first piece. The second edge of the figure needs to be raised, then wrapped in a wave. Place the beads in the middle again. The operation must be repeated one or two more times. Afterwards the product should be baked. Paint the finished keychain with acrylic.
DIY coin keychain, master class
Now we will look at the method of making a keychain from a ten ruble coin.
What we need for work:
- Ten ruble coin.
- Small drill.
- Plain paper.
- Pen
- Water.
- Bearing
- Thick tape.
- Hammer.
- File and soldering iron.
We will make the keychain from two parts, the inner part must rotate, for this we need to make a through hole. To make the hole, we will measure two points just in the center. On the sides of the coin there should be two stars, which are located exactly in the center.
You can drill these stars, but after that the keychain will look ugly, but these same stars will help us find the center and mark it. To do this, we need to put a coin on paper and make a regular template. Let's trace the coin with a pen.
We find stars and create marks on paper. Then we put the coin straight and draw these marks on the coin.
Next, take a small drill and create the holes. You should be very careful that the hole goes exactly in the center and is straight. It is recommended to use water during the drilling process, this will help complete the job faster and better.
Also, while working, you need to turn the coin over from time to time to prevent unevenness and crooked lines from appearing. When the hole is made, check if it is even. If all is well, you can move on to the second stage.
If you want, you can immediately polish the coin with GOI paste. Next you need to knock out the core. To do this, we take something that is larger in diameter than the core. It could just be a cap or a piece of pipe. We knock out the core with the bearing. We glue thick tape with one side to the bearing and the other to the coin.
You should be careful, because the bearing must be glued cleanly in the middle . Now we take our hammer and hit the bearing with one good blow. At the end, the heart of the coin easily comes away from the frame. After this, we need to remove all the irregularities and sharpen the edges of the core so that it can easily rotate in the frame. We do this with a file. Then you need to process the frame.
For the next step we need a soldering iron, soldering acid and strong wire with a diameter similar to the hole on a coin. First we treat the hole with acid. To do this, you can take a needle.
Next, take the wire, heat the surface of the coin and insert the wire into the hole. Then we pass the free tip of the wire or axle through the hole in the frame. Another wire must be placed at the bottom of the coin. Cut off all excess. Create a ring on the top part.
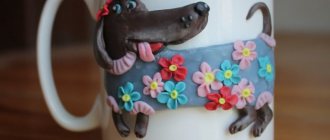
Dog
It won't be difficult to make a cute dog. The “Dog” keychain is made from polymer clay according to the following scheme. A piece of brown polymer clay is kneaded in your hands and an oval body is formed from it. Now you need to make the hind legs. To do this, you need to roll the ball and flatten it a little. Using a stack, we make a slot in one of the sides. We put this heart on its side and attach it to the dog. We make two small slits in the lower half of the paw - these will be the fingers. We repeat the operation again to make a symmetrical part. The front legs are formed from sausages, one of the ends of which is slightly flattened. Glue the sausages to the body. Make one paw raised. We cut through the claws.
Now you need to make the head. To do this, we form an oval in which we make indentations for the eyes with a pencil. Glue the head to the dog. If desired, you can make a collar. Between the head and body you need to lay a layer of polymer clay of any color. Roll out the brown plastic and cut out the ears from it. We make eyebrows using sausages. We form eyes from white plastic, and pupils from black plastic. You also need to make a nose from black polymer clay. All that remains is to make the tongue. We make it from a red oval, which has a slot in the middle. Using a stack, we form the dog’s mouth and insert the tongue into it.
Source