Three years ago I bought a bike trailer that I used to take my son out for a walk. In principle, the trailer suited me with the exception of:
- The trailer is quite low. And although there is a small flag on it, which makes it more visible, drivers in traffic may not see it.
- Since the child is one meter away from me, I can’t see what he’s doing. You have to constantly turn your head, which is not very good while driving.
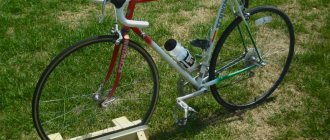
During a trip to Europe, I saw a large number of cargo bikes on the streets that were used to transport children. At first I thought about buying a cargo bike. But the price turned out to be too high and I decided to assemble the tricycle myself. Since this was my first self-assembled bicycle, during the assembly of the trike many situations arose that had to be solved by trial and error. But in the end I managed to make a cargo trike with my own hands. After searching the internet for a trike model to go with, I settled on the Christiania Trike. So, let's try to make a cargo tricycle ourselves!
DIY tricycle drawing
HOW TO MAKE A TRI-WHEELED BICYCLE
Tricycle from. two-wheeled
How to turn an old two-wheeled bicycle into a three-wheeled one with a cargo trolley?
Naturally,
that this is a troublesome task and will require certain technical skills, available materials and spare parts. Not to mention the ingenuity. What is needed here are men's hands capable of turning this idea into reality.
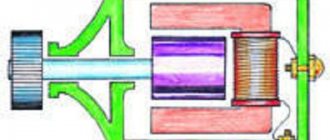
Here is the kinematic diagram of a tricycle (see Fig. 1).
Rice. 1. Drive diagram of a tricycle with one drive hub: 1 – front wheel 2 – drive to the driven sprocket of the rear wheel 3 – rear hub with an additional sprocket on the body 4 – chain drive to the axle shaft of the rear wheel 5 – driven rear wheel 6 – free rear wheel progress.
The pedal chain drive operates on the driven sprocket of the rear hub mounted on the frame. An additional chain drive sprocket is riveted onto one of the flanges of the hub body, which drives the axle shaft of one of the rear wheels to rotate. To do this, a sprocket is firmly mounted on the axle shaft, similar to the additional sprocket of the hub body.
The proposed design uses any commercial hub - both single-speed and multi-speed, both brake and non-brake. In the latter case, in addition to the brake on the front wheel, the free rear wheel is equipped with a brake of any type.
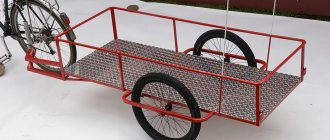
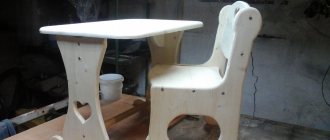
Some craftsmen have developed several types of cargo bicycle chassis, shown in Fig. 2. The bicycle on the right is designed for transporting various types of cargo and is indispensable for summer residents and gardeners, and on the left is a bicycle with a cargo trolley, easily converted into a seat for a passenger.
Abroad, for example, people are interested not so much in bicycles for transporting goods, but in “passenger” bicycles, “tricycles” for walking, for moving the elderly. Pedicars are interesting - tricycles - fairly light machines with a three-speed gearbox, differential, and effective wheel suspension. Often, in addition to canopies and awnings, designers also provide their three-wheeled vehicles with an addition to the pedal drive - a manual drive.
Comments: 1
Option 2: assembling a moped with a gas engine
This is an advanced method, and the result is more reminiscent of a real moped. To make it, we need:
- gasoline engine;
- moped parts: wheels, shock absorbers, exhaust pipe, brakes;
- proven bike frame;
- tools.
Since here we are going to get a real moped, the frame must have increased strength and weight. Also, mopeds have a slightly different frame design, which may require some modifications.
Wheels from a moped are put on the frame. It will be necessary to change the fork design, since the width of the wheels will be wider than the distance between the dropouts. If possible, install shock absorbers on the fork.
Carefully overhaul the moped power unit and replace all faulty parts. The propulsion system will require a separate space; for this, a welded metal platform at the bottom of the frame would be a good option. The engine and fuel tank are secured to the site using metal fasteners. It is better to place the battery closer to the steering wheel. An exhaust pipe is connected to the bottom of the engine. The pipe must be firmly secured to the frame so that it does not dangle while driving.
Transmission. Next, you will need to make the engine torque transmission system:
- Remove the pedals and chainring from the bicycle frame.
- Install sprockets on the rear wheel of the moped and the engine shaft. A star on a wheel with a larger diameter.
- Place the rear wheel on the frame.
- Connect the stars using a chain.
Motor connection. The clutch and throttle valve are connected to the ignition lever via drive cables. The tension is selected so that the engine can immediately start and start spinning the wheel.
Brakes. If only one brake (for example, the front brake) may be sufficient for a bicycle, then it is better to play it safe and install them on both wheels. The rear one can be used as the main one, and the front one as an auxiliary one, to adjust the speed.
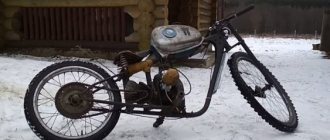
In general, a homemade moped based on a bicycle will look like this:
Converted bike
Since a vehicle equipped with an engine moves faster than a regular bicycle (this is why the modification is intended), for safety reasons it is necessary to install lighting devices on it. Personal protective equipment – helmet, knee pads and special shoes.
What does a rickshaw look like?
A pedicab is a vehicle for public or personal use that can carry 1-2 people, excluding the driver. Most of all, it resembles a tricycle, in one of which there is a stroller (seat), and passengers are transported on it. The driver controls the rickshaw by pedaling, that is, this type of transport is 100% environmentally friendly. In most cases, there is a small fabric canopy over the passenger seat, which helps to hide from the scorching sun. The use of this transport is possible only in the warm season.
Preparatory stage
To create a tricycle with your own hands, you need to purchase a standard analogue with a pair of rims. This may be a foreign or domestic modification. Taking into account the chosen configuration, the aesthetic part of the future transport will be designed. It is necessary to take into account the quality of parts and the possibility of transforming the unit.
Initially, all design diagrams and drawings should be completed. Particular attention is paid to:
- Stability, which requires correctly calculating the placement of the rear wheels.
- Height of the steering column and seat. The parameter is calculated taking into account the characteristics of a particular person.
- Purchase of a rear axle with differential. The element is responsible for comfortable movement and safe driving.
- Adjusting the steering unit. A homemade tricycle should not fall over when turning.
- High-quality brake block, signal horn.
- Smooth movement of the steering wheel and wheels. There should be no creaks or other extraneous sounds.
In the drawings of a tricycle, the most crucial moment is modifying the frame configuration. It will be necessary to strengthen the metal profile using stiffeners. As an option, it is possible to use a design from Ural. The rear axle is cut down and an updated frame made of duralumin pipes is installed. The second part is installed in the lower section, it is used for transporting goods. Wheels are placed on both sides of the axle, and a sprocket is fitted in the center.
Velomobile differential
That is the satellite axis, on the other side it is the same.
Added after 1 minute 33 seconds: But the drive is not clear.
From amphibian. It seems to be a differential too.
Added after 1 hour 7 minutes 19 seconds: Another overtaking one.
Post #1. All difi cars. type - on 2 conical satellites + 2 conical. gears on shafts. The cases are different.
Post #6. Overrunning differentials: -1st, and 4th for the Z block, 2nd for the Z cassette, 3rd for the star.
Post No. 13. Overrunning differentials: -1st double freewheels; 2nd double freewheels - one in block Z; the second is through the spacer between the rotors; 3rd overrunning differential through 2 freewheels in a common housing (classic). 4th is not clear; similar, but collapsible.
Added after 2 minutes 42 seconds: Z-star or block of stars (mine).
Added after 21 minutes 15 seconds:
Overrunning differentials - “Poltava project”.
Added after 27 minutes 33 seconds: Overrunning differential on freewheels: one in the Z block, the second is screwed into the welded (cut) Z with an M43x1 thread, and the skirt in it is cut off with a thread. Auto
r Vladimir Aksentievich.
Added after 6 minutes 30 seconds: Errors:
4th file-repeat. 6th file, author Vladimir Aksentievich.
Mazur4ak wrote: 6th file, author Vladimir Aksentievich.
Lovely! Wouldn't it hurt to take a photo of me - how to center the star nut? Both ratchets can be slid onto the 22mm pipe. A section of the steering wheel is shown. Red - tack areas
Quote: “Both ratchets can be slid onto a 22mm pipe.” We selected an F22 pipe with +, which came from an old tubular cornice.
Now, all sorts of differentials are needed: 1. On the satellites, they have reverse (reverse). 2. Overtaking vehicles cannot have reverse gear.
Now we need industrial designs: on satellites like Shtrakin and Co. Overrunning-type "classic" with a common cassette housing (here, I noted). Well, the type that I showed is an amateur version. The disadvantage is welding. And the fur option. connections from Poltava are not disclosed. We are waiting for your suggestions for using any. option.
Added after 5 hours 35 minutes 48 seconds:
Doubt: ". 2nd for cassette Z. "(?). Need translation.
Added after 51 minutes 51 seconds:
There is a block of stars with rivets. A flange is flanged on the largest sprocket, and an F43x1 thread is cut into it, into which the left freewheel is screwed. The system differs in that the connection is made by introducing a flange. In amateur conditions, the flange is bolted to a large star with centering on the inner surface, or along the outer protruding flange of a conventional block.
Added after 56 minutes 19 seconds:
I found a sketch. There the skirts are cut off - M35x1 thread, the welding is crossed out. and the flange is designed. on the 6th star.
Added after 4 minutes 27 seconds: The minus system turned out to be non-separable, but it can be bolted on.
1. Commentary on the file. There is a photo of the disassembled overtaking. dif. The big star has 6 orig. holes. 2. In amateur conditions, as an option, the threaded flange is connected to the large star using a bayonet lock, WHICH has end radial bends that enter with their hooks into the holes of the large star and are tightened into the gap between the stars.
Added after 7 minutes 2 seconds: Later I will give a drawing of a connecting flange with a bayonet lock.
Vladimir, what is this? I understand the nuts and bolts. . I twisted the sprockets this way and that, but I can’t figure out how you fastened the two ratchets together.
And, if it’s not a secret, do Kuznets’ pullers produce rods? Or were the pipes welded? How did you connect?
Its axles are loaded, and spline pullers are welded to them. The differential rests with its protruding parts on the crankcase bearings. I forgot. how and what.
What is shown on my diff is a welded Z14 sprocket with an M43x1 thread, removed from the second freewheel. As an amateur option.
If someone wants to mass-produce the differential, then they can use worn sprockets. For example, Semiokhin uses them for souvenirs. In Poltava there is such an opportunity to produce samples without body kit.
A flange, the same as a sprocket, only without teeth. It can be stamped from a sheet of 2.2.2 mm, and screwed to the large star of the Z block with bolts. I will describe how to make a flange later. The bayonet is a type of castle nut, but also a flange.
Required materials and tools
To make a three-wheeled trike from a bicycle, you should stock up on the following equipment:
- a pair of chains;
- cables for the brake and speed switching units;
- standard bicycle;
- stainless steel clamps;
- wheels;
- wings;
- brake block;
- basket for transporting cargo;
- steel frame;
- paint and varnish composition.
To create a tricycle with your own hands, you will need a hammer, an angle grinder, a welding inverter, a drill, and a set of keys. After sketching all the drawings and diagrams, you should prepare the specified materials and tools in advance. If you plan to build a spacious luggage compartment, additionally prepare sheets of plywood and a hacksaw. If desired, the unit is equipped with an alarm bell or horn. Comfortable seating is ensured by installing a new seat or installing a special cover.
Some craftsmen place a compact basket at the front of the structure for transporting bags and packages. At the same time, your hands are completely free while riding.
A bicycle with a motor: the history of the modern electric bicycle.
Motorized Bicycle - A bicycle with an outboard engine used to propel the vehicle or assist in riding it. Sometimes classified as a motor vehicle or hybrid vehicle class, a motorized bicycle is usually powered by an electric motor or, less commonly, small internal combustion engines. If it is driven by an electric motor, it is sometimes referred to as a light electric vehicle. In the past, internal combustion engines were more common in motorized bicycles than they are now, although electric motors were also used. With lighter batteries and better charging, the electric motor has recently become more popular.
History of the motorized bicycle
1818 invention of the two-wheeled balance bike
1834 first working electric motors
1860 invention of lead batteries
1885 the main features of the modern bicycle were formed
1890 A patent was issued for the design of an electric drive mounted on a bicycle.
1903 The first Harey Davidson motorcycle was a bicycle with a motor.
1991 introduction of the first lithium-ion batteries
1992 modern electric bicycles (electric mopeds)
Many motorized bicycles are based on standard bicycle structures and technologies, although there are extensive modifications to motorized bicycle technology.
In countries where the cycling culture is strong (especially in Asia), motorized bicycles are especially popular. In 1996, there were 370,000 motorized bicycles and 470,000 other vehicles in Shanghai.
Using the pedals
Motorized bicycles differ from motorcycles in that they are able to move using only pedals, if required. Mopeds also have pedals, but they are used as a last resort or due to legal requirements and are often not used at all.
The actual use of pedals varies widely depending on the type of vehicle. You can only drive with the engine running if the driver does not want to pedal. The pedals can serve as additional power, for example, when driving uphill.
bikelectro.ru
Manufacturing instructions
Master class on how to make a tricycle step by step:
- The donor model is placed on the platform with the steering wheel down.
- Remove the wheels, remove rust and other defects in visible places.
- Saw off the rear part of the unit with a grinder.
- The differential is fixed using metal clamps.
- The bridge is installed at 90 degrees using the above method.
- The remaining auxiliary elements are secured by welding.
- The wings are mounted, between which a basket of suitable size is welded.
- Install two rear rims in parallel.
- The fasteners of the clamps are tightened.
- One is made from two circuits and then installed.
- Equip the brake unit using disc parts and a switch on the steering wheel.
- They check the build quality and paint the model.
Homemade tricycles may vary in size depending on the user's creative ideas. A proven, fast and reliable method in terms of technology is the use of a UK-65 type rear differential axle. When creating a drawing of a homemade tricycle, you should take into account the costs of consumables.
When creating the modification in question, you will need to take into account the costs of purchasing the necessary parts yourself. In addition to the bridge, you will need a chain, a speed switch, wheels, and a set of sprockets. Also, we must not forget about lubricating and painting sanded and welded surfaces.