Product Features
A do-it-yourself paint sprayer for a car or repair can be made from various available materials. This device is a spray gun that is used in the process of painting various surfaces.
A hand sprayer is sometimes used to water indoor plants. More powerful varieties are suitable for painting different surfaces. This equipment allows you to apply a uniform layer of paint. The spray method is very convenient. As a result, it is possible to process different surfaces quickly, and the result will be high.
The spray bottle is suitable for paint and varnish compositions, as well as water-chalk or water-lime based products. There are several popular ways to create a spray gun. Various improvised means will be used. You can choose the best option for yourself.
Device from a car camera
If you plan to paint a small area, for example, the body of a car, then you can build a spray gun from an old car camera. It will serve as a receiver, that is, a vessel for accumulating air.
This paint spraying device, in addition to the car camera, is assembled from:
- car pump;
- pressure gauge;
- a nipple from another old camera;
- two fittings.
The car camera taken to create a spray gun must be intact and free of holes. This is important because it will be under a lot of air pressure.
When making a spray gun from a car camera, you need to complete the following points:
- We check if there are any punctures in the chamber by inflating it with a pump.
If air escapes from the chamber in some place, the rubber part is repaired; You can use an old camera - We make a small hole in the receiver without punctures. It will become a place for attaching an additional nipple, from which a compressed air stream will emerge;
- We insert an additional fitting into the formed hole, carefully fixing it with adhesive. After this, the fitting can be connected to a household sprayer;
- We try to unscrew the nipple. If the air flies out slowly, then the work was done flawlessly;
- We screw the nipple to the original nipple on the camera. It is assigned the role of a valve that lowers the pressure if it is too high;
- Determine the air pressure in the chamber. An intermittent (excessive) behavior can be indicated by a pressure gauge.
Video about the work of a homemade airbrush
Regular pen
How to make a spray bottle with your own hands? There are several options for such designs. One of the easiest ways is to use a ballpoint pen. This is the most primitive design. You can assemble it in just 30 minutes.
The operating principle of such a device is simple. A man blows into the tube of the pen body. Splashes of paint burst out through it on the other side. The material must be blown with high intensity. If you do this half-heartedly, the drops of paint will not spread evenly over the surface. You can practice before starting work.
To make such a spray gun, you will need to purchase:
- regular gel pen,
- container into which the paint will be poured,
- a needle from a regular syringe.
A small bottle can be used as a container. It must have a lid. It is better to prepare not one, but several needles. They may break during operation of the device.
How to make a sprinkler for watering a large area from one point
To water the garden and lawn, it is convenient to use a snail sprinkler, since it scatters small drops and covers a large area. Unfortunately, this device is made of fragile plastic that loses strength under ultraviolet radiation, which is why it rarely lasts more than one season. For this reason, it is best to prepare the materials and make a snail using your hands from metal, rather than periodically buying a low-quality sprinkler.
Model assembly
When creating a small spray bottle for painting with your own hands, you need to perform several sequential steps. First you need to prepare the bottle cap. A hole is cut out in it as wide as the refill of a gel pen.
The tube will be installed in the cut hole. You need to disassemble the gel pen. The cork will contain its rod. The handle body will be connected to it. This is what a medical needle was needed for. It is put on the wide end of the gel pen. The needle is inserted into the body of the pen. Its tip should come out from its thin side.
All components must be properly prepared. Having disassembled the handle, remove the paint rod from it. His nose is cut off. The content must be removed. For this purpose alcohol is used. This procedure is done carefully, otherwise the dye will end up on clothes, interior items, etc. The body and rod are connected with a needle.
Tips for using a spray gun
Having completed the creation of the device, you can move on to the process of painting walls or any other surfaces. And to improve and speed up this work, you should listen to the recommendations of professionals:
- When spraying a dye, you cannot direct the stream to the same place for a long time. This is fraught with the risk of obtaining a thick coating;
- While painting the surface, the spray gun must be held straight. If you break this rule, too much paint will be lost;
- The area to be painted will be covered with a perfectly even layer when moving the device in a circle;
- The second layer of paint is applied only after the first has completely dried;
- When starting painting, prepare the surface to be painted - clean it of dust and dirt.
Creating a homemade device for spraying paint is not a two-minute task, but rather a labor-intensive process in which it is important not to make a mistake in the sequence of actions. But you will receive a device for free, the mechanism of which is no worse than the spray gun sold in the store.
- Author: Ksenia Zubkova
I am a philologist by training and have been writing texts for more than 5 years. Rate this article:
- 5
- 4
- 3
- 2
- 1
(3 votes, average: 3.3 out of 5)
Share with your friends!
Using a spray gun
Next you need to try the resulting product. First, water is filled into the container. Next here will be paint. You need to blow intensely into the bottle. The paint will come out through one end of the prepared pan.
To adjust the jet, you need to adjust the position of the rod and pen body. The pressure of the jet depends only on the force with which the master blows into the bottle. This is how a homemade spray bottle works. It is not difficult to assemble it with your own hands. However, the texture of the paint will not be thin and uniform. It will consist of individual drops.
This option is suitable for those surfaces for which a high degree of evenness is not important. As a result of this processing, an interesting texture is obtained. It consists of many drops. This allows you to create a certain visual effect. The quality of work is influenced by the experience of the master. Therefore, before starting surface treatment, you need to practice.
Advantages of a self-assembled spray gun
How to paint with a brush or roller? It’s better to buy a spray gun or make it yourself, which will definitely affect the speed and quality of work.
Positive aspects of using a spray gun:
- There is no debris on the newly applied paintwork;
- the duration of repair work is reduced significantly;
- dye consumption is reduced;
- the equipment does not require special care;
- lightweight and small in size.
Model improvements
You can make your own spray bottle for water or paint according to the described scheme, but with some modifications. In this case, the device will be able to perform more delicate, precise work. To do this, you need to perform a number of modifications.
Another hole is made in the bottle cap. Another rod from another gel pen is inserted into it (it needs to be prepared in the same way as before). Only its diameter and length should be smaller. This is taken into account when choosing a handle. This action allows you to increase the pressure in the bottle. As a result, you can blow out more paint with less effort.
A second needle is inserted into the body of the pen. It connects to the second rod. Next, you can practice applying paint. The wizard's actions will be the same. But now the coverage will be better. To adjust the jet, you need to move the rod that supplies the paint.
Separate meter for watering the garden
Often, watering of plants on a personal plot is carried out from the city water supply network. Moreover, the cost of paying for water turns out to be critical for many gardeners. Cultivating vegetables in such conditions becomes economically unprofitable. At the same time, not everyone knows that you can install an additional meter for irrigation and pay reduced prices due to the fact that irrigation water is not discharged into the sewer. Installing an additional water meter for watering your garden pays for itself in just one season.
Advantages and disadvantages of the model
It’s easy to make a spray bottle for painting with your own hands according to the proposed scheme. Almost everyone can cope with this task. The advantage of the model is the possibility of its modifications. If necessary, a compressor hose or a hand tool (for example, a bicycle tire pump) is connected to this structure. In this case, the work will be easier.
The disadvantage of the model is its limited range of applications. The pattern that paint creates may not suit the existing interior style or type of object. Therefore, before starting work, you need to test the tool on a training surface. It is also worth considering that this model is suitable for thick paint. It will be difficult to apply whitewash using this method.
If the container does not have a lid, you can make one from available materials. If the paint is water-based, regular foam plastic will be suitable for these purposes. If the composition contains chemical dyes, you need to make a stopper for the container from rubber or other similar material. It will not be destroyed by solvent.
Master class on organizing automatic watering with your own hands
Now we know enough about irrigation as such to automate it. Personally, I did not have a clear understanding of the need for such a system at the stage of building a house. However, laying the pipeline system before the construction of the paths was enough. Since we can’t do without it, we’ll start with this.
Sketch of the area that we will provide with an irrigation system
Water supply diagram for hose irrigation
The irrigation system consists of a large number of components, so it will be difficult to correctly place all the elements and calculate the necessary materials without a diagram. It is better to do this on a computer using a publicly available program. I worked in Microsoft Power Point. The sketch can also be done on paper. You will need a compass, pencil, eraser and ruler. Of course, it is necessary to take the dimensions of the area and transfer them to a scale sketch.
Water supply diagram for watering with a hose
Before the construction of the paving stones, a water supply system was laid from HDPE pipes with a diameter of 25 mm, which is indicated in red on the diagram. The numbers in the drawing indicate the dimensions of the sides of the areas for irrigation. Circles with a radius of 10 m with centers at the locations of the cranes demonstrate the possibility of irrigating all vegetation on the site and trees outside the fence.
All connections are made with plastic fittings. Working with them is a pleasure: docking is quick, simple, and reliable. The pipe is laid to a depth of more than 0.5 m to ensure that it is not damaged by a shovel. I tried to carry out the laying outside the tracks to ensure the possibility of repairs and connecting additional lines, if necessary.
Three taps with fittings are installed at the end points of the water supply; this was done for quick-connection of the hose. The site has a noticeable slope, which means the pipe also lies on a slope. This makes it easy to remove water from the system in the fall. On a flat area, it is quite possible to lay water pipes with a gradual increase in depth from one side of the area to the other.
Hose connection point with tap and quick connect fitting
Needs and possibilities of automatic irrigation
The design of the automatic watering system itself begins with an assessment of water consumption. That is, the capabilities of the water supply must satisfy the needs of the sprayers. For this purpose, you need to place a 10 liter bucket in the bathtub, open the tap completely and record the time it is filled. I got 25 seconds, which corresponds to a consumption of 1.4 m3 of water per hour. When installing the water supply system in the house, it turned out that the pressure in the system was about 2.5 atmospheres.
Aerosol can
There are several more options on how to make a paint sprayer with your own hands. A simple design can be made from a regular aerosol can. It is suitable for applying water-based paint.
To assemble such a spray bottle, you will need to prepare a bicycle inner tube, a plastic bottle, a regular can, for example, deodorant, and a hand or foot pump. The second option is more convenient. You can work with the spray can with both hands.
The structure is assembled according to a certain scheme. With the help of such a spray gun it will be possible to perform high-quality application of liquid material to the surface. Spraying in this case will be more uniform than in the previous version. And it will be easier to work with this device. Air will be supplied to the cylinder using a pump. This ensures good paint atomization.
The water supply is no longer the same
When organizing water supply at the dacha, plastic pipes gradually replaced metal ones. This event is probably comparable to the replacement of wired phones with mobile phones. Such pipes can be delivered to the site in the trunk of a car and installed without welding or threading, that is, using plastic fittings. Now the water supply does not rust and can withstand freezing water.
The most popular are HDPE pipes. For a plot of 6-15 acres, pipes with a diameter of 25-40mm are sufficient. It is important to hide the pipes in the ground so as not to trip over them and spoil the appearance of the site. The minimum laying depth is 0.3 m, so as not to damage it with a shovel. At a depth of 1 m they will be protected from freezing.
It is better to ensure a general slope of the system to drain water before frost. HDPE pipe and plastic fittings can withstand ice expansion, but for a limited number of cycles. Automatic watering valves and sprinklers may not like the frost at all: water from them must definitely be removed in the fall. Read more about the dacha water supply in the article “Do-it-yourself irrigation and watering system - installation of watering equipment for a garden at the dacha”
Assembly procedure
If you want to make a spray bottle with your own hands for whitewashing with lime or water-based paint, a spray can design is suitable. First you need to cut the nipple off the bicycle tube. Its lid has a diameter of approximately 3 mm. A hole is made in the bottle.
Next, you need to fix the nipple onto the inner wall of the bottle. It will force air inside the container. After this, you need to remove the sprayer from the can. To do this, you need to saw the body of the container with a hacksaw. The spray module with valve must match the diameter of the bottle neck.
The valve must be attached to the bottle cap by cold welding. The connection must be tight. This is a must. After all, the system works under pressure. After the manipulations, the device is tested under a pressure of 3 atm. You should also try applying paint on the training surface.
We will make a water sprinkler from a pipe
This version of the sprinkler is a little more difficult to make than the previous one, which is noticeable in the photo. However, its watering quality is higher, and the area it can cover is much larger. To make a sprinkler, you will need a plastic pipe, 5 cm in diameter, 60 cm long, an old ski pole and a clamp. Now let's get started:
- First you need to cut a 0.5 m long piece from an aluminum ski pole. Then close one end of the tube with a wooden plug, epoxy resin, or simply rivet it with a hammer.
- Then cut the plastic pipe into two parts to get identical parts 30cm long. In the center of each workpiece, it is necessary to drill a through hole equal to the diameter of the cut ski pole, so that the aluminum tube fits tightly into the hole of the plastic pipe.
- Then you need to put pipe cuttings on the ends of the stick, securing the parts with glue or clamps. The result will be a structure shaped like the letter “H”. Next, you need to connect the watering hose to the end of the ski pole that does not have a plug. Secure the connection well - secure with a clamp, seal with silicone.
- After this, you need to make a straight or cross-shaped cut in the center of the aluminum tube using a grinder or saw. When water enters the hose, then into the aluminum pipe, under pressure through the cut it will come out as a fountain. The result is a fairly effective sprinkler.
A pipe sprinkler has a fairly large watering area
Spray gun from a vacuum cleaner
There is another way to make a spray bottle with your own hands. If you need to paint walls or ceilings, using a hand sprayer will be quite difficult. To process a large area, you will need a device with automated paint supply. In this case, use a refrigerator compressor or (which is simpler) an old vacuum cleaner.
Such designs spray water-based paint well. It is not suitable for powder dyes. It is also worth considering that only an old Soviet-era vacuum cleaner is suitable for such work. Their design was significantly different from modern models.
The hose of the old vacuum cleaner could be connected to both the inlet and outlet pipes. This allowed the equipment to work both in blowing and blowing. It is the second mode that will be required when creating a spray gun. If the owners have a similar unit left somewhere in the pantry, this will be an ideal option for painting the walls and ceiling.
Variety of elements for delivering water to plants
Water reaches the plants using a hose, spraying, drip irrigation or root irrigation. All options have the right to life and are applied depending on specific conditions.
A hose with quick-release couplings is a convenient tool for watering
Good old watering hoses
Option number 1 - use a watering hose. Despite the simplicity of the process, in this case it is necessary to lay a water supply system throughout the site, preferably from HDPE pipes and preferably in the ground. The pipes must be laid out so that a hose (no more than 10 m long) can be reached from the connection point to all nearby plants. We install taps at the connection points, and connect the hoses with quick-release couplings. If you have trees growing on your property, it is convenient to supply them with water using hoses. It is expensive to provide automatic watering to each tree, and it will not be possible to ensure accurate filling of different holes using a timer.
Making a spray bottle
A DIY paint sprayer is assembled from an old vacuum cleaner. In some cases, a new model that is no longer planned to be used for its intended purpose will also be suitable for this purpose. In such a vacuum cleaner you will need to change the direction of traction. To do this, you need to change the poles on the terminals. They are adjacent to the stator and rotor.
After the unit begins to operate in the desired mode, you need to select a suitable container (bottle) for the paint. The neck of such a container should be wide. There should be a rectangular ledge on the plug. It will allow you to insert the tube from the gel pen here at a right angle. You can also use a dropper for these purposes.
Holes are made in the lid and tubes are inserted into them. One of them will supply paint, and the second will provide compressed air. You also need to make another hole in the cork. This is necessary to allow air to enter the bottle. When the volume of paint in the container decreases, a vacuum occurs in the tightly closed container. Another plug should connect the hose from the vacuum cleaner and the paint spray system.
Installation of an automatic watering system
Now that we have an irrigation scheme, we can completely determine the list and number of components required for practical installation. The result is the following list:
| Name | Quantity | Purpose |
| Controller STP6PL | 1 PC. | For controlling solenoid valves |
| Sprayer UniS-400 (With nozzle - UniS - 412) | 6 pcs. | For watering flower beds, complete with 12 VAN nozzle |
| Injector 12 VAN | 6 pcs. | For watering the flower garden, complete with UniS-400 sprayer |
| Rotary sprayer 3504 | 6 pcs. | For watering the lawn |
| Sprayer SXB-360-TS-SPYK with self-piercing fitting included | 14pcs. | For watering beds and a narrow flower bed near a pergola |
| Branch pipe SPX-FLEX | For connecting lawn and flower garden sprayers using flexible bends (optional) | |
| Threaded angle fitting SBE-050 1/2″ | For connecting 25mm UniS-412 nozzles and 3504 rotors to a HDPE pipe | |
| Solenoid valve 100-JTV 1″ | 2 pcs. | For supplying water to lawn and flower bed sprayers |
| Starter kit XCZ-075 PRF, 1″ | 1 PC. | Valve with filter for supplying water to the bed sprayers |
| Drip irrigation hose 17mm | 30m | For supplying water to bed sprayers |
| Stand holder 12-16 mm C12 | 15pcs. | For attaching 17mm pipes to the ground |
| Dispensing tube 4-6mm XQ1000 | 7m | For connecting SXB-360-TS-SPYK sprayers to a 17mm pipe |
| XFD TEE Barbed Tee | 1 PC. | For routing a 17mm pipe |
| Adapter for drip hose 3/4VR | 1 PC. | To connect a 17mm pipe to a 25mm HDPE pipe |
| End cap 700-CF-22 | 3 pcs. | For 17mm pipe plug |
| Micro-irrigation tap BF92 | 2 pcs. | To shut off irrigation zones with a 17mm hose |
| Boxing double | 1 PC. | For valve and starter kit for lawn and beds |
| Single box | 1 PC. | For flower garden valve |
| Fitting for sprinkler area - Saddle 25Х1/2ВР | 7pcs. | For connecting sprinklers to a 25mm passing pipe |
| Corner bend 25Х1/2″НР | 5 pieces. | For connecting sprinklers to the end of a 25mm pipe |
| Fitting for magnetic valve coupling 25Х1″НР | 3 pcs. | For connecting valves to a 25mm pipe |
| 2-position manifold | 1 PC. | For connecting 2 valves in one box |
| Tee 25*25*25 | 4 things.. | For routing HDPE pipe 25mm |
| PVS cable 2x0.75 sq. mm | 60m | To connect valves to the controller |
| HDPE pipe diameter 25mm | 110m | For water supply |
By and large, guided by the above table, you can already assemble the entire system. Of course, in your specific case there will be a different list. In any case, if you organize automatic watering of the area with your own hands, you can discuss the list of necessary items with the seller at the gardening store and make adjustments. Of course, for this you need to have a sketch of the project.
Lawn and garden irrigation control valve
Now let's look at the installation in more detail. First you need to dig trenches for laying pipes. Taking advantage of the fact that no one would dig next to the paths, I did not go deeper than 30 cm. Then we had to cut 25x25x25 tees into the existing water supply to connect the valves. In the double box I used a 2-position manifold and 25X1HP couplings to connect the valve and starter kit. For watering the beds, a starting kit was selected, that is, a valve with a filter, since the nozzles on the beds are afraid of contamination. The valves and sprayers of the lawn and flower bed are connected by HDPE 25 pipe.
Flower garden watering control valve in a single box
When connecting the sprayer to a pipe passing by, I used a 25X1/2BP saddle, and to connect to the end of the pipe - a 25X1/2″HP corner outlet. When the pipe is located deeper than the bottom of the sprinkler, an optional flexible elbow and SPX-FLEX pipes can be used. In this case, you will need a threaded angle fitting SBE-050 1/2″.
Connecting the sprayer to the end of the pipe
To connect a 17mm garden watering pipe to the valve, I used an adapter for a 3/4BP drip hose. To route the 17mm pipe, an XFD TEE fitting tee was required. To ensure the possibility of turning off the beds and half of the flower bed near the trellis, two BF92 micro-irrigation taps were installed on a 17mm pipe.
Micro-irrigation taps allow you to turn off part of the irrigation
Next, I installed self-piercing micro-fittings into the 17mm pipe, which I connected using an XQ1000 distribution cabin with sprayers on the beds. I did the same thing in the flower bed near the trellis. The 17mm tube was secured to the ground with holder posts 12-16-C12.
The sprinkler is connected with a self-piercing fitting and tube
I laid a double multi-core cable in double insulation along the pipes and connected the valves to the controller. I had to cut a seam of paving stones to lay the cable without disassembling the path, and then seal the gap again with a mixture of sand and cement. Several tiles of the path still had to be temporarily removed when laying the cable into the garage.
A seam is cut along the red paving stones with a grinder, into which the cable is laid
I connected the power and control wires to the controller according to the instructions. There is nothing complicated about electrical installation. Setting up the controller turned out to be easier than learning a new mobile phone, although the instructions were only in English. During the test switching on of the equipment, I set the required angle of the irrigation sector for each sprinkler. After checking the entire system, the pipe grooves were filled in and the ground was compacted.
Refrigerator compressor
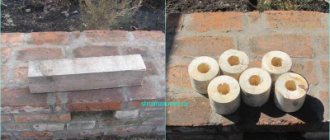
You can assemble a spray bottle with your own hands from a compressor that was left over from an old refrigerator. Such a unit will be quieter than a vacuum cleaner. When whitewashing ceilings with lime or water-based paint, such equipment will provide significant savings in materials.
Assembling such a spray gun will be more difficult. You need to select a sufficiently large sealed container (receiver). This could be a canister, fire extinguisher, cylinder or other similar product.
You need to remove the compressor with the start relay. Copper tubes need to be sawed off with a hacksaw or cut with a special tool. Next, the system is connected to the network. You need to pay attention to which tube the air is supplied through. A gasoline filter from a car is attached to the structural element that absorbs it using a hose and sealant. This protects the spray gun from dust getting into it.
Making a spray gun for powder paint
Making a powder paint sprayer is not an easy task and requires professional skills and electrical knowledge. Common spray gun manufacturing technology includes the following tasks:
- Assemble the electrical module. To do this, the core is formed from a piece of plastic water pipe and a wire with a ferrite element wound on it. This module is placed in a plastic vessel and filled with paraffin.
- Assemble the pistol. An electric core is mounted into a plastic tee, and it must fit very tightly into it. The inside walls must be treated with glue to ensure the stability of the mechanism. All electrical wires are brought out through the lower holes, which are sealed with paraffin, and the exposed core is covered with a casing.
- Connect the structure to the paint tank. A hole is drilled on the tee into which the tank is inserted, and the flow of paint is regulated by a rubber trigger.
- Disconnect the removed wires and short-circuit them to the power supply, after which you can begin testing and filling the device with powder paint.
Continued assembly
When assembling a spray bottle with your own hands, you need to connect an air injection tube to the receiver. Hoses of the appropriate size are also used for this. They are connected using a fitting and sealant. You need to install a diesel fuel filter on the receiver. This will prevent moisture from the air from entering the system. In this case, the spray gun works more efficiently.
Both the receiver itself and the compressor need to be mounted on the board. Next you need to check how the system works. If everything is fine, you can start working. During the inspection process, it is also worth practicing working with such a unit.
It is worth considering that the compressor must be installed in the same position in which it worked in the refrigerator. If this is not done, the equipment simply will not work. Also, when using such a spray gun for a long time, you need to periodically change the oil in the compressor. To do this, you need to find the third tube in the unit body. If all steps are performed correctly, the device can be used for spraying thick water-based paint, as well as whitewash or other types of materials.
“Without water and neither here nor there”
This is how they sang in the Soviet film and it is impossible to refute it. Sources of water can be:
- central water supply, in which there is always water (almost);
- water supply system of a dacha society, in which water is supplied on a timely basis;
- well or well;
- pond, lake, river, that is, a natural body of water;
- a container containing accumulations of rainfall, drainage water, or filled from a water supply.
Everyone likes clean and warm water
Water is water: it would seem, what difference does it make? Differences in its purity, volume, temperature and pressure.
In the case when we are dealing with not entirely pure water, that is, from a reservoir or container, and we use drip irrigation, we will have to install a special filter. Otherwise, the droppers will quickly become clogged.
The garden wants personal irrigation with warm water
Temperature is also important: many plants do not like cool water. The source of cold water is a borehole or well. The problem is solved by natural heating of water in the storage tank. Note that when irrigating at night, the temperature difference between the liquid and the plants is noticeably smaller, so this positive factor can be used. Also, when spraying water in small drops, it has time to warm up when it comes into contact with air. We definitely take this fact into account.
It is advisable to have more water and stronger pressure
Water pressure has ambiguous properties. For example, when using drip irrigation, it should not exceed two atmospheres. Too high pressure is compensated by installing a reducer. On the contrary, when using sprinklers (sprayers) with a retractable part, water pressure in the system will be of the order of two atmospheres. You can increase the pressure using an additional pump.
The volume of water reserves is also ambiguous. So, when using drip irrigation from a container, the size of the latter determines the duration of irrigation. If the correct amount of liquid is prepared, the process will end at the right moment, and we will have a simple automatic system. On the contrary, when installing sprayers, for their normal operation, you will have to balance the water consumption and quantity with the capabilities of the water supply. In the worst case scenario, the sprinklers simply won't work or won't cover the intended area.
Technical solutions for water supply
All options without running water involve the use of a pumping station or simply a pump. A pumping station will provide constant water pressure in the system, but costs money and requires maintenance. It is cheaper to install an ordinary, for example, drainage or submersible pump and pump water into the container. By the way, the water in the container will warm up.
You can automate the process of turning the pump on and off yourself. To do this, a valve float from an ordinary toilet is installed on the container. The float can control the limit switch. The pump is connected to the switch via a timer. Otherwise, the bounce of the switch contacts will damage the pump.
When filling the container from the country water supply, you can install the mentioned valve from the toilet to the supply line. Thus, the container will be filled with water automatically to the required level during your absence.
Irrigation is connected to the home water supply through a separate tap using a HDPE 25 pipe
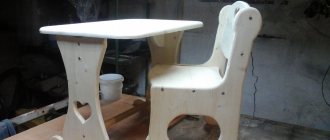
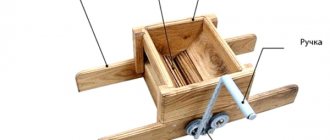
Holder
You can make a holder for the spray bottle. For this you need a board 10 mm thick. A square 250 x 250 mm is cut out of plywood or wood. A hole in the shape of a circle is cut out in it with a jigsaw. It must match the paint tank of the unit. The pistol handle is inserted into the groove. It is cut out from the edge of the plywood to the hole. The structure must be installed on a support of 3-4 legs.
Having considered the options for creating a spray bottle with your own hands, you can design a suitable type of structure. This will allow you to apply paint and whitewash quickly and efficiently.
Small felt-tip pen spray
A simple spray gun is made from materials that can almost always be found around the house. You will need:
- felt-tip pen body;
- plastic jar with a lid;
- drip hose;
- tubes made of any metal or plastic;
- household sprayer.
The tools are the simplest: a drill with a drill with a diameter of 4-5 mm, a sharp knife. You will need glue that bonds the plastic well and quickly.
Making a homemade spray gun begins with preparing a container for paint. 2 holes are drilled in the bottom of the jar, located opposite, each closer to the wall. Pieces of pipe are inserted into them: one comes out inside at the bottom, the other under the lid. Paint will be supplied through the first, air will be supplied through the second. On the outside, the tubes are the same in length: 1.5-2 cm. They are fixed in the holes of the tank with glue, achieving tightness.
Next they work with the body of the felt-tip pen. The end through which the ink rod came out is cut off. 3 holes are drilled in the shell: 2 in the middle, the third almost at the edge. It should be inclined relative to the felt-tip pen wall by 10...15°. This is achieved this way: first, the drill is held vertically, then, having gone a little deeper into the material, it is tilted.
From a household sprayer, you only need a nozzle. It is removed from the body, which is cut with a knife. A hole is drilled in the side of the nozzle and a plastic tube from the dropper is glued in.
All the elements are ready, all that remains is to correctly connect the hose from the dropper:
- The central channel of the nozzle is connected to a tube on the tank, the end of which is at the bottom. The hose is taken out through a hole in the felt-tip pen body, made in the center.
- A piece of hose is connected to the tube glued into the nozzle and inserted into a hole drilled at the edge. They are pulled inside the body and brought out.
- A hose is connected to the remaining free tube on the tank and inserted into the opening of the housing. The end is pulled out.
The result is a design made from a felt-tip pen, with a plastic container placed on top. On one side of the body there is a nozzle inserted into its end, on the other there are 2 hoses. Air will be pumped through them, so for convenience they are connected with a tee. They blow it out with their mouth, but it is better to connect an inflated chamber. This small device will help you carefully paint over small areas and hide scratches on your car.
How are water sprayers used?
Having studied numerous proposals from specialized companies for design, installation and turnkey installation, the owner of the site can determine with a reasonable degree of confidence which moisture supply system will suit him best.
- The best way to supply moisture in greenhouse conditions is to use drip-type spraying. Here the sprinkler is of the most basic nature - simple holes in the hose that you can even make yourself.
- The spray type is similar to a traditional garden watering can. Such designs are the most suitable option for an open garden, where hard crust on the soil is contraindicated for the beds.
- For lawns, especially if they occupy large areas, a sprayer using an electric motor drive is becoming a popular option. These are usually industrial parts that require good fit.
The assortment is large, but it is best to make your choice based on the advice of a specialist or installation by specialists from companies that have the appropriate permits.
Read about which pumps are suitable for watering and irrigation from a well here.
There is no need to mention the truism that any plant requires moisture. Especially popular today are green areas and irrigated parks in cities, large areas near country cottages require systematic care and watering in strict accordance with agronomic technology. Too much water can lead to waterlogging, while too little water can lead to drying out. Today it is very important to decide on the choice of sprinklers and sprinklers, which represent the direct working part of the entire complex system. The range of this equipment is represented by five types of designs.
- Manual watering of small areas is perfectly accomplished using watering guns. They are produced by almost all manufacturers of garden tools.
- Irrigation of a rectangular or square lawn is most effective by using a pendulum or oscillating sprinkler. The range includes models for manual use and partially mechanized ones.
- Sprinkler systems with a rotating effect are very popular. This is a large product line of static or fan sprinklers. They are distinguished by the possibility of stationary installation by digging into the soil; some models have a special bayonet design.
- To fully saturate a certain area of a meadow or lawn with moisture, the best option is to install rotary sprinklers. They are in many ways similar to static ones, but their priority is that they cover water supply areas with perimeters of complex shape.
- An even more convenient design is the pulse sprinkler - sprinkler. The effect of operation is that it has only one hole for the jet to exit. Through it, over equal periods of time, a ratchet mechanism pushes out a certain amount of life-giving moisture.
The beauty, freshness and aesthetics of the green covering of your lawn, flower bed or meadow depends on how correctly the sprinkler model is selected. For beginners in this fascinating business, it is best to get advice from a professional. This will allow you to get maximum effect and save money. This material will tell you about the electric lawn mower.
Where to buy and how much they cost
Every owner of a garden, cottage or vegetable garden must have a watering system in his arsenal if he wants to reap good harvests or admire the lush greenery of flower beds and lawns. When you have the financial opportunity to purchase professional equipment for watering your garden with water, you should choose brands that have proven themselves to be high-quality mechanisms, such as Karcher.
- The Hozelock company, working in the market specializing in garden equipment, components, and hoses, is ready to provide a wide range of products that you can choose from on the website hozelock-ru.com. The price range depends on the model and purpose of the selected irrigation product.
- The Garden Engineer online store on its website sadin.ru offers rotary sprinklers and accessories for them. You can purchase a nozzle for 67.20 rubles, and the sprinkler itself from 972 rubles. and higher.
- The ozon.ru website is ready to offer garden equipment from famous brands such as Kärcher, FIT, TRUPER, Marolex. In the assortment of the online store, which is located in Moscow, Chapaevsky Lane, 14, you can choose and order sprayers, sprinklers, including rotating, pulse, tips, pistols, and filters for home delivery. Prices for the existing range of goods from 254 rubles. Half of all store sales occur in Moscow and St. Petersburg.
Homemade mini oral spray gun
The simplest version of a liquid nebulizer that operates using the user’s breath. The performance of such a device largely depends on the volume of the lungs. The diameter of the tubes determines the amount of paint transferred, but it should not be too large.
- Ballpoint pen (helium can be used).
- Small container (jar, bottle).
- Wooden block or piece of foam plastic 50x20x10 mm.
- Grinding stone or sandpaper.
- Universal glue (you can use a hot-melt gun).
The essence of the device is to pull the mixture out of the container through a tube, due to the air flow flying over this tube. Small doses of the mixture are broken under pressure into tiny droplets, flying forward. The task is to fix the two ends of the tubes in a certain position on a frame made of wood, foam plastic, metal and any other available material. Let us describe in more detail, in order.
- The first step is to disassemble the handle into 2 tubes: the body and the rod. Air will flow through the first, and paint will come out of the second. The tapered nose of the rod, from which the writing ball usually protrudes, must be expanded to a diameter of about 3 mm. You also need to prepare the rod by removing the ball from its metal tip. To do this, you need to deform the ball by rubbing it on a grinding stone or sandpaper until it falls out. Don't forget to remove the ink from the refill.
- The prepared tubes must be placed perpendicular to each other so that their ends converge at one point. You can attach them to any element the size of a matchbox. The air tube from the pen body is located horizontally, and the paint supply rod is located vertically. The location of the outlet holes may require slight adjustment, so you should not immediately fasten the elements tightly, but place them on electrical tape or tape and check the quality of the spray. It is best to place the paint outlet exactly in the center of the air tube.
It is better to see the device once than to imagine it by description. For a more detailed discussion of the topic, we present you a video on how to make a mini bullet gun with your own hands with a detailed explanation and demonstration of each stage of the assembly process.
Operating principle
Before you start making your own tool, it is important to understand how it works and what parts of the mechanism cause the paint to escape from the tank and quickly transfer to the surface. Since the object of analysis is exclusively the paint sprayer, we will not consider the design of air sources (compressor or turbine), but will take it as a given by default. Let's focus on the design of spray guns.
Any air spray gun (both pneumatic and electric) has a body where a needle and nozzle (nozzle) are placed. An air cap with side holes is screwed on top of this to give the torch an elongated shape. In addition, on the body there is a trigger for opening the air valve and a tank with a spray mixture. Pneumatic guns are equipped with regulators for the size of the torch, material supply and sometimes air. Electric models have an air flow pressure regulator on the body and a material with a torch on the air head.
The first thing the air encounters when it enters the nozzle channels is the valve connected to the trigger. When lightly pressed, the path opens, the flow passes inside the housing and flies out of the air cap. In this case, the material is not sprayed, because its path is blocked by the needle cone, which rests against the back wall of the nozzle. Stronger pressure on the trigger moves the needle away from the nozzle, opening a passage for the paint, through which it is picked up by the air flow and rapidly rushes forward in a cloud of small particles. If the tank is installed at the bottom (like most electric models), the mixture is forced out through the tube by the same air entering the container through a second hole open to it. Using this principle, you can make a pretty decent homemade spray gun for painting a car without a compressor, based on an old household vacuum cleaner.
The air cap, screwed onto the nozzle, is inherent only in factory models of instruments. When making a spray gun with your own hands, even the most skilled craftsmen usually do not try to repeat the complex design of a given part, and use the less productive, but simpler principle of spraying. We will talk about this technology further.
Watering the lawn
A very good option is the use of polypropylene pipes with final water spraying devices. A sprayer for watering a lawn can be made like this.
When cultivating the area under the lawn, we install a pipe structure so that the water sprinklers cover the entire area. The spray diameter depends on the water supply pressure and the design of the sprinkler. Then, at a depth of 40-50 cm, we bury the prepared system. The spray tips are brought to the surface and tied with polyethylene to prevent soil from getting inside the pipes.
If it is not possible to dig in the lawn area, then portable water sprinklers for irrigating the lawn will help. Another option is to use a Crazy Flower watering sprayer. This automatic watering system does not damage fragile buds, greens, soil and roots. It is mounted to a regular hose and can be installed anywhere. In addition, this sprayer is very beautiful to use.
You can also purchase a ready-made automatic watering system, and then assemble it yourself in your garden.
Operating principle
A spray gun is a device designed for applying paint and varnish material and other liquids to objects by spraying. The result of the work in this case looks better than doing it manually.
The principle of operation of the device is to supply paint and air under high pressure to the nozzle of the device.
The air stream breaks up the paint and varnish, mixes with it, turning into fine dust. Thus, the working composition leaving the nozzle evenly covers the entire working surface.
For reference! Finished products are available for sale. However, their cost starts from 2,000 rubles. Not everyone wants to incur such expenses for one-time work.