DIY turbine spinner
Let's tackle perhaps the most labor-intensive process - making petals. To do this, we need sheet material made of non-ferrous metal with a thickness of 0.4 mm.
A brass plate from a photo glosser (you can buy it through an advertisement) is ideal for our craft. The size of the workpiece is 25x8 mm. I tried to experiment and increased the size to 28x9 mm.
But such a turbine spinner flies worse and is more stubborn, and this did not affect the behavior of the fish in any way. Small spinners with a small tee can be useful for catching small fish such as bleak.
I strongly recommend making a couple of these spinners and fishing for a bleak from a distance of 80 meters (asp hunting position). Such entertainment broadens the angler’s horizons and gives an idea of the capabilities of the gear and the situation on the reservoir.
How to make a turbine spinner?
We will need a caliper to mark the workpieces. It is convenient and fast to work with, which cannot be said about a ruler with a scriber. Please note that the caliper must have sharp jaws for marking.
I used ShTs-II brand calipers. Now from the edge of the sheet you need to mark strokes with a caliper at intervals of 2 mm. There should be 4 strokes.
The center line is at the 4 mm mark, the edge of the workpiece is at the 8 mm mark, and we will need the 2 mm and 6 mm markings in the process. But we'll talk about them later.
From the end of the strip, with a step of 13 mm from the center line, we place marks as many as will fit. Using a sharp core on the first marking and then every other marking, we mark the locations for the holes and drill them out with a thin drill.
The holes should be round, and the diameter should correspond to the thickness of the axle wire. If the diameter of the hole is larger, the petal will beat and rub its edge against the support bead.
This can cause the bait to twist the line. I do this: with a sharpened dowel I mark the locations for the holes and with a drill with a diameter of 0.7 mm, clamped into a miniature collet clamp, I drill out the holes.
If you don’t have such a clamp, you can wrap foil around the tail of the drill and clamp it in the chuck of an electric drill. Since I haven’t yet acquired a small electric drill (I have an SDS plus hammer drill with an adapter chuck for a regular drill), I had to drill a hole with this monster.
As it turns out, this is possible. It is enough to place the tool on its side, turn on low speed, and feed the workpiece by hand. I will say more: holes can be drilled manually using a drill.
Next, set the size to 12.5 mm on the caliper and measure it from the hole on both sides. This is necessary to obtain a symmetrical workpiece. Using metal scissors, we cut off a strip, straighten it and cut it along the +-12.5 mm marks.
If a small gap forms between adjacent marks, we categorically cut off the excess with scissors. At the ends of the workpieces, I mark 3 mm from the edge and cut off the corners of the workpiece with metal scissors.
Now we won't need scissors anymore. The “finest hour” of a semicircular file and a small vice has come.
Making spinners for perch
Quite good models of spinners can be made for perch. Many fishermen do not buy such accessories, but make them exclusively with their own hands. In this way, it is possible to save money and prepare promising baits for fishing.
There are several varieties of winter spinners designed for perch fishing. Each option has its own distinctive features and structural features. An angler can easily make each of the popular types of spinners on his own. Let's take a closer look at the stages involved in the manufacturing process of various perch baits.
"Sleeper"
A promising tackle is a winter lure called a sleeper. In production it turns out to be one of the simplest and most uncomplicated. Both experienced and novice anglers can make it with their own hands.
Not only perch, but also pike perch or pike are very well caught on the “sleeper”. You can make this spinner in literally a matter of minutes. Let's consider what actions are needed for this.
- A winter lure called a “sleeper” is made from a narrow strip cut from metal. It is best to use copper, practical stainless steel or brass.
- When this blank is cut from a metal sheet, you will need to make a couple of holes at its edges.
- Next you need to carry out a thorough polishing. To do this, it is recommended to use a sheet of sandpaper or special GOI paste.
- The hook will need to be attached, overcoming the winding ring. Some fishermen prefer to solder this part to achieve a more secure connection.
"Malek"
An equally popular winter lure is the whitebait. Similar options are also made quite simply and quickly
To do this, you don’t have to purchase expensive materials and professional tools, but in the end you can get a very effective bait that will attract the attention of underwater inhabitants
Let's look at step by step how you can make a spinner of this type yourself.
- First you need to prepare the corrugated pipe. From it you need to cut a blank, the length of which will be from 40 to 45 mm.
- The final look of such a homemade product can be achieved by using a file.
- As a rule, a spinner called “fry” is characterized by an elongated shape. The body of the product should expand slightly towards the bottom.
- When assembling the winter lure in question, the hooks must be fastened by passing them through the winding rings, or attached by soldering. Both options are acceptable, but the second is often more reliable.
Castmaster
From a copper tube you can build a winter spinner called a castmaster. Let's find out what stages it will take to make it at home.
- You can first draw a template for the future product indicating all dimensions and angles. You need to take a copper tube, and then mark the required corners of the future product on it. For the bait in question, they will be 17 and 23 degrees, respectively. Such parameters are considered standard when it comes to a castmaster.
- If the digital designations are not the same as indicated above, then this will certainly affect the performance of the spinner. As a rule, the impact is negative.
- In accordance with the outlined lines, you will need to cut out the body of the future spinner from the tube. All sharp edges will definitely need to be removed.
- The internal surfaces of the workpiece will need to be carefully treated with special solvents.
- The next step is to carefully seal the cavity of the workpiece in question with tin.
- After this, the homemade bait will need to be well sharpened and polished. You also need to drill holes for the subsequent attachment of the leash and hook.
How to make turbine blades?
The workpiece must be clamped horizontally under the hole in a miniature vice and a notch is made with the semicircular side of the file in the middle, not reaching 2 mm from the stroke.
Next, using the straight side of the file towards the right, remove the corner almost to a vertical stroke of 3 mm and grind off the two protrusions formed after cutting the corner.
Then we turn the workpiece 180 degrees and perform the same manipulations (we grind a notch in the center of the product, grind off the protrusions formed after cutting the corner with scissors);
Next, turn the workpiece over with the markings facing away from you and grind off the protrusions at the corners and protrusions on the right;
Again, turn the workpiece 180 degrees (marking away from you) and use a rasp to perform the usual manipulations.
By always grinding the upper right quadrant, the petal will be symmetrical in relation to the hole. If you grind the workpiece around the perimeter, it will be difficult to achieve such a result: errors in the hand and an imperfect eye can ruin everything. Use fine sandpaper to “lick” the petals.
Bend turbine blades
Using pliers along the edge of the small jaws, the petals are bent 60-80 degrees. The blades should form the same angle between themselves.
To prevent the blades from coming into contact with the support bead, the area between the blades must be made at least 3.5 mm wide.
The flat exit side of the workpiece hole should be adjacent to the support bead. Don't panic if the blades bend further. The petals easily acquire the desired bend angle if you bend the support pad with the hole.
After this, a recess is formed on it for the divider bead. Regarding the angle between the blades, I can give some explanations. When throwing a bait with a bombard, it will fly head first, and the pressed blades are better flown around by air, and by the way, by water too.
When the spinner moves, the turbine resembles a spinner and thus becomes more noticeable. Our device has 2 blades, they are flat, due to which the light is scattered over long distances, attracting the attention of the fish.
Now let's look at choosing the direction of rotation of our invention. A floating bombard against the current can twist the line, more often this happens with a stubborn bait or accelerated retrieval.
The bombard rotates against the current, since part of it is on the surface of the water. If the spoon and bombard rotate in the same direction, then the line may twist.
In calm water, with a current and in the case when the turbine and bombard spinners rotate in opposite directions, spinning does not occur. Therefore, think through places for fishing in advance or adapt to the direction of the current to avoid possible incidents.
Ultralight turbines. #WITH YOUR OWN CURVES
Turbines for ultralight.
“Acquirers are taking over the World...
Previously, the world was captured by Genghis Khans,
Tamerlane, Macedonian. Now it's tight
and the acquirers inexorably seize..."
What is this epigraph for? And, in fact, only to emphasize the value of things that we do not acquire, but make ourselves, and to give such things some additional “romantic” aura.
In fishing, the question of “homemade products” comes up very often. Sometimes you want to save money by making, for example, jig weights. Sometimes creative impulses directed in the right direction lead to the creation, for example, of jerks and wobblers, which cannot be called anything other than a Work of Art (I have seen it on the site more than once). And sometimes we are driven to handicrafts by the banal lack of necessary items in stores... That’s how I started making turbines.
Having started ultralight, I quickly noticed that spinners of extra small sizes (00) did not meet my requirements from them. The operation of the petal was extremely unstable. Especially in locations with small rivers and streams. I remembered some program where they showed a bait with a propeller and that’s where it all started...
To date, I have already tried several variations of “turbine” class lures. I tried different shapes of the propeller, its proportions relative to the core, materials and shapes of the core, its different colors, experimented with hooks... And in this article I will offer my most extreme version of the “evolution” of this bait. Evolution, of course, in the “test tube” conditions of my home workshop).
I suggest you start with a can of good beer! Or cola (if you are a “no-no”, like me). This will lift your spirits and, most importantly, provide material for making a propeller. By the way, there are more bites on turbines made from non-alcoholic liquid containers. I’m promoting, as it were...)))
The material will be the bottom of an aluminum drink can. Or its TOP END. The metal in these places is thicker. It does not deform when bitten, remaining light and easy to process for its thickness.
We open the bottom into strips of the required width (it’s convenient to use an angle grinder using thin disks, BUT FOLLOWING ALL SAFETY RULES! Because sawdust flies into your eyes, and sometimes the workpiece is pulled out of your hands. But you can get by with scissors).
Next, draw an 8-piece of the required size on the metal (I already have a template, so in the photo I drew according to it). Cut it out. We process it with a file or a nail file. Mark the approximate center with a needle and punch through. We modify the hole with a channel expander. We slightly bend the propeller blades in different directions - voila! Ready
NOTE: it is initially better to make the hole in the propeller of the minimum diameter for the bait axis you have chosen. It is better to then gradually expand it to what is necessary. There is absolutely no need for extra play in this place.
I tried different options: metal stoppers from guitar strings, plastic beads, lead float “pellets”... But in the end I came to the option with homemade lead cores. This option is labor-intensive, but in the end it turned out exactly what I wanted. It would be easier to buy ready-made lead olive weights with through holes, but this is not our Way!)
So, we need preparations. I made them in three ways of pouring lead:
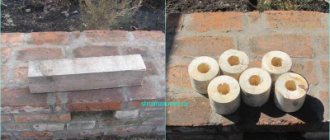
1. Pouring into channels drilled in brick. Drill diameter (for concrete) 4-6mm.
The method is convenient if you have a DRY brick, drill or hammer drill at hand. The holes must NOT be through holes. After the lead cools, the brick splits.
2. Pouring into channels drilled in a wooden board. The diameter is the same. Even a simple screwdriver can do it. The wood also splits after the lead cools.
3. Pouring into tubes rolled from cardboard. Cardboard from the covers of notebooks of the “48 sheets” type is suitable. The diameter of the blanks is obtained “by eye”. Care is required when working. I roll the tubes around a nail and secure them from unwinding with wire and electrical tape. Tuck the bottom end.
How to make an axis for a turbine spinner
We will need thin elastic wire with a diameter of 0.45–0.5. You can use thicker wire, but then all the drive and meaning of the lesson is lost. I use 0.45 diameter wire from old stock.
You can order 0.51 mm Worth wire online. This is perhaps the most affordable option for purchasing this material. Hooks for our spinners should be taken according to Western numbering No. 8.
I prefer the Owner ST‑36BC and ST-41BC. Of course, you can install hooks from any manufacturer, but I recommend choosing something similar in size and weight.
For example, let’s take a hook made of thinner wire ST‑21ВС. It is lighter, so it can cling to the fishing line as a result of unbalanced work with the spoon.
For clarity, I will take wire and 3 hooks of 36 and 41 series. On a piece of wire (Worth has 127 mm cuts, but 80 would be enough), using small pliers and round nose pliers, I make a bottom loop with a tee and twist.
I cut the rest with a file and break it off. I use a pyramid file. It has one edge with a working notch, but the other two have no notch.
Sometimes on homemade and store-bought spinners you can find excess wire sticking out on twists. I think it's better to get rid of them with a needle file. Using a file, we cut the excess wire under the root and break it off, polish the break by cutting along it a couple of times.
How to make a spinner core?
Well, we finally got to the core of the spinner. The core is a symmetrical and smooth support for the bead and acts as a weight, ensuring the penetration of the spoon into the water column.
We will use polyethylene insulation from the field wire P-274. The outer diameter of the insulation is 2.3 mm, and the inner diameter is about 1.3 mm.
All these are approximate parameters, since the clearance of the internal insulation hole is made in the shape of a hexagon. Unfortunately, I cannot suggest what can replace such insulation.
Most often, cambrics are made of PVC, since this material, unlike polyethylene, is not so slippery and does not deform under the influence of high temperatures. You can use cocktail straws from Soviet times, although you will have to adjust the sizes and joints.
Insulation
I heat the end over a candle and then cool it in a metal recess. Now I’ll tell you how to make a notch. I take a steel ball with a diameter of 5 mm, place it in a pre-drilled hole in a metal plate and hit it with a hammer. The plate can be made of lead, copper or duralumin.
So, we have a frozen fungus, the length of which varies between 8–10 mm. I advise you to prepare cores for future use, devoting an hour or two to this activity.
Next, we measure the thickness of the bottom twist and use a drill of the same diameter or a smaller drill to adjust the core from the bottom to a depth of 2–3 mm to the diameter of the twist.
Although the supporting side of the core is sealed, it can be easily pierced from the inside by twisting and pushing the axle clamped with pliers. The axis comes out in the center of the supporting part.
I pierce the support with an axle with insulation strung on it. I remove the burrs formed from the puncture with a knife. I screw the core onto the bottom twist. The twist has the same lead as the thread, formed from a needle file.
To make the load, I use thin solder 1 mm thick. I pull a smooth metal rod several times on both sides of the segment and get flattened solder.
This will allow the load to be secured using a 4 mm diameter heat-shrinkable casing in the future. A piece 70 mm long is cut and inserted into the lower hinge of the axle in the very middle.
Both ends are wound onto a plastic core in the direction of twisting and cut diagonally near the fungus with a paper knife or scalpel.
A piece of heat shrink with a diameter of 4 mm is put on the solder and melted with hot air or flame. In principle, this is not necessary: the solder holds tightly and unwinding it is not difficult.
If you decide to use heat shrink, I advise you to make a device to hold the tee. It is much more convenient to work with it. Rotate the assembly over the soldering iron or on the side of the candle flame and frame it.
This must be done quickly so that the support does not melt. Or you can line an elongated piece covering the top of the support and covering the ring of the bottom twist, and then carefully trim off the excess with a knife.
Final assembly of the turbine spinner
Final assembly is the most enjoyable part of the process. We take support beads with a diameter of 4 mm. Glass beads are best. They are the most popular and have small diameter holes. Metal beads will also work, but they will be more difficult to obtain. I use Worth Solid Brass .
They have one drawback: a large hole. It seems that all store-bought beads have this vice in common. At worst, you can use plastic beads.
The assembly process is very simple. A bead is strung on the axis with a core, then a petal is placed, and a divider bead with a diameter of 2 mm is placed on top. made of plastic.
By covering the petal support area, it reduces drag and also gives the structure a complete look. The divider bead must be selected with a small hole, otherwise it may get stuck on the top twist, or even break completely.
When performing an upper twist, the petal should be centered relative to the axis or slightly lower. There is no need to shorten the free part of the axis: with a shortened axis, the spinner is more likely to overlap. In our case, the axis length reaches 45 mm. The upper twist is performed in the same way as the lower one.
Feathering on the tees may or may not be done. It's a matter of taste. I take this absolutely calmly, since I did not see a correlation between the behavior of the fish and the presence or absence of plumage.
Therefore, I leave the right to be considered the key object of interest for fish to the bombard turbine.
Oscillating spoons
Spoon baits are excellent baits for catching pike. Its basis is a plate curved in a certain way, which allows the spoon to make characteristic movements in the water that attract predators.
- The simplest option for making a spinner for pike is to use a handle from a tablespoon made of stainless steel or cupronickel. The desired shape is obtained by bending the handle at both ends. At the same ends, holes are drilled for attaching the tee and the bait itself to the main fishing line. The tee is installed on the wider side. In general, this lure resembles a small fish, like a bleak.
- The remaining part of the spoon is also suitable for making a spoon. At the same time, you can immediately note that there is no need to bend anything and the spinner is almost ready, all that remains is to drill holes for attaching the tee and the winding ring.
- From the handle of an aluminum spoon you can make an analogue of the well-known and expensive spoon bait called “Devon”. The manufacturing technology is the same as for making a spinner from heavy metal, but the tee should be installed on the narrow part of the handle. By adjusting the bend of the handle, you can change the game of the bait.
- A spoon is made from the remaining part of the aluminum spoon, according to option No. 2. The only advantage of such a spinner is its ability to make certain sounds while moving. As a rule, the pike certainly reacts to this stimulus.
- Basically, oscillating spoons are made from blanks cut from plates of various metals. It can be oval, diamond-shaped or in the form of a willow leaf. A hole is drilled on one side for attaching the fishing line, and on the other side the hook is attached using soldering. Soldering allows you not only to secure the hook, but also to load the bait. But before this, the workpiece is given a special shape by stamping or embossing. On the side where no soldering was done, the surface of the spoon is carefully ground and polished. To make the manufacturing process faster, several blanks should be made and a ready-made stamp should be used. Then you just need to drill the necessary holes and secure the hooks.
- If you connect together two blanks made of different materials, you get a bimetallic spoon. One of the best options may be a copper-aluminum spoon, but it will not be durable, since these two metals are not friendly with each other. And yet, it can be made. To do this, you should prepare two absolutely identical blanks from copper and aluminum. To connect them, you can use the riveting method, after which the surfaces are ground and polished. Using the stamping method, the spoon is given the desired shape.
- A tubular spoon is made from a metal tube. To do this, take a tube of any metal of the required diameter, after which it is cut on both sides at different angles. After this, the outer part of the tube is ground and polished. Finally, mounting holes are drilled on both sides. The tee is installed from the more acute angle, and fastening to the fishing line is carried out from the blunt end. This will give the bait the necessary game.
- A greater effect can be obtained if the tubular spoon is made composite. As a rule, a spoon consists of three parts, which bend when the spoon moves, making it more attractive to a predator.
- You can also make a spoon from a corrugated plumbing tube, which may be more catchy than any other spoon. To make it, you need to take a corrugated plumbing pipe (shiny) and cut out suitable blanks from it, and then drill the necessary holes for fasteners.
- Small oscillating spoons (ultralight) are made using similar methods described in paragraphs 5 and 6. The only difference is in size.
Read Fishing boat: how to choose, where to buy and how to repay the loan for it
Plumage
The different colors that are located in the tee area play an important role. The bait becomes more attractive to fish, and it also camouflages the hook. Options are possible using vibrating tails or other silicone baits that are attached to the hook of the spoon. This approach allows you to make the spoon more catchy. Sometimes it is enough to add a fish eye or several stripes on the surface of the spoon and the spoon will play completely differently, which will undoubtedly increase the number of pike attacks on the bait.