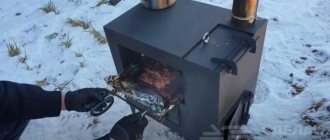
With the onset of warm weather, city residents go to their dachas to relax in nature, cook barbecue and other dishes over a fire. For owners of the private sector and summer residents, cooking food outdoors has long become commonplace. An outdoor stove installed in the yard is perfect for this. This design is durable and multifunctional. You can order the construction of a furnace from specialists, buy a ready-made factory model, or do it yourself, following the step-by-step recommendations of the masters.
Possible problems
During construction, several mistakes can be made.
Connection of foundations - due to different loads, differences in subsidence are possible, which is why the furnace may warp in the future.
If you take river sand instead of quarry sand, the masonry mortar will not be strong enough due to the smoothness of the sand grains and their poor adhesion.
Hewn and cut bricks collapse faster, so when laying it you should try to install it with the cut side inside the seam.
When laying a chimney, it is necessary to use a special plug so that the mortar does not remain on the internal walls, and the surface of the masonry is cleaned of mortar every 4-5 rows.
If you do not make a cleaning hole in those places where the chimney changes direction, soot will accumulate in it. When installing dampers and doors, we must not forget about the property of metal to expand - masonry cannot be done without a small gap.
These and other mistakes can be avoided if you consult with an experienced craftsman before starting work.
Place for the furnace
Choose the optimal location for the heating stove. For example, a stove installed in the center of the room will distribute heat as efficiently and evenly as possible. However, such placement of the stove is not always convenient.
Stove in the center of the room
If the stove structure is placed against the wall (this option is the most popular and frequently used), cold will flow across the floor of the house.
Select in advance the location of the combustion chamber door. Design the stove so that in the future you do not have to carry fuel throughout the room, spreading dirt around the room.
The heating stove is located against the wall
The best option is to install a firebox in a room that is rarely visited.
Recommendations regarding the foundation are standard - an individual concrete foundation is installed. It cannot be connected to the main foundation.
Calculate the design of the foundation in such a way that it is able to withstand the load not only of the furnace itself, but also of the smoke exhaust structure, which is also strongly recommended to be built of brick.
Recommendations for using a small stove
In order for the stove to be useful and save money, it is necessary to monitor its condition. Even a minor crack increases the loss of efficiency. For better heating, use only dry wood for kindling. Be sure to close the view.
Major cleaning of soot is carried out once - in the summer; in winter, minor cleaning is done, but at least 3-4 times per season. Accumulated soot reduces the heat output of the device. If the viewer, valves or door are faulty, you cannot light the stove, because they control the draft and help carbon monoxide evaporate.
Despite all the nuances in the construction and operation of a mini-oven, it acts as an excellent heating device and can compete with modern gadgets in the speed and delicacy of preparing many dishes. It’s not for nothing that our ancestors considered the stove to be the soul of the house and placed the structure in the middle of the hut.
Not even a few centuries passed before she returned to us, only in a slightly different form. But its small size is not the main thing, because in terms of its functions and the wonderful atmosphere that is created in every home, the device is very similar to the good old Russian stove.
Options for installing a stove in the house
The placement of the stove depends entirely on what exactly the owners expect from it. If it is installed in a small house and will be used as a fireplace for friendly gatherings, you can use the first scheme. This stove is a good option for cooking barbecue on the grill or kebabs.
Brick kiln placement options
The second scheme is for a house of solid square footage. In this case, the front side of the fireplace stove opens into the living room, the stove walls heat both bedrooms, and the heat in the remaining rooms is maintained using heat exchange.
The third scheme with a stove for heating and cooking is a budget housing option for a bachelor or a small family. Pros: a warm bed and the ability to place a dryer in the hallway.
Important: it is worth taking care of the external insulation of the house in advance, because it greatly increases the efficiency of stove heating.
Purpose of an outdoor stove
In addition to cooking in the fresh air, it will become an assistant in many matters:
- canning vegetables, berries;
- drying mushrooms, fruits;
- smoking meat and fish.
There are many advantages to purchasing it. The garden stove does not consume gas or electricity, as it runs on wood or coal. Its location near the gazebo will make it convenient to receive guests or have dinner with the family, and the interesting design of the structure will turn it into a decoration for the estate.
Users often search for:
- Woodpile for firewood at the dacha
- Firewood storage shed
If you decide to do it yourself, it is worth considering that:
Purchasing high-quality material guarantees the durability of the device. It is better to choose a combination oven
It's more practical. When choosing a site for a future structure and carrying out construction work, it is important to follow safety precautions. Accurate calculation of the amount of materials will save money and reduce the time of all processes.
What to consider during construction and operation
After choosing any of the models of garden stoves and deciding to build it, in order for everything to be successful, you need to understand some of the nuances of its construction and care.
- The foundation of the furnace must be raised to a certain height so that the furnace structure is not affected by melt water or flooded by heavy rains.
- Since clay mortars do not respond very well to natural influences (humidity, precipitation, direct sunlight, etc.), it is better to use cement mortar to seal external joints.
- The best option would be to place a garden stove under the roof in a closed gazebo - this arrangement will allow it to be used in winter, as well as in any weather.
- A gazebo for a garden stove should be spacious, so that you can install a table in it and seat guests.
- On the site, the gazebo and stove should be located away from the gas pipeline and power lines, but closer to the water supply so that water can be piped inside the gazebo.
The first thing you need to do when planning a building is to find or draw up a project. How convenient it will be to prepare your favorite dishes will depend on it. Therefore, when dealing with this important matter, you need to think through all the nuances of the functionality of the future stove.
Types of brick kilns
Differences in furnace device designs are manifested in the masonry features, shapes and sizes.
Simple BBQ
A popular design for outdoor structures is the barbecue stove. It is erected using simple brickwork, which resembles the letter “P”.
5b6027f1fd565a39b7d9f054b8937253.jpe d4c248074f8a46e4f1b275d8d06f7af7.jpe 61ec0d7d7f3aed387a642719567fc2b2.jpe
The inner walls have several projections to secure grates for meat and a metal sheet for coals. The structure is light in weight, so there is no need to build a massive foundation.
For the base, choose scraps of concrete pillars. Raise the device to the height that will be convenient for comfortable cooking.
Outdoor stove with smokehouse
In the design of such a stove, a smokehouse is installed above the hob in the smoke collector. It can be created from more affordable materials than a barbecue. A special feature of the stove with a smokehouse is the absence of fire-resistant masonry.
Scheme of a direct-flow chimney for a stove
This device is more difficult to build than the previous ones, but the increased ease of use and attractive appearance cover all the shortcomings.
These products look like a fireplace. However, this is not quite true. Using an open flame in this type of stove is dangerous. This is explained by the design of the pipe - it is direct-flow.
Cooked on such stoves using coals. Firewood is used only at a great distance from residential and outbuildings.
Construction of a stove for a summer residence and its features
The main elements of any brick stove for a summer residence are:
Foundation. For any stove it is necessary to build a separate foundation, not connected to the main foundation of the house.
Ash pit (ash chamber). This element of the furnace is designed to collect products during fuel combustion. Oxygen is also taken in through the ash pan, which is necessary for the combustion process.
The ash pan is located below the combustion chamber and is always equipped with a metal door through which cleaning takes place. A grate is laid between the ash pan and the combustion chamber. Typically, the ash chamber is 3 bricks high.
Prices for factory stoves
Owners of dachas and country cottages should consider stationary or mobile purchased stoves.
A barbecue oven made of red refractory brick with a length of 1.4 m, a firebox width of 0.98 m, a height of 2.12 m, and a depth of 1.3 m without installation will cost 78 thousand rubles. The same structure made of aerated concrete costs 55 thousand. The price of a brick oven 2 m long and deep, equipped with a cutting table and a built-in sink, will be 105 thousand rubles.
A product of smaller depth, 71 cm, without additional devices and cladding will cost 54 thousand.
Building a stove yourself will be much cheaper. Regardless of the type of design chosen, it will delight the owners with delicious dishes over a fire and make evenings with family and friends warm and cozy.
Types of stoves
The most popular modifications of brick kilns are:
heating stove units. The main function of this design is clear from its name. This stove is used for heating rooms. Heating stoves are characterized by fairly easy and quick construction;
heating and cooking stove structures. They are the most optimal, popular and in demand option among private developers. In addition to heating, such stoves make it possible to cook various foods, which allows you to save a lot on gas and other sources of thermal energy. This design includes a special stove or even a spacious oven;
Materials and tools
First, prepare the necessary tools:
- shovel;
- bucket for solution;
- vertical and horizontal level;
- pliers;
- trowel;
- pickaxe;
- hammer, including a rubber one.
We prepare reinforcement and formwork if we do the concreting of the foundation ourselves.
We purchase enough fireproof and fireclay bricks to cover the entire structure. Construction materials must:
- be resistant to temperature changes;
- not be subject to corrosion and other external influences;
- to be whole;
- be certified.
Then we check the availability of the necessary metal equipment:
- pipes;
- gratings;
- staples;
- gate valve;
- door;
- corners.
Their number must correspond to the furnace design.
We prepare a mortar for masonry, which will include:
- clay;
- sand;
- alabaster;
- cement, etc.
Consult with the builders first and choose the most appropriate solution option. Experts recommend cement-sand grade M250 and higher.
7181adadd41f890dd9ae31eefbcc49e8.jpe
Small country stove made of brick
This heating stove, operating on the Dutch principle, has dimensions of 510 * 770 mm with a height of 2150 mm. Its heat output is 1760 kcal/h.
Preparation of materials
Construction requires 210 red bricks and 76 fireclay bricks for the firebox. For masonry you need about 80 liters of heat-resistant mortar. You will also need the following materials:
Stove diagram: 1 – roofing felt for waterproofing; 2 – blower door; 3 – firebox; 4 – cleaning door; 5 – valves.
Ordinal masonry scheme
The stove is placed strictly according to the order pattern, not forgetting about bandaging the seams and installing the doors. The doors are secured with steel wire, embedded in the masonry. The grate is installed after laying the fifth row. On the twenty-first row, the channel is narrowed by half a brick, and on the twenty-third row, a channel measuring 130 * 130 mm is laid out. The last row is laying the base of a chimney made of four bricks with a 130*130 mm channel.
Layout diagram from rows 1 to 15
The sequence of masonry is from rows 16 to 30. Upper rows of the furnace
If laying a stove with your own hands seems like a complicated process, it makes sense to turn to professional stove makers for qualified help. In the hands of a master, an incomprehensible scheme can be transformed into a spectacular home hearth, warming the body and soul.
Project selection
If you love fried meat, then the oven should include barbecue and grill elements. For smoked meats, you can install a smokehouse. The Russian outdoor stove includes a hob, which will provide the owners with healthy boiled, steamed or stewed dishes. And the availability of space for a cauldron - exquisite oriental: pilaf, shulem, shurpa, etc. Each type of stove has its own patterns and subtleties of masonry.
In addition to functionality, you need to think about the overall appearance, which will harmoniously combine with the entire site and the house.
Photo 2. An example of a brick structure project with a Russian stove, sink and cauldron. There is a comfortable warm place to sit on the side.
Selection of bricks, sand, mortar
In order for the stove to serve for a long time, you need to select all the materials correctly. There are three types of bricks:
Advice: when choosing a brick for a stove, you need to completely abandon the hollow types.
The solution is made from clay. Red clay is suitable if the stove is made of red brick; when using fireclay, special fireclay clay is required. Some stove makers still make their own mortar in the old fashioned way from river sand with a grain size of 1–1.5 mm, clay (in a ratio of 2.5:1) and water. It is advisable to use angular quarry sand without foreign inclusions and the so-called fatty clay. However, it is easier and more reliable to buy a ready-made baking mixture in the store, preparing it according to the instructions.
From the accessories you need to purchase grates, blower and combustion doors, soot cleaners, valves or dampers.
Combined brick garden stove
This model is designed to be built in a gazebo. It combines the advantages of a Russian stove and barbecue. To build such a unit, enough space is required. Benches, chairs, tables should be located away from the structure.
The main stages of laying a garden stove:
You need to decide on the parameters of the device, prepare a drawing, and also purchase everything necessary for the work. It is important to make a solid foundation of cement and sand. How to lay the base was discussed earlier. You need to wait a few days for the foundation to harden well. The furnace is laid according to the drawing
The solution is mixed from sand and clay in a ratio of 3:1. The Russian garden stove is equipped with two grates, which should be located at a height of 1 m above the stove. One of them is intended for lighting a fire, and the second will be used to prepare food. The barbecue must be placed on a concrete base. You need to organize two compartments: a cooking table where you can build a sink, and a roasting pan equipped with a smoke pipe. The chimney is the main part in the construction of the gazebo. The most convenient and correct shape is trapezoidal. When installing this system, you must be careful, because the slightest mistake can lead to structural failure. Using the drawings, there will be no problems with the construction of a Russian stove and barbecue. The main thing is to accurately observe the dimensions and required shapes.
Laying a garden stove with your own hands
We lay a layer of waterproofing on top of the foundation and install the first row, according to the order. We check each row with a level to ensure it is horizontal and all angles using a plumb line. The seams between the bricks must be filled with mortar. After this, he lays out row by row, strictly in accordance with the order.
When installing the doors and slabs, we carefully cover each of them with basalt wool or wrap it with asbestos-cement cord. This is necessary so that, when expanding from heat, the metal door does not burst apart the brickwork.
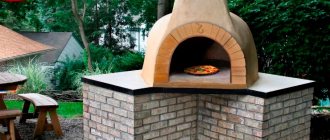
How to make a Russian summer stove out of brick for outdoor cooking
The Russian summer oven is suitable for cooking dishes from any cuisine in the world. You can bake bread, pies, flatbreads, pita bread, and Italian pizza in it. The outdoor oven is also intended for cooking fish and meat dishes. A Russian stove outdoors can retain heat for a long time. Its main disadvantages are its large size and irrationally high fuel consumption, which also increases because such a stove takes a lot of time to heat up. It is recommended to heat an outdoor stove for cooking only with hardwood wood.
A classic outdoor cooking oven has no smoke ducts. The improved Russian stove additionally has a heating panel with smoke channels and a stove.
An outdoor Russian stove on the street under a canopy is placed on a base - an oven. Above is the furnace furnace and hearth.
Wood is burned in the crucible and food is prepared. The hearth contains the mouth of the furnace for the exit of flue gases from the furnace. Above the mouth there is a furnace smoke collector, and above it there is a chimney. The walls of the inclined chimney serve as a second gas threshold.
The choice of size of the firebox depends on the purpose of the stove.
When building a Russian stove outdoors with your own hands, its outer walls should be lined with thermal insulation to reduce heat loss.
To do this, you can use vermiculite with clay or expanded clay and basalt wool. You can cook in such a stove even in the cold season at temperatures down to -10° C, but much more firewood will be required. Look at the photo of the stove on the street - options for its arrangement are demonstrated:
Which one to build?
First, let's see what kind of stove it is possible to build outdoors, taking into account the fact that it will not be heated intensively and irregularly, but will be exposed to climatic influences, freeze in winter, and it will be difficult to provide it with a high chimney. But the danger from the spread of carbon monoxide from an outdoor stove is reduced to the minimum possible, although it is not completely eliminated, especially in a gazebo, under a canopy and in calm weather. Don't forget about this: there is no stove that can be heated at random without fear of fumes. You can get burned just sitting by the fire.
Keeping these circumstances in mind, the choice of outdoor stove design is not so wide. The simplest garden stove is the well-known rough or rough stove. She can look terrifying, pos. 1 in Fig., but it can be heated with any fuel and it works properly, almost regardless of the quality of the materials used and the work: when building a rough structure, you can use broken simple red working bricks or stones from the surrounding area using ordinary cement-sand masonry mortar, i.e. .To. microcracks in the masonry have almost no effect on the technical performance of this stove. See, for example, the video below of how a 5-year-old child built a rough stove, which his family successfully uses and which can also be used for smoking. Which, by the way, not every oven allows, see below.
Video: a simple stove, a rough one, a design accessible to a child
An outdoor oven at a weekend cottage is often a barbecue roaster, pos. 2. Although, as we will see later, in fact this is not a barbecue at all. Such a stove takes about the same amount or less bricks as a rough one (about 200 pcs.), and you can use red working brick in the same way, but masonry mortar, due to the, so to speak, subtlety of the structure, is already needed for the stove for the street (see .further, about technology and materials).
Based on the brazier, the so-called. Finnish outdoor brick oven, which is a hearth, brazier or barbecue attached to a rough stove, pos. 3. In fact, the only Finnish thing about such a stove is that the Finns were the first to think of producing them in the form of a set - construction instructions with detailed instructions and procedures, dry mixture for preparing masonry mortar, embedded parts, fittings. Now domestic kits for building an outdoor brick oven are sold in the Russian Federation. Sometimes the set also includes bricks; if necessary, hemmed/trimmed and numbered. A kit for an outdoor Finnish stove is inexpensive, and even a completely inexperienced person can build a stove from it, which is why the Finnish outdoor stoves from the kit are very popular, see for example. track. video clip.
Video: Finnish outdoor stove
Note: a stationary smokehouse is also often attached to a wood-burning stove, pos. 4. But during use, it turns out that in the cooking mode the stove is quite gluttonous, and the quality of smoked meats is slightly above average. Why this is so and how to still combine an outdoor oven with a smokehouse, we’ll talk further.
Even less common in areas is an outdoor fireplace, pos. 5. The reason is limited functionality: you can admire the flames and cook something as if on a simple fireplace, although the material and labor intensity of an outdoor fireplace is quite high. A Russian stove is built on the street (item 6) even less often. The culinary qualities of products and dishes from a Russian oven are well known, but a small Russian oven requires 2500 bricks, a large one - 3500, the design is very complex and it is not easy to protect it from bad weather. For the same reasons, Neapolitan (item 7) and Sicilian ovens for pizza and pastries are not very common in private households; In addition, these are quite highly specialized devices.
Note: much more attention for the garden and picnics deserves the so-called. mobile rocket oven, pos. 8. Rocket stoves are a special article. Here we only recall that rocket stoves exist in 2 forms - a luxury item that allows you to get a warm bed at home without building a Russian stove, and a light, compact device on which you can quickly cook dinner using a minimum amount of waste fuel. In the latter case, the degree of heating of the cooking utensil is regulated as precisely as in a gas stove.
Choosing the optimal location
The location of the stove for a garden house must be approached with the utmost seriousness, since not only effective heat transfer, but also your safety from fire depends on it. Of course, ideally in the old days, and even now, the place where the stove will stand was planned before the construction of the house began.
Here are the basic requirements for determining a place for the stove:
- The room where you plan to install a wood-burning stove must be at least 16 sq.m.
- The stove must be installed on a reliable foundation, which means there should be no floor beams under it. The chimney should exit in a place where there are no ceilings.
- Construction near the outer wall is not advisable, because precious heat will be given to the street. Therefore, it is better to locate it in the center of the house; the chimney will exit in the area of the ridge, and the height of the pipe will be smaller. For wooden houses, central placement is recommended for fire safety reasons.
Now let's talk about the features of choosing a place for the stove. The best option to ensure good heat transfer is to place the stove so that all walls can come into contact with the air inside the home. The rooms should not be large, then you cannot do without additional heat sources.
Therefore, ideally, it should be placed in the opening of the partition between the rooms, and the firebox would go out in the kitchen or hallway area. On the one hand, the kitchen also becomes warm with the ability to cook, and on the other hand, the living spaces are freed from garbage.
When installing a multifunctional stove in large rooms, it should again be placed in the center of the room. The stove turns into a place of concentration of comfort that gives a home. It turns out something similar to a studio apartment, with an open layout, where the stove becomes a space divider.
Designs, their features and principle of operation
Brick oven
The brick version for a dacha is not much different from a conventional stove, the only difference being that it can be manufactured in smaller sizes. This option is not very often found at dachas, since the process of erecting such a structure requires a lot of preparatory work and financial costs. When constructing such a furnace, at the level of masonry of the second, third and fourth rows, fireclay bricks are used. This material is not destroyed when exposed to open fire. The height of the oven is nine rows. Subsequent rows form a chimney to remove furnace gases. The chimney pipe is equipped with a stainless steel metal sleeve.
The operating principle of this furnace is the formation of pyrolysis gases under the influence of high temperatures. As a result, gasification of wood occurs. The combustible material gradually chars and disintegrates into solid hydrocarbons, tars and mixtures of gases. The pyrolysis gas released in this process itself becomes fuel, which makes it possible to obtain an additional source of heat.
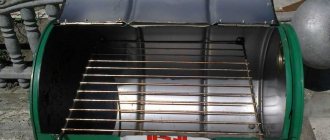
Made of metal
A metal stove, or its most common name – “potbelly stove”, has the form of a box, a piece of pipe, a used gas cylinder or barrel. It contains compartments and chambers equipped with doors. This design will require metal with a thickness of at least 5–6 mm, otherwise the walls of the furnace will burn out. If a pipe is used for the body of the potbelly stove, then its diameter must be at least 30 cm, with an appropriate metal thickness. The design of such a furnace is equipped with an exhaust pipe, which is located on top closer to the rear of the body.
When installing the pipe from the rear side, it is necessary to make it slope at least 30 degrees.
At the bottom of the combustion part of the metal furnace, slits are made to allow ash to fall out. The size of the holes depends on the size of the material being burned.
On used oil
The waste oil furnace is made of metal. Its design consists of two cylindrical containers located one above the other, connected by a pipe. Like all types of stoves, this option is equipped with a chimney pipe. Used engine oil burns in the lower container. The released gases pass through the pipe into the upper tank, where they mix with air and create a second combustion source. Air enters the upper chamber through holes with a diameter of up to 10 mm.
In this furnace you can burn different types of waste:
- solar oil;
- oil;
- transmission;
- transformer;
- kerosene;
- diesel fuel;
- fuel oil
It should be noted that flammable substances such as acetone, gasoline or solvents cannot be used in such ovens. These materials, in small quantities, can only be used when lighting the stove.
Such substances should be used with particular caution when lighting firewood indoors in a country house. On such a stove, the chimney should be installed only in the upper part in a vertical position.
Long-burning country stove "Bubafonya"
This stove differs from previous options in that the wood burns for 15–17 hours, without adding fuel material. This feature is achieved thanks to the metal stove damper and a full load of firewood. This helps to create a moderate draft in the combustion part, as a result of which the wood does not burn, but smolders for the specified time. The power of the flame in the furnace is regulated by a metal vent. The fire in such a stove burns at the top of the wood, slowly spreading downward as the combustion material burns out.
To make such a stove, it is recommended to use not individual sheets of metal, but a solid barrel with a wall thickness of at least 5 mm. The optimal volume of such a barrel is 200 liters.
However, this size is not mandatory. A solid body will eliminate the appearance of holes and cracks through which heat will escape.
Slow burning of firewood is ensured by a moving element of the stove, called a load. This part of the housing supplies air to the combustion chamber. This element is made of a metal circle, to the middle of which a pipe is welded. On the reverse side of this circle, from the center to the edge, metal corners or channel fragments are welded. These parts provide air supply to the extreme areas of the combustion chamber.
The operating principle of this furnace is expressed in the following features:
- Firewood is laid vertically. Sawdust, chips or paper are poured on top to ignite the kindling material.
- The combustion of pyrolysis gases is facilitated by a round steel plate with welded blades that transport air to the hearth. In the middle of the plate there is a hole that stabilizes the combustion process.
- The plate with blades is installed on the burning firewood, and the top is covered with a lid.
- Burning wood is under constant pressure from the plate. As a result, the combustion material is gradually compressed, and the temperature inside it increases. This process causes thermal decomposition with subsequent release of flammable gases. When wood burns, the volume of fuel is reduced and the plate moves towards the bottom of the structure, thereby helping to maintain a constant temperature.
- The gas that is released during the combustion of fuel burns above the air distribution plate in the furnace. In this case, the efficiency of the furnace increases by 25–35%.
Principle of operation
Step-by-step instructions for building an outdoor brick oven
The beginning of work is drawing up a project, where the consumption of materials, their total cost and choice of location are calculated. Construction stages include:
- Pouring the foundation.
- Laying the base, blower, smoke ducts.
- Installation of grate and firebox.
- Hob fastening.
- Installation of chimney and fittings.
Brick kiln diagram
From materials and tools you need to prepare:
- fireproof, facing brick;
- cement;
- clay;
- sand;
- crushed stone;
- firebox doors, blower;
- grinder with disc attachments;
- steel pipe;
- metal rods;
- asbestos cement board;
- shovel;
- level;
- hammer;
- celt;
- cord for marking.
Let's consider a detailed description of each of the construction stages.
Construction of the foundation
It is better to pour a monolithic foundation under the stove, having previously marked the area with a nylon cord. In this case, the width of the area should be 10–15 cm greater than the width of the masonry.
A hole up to 50 cm deep is dug. The soil is compacted. Steel rods are installed horizontally. Covered with a layer of crushed stone. The pit is filled with a solution of cement and sand in a ratio of 1 to 3.
To avoid cracks in the foundation, it must be periodically watered until completely dry.
Lay out 2 layers of cinder block. An asbestos-cement slab is installed on top. This will raise the height of the oven.
Another option is to cover the monolith with roofing felt to create a waterproofing base.
Furnace laying
- The order in the first row begins with a whole brick, each subsequent one - three quarters, halves. The evenness of the masonry is checked by level.
- In the second row, a blower door is installed, which is wrapped with asbestos cord. First, 3 mm iron wire is placed in order to secure the door.
- The opening between the brick and the door should be no more than 10 mm. Having closed the vent, the grate bars are installed.
- The masonry is carried out up to the height of the fasteners of the second door. The dimensions of the brick are adjusted using a grinder.
- The top of the oven is covered with a stone slab. If you need a hob, it is better to fix it with cast iron.
The masonry of the stove is clearly shown in the photo.
Photo: lay out rows 2 and 3
If desired, an arch made of brick or stone is laid out.
Chimney
To install it, you need to take into account several important recommendations:
- The chimney fasteners begin to be installed in the direction from the stove.
- The most convenient to install is a modular system, which is lined with brick on the outside.
- At the joints, the modules are treated with a heat-resistant sealant to ensure the integrity of the seams.
- Each element of the system is connected to a depth of half the pipe section.
- The joints of the chimney parts should not pass through the ceiling of the structure. They are provided with free access to remove blockages if necessary.
- The recommended distance between brackets when attaching modules is at least 2 m.
Chimney lining
How to protect the stove from climatic factors
At the end of the masonry, the brick seams are carefully checked for integrity and rubbed down. The identified cracks are filled with solution.
da2e891df1f12cafd2d70c176d194a9f.jpeFor an aesthetic appearance and extended service life, the device is lined with fire-resistant tiles, porcelain stoneware or natural stone. You can build a canopy, which will prevent precipitation from entering the structure.
How to make a laundress stove with your own hands
The laundry stove (pressure cooker) (Fig. 55 ) is designed for quick cooking, boiling water, canning, steaming feed, etc. Such a stove requires little fuel, since the cone-shaped tank inserted into it is surrounded on all sides by hot gases.
The stove consists of a box or casing 1 made of roofing or thicker steel. Three legs 2 are attached to the casing. Under the casing door there is an ash pan 3 in the form of a box, above which there is a firebox 4. Five holes are made under the firebox, which are the ash pan. Handles 5 are attached to both sides of the casing. A cone-shaped enameled tank with a lid b is inserted into the casing. The casing is made so that the tank does not fit into it by 70.100 mm. The tighter the casing walls fit the tank, the better. The stove is supplied with a type 7 samovar pipe with a diameter of 100 mm and a wind extinguisher.
To allow hot gases or smoke to escape into the pipe, there is a through hole in the casing, the dimensions of which are equal to the pipe or slightly smaller than the dimensions of the holes. The holes are closed with a pocket 8 with a pipe for putting on the pipe. The pipe is welded or riveted to the casing. The hole in the casing is made on the opposite side of the firebox.
The diameter of the pallet is made 15.20 mm smaller than the diameter of the casing, which makes it easy to insert the pallet into the casing.
To make the lower part of the casing burn less, an insert 10 with a diameter slightly smaller than the tray is inserted into it. In the bet, a hole is cut exactly opposite the door to the size of the door (Fig. 55, a).
The tank can be at the same level with the insert, slightly higher or lower than it.
The diameter of the oven depends on the size of the tank. Therefore, you should first purchase a tank, measure its diameter below the side by 70.100 mm, and if it has handles, then below them by 20.30 mm, and only then begin making the casing from one or several pieces.
The tank can be made only for preparing food or steaming feed from aluminum used for various utensils. The tank for heating, washing or boiling clothes can be made of any aluminum or galvanized steel.
The composite casing is made welded or riveted. For this, steel of any thickness is used. The casing itself must be very round so that the tank fits into it as tightly as possible.
Instead of a cone-shaped tank, you can use a flat one, but the furnace itself can be arranged exactly as discussed above, giving it a cone-shaped shape with a downward expansion ( Fig. 55d ).
Using this principle, you can build a brick oven of any size or an adobe oven under a canopy. If the work is done correctly and the canopy is good, these stoves can last a long time. For the top of such stoves, you should use a fairly thick steel sheet with a round hole cut out to fit the diameter of the tank or pan. To make the tank put less pressure on the steel sheet in the firebox, it is better to place bricks under it.
Source
Calculation of basic parameters
Before choosing a working design for a heating device, it is necessary to make a preliminary calculation according to the parameters of a particular room. The most accurate method is to determine the dimensions based on the heat output of the furnace. In order not to go into complex calculations, for well-insulated houses they use a simplified calculation scheme proposed by I.V. Kuznetsov. This method uses the average thermal power removed from one square meter of the surface of the unit (TMEP). For a conventional firebox, take the value 0.5 kW/sq. m, and if intensive heating is necessary, which occurs during severe cold weather - up to 0.76 kW/sq. m.
In principle, these values are enough to select a suitable project from those that can be found in the public domain. If the available options are not suitable for any reason, then you will need to calculate the parameters of the main elements of the furnace and design your own design.
Firebox
The dimensions of the firebox are determined based on the maximum volume of the fuel fill. In this case, the amount of combustible materials is calculated using their calorific value and specific gravity, focusing on the required power. The volume of the firebox should be 2–3 times larger than the obtained value, which will allow the stove to be reheated at extremely low temperatures. When calculating the size of the combustion chamber, it is necessary to take into account that the maximum filling should not exceed 2/3 of the volume of the combustion chamber. In addition, the dimensions of the firebox and all its components must be adjusted to the size of the bricks used for laying the stove. In your calculations, you can use special tables designed taking into account the need to heat rooms of various sizes.
Calculation table for the main elements of a brick kiln
Ash pan
The height of the ash pan depends on the type of fuel used. For low-ash combustible materials such as coal or peat briquettes, this value is taken equal to 1/3 of the height of the firebox. If the stove is heated with wood or pellets, then the height of the ash chamber must be reduced to 1/5.
Chimney
When calculating the chimney, it should be taken into account that the place of its installation must comply with SNiP
Unlike gas heating equipment, wood stoves do not require much draft, so the best shape for the smoke channel would be a rectangle. When calculating the chimney, it is taken into account that the cross-section of the blower should not exceed the area of its flue, and all values are adjusted to the dimensions of a standard brick. Since accurate design requires operating with a lot of data and parameters, it is best to use one of the special programs. However, for the most common cases (no kinks in the smoke channel, vertical stroke, rectangular cross-section, height from 4 to 12 m), you can use average values for furnaces with a power of up to 14 kW:
- Less than 3.5 kW - 140x140 mm.
- 5 – 5.2 kW – 140x200 mm.
- From 5.2 to 7.2 kW - 140x270 mm.
- From 7.2 to 10.5 kW - 200x200 kW.
- 5 – 14 kW – 200x270 mm.
To calculate the amount of material required, it is best to use special tables. Below is one of them.
Calculation of the number of bricks
How to make a simple but effective stove?
This option can serve as an alternative to the simplest metal heating devices - for example, a potbelly stove. With the help of this stove you can heat the room, cook food, and even admire the flames.
The structure occupies just over half a square meter. Unlike full-fledged brick ovens, this one does not require a foundation. The weight of the structure is not so great as to make a strong base - it is enough to lay a strong board.
The oven can be made in just a day. One of the advantages of this option is that starting heating is possible in the evening. Certain skills are necessary, but they do not go beyond the skills of the average male.
On a note! No qualifications are required to build stoves. But it is necessary to maintain order - this will make the design as effective as possible in the context of its potential.
What will you need for the job?
This is not only a simple, but also a budget option. To build the structure you will need:
Clay solution is used as a binder. In total you will need about 20-25 liters of the mixture.
It will also be interesting: barbecue oven - types and characteristics.
Preparation
The first step is to decide on the location of the stove. Since the mass of the structure is small, there are no limitations inherent in traditional brick solutions. By securing strong boards or a suitable alternative material, the “foundation” is thermally and waterproofed.
The role of an insulator can be played by a non-flammable material - for example, basalt wool. Polyethylene or roofing felt is placed on top of the base. The size of the latter corresponds to the dimensions of the base plus a small allowance.
A layer of sand 1-2 cm thick is poured on top. The bedding is leveled. It is important to make the base level - the quality of the design and the convenience of subsequent work depend on this.
Masonry scheme
The oven order is as follows:
After this, those bricks that were laid “dry” on the 4th row are removed. At the same stage, the smoke exhaust duct and the surface of the stove are cleaned of construction debris.
Final works
The simplest stove does not require serious decorations. The only decoration is whitewashing. It is recommended to add a little blue and milk to the composition - this will protect the coating from the formation of a yellow coating and bleaching.
Important! Brick and metal should be protected before work. If this is not done (for example, using film), you will not be able to get rid of the stains.
It is necessary to coat the seams between the brick and the metal of the chimney very well, as well as the seams between the ceramics and cast iron.
It is imperative to close the joint between the stove brick and the floor. This will prevent oven sand from getting into the room. It is advisable to cover the joint with an L-shaped sheet. Then they make a plinth edging, which serves both as decoration and as an additional element that prevents the “foundation” bedding from spilling out.
Figure 3. Functioning oven
The stove is ready. The entire process took no more than one working day. Now you can try making low-power kindling. You cannot use logs - only wood chips or paper. Wood burning will create too high a temperature and the structure will crack. For the mixture to fully set, you need to give it a week or two. After this, you can already heat it “like an adult.”
Which stove is suitable for a garden house?
First we need to decide what function the hearth will perform for the garden house:
- If you are at the dacha only in the summer, and you only need it for cooking, a hob type stove is suitable for you. Its design does not provide heating. The combustion chamber, equipped with a chimney and an ash pan, is lined or made of brick, and a metal plate lies on top.
- Heating stoves are used by summer residents when they simply need heating, and have an electric stove for cooking. The design of such a stove is simple; it consists of a combustion chamber, an ash pan where ash is collected and a chimney. These also include fireplace stoves, with the help of which dacha owners try not only to heat their living spaces, but also to create country comfort. The efficiency of heat transfer of such structures depends on the thickness and origin of the material and the method of laying. Laying one brick allows you to heat the furnace walls up to 600 degrees; those laid out in this pattern are called Dutch ovens. Stoves can have different shapes, it all depends on the area of the room, the interior and the desires of the owners.
- In our country, the most popular is the heating and cooking stove; its design is more complex and consists of a combustion chamber, chimney, ash pan, hob and oven. To build such a stove you need a lot of space, but thanks to it, the house will be warmer, and a delicious dinner, simmered on the stove by a skillful housewife, is guaranteed. Such a stove has many accessories; it can be equipped with a drying chamber, a stove bench, and a tank for heating water can be placed in the structure. This stove option is the most multifunctional.
Procedures to help independent stove makers
There are a lot of nuances in choosing the design of a country stove that cannot be ignored. The vast majority of wood-burning units in dachas are not constantly heated, which does not have the best effect on their functionality and performance.
Due to the limited free space at the dacha, they try to build one stove. They mainly prefer universal designs that have both a heat-conducting surface and a cast-iron stove with burners for cooking. Although there are adherents of purely heating units.
Image gallery
Photo from
Brick oven with forged appliances
Large heat-intensive stoves
Small heating unit
Furnace with heat storage array
Let's look at three options for the construction of brick kilns for dachas, the construction of which is quite possible to handle with your own hands. Let's consider universal and heating designs of an extremely simple device, which can be quickly and easily cleaned even with irregular fires.
You can read about the most popular types of brick ovens in this material.
Option #1 - stove with a single burner panel
This is an extremely simple and compact design, seemingly elongated in the vertical direction. In the example, it is equipped with a door with heat-resistant glass, which allows you to monitor the process. If it is not possible to purchase just such a door, the cast iron variety is quite suitable.
The oven can be made in two versions: universal - with a hob designed for preparing hot dishes, heating - without a chamber for the hob
The width of the small-sized brick structure is 510 mm, which allows it to be placed in traditionally small country houses without any problems. The depth of the stove is 640 mm, while the depth of the firebox does not exceed 500 mm. The height of the structure is 2150 mm, the height of the chimney is determined by the position of the pipe relative to the ridge.
There is an oven that can be replaced with a drying chamber or a tank for preparing hot water. The presence of functional compartments not only allows you to prepare delicious hot dishes at the dacha, but also increases the heat transfer of a brick structure.
During operation of the stove, the air and flue gases heated by the stove rush upward, pass along the rear wall of the cooking compartment, after which they flow into the smoke circulation and further into the chimney. Thermal energy in this building is used to the maximum.
A narrow, vertically oriented design takes up minimal space in a country house, but does an excellent job of heating the space
The described brick structure includes 31 rows of flat laid bricks. In order for the structure to function flawlessly, the following procedures must be strictly followed.
During masonry, you need to constantly check the horizontalness of the structure being built and check the size of the diagonals of the laid sides. There are strict requirements for the thickness of seams that must be strictly taken into account. The maximum thickness of seams when laying the body and smoke exhausts cannot exceed 5 mm, when making lining - 3 mm.
For independent masonry of this stove structure, orders have been developed and material consumption has been calculated, which is a tangible help to independent builders
The presented order does not indicate the foundation for the stove, the specifics of the construction of which are presented in another article on our website. It is poured or built of brick according to standard rules. We will assume that the foundation has already been erected, and we will proceed to the actual laying of the stove.
No comments are needed for laying the first three rows; everything is extremely simple. In the 3rd row we put a door for the blower, in the 5th row we put a grate. Before installing the 6th row, we place the firebox door: we temporarily secure the frame with the door with wire braces and immediately support it with two side bricks.
At this stage, the ash door is installed, the grate is laid and the firebox door is mounted. A cast iron hob is placed in row 11
Next, follow the ordering instructions up to the 11th row. After laying it, we lay a metal corner or a steel strip, stepping back from the rear edge of the already constructed part of the structure exactly the width of one brick. This is necessary to install the hob.
After installing the hob, we continue laying, strictly following the instructions. Starting from the 12th and continuing to the 15th row, we simultaneously build the walls of the rear smoke channel and the cooking compartment.
At this stage of construction of a brick stove, a cooking chamber and a chimney are formed, located behind its rear wall
Upon completion of the laying of the 15th row, we place metal corners or install a slate sheet. They will serve as the basis for the upcoming continuous masonry.
In the 17th row we install and secure the cleaning chamber door. We lay it out up to the 22nd row. The result should be a hollow section connected to the smoke channel.
At the third stage of stove construction, the oven is installed and bricked, as well as chimney valves are installed
In the 24th row, we lay out asbestos scraps along the inner edges of our structure. Next, we wrap the oven body with asbestos rope, and then place it on the stove, resting it on the scraps. The asbestos rope will serve as thermal insulation and at the same time protect the device from burnout.
From the 24th to the 27th row we line the oven with bricks, observing the thickness of the seams regulated by the rules.
In the 28th row we install a door through which we will clean the chimney. We fix it as it should be with two bricks on the sides and continue construction.
In the 29th and 31st rows we arrange channels for chimney valves. We simply lay them down and carry out further masonry without connecting the devices to the bricks with mortar. Then from the 32nd row we build a chimney.
Option #2 - stove for heating adjacent rooms
We can unconditionally classify this design as a heating unit. It is not equipped with a hob with burners and an oven. But it perfectly warms several adjacent rooms, in which it is part of the interior partition.
A stove without a hob and oven is used as a heating unit. It is installed so that no more than three adjacent rooms are heated
The design, just like the previous type, is compact due to its elongation in height. It is only 510 mm wide and 890 mm deep.
The height of the heating stove without a chimney is 2380 mm, which is equal to 35 rows of laid bricks.
A brick building has a minimum of functional chambers. A novice stove maker can easily handle its laying
We will divide the manual for laying a heating type of a country brick stove into three conditional parts. We will assume that the foundation for it has already been built in accordance with the general rules.
The orders for masonry from the 1st to the 12th rows represent the construction scheme with the installation of a blower door, grate and arrangement of the firebox
The first third shows the ordering patterns from the 1st to the 12th row. We build the starting rows with special care, because... We will focus on them in the future. In each row we check the equality of the diagonals, using a building level we control the verticality of the rows.
To ensure that the walls are strictly horizontal, we will periodically check them during laying with a plumb line. In case of deviation, errors must be corrected immediately, before the solution has time to set and begins to harden.
The 1st row is laid over roofing felt, roofing felt or similar waterproofing material laid in two rows. For convenience, we fix the waterproofing with a binder solution and mark the outline of the stove under construction on its surface.
In the 2nd row we install a frame with a blower door and begin building a chimney. In the 5th row we place a grate, which is the overlap of the blower. In the 6th row we place a frame with a fire door and secure it with two bricks on the sides at once.
From the 5th to the 15th row we carry out the masonry with fireclay refractory bricks, thanks to which there is no need to carry out lining, which would essentially significantly reduce the volume of the already small firebox.
The second stage of building a brick stove consists of forming vertical smoke channels, a firebox and a cleaning chamber
After laying the 16th row in the formed recess in the 15th row, we strengthen its bottom with cement-sand mortar.
This is necessary to strengthen the bottom of the chamber intended for cleaning smoke channels. Then in the 16th row we install a cleaning door.
At the third stage of construction of a brick heating structure, further laying of vertical smoke channels, a second cleaning chamber, and installation of furnace valves are carried out
Afterwards we cover the cleaning door and form this chamber, at the same time we continue to build vertical channels for the smoke exhaust up to the 24th row.
Next, we proceed to the third stage of masonry. In the 25th row we begin the construction of the second cleaning chamber. We again strengthen the bottom of the previous row with a clay-cement composition, install another door and continue building the chimney.
In the 28th and 32nd rows we install valves, which are used as draft regulators. We add the furnace mass up to the 35th row, so that after that we can begin building the chimney.
Option #3 - a stove with a shield and a low trestle bed
A very practical design with a low brick couch that serves as a heated sleeping place in Russian huts. The construction is more complicated than previous options, but more practical, because includes a heating unit, some furniture, and a hob.
This stove design also has two flooring options. The differences are confined to rows 5 and 6, 5a and 6a. In the second option, a steel corner is placed on the corner of the top row
In order for the shield of the heating part of the stove to be 1020 mm wide, protrusions are formed on both sides. If you plan to increase heat transfer, the number of smoke rotations can be increased to 5. For normal operation of this design, it is necessary to rotate the chimneys above the stove.
This stove has two solutions, the differences of which are determined in rows 5 and 6, as well as in 5a and 6a. The second solution involves installing a steel angle on the corner.
There are developed procedures for this brick kiln design, and the material consumption required for the construction of a universal structure has been calculated. If the summer valve is not intended to be used, it is closed with a brick.
The dimensions of the bed are selected individually. It may not be a solid brick structure with chambers for burning and cleaning, but some kind of trestle bed on pillars instead of legs.
Between the posts you need to leave holes 120 mm wide. However, a structure with chambers retains heat better.
The ordering is essentially an exact instruction for novice stove makers who want to build a brick stove in their dacha with their own hands.
It is recommended to build this stove on a monolithic foundation, on which asbestos sheets are placed before constructing the stove. Fireclay refractory bricks are used only in the construction of a firebox as a lining. Typically, the firebox is built one brick lower than the installation level of its door.
The lining is carried out with bricks installed on the edge. We will not describe in detail the procedures given for the construction of this stove, because... the reader has already received an idea of the symbols and specifics of stove construction.
This stove is suitable for both summer and winter use. In the summer they cook food on it, in the winter they not only cook, but also warm themselves, dry it, and treat colds.
It is important to follow the given sequence diagrams, as well as strictly adhere to the proportions and compositions of binding solutions used in the construction of brick stoves.
Recommendations for choosing purchased structures
The key indicator in purchasing a ready-made kitchen stove is the type of fuel on which it will operate.
The factory-produced summer stove has several design options.
- If you have gas nearby, you should consider purchasing a gas stove with oven. Its heating temperature is adjustable. The device is ready for use at any time and does not require the cost of searching for fuel.
- A cheaper solution would be to buy an electric stove. Easy to use and convenient to transport.
- In the absence of communications, an excellent wood-burning option is a solid fuel stove. Suitable for the most remote summer cottages.
- Universal stoves allow you to use several types of fuel, which significantly saves time on cooking.
It is worth noting that factory models have a number of advantages in operation:
- a large selection of finished products of various sizes and colors; metal alloys and refractory mixtures are used as materials;
- the device’s operating scheme reduces the risk of fire and smoke leakage to a minimum;
- designs are light in weight.
- quick assembly and installation.
However, a DIY project for a closed or open summer kitchen with a stove will allow you to take into account the characteristics of the site, the wishes of the owner and save money. In addition, step-by-step construction instructions have now been developed for furnaces of varying complexity.
Budget options could be:
- Russian stove for a cauldron;
- two-burner stove with oven;
- barbecue oven with grill.
It is important to remember that when creating a furnace, you need to accurately draw up a drawing in order to take into account the nuances of construction, the amount of material required and the amount of work
An even simpler version of the stove
If the previous option seemed complicated to someone (although it is not), we can offer an extremely simplified heating design. You can lay out this oven with your own hands in literally an hour, even if your hands are far from being called golden.
Figure 4. The simplest version of a brick oven
The operating principle of the structure is simple. Solid fuel burns below, and settles here under the influence of its own mass. Temperature changes create a draft that carries hot air currents upward. In this case, the firewood burns almost without a residue - the smoke is minimal.
For masonry you will need only two dozen whole bricks and two halves. The stove consists of five rows. The design is so simple that there is no point in describing the order. The procedure is clearly shown in the illustration.
Figure 5. Order of the simplest brick structure
If you lay the bricks correctly (and it is very difficult to do otherwise), the result will be similar to that shown in the photo. It is recommended to bind the bricks with clay mortar. But in field conditions, you can do without binding material - just put the components on top of each other according to the order. In this case, the stove is built in five minutes.
Figure 6. Laying process Figure 7. Finished mobile brick oven
For those who want an intermediate option, we can recommend a slightly more complicated option.
Figure 8. Diagram of a simple stove
According to this diagram, the output is an L-shaped three-section stove. The first compartment is designed for loading firewood. The second is a chamber in which the logs are burned. The third compartment is the chimney duct.
Figure 9. L-shaped stove
To create this structure you will also need 20-30 bricks. This option can be completed by yourself in a couple of hours, if the skills of a mason are completely absent. A specialist will complete the construction in a matter of minutes.
Advantages of the simplest furnace designs
Step-by-step instructions with photos for laying a stove
Different stove makers have their own masonry technologies and their own secrets that come with years of experience. Here is information about a fairly simple way to create a stove-fireplace for heating a two-story house; the process will not seem extremely difficult even to novice stove makers.
Foundation laying
The base course of brickwork will serve as the foundation. It is done with any brick; some stove makers even fill this level with crushed stone.
When laying the base row, cement mortar is used.
The foundation is completely filled with mortar, the layer is leveled.
Construction of the furnace body
The first row of stoves is marked. The horizontal line from which they start when marking is the wall of the room.
A grate is placed where the fireplace is planned to be placed. From this row, the bricks are already laid on the kiln mortar.
An important stage of work is the scrupulous alignment of each new row by level.
Laying the second row. The stove wall, located closest to the wall of the room, is reinforced with additional bricks to increase fire safety.
The place where the chimney will be located in the 2nd row remains empty, the rest of the stove is laid completely. A door is installed through which the owners will clean out the ash.
The door is installed on the solution and leveled. For a more reliable fixation, it is secured with wire, which must be laid between the bricks.
Next, the next 3 rows are placed. Then a brick stop for the grate is installed - 2 rows of 1/4 bricks are placed on the sides.
The grate is laid not on a simple brick, but on a refractory brick. To ensure that it lies at the same level as the bricks, holes are cut in the fireclay bricks.
The size of the brick can be easily adjusted - the excess is measured and carefully cut off.
The large door is mounted next to the installed grille.
The large oven door is similarly secured using wire fasteners.
The first row of fireboxes is placed exactly above the fireplace, it is reinforced with metal corners and a strip or thick tin. So that the masonry can lie on them, it is cut using a grinder, then the slots are adjusted manually to the desired size.
The next brick row is laid.
A fireplace grate is laid on the fire-resistant brick along with the brick row.
The door is fixed, the brick is strictly adjusted to it.
The firebox of the new stove and fireplace is ready.
Fire-resistant fireclay bricks are placed above the stove firebox.
The stove body is built.