Application area
A self-made all-wheel drive mini tractor has quite good cross-country ability, which gives it the opportunity to perform virtually the same scope of work as store-bought counterparts, such as Uralets, Kubota, Bulat 120, Yanmar, Belarus 132n, Scout.
Of course, the power of a homemade unit may be somewhat weaker, but at the level of domestic use this fact is almost unnoticeable.
The main area of application of this DIY unit is agricultural work. This term covers a fairly wide spectrum, including many related works. In other words, a homemade mini tractor is needed for the following purposes:
- plowing of land holdings for the purpose of their further use;
- cultivating the soil and getting rid of weeds;
- harrowing the soil;
- carrying out sowing work on treated soil;
- planting and digging potatoes.
In principle, this is the main purpose of a mini tractor, for which it is made. But, its application can be significantly expanded if a special connection for additional equipment, mounted and trailed, is provided in its design.
If everything is done correctly, then your homemade product can additionally perform the following work:
- transportation of various goods (transportation of firewood, construction waste, etc.);
- snow removal in winter;
- mowing lawns and lawns, as well as making hay for livestock.
As we can see, a mini tractor breaking a classic 4x4 with your own hands can significantly make the life of any rural resident easier, because with the help of this equipment it becomes possible to perform all types of work that are required for proper management of a subsidiary farm.
The indispensability of a home-made unit is also due to the fact that its production uses a minimum of investments and funds, which is very important for rural areas.
All-wheel drive mini tractor-breaker
Such an all-wheel drive unit has high cross-country ability, which increases the range of its use. At the same time, homemade options have slightly less power, in contrast to factory-made products. However, when using them for various household purposes, it will be very difficult to notice. The main area of application of such equipment is considered to be various agricultural work. So, it can perform a whole range of different actions, including:
- Plowing the soil for further processing.
- Soil cultivation and weed removal.
- Planting and digging up potatoes.
- Carrying out harrowing of the field.
- Sowing work.
The minitractor performs a large range of work.
In general, these are the main purposes of such units. However, the range of possible areas for application can be expanded if the design itself additionally provides for the possibility of connecting attachments or trailed equipment. If this process is performed correctly, the unit can, in addition to the main types of work, also be used for:
- Transportation of various cargoes.
- Carrying out snow removal work.
- Lawn mowing and hay harvesting at the same time.
Benefits of using technology
Due to the high cost of ready-made equipment, for many it is more optimal and profitable to make a homemade 4x4 mini-tractor. In addition to the obvious advantages of saving money, creating a homemade unit allows you to get the following:
- Due to their small size, such homemade mini tractors can cultivate the land even in areas with a small area. This is especially true due to the fact that most private gardens are small in size, which does not allow the use of large equipment for their processing, and sometimes this is completely impractical.
- High performance indicators that can be used for soil cultivation.
- Quick payback for the created device. Due to its effectiveness, one season is enough for this, which is due to cost savings when assembling it yourself.
Be sure to read: Minitractor Bulat 120
Instructions on how to make an all-wheel drive mini tractor with your own hands - drawings and dimensions
Having assessed all the advantages, many people ask the question - how to make a 4x4 mini tractor? In principle, this assembly method is not much different from traditional methods, except, perhaps, for the construction of the frame structure.
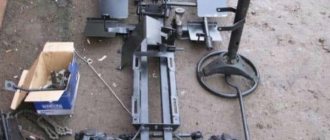
Basically, the frame comes in one piece, but in fractures there is an option with a breaking frame, which is where the name comes from.
The appearance of the structure may be a little puzzling to an outside observer, but its apparent unpretentiousness should not be misleading. The fact is that everything inside is located so proportionally, if you follow the drawings exactly, which allows the unit to show fairly good performance indicators.
Speaking of drawings. This is probably one of the most important stages of the entire assembly, because the success of the entire design depends on the correctness of leaving a detailed drawing and determining the exact dimensions.
The fact is that the specifics of self-assembly involve adjusting some parts to the individual characteristics of the frame or power unit. This is understandable, because the components are taken from completely different equipment, which leads to their dimensional discrepancy.
The fitting itself is carried out mainly on a lathe, which in itself presupposes the presence of a detailed drawing. After all, it is much easier to make certain holes or stitches while looking at the drawing than keeping all this abstraction in your head.
So, having made the drawing, we begin the assembly process:
- The frame itself will consist of traverses and spars. The spars, in this case, have a three-stage structure. The first stage is made from channel number 10, and the last stage is made from a square steel pipe with dimensions of 80x80 mm.
- The rear traverse is made from channel number 16, and the front crossmember is made from channel number 12.
- If you are converting a walk-behind tractor into a mini tractor, then the main power unit will be the engine located on the walk-behind tractor. If not, you will have to purchase the engine separately. In principle, any diesel engine of the required power (at least 12 hp) can be suitable.
- However, experts advise taking a more powerful one - a motor with 40 hp. and water cooling.
- The gearbox and power take-off shaft, as well as the clutch, can be taken from GAZ-53 and GAZ-52 cars, respectively. They won't fit ready-made, so you'll have to modify them a little. To do this, you need to remake the motor flywheel by cutting off a little from the back and drilling one hole in the middle.
- The bridge can be installed in the unit in the desired form, without performing any manipulations. It is attached to the frame structure using four stepladders.
- Wheels can be taken from old cars, but their optimal diameter is considered to be 18 inches. The process of installing wheels on hubs is quite simple. It is enough to cut a hole of the required diameter from the center of the disk, and the center of the disk from the ZIL-130 is welded to this place.
- The front axle is not so important, because it will not be the drive one. Therefore, you can take a bridge from another technique.
- Steering is best enhanced by hydraulics. You can take it from old agricultural machinery, but for it to work correctly you need an oil pump.
- By the way, the driver’s seat also needs to be installed correctly, because a person spends more than an hour operating the unit. The seat should be positioned so that the steering column does not rest on the person’s knees.
In general, the assembly of a homemade all-wheel drive mini tractor is carried out using third-party spare parts, including mainly automobile ones.
In particular, the drum brake will be used in the front wheelbase system, and the steering rack will be borrowed from the VAZ family of cars.
Other components can be freely found on the spare parts market, where there is quite a lot of useful stuff. In addition, on specialized websites there are a sufficient number of advertisements for the sale of parts that can be purchased for mere pennies.
How to make a mini tractor with your own hands
Homemade mini tractors with a breaking frame require certain skills from their manufacturer. Designing such a machine is not an easy task. There are quite a lot of options for making a homemade mini tractor, but among homemade products there is an optimal option that almost everyone, even novice designers, can make based on the necessary drawings. You can find the necessary calculations and diagram of the unit components on the Internet.
To begin assembling a homemade 4x4 tractor, you need to carefully study how to construct a frame. The frame consists of 2 main components:
- The spars are a three-stage prefabricated element. The front steps are assembled from channels (tenth sizes), the outer steps are constructed from a square steel pipe, the width and length of the sides are 80 mm.
- The traverse on the rear of the tractor is made of 16-gauge channels, the front traverse is made of 12-gauge channels. The crossbar is made in the same way.
Tools and materials
Frames are often made from traverses and spars. The spars themselves are made of channels and steel pipes. Cross members are made in a similar way. In this regard, the preparation of any mini-tractor is not much different. As for motors, any version that is powerful enough will do.
But still, professionals believe that the best option is a four-stroke diesel engine cooled by water. They save fuel and are more stable in operation. Transmissions and transfer cases, as well as clutches, are often taken from domestic trucks. But we must take into account that the individual components will have to be adjusted to each other. For this purpose, you will have to use a home lathe or turn to professionals.
Bridges are taken from old motor equipment almost without changes. Sometimes they are only shortened a little. In this case, metalworking equipment is used. Wheels are sometimes removed from passenger cars, however, their diameter must be at least 14 inches (for the front axle).
By installing smaller movers, farmers will often encounter the mini-tractor sinking into the ground. If you install too large a chassis, maneuverability will deteriorate. Hydraulic power steering helps to partially compensate for this disadvantage. Whether to remove it from old cars or do it yourself is up to the master to decide. As for the driver's seat, although this is optional, it is a very important element.
If you take an old walk-behind tractor as a basis, you can take it in finished form:
- motor;
- checkpoint;
- clutch system;
- wheels and axle shafts.
But the frame from the walk-behind tractor can only become an integral part of the frame of the mini-tractor. When using it, you need to make sure that the mounts for the engine and gearbox are ready. If a motor cultivator is used as a basis, a powerful frame is abandoned; a 10 cm square pipe is sufficient. Preference is given to the square shape because home mini-tractors often drive on bad roads. The size of the frame is selected according to the size of other parts and their weight.
A simple type of transmission involves the use of a belt clutch placed on the gearbox. In a more complex version, torque is transmitted using cardan shafts. However, the consumer has no choice - it all depends on the characteristics of the engine and the wheel formula. If an effective breakable frame is used, then in any case you will have to install cardan shafts. It must be taken into account that this is difficult when making it yourself.
The controls are created according to a standard scheme; they simply take parts from any car. Since the load on the steering wheel when operating a mini-tractor is less than that of a passenger car, you can safely install used parts. Attaching the column, tips and other components occurs in exactly the same way as on a car. But the tie rods are shortened a little to accommodate the narrowed track. To work, therefore, you will need:
- angle grinder;
- screwdrivers;
- spanners;
- roulette;
- welders;
- hardware.
Niva from How to make a tractor with your own hands?
reliable Assembling a passable tractor from Niva 2121 is not as difficult as it might seem at first glance. However, in order to achieve the best result, those who want to do the alteration will still need to find the appropriate drawings, which should describe the dimensions of the parts and methods of attaching them to the overall structure.
design When studying the diagrams, you need to choose the most suitable ones for assembling the car unit. craftsmen Some convert the existing Niva into others. tractors, farmers who do not own a domestic car, purchase each part separately and make it into any one. In the case of an agricultural machine, the best option would be to use parts from the same machine - this will greatly simplify the assembly of the tractor.
All parts used for assembly must be completely intact and in good working order. It is not allowed to use spare parts that are worn out or parts with cracks - this will quickly lead to breakdown of the tractor, moreover, in this case, the main elements of the agricultural machine will be subject to increased loads, which will lead to an increase in the amount of fuel consumed and a rapid loss of properties of the engine.
Important How to disassemble and check the MTZ-82 generator: connection diagram
oil drawings and having prepared the parts, you can proceed directly to assembly.
All work is performed in the following order:
At the very beginning, it is necessary to prepare the engine frame and other tractor components. For this purpose, you can use a ready-made body from an old car, for example, the same Niva. In this case, the frame needs to be slightly modified by welding the necessary parts by welding. For this, channels, metal corners and pipes are useful
Before welding them to the structure, it is important to clean the surfaces from coating and rust with a thick layer of primer; You will need to Next install and secure the axles, chassis transmission and part with the transfer case from the Niva. as well as parts of the tractor hydraulic system; Then you need to install the Niva from the engine - for its installation you need to first prepare special rubber mats, which, elastic together with gaskets, will effectively dampen the vibrations created by the engine
It is also necessary to install a casing equipped with an auxiliary cooling system on the motor; The tractor cabin also needs to be equipped with steering parts, as well as clutch, brake and gas pedal controls. After this, you will need to install the driver's seat - it should be mounted on a spring, which will smooth out uneven roads. The finished cabin can be sheathed with soundproofing material and the following rubber floors can be laid; On the stage mats you will need to install hydraulics and a dedicated PTO for controlling attachments; At the end you need to fasten the wheels, and they can be taken from an old Niva, cars or those with large diameter rims. It should be remembered that in order to install large wheels, you will need to replace the brakes from the Niva with a more durable braking mechanism. In addition, installations for larger wheels will require a corresponding hub diameter. The video will tell you more about making a Niva from a tractor.
Advantages and disadvantages of a homemade mini-tractor
In an unstable economic situation, a homemade tractor can greatly help people avoid spending extra money on equipment. A homemade tractor has other advantages:
- small dimensions allow you to work in small areas;
- the design will pay for itself in one season;
- good technical performance.
Among the disadvantages, the main one is the complexity of the design process: not everyone can quickly find the necessary parts. In addition, such homemade products are quite difficult to repair.
What to make a chassis from
To assemble a mini tractor, you need to prepare its chassis. It includes wheels, front and rear axles, and transmission elements.
When choosing wheels for a mini tractor, you should take into account the purpose of using the latter. If the unit is being built for transporting and pulling loads, then a disc diameter of 16 inches will be sufficient. When using a tractor in field conditions, it is better to use more massive wheels with discs with a diameter of 18 to 24 inches.
If the drive axle in your tractor is only the rear one, then the front beam is made quite simply.
- It is necessary to prepare 2 steering knuckles from a VAZ Classic car.
- A piece of the required length is cut from a profile pipe (40x40 mm square). The width of the track will depend on the length of this beam.
- Next, racks of 35x35 mm corners are welded to this pipe. The steering knuckles will be attached to them. There is no need to disconnect the steering bipod - it will be useful when installing the steering mechanism.
- Brackets are welded to the corners into which ball joints are installed.
- The front beam of the mini tractor also has a swinging mechanism in the center. In this case, it, together with the cross, was removed from a UAZ vehicle.
To make a homemade front axle, as well as its rear analogue for an all-wheel drive unit, you will need to take 2 identical chassis units, for example, from a VAZ or Moskvich car, and shorten them. You can learn how to shorten the bridge from a VAZ car from this video.
Important! Axles must have the same gearboxes, with the same gear ratio. Otherwise, the front and rear wheels will rotate at different speeds when the tractor moves.
Since the bridges already have a built-in mechanism for transmitting rotational motion to the wheel axle, there is no need to make a homemade gearbox.
Types of adapters for walk-behind tractors
Externally, the adapter looks like a two-wheeled trailer with a driver's seat. When installing such a trailer, almost all work performed is automated. The walk-behind tractor itself becomes almost a mini-tractor. In addition, several models have a special lever that allows you to raise and lower the seat, making work even more comfortable.
Adapters for walk-behind tractors can be of several types. To make the unit yourself, you need to decide which type will be more convenient and comfortable for the owner. Depending on the type of clutch, they come with steering and a movable joint. Depending on how the main power plant is located, there are two types: front and rear adapters.
Adapter with steering
This type is on a rigid joint with a walk-behind tractor. The steering is represented by a separate unit, and options with both rear and front wheels are possible. The walk-behind tractor becomes practically a self-propelled machine, which is quite simple and easy to operate, practically no different from motorcycles or cars.
Safety precautions
Regardless of the design nuances and the selected models, you must work with a mini-tractor with caution. Every time before starting it, you need to inspect all parts of the machine and check their suitability. First of all, you should evaluate the serviceability of the brake system. Stopping is done only at low speed, and the engine can only be turned off with the clutch depressed and the brake gradually released. An emergency stop is made only in a critical situation.
Both the driver and passengers can only ride in adapted seats. Do not lean on the traction bars. Driving on slopes is only allowed at minimum speed. If the engine, lubrication system or brakes are leaking, the mini-tractor cannot be used. Any mounted tools can only be attached to standard mounts.
For an overview of a mini-tractor made by yourself, see the following video.
If you have some tools - a welding machine, a metal cutter and a lathe, making a tractor-breaker becomes a very real project, and there are hundreds of proofs of this.
Craftsmen who do not have tens of thousands of rubles manage to save significant money by assembling a homemade 4x4 tractor with their own hands. Paying for spare parts turns out to be several times cheaper than buying a factory one.
Pros of installing hydraulics
Hydraulics are installed on a minitractor in order to ensure the operation of some of its mechanisms and facilitate the control of this unit. A unit with installed hydraulics has its advantages.
- The car becomes easy to control. The steering wheel can be turned with virtually no effort, with one hand.
- Hydraulics makes it possible to use various attachments.
- The use of hydraulics allows you to modernize the brake system. Thanks to the hydraulic cylinders installed on the unit, the unit brakes instantly.
You can make hydraulics on a mini tractor if you purchase a ready-made system in advance in a store or use parts from old agricultural machinery.
Important! When installing hydraulics on a mini tractor, it should be taken into account that some of the engine power will be spent on servicing this unit. Therefore, for tractors with low-power engines, installing hydraulics will not bring any benefit.
Types of adapters for walk-behind tractors
Externally, the adapter looks like a two-wheeled trailer with a driver's seat. When installing such a trailer, almost all work performed is automated. The walk-behind tractor itself becomes almost a mini-tractor. In addition, several models have a special lever that allows you to raise and lower the seat, making work even more comfortable.
Adapters for walk-behind tractors can be of several types. To make the unit yourself, you need to decide which type will be more convenient and comfortable for the owner. Depending on the type of clutch, they come with steering and a movable joint. Depending on how the main power plant is located, there are two types: front and rear adapters.
You can also read about how to make a trailer for a walk-behind tractor yourself.
Step 4
Installation of the steering mechanism does not always involve a handle removed from the vehicle.
Completing the build
- The brake system is removed from cars or motorcycles and installed without modification.
- The fuel tank is selected for specific tasks. On average, a tank of 10 liters of fuel will be sufficient. If necessary, the container dimensions can be increased.
- If you plan to work in the field at night, you should install a path lighting system on your homemade breaker tractor. To do this, headlights, wiring, battery and generator are installed.
- The driver's seat must be installed taking into account the stiffness of the suspension, otherwise the driver will feel every uneven terrain.
- The cabin will help to give an aesthetic appearance to the assembled agricultural machinery, and will also protect it and the driver from weather conditions. Finishing is done based on your own tastes and preferences.
The use of a homemade tractor is permitted only after it has been fully tested under various conditions. Otherwise, shortcomings may appear at the most crucial moment.
The attractiveness of a homemade tractor from Oka can hardly be overestimated. The cost of spare parts and components needed to manufacture a tractor is quite low. The total cost can be recouped in one harvest season. This solution is suitable for beginning farmers who do not have the funds to purchase factory-made agricultural machinery.
Additional tips and warnings about the mini tractor
If you have a sufficient amount of money, then you can buy some old Zhiguli, Oka, walk-behind tractor to use it as a “donor” for a future homemade mini tractor.
You can purchase it without documents, and it’s quite used, so its cost will be approximately 25-30 thousand rubles, which is relatively little compared to a ready-made mini tractor.
The essence of this advice is simple: in order not to look for spare parts and parts everywhere, you can take everything from one machine, i.e. gearbox, clutch, etc. By the way, the car body can then be sold.
Also important is the registration of a home-made unit with the traffic police. Of course, you don’t have to do it if you don’t plan to travel outside your garden, but for those who plan to use public roads, this action is necessary.
The fact is that a minitractor, even a homemade one, is classified as special equipment, and therefore requires mandatory registration with the inspectorate. If you do not comply with these rules, the employee may impose a fine on you, and the vehicle itself may be removed to the impound lot.
What is a fracture tractor?
In terms of design and dimensions, the fracture is nothing more than an ordinary mini-tractor. Typically, such equipment is produced on the basis of a walk-behind tractor. There is a home-made tractor with a factory-made fracture frame or one assembled at home from old spare parts. There is a third option for fracture. The unit is assembled from a walk-behind tractor, and spare parts are used from a special conversion kit sold.
In terms of performance and a number of characteristics, a homemade tractor is inferior to a factory-made tractor. But homemade products also have their advantages:
- Properly assembled equipment can surpass powerful factory mini-tractors in functionality, and the cost of a home-made unit is many times less.
- The functionality of the breaking tractor can be significantly expanded to suit your requirements. Craftsmen adapt to technology those mechanisms that help perform the necessary work.
- The costs incurred during self-assembly of the tractor will pay off in 1 year. And if there are a lot of spare parts from old equipment at home, then the unit will cost the owner almost free.
The disadvantage of a homemade tractor can be considered the lack of necessary spare parts. If you have to buy them all, there will be no savings. Then it is better to immediately purchase a factory-made mini-tractor.
Manufacturing a three-point hitch
The hitch is used to connect additional equipment, such as a plow, to the tractor.
The hitch must be movable both in the horizontal and vertical planes. In the first case, mobility helps to reduce the overhang of the nozzle when taxiing. Vertical movement of the suspension is required to lower the equipment into a working position or raise it into a transport position.
The hitch on a mini tractor is made from various parts removed from old agricultural machinery. It is quite difficult to describe how to make a three-point hitch at home. Therefore, it would be more correct to use the following video, which shows the dimensions of all parts of the device.
If you decide to make a mounted loader, then you can use T-25 and T-40 in tandem with this equipment. This option will be simpler compared to a front loader, which is true in matters of installation on a tractor and calculation of dimensions. At the first stage, you need to find or independently make a drawing, in which you should indicate the dimensions and proportions of the metal parts.
How to make an adapter for a walk-behind tractor with your own hands
Movable joint adapter
With a movable joint, the angle relative to the vertical axis between the adapter and the walk-behind tractor changes. Making such a trailer is much easier, but making a turn will require more effort. However, this type of adapter is inferior in geometry: the turning radius, as well as its angle, is much larger.
Required materials and tools
To make a trailer yourself, you need the following materials and tools:
- metal corners;
- metal sheets to support the legs;
- square metal profile;
- wheels (2 pcs.);
- welding machine;
- other tools (saw, screwdriver, etc.).
Features of device collection
Assembling such a complex device as a tractor will require significant time and financial investments.
In addition to purchasing parts and components of the unit, you need to take into account that you will need some tools. If you don’t have them, you can ask friends for help or rent them.
What tools will you need?
Since many parts will have to be adjusted to each other, and some will even have to be made independently, you will need a lot of tools:
Necessary materials for construction
The device consists of several components, some can be taken entirely from other equipment, some will have to be redone:
- composite frame;
- engine;
- chassis, including suspension, axles and wheels;
- assembly with brake discs;
- steering mechanism;
- seat;
- mechanism for attaching attachments.
Important! To create a homemade fracture, it is not advisable to use new materials and parts; it is better to use a “second-hand machine.” The ideal option would be to purchase an old passenger car: a Zaporozhets, Moskvich or Zhiguli, then there will be no need to connect the engine to the chassis and transmission
About the device
In terms of its design, the 4x4 adapter intended for the Neva walk-behind tractor is a fairly simple device. It consists of several main components:
- frame structure on which other components are installed;
- driver's seat;
- wheelbase, as well as wheel axle;
- mechanism for connecting the adapter and walk-behind tractor.
Simply put, the adapter is a regular cart with a seat that is attached to a walk-behind tractor. Walk-behind tractors can be such as Cayman, Patriot, Texas, Foreman, Crosser, Viking, Loplosh (loplosh video) and others. After coupling the adapter and walk-behind tractor, it can be compared in functionality to a mini tractor, but such a comparison is a little arbitrary, because the power remains the same, i.e. from the walk-behind tractor engine.
In addition, additional attachments can be attached to the adapter, which further expands the potential scope of work.
Some adapters are equipped with special compartments where you can place some kind of cargo. There are models equipped with a lifting lever, which greatly simplifies working with the device.
As a rule, the adapter contains two couplings - one allows you to attach it to a walk-behind tractor, and the second allows you to attach additional attachments. In particular, you can connect a seeder, hillers, plow, harrow and other devices to the adapter.
The wheelset axle in the adapter is of a fairly robust design, allowing the walk-behind tractor to be used on the most difficult areas of land, as well as for transporting fairly heavy loads.
It is also important to understand that driving such a unit on public roads is prohibited, which is why they are used exclusively in rural areas.
However, despite some structural similarity between all adapters, they also have some differences. In particular, rear adapters with steering, front adapters and all-wheel drive units are available for sale.
For more information about the adapter for the Neva walk-behind tractor, see
Adapters for the Neva walk-behind tractor can significantly increase driver comfort when operating the walk-behind tractor. In fact, a person does not need to constantly drag behind the unit, but just sit on a comfortable seat and carry out all the work in comfortable conditions.
READ Which plow is better for a walk-behind tractor?
The design of such adapters is quite simple, so making them yourself is quite possible at home.
Here we must take into account the fact that self-assembly requires certain skills in working with welding, as well as with related tools. If this appears in your head, then you need to stock up on a sufficient number of metal pipes and corners so as not to be interrupted from work due to a lack of material.
In general, it makes sense to assemble the adapter yourself, given that the cost savings are significant.
The adapter for a walk-behind tractor should be familiar to everyone who owns an estate or spends the summer at the dacha. After all, in order to improve the process of working on the site of a country house or dacha, they use special equipment, in particular, walk-behind tractors. An adapter purchased for a lot of money or made by yourself will help you save yourself from unnecessary physical activity and make this device universal, capable of coping with a variety of jobs: weeding, hilling, clearing snow drifts.
Front
Structurally, it is very similar to the previous type of adapter, but its coupling mechanism will be located at the rear. Accordingly, we get a full-fledged front adapter for the Neva walk-behind tractor. This design is completely disassembled, which greatly simplifies its further transportation.
An important area of application for a chainsaw is collecting firewood, cutting down trees and working with other wooden objects. Here you can learn how to choose a good chainsaw.
A lawn mower is a suitable device for mowing unwanted plants, grass, and weeds. Here's an article on how to wind your own fishing line on a lawnmower.
The MAZ-5551 truck remains one of the most popular eight-ton trucks in Russia. MAZ-5551 is maneuverability, reliability and practicality.
At the request of the client, additional wheels with lugs or wheels of larger diameter can be installed on the adapter. Naturally, the cost of these additions is determined separately.
- adapter length – 190 cm;
- adapter width – 81 cm;
- adapter height – 140 cm;
- wheel track – 75 cm;
- ground clearance - 30 cm;
- total weight – 65 kg;
- speed indicators are about 10 km/h.
.
Commissioning
Having assembled the adapter for the walk-behind tractor with your own hands, you need to try it in test mode. Proper preparation of equipment will ensure good quality work. Particular attention should be paid to adjusting the main components, the engine and the fuel system.
Step 7
The coupling of two main elements: a purchased walk-behind tractor and a hand-made adapter occurs using a channel with holes for the walk-behind tractor pin.
At the final stage you should: paint all parts to protect them from rust and lubricate them.
Making the front adapter - video
Cultivating agricultural land involves quite labor-intensive work. Owners of personal farms and gardens usually use manual labor or small-scale mechanization to make this process faster and easier.
Steering. Mini tractor assembly
A technical device such as a walk-behind tractor can significantly simplify any agricultural work, which distinguishes it from other devices.
The walk-behind tractor can be used separately, as well as a variety of additional equipment can be attached to it.
Devices such as a mower, harrow and cultivator can significantly increase the potential range of work that a walk-behind tractor can handle.
In addition to this, you can use a walk-behind tractor as a means of transportation if you provide a special adapter for it. This device allows you to sit quite comfortably on the seat with which it is equipped, and then perform exactly the same work, but with a fair amount of comfort.
Step 3
The design of the chassis depends on the location of the engine. If the engine is located at the front of the unit, the base wheels will provide the track width, so the rear wheels are fixed to the frame using the wheel axle.
Fracture unit and steering for the “MUDIY TRACTOR” fracture. My version.
If the engine is provided at the rear, then for normal balancing of the final structure, the width of the laid track must be greater. For this purpose, it is recommended to reinstall the wheels provided as standard on a wider axle.
Sources:
https://vdartebe.ru/motoblok/rulevoe-k-motobloku-svoimi-rukami-video.html https://booktube.ru/samodelnye-adaptery-k-motobloku-s-rulevym/
Self-assembled mini tractor
Assembling a tractor with your own hands is not an easy task, but it is quite an interesting task that requires diligence and concentration. There are a large number of assembly variations, but there is an optimal design, not only for experienced, but also for novice designers. The design is shown in the photo.
Design of a homemade mini tractor
First of all, let's look at the frame design. Despite the angularity from the outside, all the nodes that connect and chassis parts are distributed rationally.
Main parts of the frame:
- spars;
- traverse.
The tractor spars have a three-stage assembled structure. The front steps are made of size ten channels, the last one is made of a square-shaped pipe (material steel), with sides 80x80 mm. The traverse at the back is also made from a sixteenth-size channel, and at the front - a twelfth. Exactly the same system is suitable for preparing the crossbar.
For the tractor, you can choose any engine that suits the power. The best option is a 4-cylinder water-cooled diesel engine. The power is 40 hp, but as for a self-made model of a mini tractor for the purpose of working on home plots, this is quite enough.
Clutch with GAZ-52
The PTO transfer case and gearbox will fit from an abandoned GAZ-53 (or similar model), and the clutch will fit from a GAZ-52. To dock the clutch basket with the power unit, it is important to remake the engine flywheel and build an updated basket casing in order to adjust the required size. The flywheel is processed on a lathe. You need to cut off the area at the back and carve another span in the middle.
The bridge is integrated into the mechanism without significant changes. It can be used in any size. Four stepladders facilitate attachment to the frame. The driveshaft can be made from different cars. Good shock absorption is achieved thanks to the installation of 18-inch tires.
Installing the wheels on the hubs is very simple. You can notice that a part of it in the center with a hole for installation is cut out of the disk, instead of which the central part of the disk from the ZIL-130 is welded. The bridge in front is constructed on its own - you do not need to have serious skills for this, since it is not the leader. To simplify the assembly process, you can rearrange the bridge from other machines.
Wheelbase
It is important to pay special attention to the wheelbase of a mini tractor. Of course, it is quite enough to use wheels from a passenger car, but here you should go slowly. The required wheel rim dimensions for the front axle are approximately 14 inches. If you choose a smaller diameter, there is a risk that the mini tractor will not operate correctly in the future. After all, it is important for us that the tractor does not fall into the ground. But there is another side to the coin - if the front wheels are too huge, the driver will have to gain strength to perform certain maneuvers. It will be physically difficult. But this process can be simplified with the help of power steering.
Steering wheel control
To increase the maneuverability of the tractor, it is necessary to install hydraulic control on the steering wheel. You can find hydraulics on equipment that was written off in agriculture. To assemble it you need an oil pump, which is driven by the engine. It provides the required pressure in hydraulic motors. It is good when the wheels of the main shaft are controlled by a gearbox. The direction of rotation occurs thanks to a simple distributor with four working positions.
A four-wheel drive tractor with a 4x4 breakable frame has the main advantage of good maneuverability. This, of course, complicates the assembly, since it is necessary to design the correct and high-quality shaft with connections.
When making a homemade tractor with a breaking frame, it is necessary to use final drive cardans from trucks. There are many videos on making tractors yourself.
But the manufacturing principles used are approximately the same everywhere. In all tractors, the gearbox is moved towards the driver and fixed to the frame, and steering rods contribute to steering. A hydraulic drum brake is used everywhere, which, like the clutch, is pedal controlled. The accelerator and attachments are used by manual control.
Construction Tools
In addition to spare parts, it is important to use a wide range of tools:
- welding machine;
- drill;
- spanners;
- disk plate and many others.
Sometimes, when designing, you may need to contact a welding professional or an auto repair shop. Here you need to build on your own skills and capabilities.
Controls and seat
Car seat for mini tractor
Usually, installation of the control system and kinematic diagram begins after designing the chassis. An important point in this matter is the correct placement of the seat. A passenger car seat is perfect for this case. It is easy to find in car workshops or car services. It is important that the steering wheel is attached at a comfortable height for the driver. The steering wheel should not crowd your knees, so it should be mounted in such a way that the work process does not provoke any feelings of discomfort.
Engine and bodywork
After the chassis has been assembled, the kinematic plan has been implemented, the seat has been installed, you can begin to mount the main part of the mini tractor - the engine. In order to properly fix it on the frame, it is necessary to use a specialized plate with grooves. It also gives the necessary rigidity to the chassis. Then the electrical and mechanical circuits of the control system are laid. The body is sheathed based on the manufacturer's wishes. But it is better to hide certain components and parts of the body in order to prevent clogging and damage upon contact with the ground and unnecessary objects.
Power unit and transmission for tractor from Niva
The basis of the future homemade product will be the engine removed from the old VAZ.
To do this it:
- We remove the engine from the car and place it on a subframe. We give it a low landing, so that the front axle is between the engine and the gearbox;
- Fix with ties;
- We calculate the gear ratio, which should not exceed 2 thousand rpm for operation in 2nd gear - the main one used for plowing;
- To divide the torque between the axles, we limit ourselves to the transfer case from the Niva. It is needed in order to: increase the tractor’s cross-country ability on country roads; the drive wheels were subjected to greater rolling; the tractor moved confidently and stably regardless of the mode and power.
- We also take the clutch and gearbox from Niva;
- We connect the crankshaft to the PTO, which is best purchased ready-made;
- We connect the gearbox secondary shaft hub to the gearbox, which will transfer torque forward. The revolutions to the rear half-frame will be supplied through the fracture joints and the driveshaft.
Wheelbase and steering wheel for a tractor from Niva
- For a homemade tractor, 12-14 inch wheels from an old car (Niva, Oka), which are equipped with tires with a rough tread pattern, are suitable;
- The steering column is taken from the VAZ and placed on a plate welded into the front half-frame. It is important to correctly determine the height of the steering wheel: its smooth movement should not be interfered with by the tractor driver’s knees;
- We change the worm gear, for which we make a gap in the bearing adjusting nut and in the oil tank cap;
- It is almost impossible to assemble a full-fledged hydraulic unit with your own hands. Therefore, it is easier to buy it or take it from an old tractor;
- We fit the hydraulic pump and lubricant reservoir next to the engine, making a hydraulic outlet in front and rear for multi-position installation of attachments;
- We install a power cylinder that will control the adapters.
Technology capabilities
In the agricultural sector, these machines are capable of doing a huge amount of work. Thanks to its maneuverability and the ability to attach additional attachments, the assembled classic 4x4 mini tractor can cope with the following operations with its own hands:
- deep plowing of the soil;
- cultivation to remove weeds;
- harrowing of certain areas;
- implementation of sowing spring field operations of cereal crops;
- planting/harvesting potatoes.
In winter, the fracture mini tractor can also not be parked in the garage, but can be used to clear roads of snow. A trailer is attached to the tow bar, which helps in transporting loads of up to several hundred kg. Owners can even use mini tractors at home to mow lawns.
Technical characteristics of the fracture mini tractor
A mini tractor assembled with your own hands has a number of positive characteristics, including certain savings on purchase costs. The advantages of homemade products include:
- the compact dimensions of the transport ensure its convenient operation even in small areas, and since most farms include small cultivated areas, a DIY assembled mini-tractor will be very appropriate;
- homemade devices with a single-axis drive or with a full drive in the vast majority of cases pay for themselves in one or two seasons, and subsequently allow you to save on components;
- agricultural new products have decent performance indicators that can compete with factory models, since a master can make a mini tractor independently using selected units and components that have a large margin of safety.
Homemade mini tractor fracture (with breakable frame) 4x4
It is worth considering that a homemade 4x4 mini tractor may also have disadvantages. The disadvantages lie in the following factors:
- sometimes the process of searching for the necessary components or individual parts is delayed;
- in the case of using non-standard structural elements, repairs are difficult;
- It will be possible to assemble a homemade 4x4 mini tractor if you have the appropriate set of tools and have the skills to work with them;
- Frequent breakdowns can occur due to the use of old used technical components.
Frame assembly
The frame design is optimal for homemade products assembled in the garage. The key parts for it are the longitudinal spars and a pair of transverse crossmembers. It is preferable to make the spar beams in a three-stage form from a tenth channel, and for traverses a sixteenth square profile at the front and a twelfth at the rear are suitable.
Dimensions of a machine with a breaking frame
During the assembly process, it is important to ensure that the front half-frame can be rotated relative to the rear half-frame at a certain angle. Car hinges from trucks are suitable for this. In most cases, cut driveshafts are used. When folded at an angle, they continue to transmit rotation.
Motor and clutch for fracture mini tractor
After assembling the frame, they begin to install the power unit. It is recommended for cars with a single-axle drive to take engines in the range of 15-30 hp, and for all-wheel drive, the optimal solution would be an engine with a power of 30-40 hp. Preference should be given to water-cooled diesel units. They are quieter in operation than analogues with air removal of excess heat.
Kinematic diagram
As a ready-made solution, engines from walk-behind tractors or old cars can be mounted on the frame. There are drawings where the central place is occupied by power plants from the following models:
- walk-behind tractor "Neva";
- model with walk-behind tractor “Bison”;
- homemade from the Centaur walk-behind tractor, etc.
A minimal exhaust system may involve an empty metal fire extinguisher with metal shavings from a lathe stuffed inside it. If an air-cooled motor is used in the design, then some of the partitions can be eliminated in the lower docking area. It is also important to ensure the presence of mounting holes for fixing the power unit.
Engine UD-2
The next step after installing the engine is installing the transfer case and gearbox. An acceptable option is to choose them from GAZ-53. To ensure a good connection between the clutch and the engine, the flywheel will have to be rebuilt. In such a situation, turning work will be needed.
The back part is cut off, the excess with tides. A hole is bored in the center for a new shaft. The clutch basket cover is optimized in terms of dimensions to the required dimensions.
Do-it-yourself mini tractor with a breaking frame
First of all, homemade mini-tractors are popular among owners of small farms, since the use of large factory equipment on a small land area is, in most cases, not rational and very costly.
On the contrary, a small mini-tractor will do an excellent job of plowing the garden, mowing the grass, transporting small loads, etc. In terms of functionality, such a unit is not inferior to, and sometimes far superior to, specialized tractors. A mini-tractor made by yourself will not only become an indispensable assistant in a small farm, but will also allow you to save a lot of money. After all, the costs of assembling such a “miracle machine” will pay off in just one season. All parts and main mechanisms can be removed from broken agricultural machinery, or purchased at a dismantling site at fairly low prices.
Anyone can make a homemade mini-tractor. This requires minimal technical knowledge and, of course, desire. At the initial stage of working on a homemade mini-tractor with your own hands, you will need drawings. When choosing a drawing, you need to decide on the type of mechanism that you want to get in the end.
The “perelomka” mini-tractor has become very popular among private farmers. The essence of this model on an articulated (breakable) frame is that a two-wheeled trolley was attached to the walk-behind tractor, and the steering was equipped like an automobile with a 4-wheel drive (4x4).
This mini-tractor is distinguished by its compact size, small turning radius, excellent traction force and has performed well off-road. It is quite simple and economical to operate.
But somehow an opportunity arose to purchase inexpensively not a new, but quite functional power unit from a Ural motorcycle. This prompted me to make the next, third modification of the machine, which has already been completed.
The design of the mini-tractor remained the same - with a “breaking” frame. But the old “Izhevsk” engine gave way to a more powerful (and most importantly, more reliable and not so whimsical) four-stroke power unit from the “Ural” motorcycle. Another drive axle appeared on the rear semi-frame. It, like the front one, is also from the Moskvich-412 car. Many components were used from the previous modification, such as half-frames (albeit with minor alterations), gearbox, intermediate chain gearbox, fuel tank and lining. At first, I left the forced air cooling system of the engine the same, changing only the fan drive and dividing the air flow two cylinders away from it. But later, due to low efficiency, it still had to be redone, installing a “personal” fan above each cylinder. This allows you to operate the mini-tractor under load for a long time, even in hot weather.
Now let’s take a closer look at the design of the mini-tractor. It is based on two semi-frames of a simple rectangular shape: the front with plan dimensions of 900×360 mm and the rear with dimensions of 600×360 mm. Although they were manufactured at different times, both are welded from steel channel No. 8 (the wall is 80 mm high and 4.5 mm thick, the width of the shelves is 40 mm each with variable thickness). The ends of the channel sections for miter joining were cut at an angle of 45°.
On the front half-frame there are two cross members made from sections of a 50×30 mm rectangular pipe (laid flat), which are the subframe of the power unit. There is also a wall made of 12 mm thick steel sheet installed on it and several platforms and brackets for fastening units, mechanisms and components are welded.
A stand made of a rectangular pipe 80x80 mm (welded from two sections of channels No. 8, joined by the edges of the shelves) is welded to the rear semi-frame at the back for mounting a hitch on it, to which soil-cultivating and other agricultural implements are attached. And in front there is a vertical plate for the swivel assembly (more on that later), supported on both sides by gussets. Both the stand and the plate are made of the same 12 mm steel sheet. The top half of the frame is covered with sheet steel 3 mm thick. In front, another platform made of the same steel sheet is subsequently attached, covering the “breaking” node. The gas and clutch pedals are mounted on it. The semi-frames are connected to each other by a “breaking” unit, which is a flat (uniaxial) cardan mechanism (hinge). Its forks are welded from 12mm steel sheet. Moreover, the wall of the front fork is welded directly to the rear cross member of the front half-frame and reinforced with gussets. The fork horns are also reinforced with small scarves made of the same steel sheet. The journals and bearing housings for this joint were cut off and used together with bearings and lock washers from the corresponding KamAZ driveshaft units.
The suspensions of all tractor wheels are dependent and rigid. And so that the wheels of any of the bridges do not freeze when the tractor moves over bumps and holes, the semi-frames still have the ability to “rotate,” or rather, deviate by an angle of about 15° clockwise or counterclockwise from the average position one relative to the other. This happens due to the swivel used in the coupling of two half-frames, made from the front wheel hub of a UAZ car and installed in the front part of the rear half-frame. And to prevent too much rotation of one half-frame relative to the other, a tooth measuring 38x10x12 mm is welded on the hinge plate, and two similar stops are welded to the rear half-frame plate.
The engine is mounted on the cross members of the front frame and secured here through the eyes with two long bolts. From the engine, rotation through a soft connection (clutch) from the Ural motorcycle is transmitted to the primary (input) shaft of the gearbox from Moskvich-412. The gearbox is attached to the frame through a welded plate 12 mm thick with four bolts. The far protruding end of the secondary (output) shaft of the box rests on a bearing installed in the partition. At this end of the secondary shaft there is a hub with a 17-tooth sprocket - the drive sprocket of the chain gearbox. Another (driven) sprocket with 68 teeth is mounted on the front driveshaft. The sprockets are connected by a chain with a pitch of 22.225 mm. The gear ratio (decrease in angular speed or increase in torque) of the chain gearbox is 1:4. Rotation is transmitted directly from this shaft to the main gear of the front axle, and to the rear axle - through the cardan mechanism of the “breaking” unit and then through the rear driveshaft. The rear driveshaft consists of two links with a splined connection. For the first link, a splined end was used, cut from the secondary shaft of the Moskvich gearbox, which was welded to the cardan. The second link is borrowed from the Moskvich driveshaft. Due to the splined connection of the links, the rear shaft will lengthen when turning.
The axles from Moskvich-412 (both front and rear) are narrowed to a wheel track width of 700 mm. In each of them, on both sides of the main gear housing, the end parts of the axle housings are cut out (car enthusiasts often call them “stockings”), and the flange end switches (the outer parts of the bridges with bearing housings and threaded holes in the ends) are again welded to the remaining parts of the housings. But not at once. First, the axle shafts were shortened accordingly (their middle pieces were cut out). Then the internal splined ends are welded to the outer flanged ends of the axle shafts, and after mutual alignment, both parts are finally welded. Next, the finished shortened axle shafts were screwed to the cut off ends of the bridge with standard screws and their inner ends were inserted into the splined holes of the differential gears. And only after checking the alignment of the end switch and the remaining part of the casing with the crankcase, the parts were welded.