How to choose an engine
In order to create a snowmobile, it is necessary to take into account the most important and central part of the entire mechanism - the motor. The motor must have decent traction in order to move the entire mechanism in difficult snowy weather conditions. For everything to work out as it should, a powerful motor from the Neva walk-behind tractor will do.
If such an engine is available, one or two people will be able to move on a homemade snowmobile from a walk-behind tractor with their own hands. The engine power is 6-7 horsepower, which is quite enough to move on snow cover.
If you add a snowmobile stand to the walk-behind tractor, the lifting force will increase and you can easily load your walk-behind tractor for snow trips.
What is good about this engine, many ask. In fact, there are many more advantages than you might think:
- First of all, it is an affordable price.
- Also good quality is proven by Japanese production.
- The motor has an additional air cooling system.
Also note that gasoline can be used as fuel.
Replacing and tensioning the track
In general, replacing a caterpillar track on a motorized dog is not much different from replacing it on a snowmobile. In some moments it’s even easier. All you need is a set of wrenches, screwdrivers and some pipe (used as leverage). And then everything depends on what is said in the instructions for your unit.
Regarding tension, not all motorized dogs are equipped with a system that will allow such an operation. But this can be solved very simply - since the tracks are made of rubber, over time they dry out and tighten themselves. But the main thing is to make sure that everything is not tight, otherwise on a bump or pothole the caterpillar may simply break, sending you flying.
Features of the design plan
The simplest version of a snowmobile consists of a part that drives and one that is driven first. The second part consists of a seat, shock absorbers, a steering part and runners, thanks to which this part moves. The second part is much more complicated, since it contains all the elements that set the snowmobile in motion.
First of all, in the second part it is necessary to correctly provide the power unit, that is, the motor itself. The frame on which everything will be arranged and the drive are also important.
Do-it-yourself diagrams and drawings of a snowmobile from a walk-behind tractor must be made in advance, and you can find the required option on the Internet or in various types of literature.
First, before drawing up the drawing, determine the purposes for which the snowmobile will be used. After the drawings, you will need to select the parts, and, if possible, make some with your own hands.
Features of pneumatic and swamp vehicles
As already noted, a swamp vehicle, as well as a pneumatic vehicle, are just analogues of an all-terrain vehicle. The first option will make it easy to move over uneven terrain, and its modification most often includes from three to six wheels.
The main feature of both the pneumatic walker and the swamp walker based on a walk-behind tractor is the use of wheels that exert low pressure. In this case, the tires should weigh very little, be flexible and exert little pressure on the ground. Along with a wide swing radius, the equipment will be distinguished by its endurance and maneuverability.
The two vehicles are created from the same design, just like the all-terrain vehicle, so many manufacturers use three definitions at once in the same context. Thanks to simple modification methods, you can independently create a good ATV that will not need a rolling road and will not be afraid of slopes and strong uneven surfaces.
Homemade snowmobile from a walk-behind tractor
The simplest, homemade snowmobile can be made from an ordinary walk-behind tractor.
Winter is already upon us, and folk craftsmen are in full swing constructing their homemade means of transportation on snow and ice. Some people need a snowmobile to go winter fishing, and others need a snowmobile to go to the store to buy bread along the countryside off-road. Not everyone can afford to buy such equipment, but you can be smart and make a snowmobile, for example, from a walk-behind tractor.
And why not, but the walk-behind tractor itself needs a little modification, in principle it’s nothing complicated, let’s take a closer look at such a snowmobile built by a craftsman.
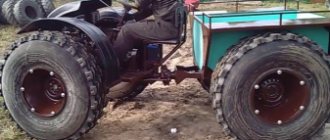
You need to install wheels with a larger diameter than the standard ones on the walk-behind tractor so that they do not get buried in the snow. As an option, replace it with car wheels, and to increase the contact area, we wrap a wide conveyor belt around each wheel. We will also make lugs from wooden blocks (you need to use hardwood). We fasten the bars with self-tapping screws directly to the conveyor belt. You can make more reliable lugs from a metal corner, and secure the corners to the tape with bolts and nuts.
This is how wide the wheels are, they will no longer dig into the snow, and the lugs will not allow the wheels to slip.
You also need to connect a drag sled to the walk-behind tractor for the driver and the cargo being transported.
Control left and right is carried out by turning the walk-behind tractor relative to the sled.
As a result of this modernization, we get a real snowmobile, albeit a homemade one, but still a vehicle on which you can move around a snow-covered village. If necessary, the structure can be disassembled and the walk-behind tractor used for its intended purpose. True, the cruising speed of such equipment is low, about 10 - 20 km/h.
Do-it-yourself snowmobile from a walk-behind tractor
A snowmobile is a universal technical means of transportation in the winter season. Thanks to the peculiarities of the chassis, it is able to overcome kilometers of deep snow, while developing up to 50-70 km/h. Economical fuel consumption, maneuverability and extraordinary ease of control are all that make it indispensable where winter snowstorms and snowdrifts occur almost all year round. True, the cost of such machines ranges from several to tens of thousands of dollars, which complicates the purchasing process.
In a situation where purchasing a factory snowmobile is an unrealistic dream, and circumstances require its availability, homemade products come to the rescue, ready to solve it in a less expensive way. One of them is the conversion of a walk-behind tractor into a snowmobile, to which we will devote the article.
Turning a walk-behind tractor into an all-terrain vehicle
Before you begin converting a walk-behind tractor into an all-terrain vehicle, you need to decide on the type of all-terrain vehicle that suits your needs. If you have no experience working with mechanisms on tracks, it is recommended to start with pneumatic machines.
Next, you need to decide on the operating conditions, carrying capacity and spaciousness of the all-terrain vehicle, then make sketches of the future design. To do this, it is necessary to outline the location of all components and assemblies of the future machine.
To create an all-terrain vehicle, you cannot use just any engine. It must be equipped with forced cooling. Motoblock engines with air or water cooling are perfect. In addition, the engine must have a large reserve of power so that the all-terrain vehicle can move almost anywhere.
To calculate the maximum power, we use the following formula:
Here nmotormax is the maximum speed, Neud. – specific power per ton of weight. Power limits range from 20-35 hp. With.
To use the all-terrain vehicle all year round, it is recommended to choose a four-stroke engine. They are characterized by more stable operation and the ability to start in cold weather.
Which engine is better for an all-terrain vehicle - gasoline or diesel?
There is no specific advice on this issue, since each has both pros and cons.
Domestic engines performed well in all-terrain vehicles: M-67 motorcycle engines and ZAZ automobile engines. Engines based on tractor starters are quite common. Recently, all-terrain vehicles made from walk-behind tractors have become widespread. This is explained by the fact that there are many cheap Chinese walk-behind tractors on sale, equipped with fairly powerful engines. Such motors are inexpensive, reliable and unpretentious.
To create a chassis, it is advisable to use independent wheel suspension. This technology is more complex, however, it will be more comfortable for both the driver and passengers. An excellent result can be obtained if you combine them with low-pressure pneumatic wheels.
The frame is made of two types of structure: spatial and flat. The frame of the tracked vehicle is solid, while the wheeled vehicle is articulated. Although tracked all-terrain vehicles can also be made on an articulated frame, which will allow better development of constructive thought.
But highly complex frames are rarely used in homemade all-terrain vehicles. To make an all-terrain vehicle frame, you will need channels, angles and pipes of various sections and sizes.
Do-it-yourself snowmobile from a walk-behind tractor: reasons for choice and selection criteria
A walk-behind tractor is a worthy technique for transformation, which is in the arsenal of almost every resident of our country.
In the list of homemade devices that can be adapted from it, the snowmobile occupies one of the first places, competing with the caracat and the all-terrain vehicle. This is due to the fact that in winter, when a snowmobile is needed, the farm does not need the standard tasks of plowing, hilling or mowing the grass. Therefore, it makes sense to remove the engine in the winter and make a snowmobile based on it, and in the summer to return it to the walk-behind tractor and operate it in the standard way. Not every modification of a walk-behind tractor is suitable for a snowmobile. It is best to use for this purpose those that have:
- rear towing device;
- possibility of manual control;
- medium-power motor, cooled by air.
The Neva walk-behind tractors, which are available in eight models, are considered ideal for a homemade snowmobile from a walk-behind tractor. All of them represent a group of tillage machines with average traction potential (6-9 hp). Despite their low cost, the motor systems are assembled and tested in Japan, which makes them extremely durable.
Taking all these points into account, such walk-behind tractors make snowmobiles with good power. This means that it will be able to carry not only the driver, but also at least one passenger.
How to convert equipment?
An all-terrain vehicle in the traditional sense is a vehicle designed to move along mud roads and highways, regardless of their surface. An all-terrain vehicle made from a walk-behind tractor is characterized by small dimensions and light weight.
Before you begin the conversion process, you need to focus on individual aspects. You can create a unit on tracks or on pneumatic wheels. At the same time, the tracked structure is more sophisticated, and you need to know and understand how to operate it.
The next thing that needs to be clarified is where and how the unit will be used, what capacity, and also what load it can carry. Having dealt with these issues, you can begin to create a drawing of the future unit.
You should not take just any motor. It must certainly be with forced cooling. Select walk-behind tractors that have an air or water cooling system. The engine must be powerful enough to be able to move over any terrain without problems.
To use a homemade all-terrain vehicle in winter, choose a 4-stroke engine. It has excellent performance during operation at sub-zero temperatures.
Snowmobile based on a walk-behind tractor: various design options
Among the varieties of walk-behind snowmobiles available today are:
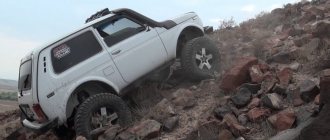
The wheeled snowmobile has a primitive design. The only element that is replaced is the wheels - they are replaced with larger tires or even low-pressure wheels. They are made with all-wheel drive so that the equipment can easily turn to the sides. Among the disadvantages of wheeled snowmobiles made from a walk-behind tractor is their suitability only for shallow snowdrifts.
A homemade snowmobile on skis is also considered one of the simplest options for replacing branded motor sleighs. If you take a ready-made sled as a basis, the assembly process is simplified as much as possible. Another method is also possible, when skis are made independently from plastic.
A tracked snowmobile based on a walk-behind tractor engine is considered the most labor-intensive to recreate. Considering its versatility, excellent cross-country ability and maneuverability, we will dwell on it in more detail.
Controlling an all-terrain vehicle on caterpillar tracks
The tracked all-terrain vehicle is controlled in two ways, depending on the installed chassis. So, for example, if levers are used to control an all-terrain vehicle, then the differentials are located on the sides, and a pneumatic lever can be placed in the floor, which is responsible for tensioning the tracks. Operating such a unit is similar to driving a tractor. If you have had such experience, then there should be no problems. You just need to get used to it.
If the chassis is based on a VAZ, then there are even fewer difficulties with control, since it is often equipped with a manual gearbox and a simple steering wheel. The driver only needs a little practice to get used to the size and responsiveness of the turning parts.
How to make a snowmobile from a walk-behind tractor yourself?
The process of manufacturing a future homemade snowmobile begins with competent design and execution of drawings - a strong point in any homemade product.
For convenience and better understanding, the design of the machine can be divided into two parts:
Leading members include:
- traction unit (motor from a walk-behind tractor);
- frame;
- drive elements.
- steering column;
- shock absorbers;
- caterpillar mechanisms.
Before making a snowmobile from a walk-behind tractor, the auxiliary devices and material resources are determined. Electric welding and a pipe bender are a must, without which the assembly would not be complete. It is advisable to purchase parts that are not on hand in advance.
Step by step instructions
A carat made from a walk-behind tractor is a rational investment of effort and finances. An all-terrain vehicle from a walk-behind tractor is created according to the scheme. Construct the base. It will be possible to take ready-made frames. For example, remove Ural or Izh from used cars. They are durable and easy to maneuver. The rear axle includes both suspensions, which are made from: strut, mowing, bushing. For all-terrain vehicle wheelbase. It is allowed to use a used spare tire from a truck. Transport on the SND is easy to drive and maneuverable. A prefabricated engine structure is mounted so that the all-terrain vehicle performs the necessary functionality. If the motor installation is completed, install:
- transmission;
- exhaust parts;
- braking structure.
Parts from old vehicles will do. The ATV has good maneuverability, maneuverability, and safety. It looks like a 4-wheeled motorcycle vehicle. Typically, an ATV is built on a walk-behind tractor from a Neva car. The step-by-step instructions are as follows:
- Wheel conversion. The wheels are positioned at an equal distance from the car body using adapters.
- The frame is being modernized and strengthened. It is correct to use a ready-made base from motor vehicles; it is reliable and will not cause problems.
- Installing car wheels. You can use a low profile. You can reduce friction between tires and rims using fabric spacers.
- Tires are mounted. Truck wheels are suitable. You can take tires with low pressure. There is no need to install shock-absorbing elements.
After simple manipulations, the created ATV from a walk-behind tractor is used off-road. In addition to transport, you can do SND.
On a note!
Regardless of the type of equipment being created for driving on marshy soils, hooks that provide high traction are important. SND will do.
A walk-behind tractor on pneumatic wheels creates minimal impact on the road. On the rear axle, homemade tires are used, which can be installed on:
- Swamp walker.
- Motor sleigh (air sled).
- Snowmobile.
- Motoblock towing vehicle.
You can buy store-bought items or purchase parts separately (tires, tubes, wheels). The assembly diagram is as follows:
- Standard disks and fasteners are welded with metal tubes.
- They make larger cameras with more secure mounting.
- Tires are attached to the finished expanded disk. You can buy it or use it used from a truck. An air valve is inserted into the hole in the disk.
- The wheel is filled with a pump. The created tires are mounted on an all-terrain vehicle from a walk-behind tractor.
To increase the power of a standard wheel, it is equipped with a tread. Chains and tracks made in a workshop are suitable for mounting cameras.
More popular homemade models with a motor from a walk-behind tractor were described. However, the ingenuity of the craftsmen from the people in relation to such a unit does not end there. Residents of the north have long appreciated the advantages of snowmobiles, motorized sleds, and snowmobiles. A mini tractor or towing vehicle with a walk-behind engine is actively used by farmers.
Crawler snowmobile from a walk-behind tractor: the manufacturing process at home
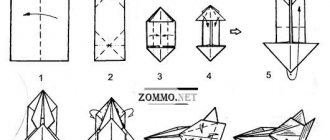
The snowmobile, the picture of which is presented below, is based on the motor of the Neva cultivator. Its production begins with the frame.
DIY snowmobile frame
The frame is made of metal pipes with a diameter that is used for motorcycle frames. Water pipes are also suitable. A pipe bender is used to give the desired shape.
To simplify the task and reduce design time, we suggest using ready-made drawings.
Designations according to the drawing:
- frame;
- intermediate type shaft sprocket;
- intermediate shaft;
- sprocket with teeth;
- gear parts;
- track drive elements;
- track shaft;
- ski support stands;
- tensioner rollers for tracks;
- axis for tensioning rollers;
- towbar;
- tensioner;
- drum flanges;
- steering column
After welding the frame elements to the established dimensions, a subframe is made in its front part - the motor is localized on it. To do this, a stand with holes for it is welded. The same holes should be in the traverse itself. Through these slots it will be convenient to tension the drive chain and adjust the position of the traction unit.
In order to ensure that the device can be started with a handle, the underframe frame is moved to the rear of the unit. Equipping the original walk-behind tractor with a forced cooling function will be an invaluable bonus. This will reduce wear on the carburetor and traction mechanism.
Intermediate shaft for a snowmobile made from a walk-behind tractor
The diagram shows a general view of the intermediate shaft.
The numbers in the figure indicate:
- support part for the operator's seat;
- cross member - made of stainless pipe 28 x 28;
- rack axle - made of pipes 18 x 18;
- traverse - from a metal corner with a side of at least 25 mm;
- jib - a steel billet 0.4 x 0.05 m is taken as it;
- bearings No. 204;
- shaft (pipe based);
- toothed sprocket (like element 10);
- spar;
- rubber casing.
All these details can be made with your own hands.
Making a steering column for a snowmobile: basic drawing with dimensions
A properly assembled and adjusted steering column is a prerequisite for a snowmobile made from a walk-behind tractor to be able to navigate through deep snow and to easily overcome uneven terrain.
Algorithm for completing parts
There are several proven ways to make a caterpillar with your own hands. They have proven themselves to be the most reliable.
Application of conveyor belt
It is considered one of the simplest methods . In addition to the transport belt, you will need a bushing roller chain. The simplicity in this case lies in the fact that manufacturing does not require a large number of auxiliary materials and tools. To extend the life of the transport belt in the device, you need to circle its edges with fishing line. It is important to ensure a step of 10 mm. To connect the ribbons, in this case you need a ring, you need to stitch it along the ends or use hinges.
Particular attention is paid to the thickness of the transport tape. The level of load on the unit directly depends on this. The optimal choice would be to select a tape with a minimum thickness of 7 mm. Among other things, you will have to take care of an additional wheel on each side. You can remove it from an old car, but it is important that its diameter matches the same parameter as the wheel on the walk-behind tractor.
Using a tire
For walk-behind tractors, tracks are often taken from tires. Craftsmen claim that the design is highly reliable when the specified element is included in it. In order for the resulting walk-behind tractor to be practical, you must take care of the quality of the car tires. They must have the correct tread pattern. In this regard, tires from large cars and tractors are preferable. The tread pattern is of key importance, as it acts as a lug.
The manufacturing process can be divided into several stages . Here they are:
- After finding suitable tires, a track for the tracks is cut out of them. This is labor-intensive work that will take a lot of time.
- Use a well-sharpened knife for cutting. It's better to take the one that shoemakers use. From time to time it must be moistened in a soap solution. This will make the rubber easier to cut.
- Both sidewalls are cut off the tires. To make the process easier, you can use a fine-tooth jigsaw for this. Remove excess fragments inside the tire if necessary. If the track turns out to be too hard inside, this manipulation can be repeated.
The advantage of this method is that there is no need for a ring connection. The tire already has a closed structure.
Thanks to this, it is possible to improve the reliability of the tracks, which is especially important under heavy load conditions. And yet such caterpillars are of rather limited length. It corresponds to a similar parameter for a car tire.
From chains and belts
All-terrain vehicles with tracks are often manufactured using conventional V-belts. They are connected to each other by means of lugs. The straps are attached with screws or rivets.
An additional method is to use chains of the same size. This material is often found in large quantities in gardeners' garages. The manufacturing process boils down to the following points:
- Take 2 chains of the same size. The last links are broken, after which they are combined into a closed ring. The links are clamped and welded.
- The lugs connect the chains to each other and provide reliable fastening. These devices can be made from simple steel plates of suitable thickness. They are connected using bolts.
If you don’t want to make tracks yourself, you can take such products from old equipment. For example, a walk-behind tractor on Buran tracks demonstrates good efficiency. It makes sense to use old parts, since new Buranovsky tracks are quite expensive.
Step-by-step instructions for assembling a snowmobile from a walk-behind tractor
- assemble the frame;
- install the engine, which should fit in the center of the machine for increased stability, and fix it;
- install an intermediate shaft to reduce angular speed and increase traction potential;
- adjust the steering column;
- aggregate caterpillars;
- choose a seat and equip it with an old car seat.
After successful testing to protect the external metal parts from corrosion, the snowmobile is cleaned and painted.
How to make a snowmobile from a walk-behind tractor with your own hands: instructions and diagrams
The walk-behind tractor is a seasonal equipment that is used mainly in spring, summer and autumn. To prevent it from being idle in the winter, you can construct a snowmobile from a walk-behind tractor with your own hands. Having minimal skills in using the tool, it is not at all difficult to do this. Reworking it back after winter doesn't take much time. Thus, the walk-behind tractor will be used all year round for household work.
A snowmobile is a useful unit that can overcome snowdrifts. The equipment allows you to transport small luggage. Many residents from the northern and central regions prefer to make such units from improvised materials. A snowmobile made from a walk-behind tractor is durable and quite powerful. It has good cross-country ability and maneuverability.
Pneumatic vehicle and swamp vehicle
A swamp vehicle is a highly cross-country vehicle. The unit showed itself excellently in marshy areas, shallow waters, muddy areas and swamps. Such transport is relevant for those who often go outside the city, tourists who overcome hundreds of kilometers of difficult off-road conditions.
Conventionally, such a transport can be called a walk-behind tractor on pneumatic wheels. It is clear that the main difference between a pneumatic drive and other home-made walk-behind models is the wheel base. Due to the low effort on the road, low-pressure tires make it possible to avoid overloading, slipping, and troubles.
What is a walk-behind tractor
The walk-behind tractor is a universal unit that is used for agricultural work. This device helps make work easier in the garden. The design is based on a single-axle chassis. The person driving the walk-behind tractor walks behind the machine and holds it by the handles on which the controls are located.
Walk-behind tractors are mostly equipped with gasoline engines, but there are also diesel engines. The power units of walk-behind tractors have automatic speed controllers, which simplify the operator’s work. Engine power ranges from one to ten horsepower.
What can it be converted into?
To create alterations from a motor unit, you only need basic knowledge of mechanics and the availability of tools . The robust design of the block, very successfully developed by engineers, allows the unit to be modified.
The most common are the following typical designs:
- snowmobile;
- mini tractor;
- all-terrain vehicle or karakat;
- swamp walker;
- ATV;
- motorized dog;
- lawnmower;
- dump;
- potato digger;
- potato planter
A mini-tractor is perhaps the most popular homemade product. This design has a greater level of comfort compared to a motor unit. Here you need to take into account the factor of shifting the center of gravity. This problem is solved by installing a second driven axle and increasing the front one. A mini-tractor is often complemented by a trailer.
On the basis of a walk-behind tractor, you can design an ATV or a karakat.
Motorcycle dog
The unit can be converted into a motorized towing vehicle that is capable of pulling drags and transporting gear and working tools. To assemble a motorized dog yourself, you need to additionally purchase some spare parts. The frame is constructed from a square tube, and the control arms are made from a round tube. The finished unit has a low speed, but is very maneuverable.
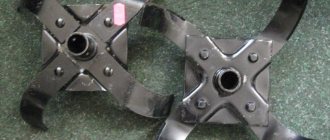
boat motor
You just need to attach a walk-behind tractor to the boat hull, and instead of cutters, put aluminum blades, which should be located in the same plane with the shaft (perpendicular to the movement). The upper parts of the blades will move through the air, the lower parts will sink into the water. This makes it possible to develop a fairly high speed.
Wood splitter
Harvesting firewood seems easy only at first glance. However, for this you need to have endurance and considerable strength. A wood splitter from a motorized unit is a convenient and simple device that even a teenager can handle. An inexpensive device allows you to save time and get rid of monotonous and hard work.
Creating a wheel unit
First of all, it is advisable to equip standard engines with a speed reduction gearbox. This is explained by the fact that acceptable torque for both diesel and carburetor engines occurs at 80% of the maximum crankshaft rotation speed.
In addition, the motor must be equipped with a forced cooling system. The bottom line is that the movement will be carried out at low speeds, and the incoming air flow is not enough to create an operating temperature regime for the engine.
Frame
First you need to create a frame that will be located between the front and rear axles. For this task, profile pipes with a square cross-section are taken. Such components have a high degree of rigidity. When using heavy motor vehicles such as “Neva” or “MTZ”, they often perform rigid joining of the frame. Due to this, the all-terrain vehicle will be single-volume.
Another option is to use the so-called fracture (breakable frame), which provides great advantages when operating the unit in areas with rough terrain. In such a situation, the connection will be made through the kingpin. At the same time, both axles will be equipped with independent suspension.
To move through forests for hunting, it is possible to make a swamp vehicle based on a walk-behind tractor, equipped with a breaker frame. Compared to all-terrain vehicles with a strict frame, it is endowed with higher cross-country ability.
Rear axle and suspension system
The easiest way to make the rear axle is to use ready-made components from an old passenger car, for example, Moskvich 412. This is due to the insignificant weight of such elements, which makes it possible to practice them for the manufacture of an all-terrain vehicle. To ensure smooth travel, the suspension system is based on shock absorbers, which additionally reduces body vibration. In order to reduce fuel consumption and reduce resistance when traveling through areas with difficult driving conditions, it is advisable to make an independent suspension system for each rear wheel individually. To prevent a higher level of swaying, it is necessary to connect the frame to the rear axle, for this you should use hardened bolts, and to make the connections elastic, use rubber inserts.
Wheels
To enhance the traction of wheels with the road surface, especially in swampy areas, an all-terrain vehicle is used on low-pressure tires. Such wheels, due to their insignificant pressure on the soil, make it possible to make the movement of an all-terrain vehicle on inner tubes extremely soft. For this, specialized wheels from large swamp snowmobiles are used. You can also make them yourself, which is implemented in this way:
- to make homemade disks, it is necessary to weld standard disks with auxiliary fastening plates;
- then a large chamber is put on the extended disc and inflated;
- the manufactured wheels are installed on the unit.
To increase the cross-country ability and grip of the wheels with the ground, you should cut out unique lugs from the tires and install them on the tubes.
Step by step assembly
We assemble our own version of the all-terrain vehicle from prepared spare parts. This process includes the following steps:
- the walk-behind tractor itself is installed on the prepared frame;
- then the rear axle is fastened;
- The driver's seat is being installed;
- if provided in the drawing, the steering control is mounted;
- the lower area of the frame is covered with plastic or iron sheet protection;
- the brake system is tested;
- lighting fixtures are installed and electrical wiring is installed.
All components or assemblies must be tested to ensure correct operation during manufacture.
What tools will you need?
A homemade snowmobile is used for sports activities, tourist walks, and household work. After determining the purpose of the unit, the basic diagram can be slightly changed.
It is necessary to prepare the following tools and materials for work:
- manual welding machine;
- special mask and gloves;
- grinder;
- hacksaw for metal;
- set of files;
- pipe bender;
- frame pipes;
- brackets, clamps and other fasteners;
- small parts;
- drill;
- spanners;
- clamps;
- vice;
- wheels.
To save money, many parts and spare parts are made independently. To better imagine the design of a homemade product, you can use the advice of those familiar with experience, ready-made diagrams, special literature, drawings, photographs.
The dimensions of the parts must be calculated with particular accuracy. It is very important to study the drawings. With their help, the order of mounting the snowmobile elements is determined.
Watch the video showing a self-propelled machine created on the basis of a walk-behind tractor.
Making a snowmobile with your own hands
By following a certain algorithm for installing a homemade machine from a motor unit, you can avoid numerous mistakes. Snowmobile equipment from a walk-behind tractor must be assembled in a certain sequence. Let's look at the step-by-step process of making a snowmobile yourself from a Neva walk-behind tractor.
First, a sketch of the future design is drawn up:
- homemade frame (1);
- second intermediate shaft sprocket (2);
- intermediate shaft (3)
- first intermediate shaft sprocket (4);
- track shaft driven sprocket (5);
- track drive sprocket (6);
- track drive shaft (7);
- two supports of the support ski (8);
- two track tension rollers (9);
- tension roller axis (10);
- tow bar (11);
- tension device (12);
- four drum flanges (13);
- four drive sprocket flanges (14);
- steering column (15).
Other types of machines
You can also assemble an ATV from a walk-behind tractor, although this unit does not develop ultra-high speed, but in terms of maneuverability and cross-country ability it is not inferior to its own. The landing position in a homemade ATV remains traditional, not a motorcycle one. Wheels can be used from any passenger car.
It is worth mentioning an interesting homemade product called karakat. The power of the car lies in its large wheels, which are ordinary inner tubes, tightened with strong belts.
They put homemade wheels on carakat, modifying standard car ones. A very original disk is also installed on a lightweight walk-behind tractor. To do this, two aluminum basins are connected along the contour, having previously cut the bottom to fit the size of the hub, stiffeners and side stops are installed to fix the camera.
Despite its external clumsiness, the caracat has high cross-country ability and stability. Not only can it easily overcome swampy lowlands, but it is capable of transporting significant cargo (up to 100 kg).
Eventually
Thus, having straight arms and a head on your shoulders, you can make a fairly simple but passable all-terrain vehicle from a walk-behind tractor, which is nominally considered agricultural equipment.
There are positive experiences with alterations, a lot of them. Have experience in operation and maintenance.
An all-terrain vehicle made from a walk-behind tractor is an excellent solution for fishermen, hunters, and simply those people who live in rural areas far from big cities.
Pros and cons of a homemade snowmobile
You can buy snowmobile equipment in a store, but many continue to create such machines with their own hands. This is due to the fact that homemade vehicles have some advantages over finished products.
- Low cost. It is precisely because of the price that many do not buy ready-made models, but create snowmobiles themselves from a motor unit. If we compare the cost of ready-made devices, their price can be 10 times more expensive than a home-made design.
- Ability to select parameters. Some homemade designs are more powerful than popular branded snowmobiles.
- Reliability. Snowmobiles, even from branded manufacturers, often break down during use. For their own all-terrain vehicle, people choose only high-quality materials.
How the construction works
It’s not difficult to do, you just need to have experience working with transport and mechanics. Create a base for transport. For this, it is allowed to use a frame from a used motor vehicle model IZH or URAL. Thanks to these details, the vehicle will become more maneuverable and will easily overcome any holes or bumps on the road surface.
Creating homemade equipment step by step:
- Construction of rear bridge, wheel suspension. To connect the suspensions at the front, at the rear you need to use a car stand, a mowing rod, and a steering wheel bushing.
- Wheels designed for a vehicle must be taken exclusively from the most powerful trucks. Tires with low pressure would be an excellent choice for the unit. With rational selection, the master can drive the vehicle in complete safety, without worrying about maneuverability.
- Engine installation is the main stage in the entire process of assembling a machine based on a walk-behind tractor (all-terrain vehicle).
As photos in auto magazines demonstrate, an all-terrain vehicle made in a garage looks impressive and is confident. Karakat from a walk-behind tractor has differences. There are several of them. It is necessary to use a welding machine to make a frame from a metal profile or metal tubes.
The “original” engine and gearbox can be replaced by a multi-stage gearbox for comfortable, simple control of speed modes. At the end of the assembly, ramps are mounted on the equipment. Carakat on 4 wheels with a motor needs to be tested. Before constructing an all-terrain vehicle, materials are prepared. This:
- Frame.
- Drive unit.
- Skids.
- Steering column.
- Strong wheels (or tracks with snow hooks).
- Power device.
- Welding machine.
- Keys.
Some parts can be made, but some need to be purchased. It would be best to take the frame from an old motor vehicle, and for the rotating ski racks use longitudinal frame tubes from a used bicycle vehicle.