If you are reading our article, then you are probably expecting a child. So that you don't get bored, do something useful and interesting - make scratches for newborn babies quickly and easily with your own hands. By the way, if your friends are expecting a baby, then homemade mittens are the best gift from the heart!
Awesome scratch pads will protect your little one's face from damage and will also keep you warm when it's chilly outside. This is a very practical and necessary thing, with the help of which you will have peace of mind for your child! Just look at the photo above to immediately start making scratches.
What are scratches for?
Very often, children are born with long fingernails, which cannot always be cut in time. And when cutting them, it is advised not to leave them too short. Because of this, babies scratch themselves, because all their movements are absolutely chaotic. It is precisely this problem that special mittens for newborns will eliminate. Some people think that they are harmful because they do not allow the skin of the hands to breathe and do not allow the baby to tactilely explore the world around him. The accessory also prevents him from holding a rattle or bottle. However, it should be remembered that scratches are dangerous for the skin of a newborn: due to weak immunity, an infection can develop.
How are scratch mittens different from regular mittens? Because they don't have a thumb compartment. As a result, the finished product looks like a bag, which is held in place by an elastic band or a beautiful ribbon. If you wish, you can sew or knit it in the form of a regular mitten, but then you will have problems putting it on.
Negative consequences
If parents do not know how to wear a collar for a newborn and self-medicate, complications may arise for the child. These include the following conditions:
- if the collar is over-tensioned, it begins to compress the neck and trachea area, leading to breathing problems. As a result, the child begins to experience hypoxia and the functioning of the cardiovascular system changes;
- With prolonged use of the splint, hypotrophy or atrophy of the neck muscles occurs. In the absence of load, their volume decreases, which can lead to the progression of the underlying disease. At the age of two months, children can hold their heads well and the collar should only be used for a short time.
The use of homemade devices is prohibited. Tires must be manufactured in accordance with existing standards and from materials approved for use for newborns.
The Shants collar for newborns is an important part of the treatment of congenital neck pathologies. It allows you to fix it in a physiological position and prevent the further development of diseases
In therapy using a splint, it is important to choose the right one in consultation with an orthopedist. The doctor will choose the size of the collar, explain how to put it on, and describe a wearing pattern during the first weeks of treatment
If the child is constantly restless or there are external signs of soft tissue compression by the splint, parents should immediately consult a doctor.
Until what age should it be used?
Each child is different, so it is difficult to say how long you will need to use scratches. For newborns, they may not be needed at all, and some children will have to wear them until almost six months. Most often, they wave their arms sharply during the first 3 months, but it all depends on the mother’s opinion. Experts advise using them as little as possible - after all, the baby must develop and get used to his hands. Babies start reaching for toys at about two months, so it's worth letting them touch and examine everything.
If it becomes noticeable that the child is showing interest in surrounding objects, then it is better to remove the mittens from him. It happens that inexperienced mothers do not know how to do the right thing. Then they should adhere to a period of three months. However, the accessory can only be worn at night.
What is a scratching post for?
The simplest reason that a cat sharpens its claws is the need to hunt, despite the fact that pets no longer have to get food on their own.
No less interesting is the hypothesis about the relationship between cat health and the claw scratching procedure. There is an opinion that here we are talking about a kind of exercise for the whole body. The surface on which the cat rests acts as a training device. All muscles and bones of the skeleton take part in the process.
The next reason also concerns health. There are many nerve endings and blood vessels leading to the ends of the paws, pads and claws. By scratching, the cat massages sensitive areas, raises its tone and even gets pleasure. Often, a cat, stretching on a scratching post, purrs contentedly, as if such training gives him pleasure.
There is an opinion about the stress factor - a cat uses even a primitive scratch in order to get rid of negative “emotions”.
Veterinarians believe that with the help of a nail polisher, animals renew their claws and thus prevent the possible development of inflammatory processes in the paw pads.
This is interesting! A cat's skeleton consists of 240 bones, while a human's has 212.
Selection of material and tools
These special mittens can be purchased and can also be sewn, knitted or crocheted. For newborns, in this case, you will need natural materials. For sewing, it is best to use flannel, kulir, knitwear or any other fabric that is pleasant to the touch. It should not cause irritation (possible heat rash), so it is better to choose a material that is not too thick. For two scratches you will need: two pieces of fabric measuring 180x130 mm, a regular elastic band 140 mm long, a needle, thread.
To crochet them, you need to choose a yarn. In this case, it is better to choose thin cotton, for example, VITA Pelican. For work you will need: yarn (you can take leftovers), hook No. 2 and a beautiful ribbon measuring 5x600 mm.
The mitten can also be knitted from natural yarn, although acrylic is also suitable (for example, Jiffy Yarn Fisherman). An acrylic product will keep your hands warmer if it’s cool at home. The work is done on five double needles No. 2-4, i.e. you need to knit in the round. You can cut a piece of ribbon or knit a cord from yarn.
cat house
This is a shelter with a single entrance, located far from the routes of people, higher above the floor. Dimensional diagrams and drawings can be found at the end of the article. Cats love boxes. Your task is to create something similar, but one that fits into the interior.
If you plan to place the house on a cat tree, take care of its stability and balancing issues, but for this it is enough to have a building level and at least three support points for the plywood base.Tips on how to make a cat house spend a lot of time on interior and exterior upholstery. An external one can be useful for a furry pet to sharpen its claws - but only if the shelter is not located at a height.
Otherwise, decorate it however you want. What will be useful inside is not upholstery, but a mattress that fits the internal size of the floor, possibly with sides. It can be taken out and washed. The animal doesn’t care, and it’s much easier to maintain hygiene.
Sew scratches
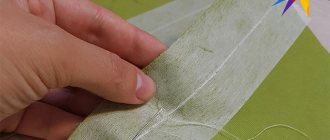
Before you start sewing, you need to prepare a pattern. To do this, take tracing paper (a sheet of paper) and draw a rectangle measuring 90x130 mm. We round the upper edges of the future mitten and cut out the blank. Let's prepare the elastic band right away: take the desired length and cut it in half. You should decide on the location of the seams, which can be internal, external or hidden (between layers of fabric).
We take the finished pattern, place it on the fabric and trace it. We cut out the parts, lean them against each other and sew them together, leaving a hole for the handles. We apply the elastic to the bottom edge of the product, turn it in 2 cm and stitch it. We decorate ready-made scratches for newborns with ribbons, bows, embroidery or lace. If desired, you can increase the length of the cuff - then the elastic will no longer be needed.
How to discourage a cat from sharpening its claws in a “forbidden” place
In order for your pet to quickly switch to the scratching post, it is necessary to create unpleasant conditions for him in his favorite place for scratching. First of all, a certain smell will help. Animals have a more highly developed sense of smell and some aromas are categorically unpleasant to them. The smell of alcohol, for example, or perfume. Cats don't like the smell of all citrus fruits. You can purchase a special spray based on aromatic oils at the pet store. Surfaces should be treated with it until the pet completely gives up the desire to scratch them.
Beaphar Stop It Cat Spray for repelling cats from furniture
You can speed up the weaning process by throwing a slipper next to the wrong object at the moment when the cat tries to scratch it. Usually animals quickly abandon places where they are supposed to be in danger. A loud bang, a stern hail, and wrapping furniture in cellophane are also effective.
Many people recommend “water procedures” from a spray bottle, but this is possible if a cat is somewhere nearby trying to sharpen its claws, and the owner is sitting fully armed, waiting for her. Everyone can invent a way to dare an animal themselves, knowing all its pros and cons.
Assault is strictly unacceptable, because cats are easily stressed and such “education” will not lead to the desired result.
Crochet
We crochet 4 loops, connect them into a ring and start knitting in the round. If possible, you can try on the mittens on your baby or use the sizes indicated above. They are knitted in single crochet stitches, and at the end the rows end with a connecting loop.
We work with rows like this:
- First: 2 lifting loops and 7 columns.
- Second: 2 lifting loops, 2 columns in each column of the previous row.
- Third: 2 lifting loops, alternately knitting 2 stitches into one, 1 stitch, etc.
- Fourth: 2 lifting loops, alternately knitting 2 stitches into one, 2 stitches, etc.
We continue to add loops until the width of the product reaches 80-90 mm. We continue working without adding (about 7-10 rows). To move to the cuff, we make decreases: we reduce each row by 2 loops. Next, we knit the cuff either with an elastic band (knitting needles) or double crochets (crochet). For newborns, beautiful lace around the edge of the product is suitable. Finish the work and cut the thread. We repeat all the steps for the second scratch and decorate both with ribbons or laces.
Corner
Can be installed on both external and internal corners. Corner scratching posts, like wall-mounted ones, unlike floor-mounted ones, require durable fasteners. The distance from the floor should be chosen based on the size of the pet, and installed in the places most favorite for scratching.
Corner scratching post with platform
Corner scratching post
Simple corner scratching post
You can also install the corner structure on furniture. An aesthetically executed scratch will not greatly spoil the appearance of a sofa or chair, but it will protect against the claws of an animal if it gets into the habit of sharpening its claws in this particular place.
A corner scratching post on the sofa will protect the upholstery from claws
How to make a beautiful corner scratching post
Knitting with knitting needles
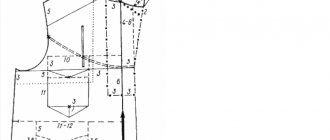
A knitted mitten will only work if the number of stitches is calculated correctly. For example, if there are 3 loops in 1 cm, then using needles No. 2 you need to cast on 40 loops (we move from the wrist to the fingertips). We distribute them onto stocking needles: 10 pcs. on a knitting needle. We begin to knit a 1×1 elastic band (in the round) with a height of 50 mm. As soon as the elastic is ready, we knit a row with holes for the ribbon or lace. It is knitted as follows: knit 2 together, yarn over, etc. In the next row, yarn overs should make knit stitches, knitted behind the back wall.
Next we knit using stockinette stitch or any pattern you like (you can even choose an original pattern). The height of the main fabric is 80 mm (with elastic 130 mm). After this there will be decreases: in each row at the end of each knitting needle we knit 2 loops together. We stop when there are 8 loops left and tighten them. We fasten the end of the thread and hide it. We thread a ribbon or lace made of air loops into the scratches for newborns.
The resulting mittens will not only protect the child’s health, but will also become a beautiful addition to any set of clothes. After all, you can experiment not only with the ornament of the product, but also with its color palette.
How to make a scratching post with your own hands
There are many ways to make a scratching post with your own hands from scrap materials:
- A piece of an ordinary rug or runner is nailed to a wooden base and a fully functional prop is obtained. Moreover, you can put it under your feet and attach it to the wall so that your pet can take a comfortable vertical stance.
- Corrugated cardboard - a scratching post made from it can also be made in the form of one sheet, which is glued to the base.
When calculating the scheme, you need to take into account the size of the cat's body. For example, the height of a scratching post for a Maine Coon should be at least 1 m. For other smaller representatives of the cat family, a “modest” 60 cm is enough.
Rope post
The standard height of a scratching post is usually 50-60 cm. When making such an “accessory” for a cat, you need to take into account important factors:
- You will need a base stand to which the main element is attached.
- A platform-bed is usually provided on top - cats love to watch what is happening from a height.
- The upper part can be used to place hanging soft toys.
- You can additionally attach a rope to the post - cats love ropes and enjoy playing with them.
In the process of making a claw post, special attention should be paid to the base (stand).
Manufacturing recommendations:
- The platform should be made of a piece of thick plywood or chipboard cuttings.
- Its size depends on the height of the structure and the weight of the cat. We must not forget that the animal will most likely jump from above, pushing off with four paws. This will give such a load that the unstable structure on a small stand will simply tip over. Low scratching posts (50-60 cm) must be provided with a base of 50x50 cm. But for a longer post you will need a platform measuring 75x75 cm.
- You need to prepare all the necessary materials in advance: a post, fabric for gluing the base and top platform, a sufficient number of meters of thick rope, self-tapping screws and a screwdriver, insulating tape, metal corners (6-8 pieces).
- If you plan to make a scratching post with a house, it is best to provide additional fastening to the wall.
- As a material for the post, you can use a plastic pipe or a rectangular wooden beam.
Step-by-step process for making a scratching post with your own hands:
- Screw 3-4 metal corners on both sides of the post. Later they will serve to attach the scratching post to the base and secure the upper platform.
- Wrap the end of the rope with electrical tape and screw it to the pipe or beam with a self-tapping screw through this seal.
- Wrap the rope tightly around the entire length of the post, leaving no free space.
- Secure the top edge of the cord with electrical tape.
- Place the scratching post on the base and secure it with screws through the corners.
Next, you need to cut out the fabric and paste the horizontal surfaces - the base and shelves. All that remains is to hang the soft toy on a long rope (if such an attribute was planned).
Scratching post-mat
Some cats love to sharpen their claws on horizontal surfaces. For example, an animal does not pay attention to the corners of furniture, but tears the upholstery on the sofa. If your pet has just such inclinations, then you can quickly make a simple scratching post for your cat with your own hands.
To work you will need:
- a piece of plywood or chipboard 500x500 mm;
- a piece of old carpet, rug or any dense fabric;
- glue.
You also need to take a drill, a large needle, strong thread or fishing line.
A horizontal cat scratcher can be made as follows:
- Cut out the wooden base.
- A fabric covering is prepared to suit its size.
- Thin holes are drilled along the perimeter of the plywood at a distance of 4-5 cm.
- The surface of the base is lubricated with a suitable glue and connected to the fabric.
- The structure is placed under a press until the glue dries.
Through pre-prepared holes, both elements are sewn along the edge with a strong thread or fishing line.
You can attach additional cat accessories to the scratcher - this could be a hanging soft ball or a mouse.
Corner scratching post
To make a corner scratching post, soft elements (scraps of thick fabric), corrugated cardboard, and old bath mats are suitable. Work progress:
- Take 2 identical sheets of any plywood or fiberboard and glue them on one side with a regular cloth or bandage. The result will be something like a folding book.
- Holes are drilled along the perimeter of these two elements at a distance of 4-5 cm from each other.
- The surface of the scratching post is covered with cloth.
- Place the workpiece under the press and wait for the glue to dry completely.
- The final stage is to sew both layers of the scratching post through pre-prepared holes.
In order to secure a corner scratching post, sometimes it is enough to place it in a corner and press the edges with furniture. Some owners use double-sided tape for fixation, with which you can firmly attach the structure to the wall.
Scratching post house
The most difficult option of all presented. You can make a cat scratching post with a house with your own hands using one of the following methods:
- Develop two separate elements (house and stand), and then connect them together. A very profitable option, since in the future you can add a play space to this design in the form of a ladder, passage or labyrinth.
- Another simpler method is to design a cat scratching post and a house together as a single whole.
The second option has an advantage. A horizontal scratching post can easily be placed on a flat roof, and a high wall can be adapted for a vertical scratcher.
It’s easy to make a house with a scratching post for a cat:
- The walls are cut out according to the intended dimensions.
- To make the structure harmonious, the interior space can be divided into two floors - the pet will only be happy with the extra “room”.
- It is necessary to provide at least two exits in different directions - it is recommended to design one of them on the second tier.
- All structural elements are connected with metal corners or using wooden slats.
- The roof must be removable - through it, the house is subsequently cleaned and disinfected.
- The inner walls must be covered with any thick fabric, and the outer walls must be covered with material suitable for scratching posts (for example, carpet trimmings).
Important! If you attach a stick with a hanging soft toy above the entrance, then the overall project will only benefit, and the cat will receive additional entertainment.
Wall-mounted plywood option
The design is quite easy to manufacture; you just need to accurately calculate its parameters. It is better to make it 10 centimeters higher than the pet’s height, then he will not be able to leave scratches on the walls. The recommended width is at least 40 centimeters.
Prepare a couple of plywood sheets at least 25 cm wide (for a big cat, the parameters need to be larger). As a soft lining, you can use old carpet, which is attached to the plywood with the wrong side up. It is enough to fix the carpet with a stapler. Then the structure is attached to the wall, and the device is ready for use.
A wooden claw house is an excellent alternative to store-bought accessories. A log cut lengthwise is simply attached to the wall and wrapped in an old rug or bedding.