From towels
The rug can be plain or multi-colored, depending on the source material
. This rug has a number of advantages. Firstly, you only have to spend about an hour to create it, secondly, if you use old towels, its cost will be close to zero, and thirdly, you can do handicrafts with your children, attracting the younger generation to useful work in the form of a game .
Tools and materials
Everything you need can be easily found in every home:
- Products made from terry fabric. These can be not only towels, but also bathrobes and even socks, if there are enough of them available.
- Scissors.
- A large needle with a wide eye makes it most convenient to assemble a rug. You can use any.
- Sewing pins.
- Strong threads.
- For a rug made of knots, you need to prepare a piece of plastic mesh with small cells. You can purchase it at a hardware or gardening store.
You should pay attention to the fact that terry can be either cotton or mixed with synthetics. The first one instantly absorbs moisture, but it takes longer to dry. The second dries quickly, but is not very hygroscopic. If the bathroom does not have heated floors, a 100% cotton rug will have to be hung on a heated towel rail or radiator after use.
Step-by-step instruction
The sequence of work depends on which manufacturing method is used. However, in all cases, the first step will be to cut the material into strips about 7 cm wide. For option No. 3, it should be adjusted depending on the size of the cells on the selected mesh fabric.
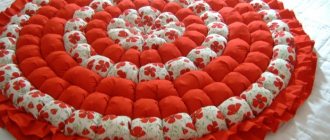
Option number 1 - braids
Since the strips have already been prepared, you can immediately begin assembling:
- Sew three strips together, positioning them so that two of them are next to each other, close to each other, and the third lies on top, half covering each of the first two. This option will make the beginning of the braid neat. You can also fasten them by folding them in a stack.
- Now you need to braid the braid. It should not be loose or too tight.
- As the braid lengthens, it is rolled into a snail.
- To prevent the structure from falling apart, the braids are secured with sewing pins.
- When one of the terry strips ends, another is attached to it, sewing overlapping. You can stitch end-to-end, but with this method the joints will be very noticeable. It is advisable to take strips of different lengths, then the rug will turn out more neat. You can sew the strips together before starting work even at the stage of cutting towels.
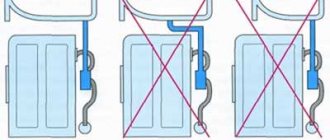
- When the rug reaches the desired size, you need to sew the braids together from the wrong side. How to do this is shown in the figure.
- If you sew the rug from the front side, trying to make the stitches invisible, the finished product can easily be machine washed.
- The end of the braid is secured with a needle and thread in the same way as the beginning, and then sewn to the rug from the inside out, rounding its shape.
- There is another way - to sew a snail from braids onto a backing of the appropriate shape, cut from a towel, making through stitches in the middle of the braids (where the strips intersect and a notch is formed). It is more labor intensive.
Option number 2 - shells
This method allows you to show more imagination and creativity.
This method allows you to make a rug of any shape (fancy, asymmetrical), but it requires more time and perseverance:
- First you need to fold all the strips in half with the right sides facing out and stitch them on a sewing machine or sweep them by hand. The first option is preferable.
- After this, you need to roll each strip into a snail shape and secure it with a sewing pin. If the strips are too short, it is possible to sew several together. It will even make the rug more interesting and give it some charm. You can also make shells of different sizes.
- To prevent the strips from unfolding, the finished round pieces must be stitched through with a so-called gypsy needle. Some needlewomen use a glue gun even at the winding stage, placing droplets of glue at a distance of 5–6 cm from each other. The disadvantage of this connection is that the rug cannot be washed in a machine.
- When all the elements are ready, you need to lay them out so that the canvas of the desired shape is formed.
- The last stage of work is assembly. Shells located nearby should be sewn together, preferably both at the top and bottom.
Option number 3 - nodules
You can make either a plain or multi-colored rug.
This rug is very easy to make, but looks like an expensive factory product. The work will not take much time:
- You need to cut a rectangle, circle or other shape from a plastic mesh. This will be the base for the rug.
- Cut the prepared terry cloth strips into pieces about 12 cm long.
- Thread each into the cells and tie with a double knot. You should try to keep the nodules as close to each other as possible.
- If the mesh slides along the bathroom floor, you can sew pieces of terry cloth to it in several places or randomly smear it with glue from a gun, which, when hardened, becomes like rubber and gives an anti-slip effect.
Dust cloth
You can make a homemade cleaning brush from a terry towel. It will be an excellent alternative to a ready-made broom, since fluffy natural fabric collects dust better than synthetic fiber. For this you will need:
- old towel;
- wooden rod;
- scissors;
- Velcro;
- glue gun
Cut out two small squares from the towel. A wooden stick is placed on one and glue is applied around it along the fabric, after which a second piece of material is applied on top. The fabric is cut into strips and tied. The edge of the towel around the rod is secured with Velcro.
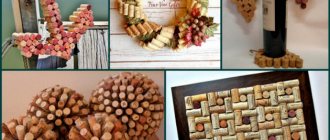
Suberic
Walking on a cork rug is not only very pleasant, but also useful.
Cork is an ideal material for a bathroom rug. It does not absorb moisture, bacteria and mold fungi do not multiply in it. And it is also very pleasant to the touch.
Tools and materials
To make such a rug you will need:
- Wine bottle corks, about 150 pcs. They can either be collected by drinking an intoxicating drink, or purchased at a wine shop.
- A sharp knife and board for cutting corks.
- Quick-setting adhesive for wood and rubber (“Moment” or any other).
- A thin rubber mat of the desired size that will serve as a backing.
DIY making
The process is extremely simple and does not require any special skills:
- First you need to cut the corks lengthwise into two parts.
- When everything is ready, start assembling. To do this, stick halves of corks onto a rubber mat; they can be arranged in different ways (for example, alternating rows laid lengthwise and crosswise). Using your imagination, you can lay out patterns from colored corks.
To make the mat durable, you should follow the instructions on the glue package.
Slippers
The fabric surface of your favorite slippers tears much faster than the sole. In order not to throw away the necessary accessory, it is renewed with pieces of an old terry towel. By folding the material several times, a dense coating is obtained. You can also put thin foam rubber between the sheets of towel, so the top of the slippers will keep its shape.
What can be made from an old meat grinder: practical and interesting ideas
From pompoms
It is not necessary to buy new skeins of thread, you can take the remains of different ones.
A bath mat made from pompoms turns out so beautiful that you can make it not only for yourself, but also as a gift.
Tools and materials
For production you will need:
- Threads. It is advisable to use thick yarn that does not contain wool.
- Scissors.
- Plastic mesh with small cells (canvas).
Creation at home
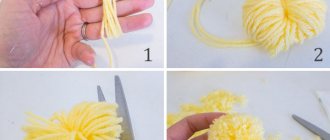
Making a rug begins with winding pompoms. Their size may vary depending on the preferences of a particular person. You should not make very small pom-poms - they will quickly become flat, as a result of which the product will take on an unpresentable appearance.
The process of winding pompoms can be done in two ways.
Winding pompoms - a quick way
This option should be used when pompoms are made from a large and solid skein of thread. To secure the yarn, you will need a table with a sufficiently large distance between the legs. You can also use a chair, but then the number of pompoms produced at a time will be much less. Some needlewomen make a special machine, driving two large nails into the board at a distance from each other.
The work consists of the following stages:
- Yarn is wound between two supports. The number of turns should be sufficient to obtain a dense and elastic pompom.
- The wound “sausage” is tightly tied with thread at regular intervals. Their ends should be long, since when assembling the rug, it is through them that the pompoms will be attached to the mesh.
- After this, you can cut the threads that are held by the table legs or nails and remove the workpiece.
- Now you need to divide the “sausage” into individual pompoms, cutting the segments in half between the transverse constrictions. You should make sure that the cut is exactly in the center, otherwise the pompoms will turn out uneven.
- All that remains is to fluff the pompoms so that they become perfectly round and no constrictions are visible.
Winding pompoms one at a time
This method is used when they are made from leftover threads:
- The threads are wound around several fingers folded together (the more fingers, the larger the pompom you get). You need to make at least 50 turns.
- A long piece of thread is cut off, and the resulting workpiece is tied with it in the middle.
- The resulting loops on the sides need to be cut with scissors.
- After fluffing the pompom will take a round shape.
Assembly
When a sufficient number of pompoms have been prepared, begin assembling the rug:
- Cut out the plastic mesh according to the shape of the future rug. It can be made in the shape of a heart, a flower, a circle, or simply rectangular.
- Using tails from constriction threads, tie the pompoms to the mesh until the entire canvas is filled.
- The rug is ready.
Organizer
An old long towel in the shape of a rectangle can become an organizer for any little things in the bathroom, kitchen or children's room. Pockets made of brightly colored material are sewn onto the surface, one edge is added with a holder or a clothes hanger is hemmed - ready.
Pockets are made across the entire width of the towel or placed in any order. It is more convenient to work with rectangular canvases; round and square ones do not hold their shape as well.
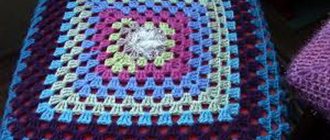
Crochet
Crocheting is not that difficult to learn.
To make such a rug, you need to have at least minimal crocheting skills.
Tools and materials
List of what you need to prepare for work:
- Big hook. Its number must correspond to the size of the yarn or strips of fabric that replace it.
- Thick threads. Woolen ones should be avoided; The best choice would be yarn that contains cotton and acrylic. If they are made of pure synthetics, you need to check them for hygroscopicity (make sure they absorb water quickly enough).
- Scissors.
- Lots of old T-shirts and pajamas if rag strips are used instead of thread.
- Thread and needle.
- Sewing pins.
Manufacturing instructions
The procedure depends on the chosen knitting method.
From old T-shirts
All you need to make is time and a little inspiration.
This rug doesn't cost a penny. Moreover, it will help to reuse things that would have been thrown away, which will be, albeit small, but a contribution to preserving the environment on the planet.
Step-by-step manufacturing instructions:
- Cut the T-shirts into strips 2–3 cm wide and sew the ends together to create a long, continuous strip. Wrap it in two balls. To save time, you can cut things into spirals starting from the bottom. The sleeves need to be torn off, and the part where the neckline begins is cut off.
- Wrap a few turns of the strip around your finger and loosely tie the resulting ring with single crochets.
- Take the second ball and lay a strip over the knitted row; so that during further knitting the loops wrap around it and it remains inside the fabric.
- Continue knitting in the round with single crochets until the rug reaches the desired diameter. To prevent the edges of the circle from turning inward, you need to expand the fabric, periodically knitting two loops from one.
In a similar way, you can knit a rug from threads, using a fabric strip only as an internal filler.
Baby washcloth
In order not to rub the baby’s delicate skin with a hard washcloth and not to use foam rubber, take a cloth from an old terry towel. A piece of material is folded in half and stitched. For quick soaping, place a piece of baby soap inside a new washcloth.
These washcloths are also suitable for adults. For example, when traveling, the fabric will allow you to quickly wipe your body with a minimum amount of water.
Pet clothes
Drying a bathed cat or dog is not for the faint of heart. The animals are spinning around, trying to escape, and the dogs are turning their heads, shaking off the drops. If you sew a spacious bag with an elastic band from an old towel and immediately put it on the furry prankster, there will be much less drops around. For convenience, holes are cut in the bag for the paws. In this case, the furry pet will be warmly “dressed” until it dries.
Drawstring bags with foam lining will serve as clothing for the winter. If you have a lot of towels at home, then any shelter for abandoned cats and dogs will be happy with such bags.
Photos of unusual rugs
By using your imagination and arming yourself with patience, you can create original and aesthetic bathroom accessories with your own hands. Suitable materials include stabilized moss, multi-colored fabric using the patchwork technique, and wooden slats.
The photo shows a magnificent moss rug that will give you pleasant tactile sensations and a feeling of unity with nature.
Homemade rugs will perfectly fit the interior of an apartment in marine, Scandinavian and eco-style, as well as country and Provence.
The photo shows an openwork crocheted rug in a soft blue shade for the bathroom.
The tiles on the bathroom floor can be cold and slippery, but this can be easily corrected with a homemade rug, because DIY crafts bring coziness and warmth to your home design.