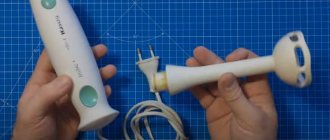
Rechargeable soldering iron from an electronic cigarette
Step Four: Cutting the Center Electrode Now you will need to carefully cut the center contact of the tip. Install the tip onto the spool holder, battery adapter, and battery.
Place the tip holder (coil) into the spacer and carefully screw it into the battery. You will feel resistance when the center contact touches the battery. If the thread does not tighten completely, you need to trim the central electrode a little more.
The master is satisfied with the work of the soldering iron. Batteries can be easily changed and more powerful ones installed. The photo shows a 1300 mAh battery with variable voltage control, which affects the heating temperature. The higher the voltage, the faster the tip heats up.
The author tested several batteries and managed to get 250 °C with a 650 mAh battery and over 400 °C with a 1300 mAh battery at 4.8 V.
The master did not check how much battery charge would last, but after unsoldering a couple of LEDs, 5 or 6 surface-mount parts and several wires from the printed circuit board, using a 650 mAh battery, the master noticed that there was still a lot of battery charge.
A nice feature of the small batteries is that they have a micro USB charging socket on the base, so unlike the 1300mAh battery there is no need for a separate charger.
The small batteries also have three settings that are activated by pressing the button 3 times and the LED around the button will flash: white for high, green for medium and red for low. The batteries can be disabled by pressing the button 5 times and the same can be enabled for safety when carrying them in your pocket. There is also a 10 second timeout where the button flashes 3 times, here you just have to wait and then press the button again.
Source
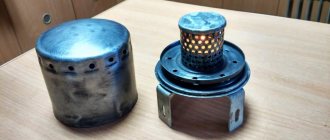
From a cartridge case
Another original way of making an ES from a sleeve.
- We don’t need the brass sleeve at first, so you can put it aside, but the plastic one should be immediately placed in boiling water for 20 minutes, and then remove the plastic part from the sleeve skirt.
- In the skirt itself we drill several 9mm holes, they are intended for a 510 connector. Also, drill a hole on the side so that you can insert a button there later, 3.5 mm is enough for it.
- We solder the button inside the sleeve, and immediately solder one of its contacts to the inner shell.
- Next, we prepare the transistor that we will need to limit the incoming current to the battery. To do this, we grind off the plate along which it was attached to the radiator, and additionally solder an 11 kOhm resistance in the form of a resistor. Then we insulate it with electrical tape and install it in the sleeve itself, where 9mm holes are drilled.
- Now it's time to attach the minus.
- When we have prepared our sleeve mod, it's time to insert it into the brass sleeve along with the 18650 battery, and what is important, the latter must be inserted with the negative side facing up!
- After installing the battery, we immediately attach the upper part with the button; it closes the sleeve tightly enough, so we don’t need anything additional for fastening.
- That's it, we made a sleeve mod! All that remains for you is to make a more or less decent box for this device to make it look more elegant!
What can be made from an electronic cigarette
How to make an electronic cigarette with your own hands? Experienced vapers are often interested in the construction of electronic devices for vaping and dream of making their own unit. Making a homemade electronic cigarette is an interesting experience and an opportunity to better understand the essence of how the device works.
In addition, not everyone is ready to spend a lot of money on buying an expensive vape, so they want to assemble it on their own. Today in our article we will look at how to make the simplest electronic cigarette using available materials.
What will you need?
To manufacture the device you will need the following elements:
- The bulb is from a light bulb, the tube is from a ballpoint pen. These components make up the body of the device and are selected from new products. It is largely irrelevant to use used light bulbs due to various impurities and corrosive formations.
- Scissors. This is the basic and most important tool that a vaper will need.
- Plastic bottle, electrical tape. Don't forget about salt, which is useful for preparing the vaporizer. A plastic bottle is selected in a volume of 0.5 liters, and electrical tape can be bought at any office supply store.
E-cigarette device
In recent years, electronic cigarettes have become rapidly gaining popularity.
Some people consider this a safe alternative to smoking, some have succumbed to fashion trends, others like the process of releasing aromatic steam. Against this background, a large selection of vapes and electronic cigarettes has appeared in stores, from very expensive models to quite budget options. However, there are always inquisitive minds asking the question “How to make an electronic cigarette at home?”, and this is what today’s article will be devoted to.
Before you try to assemble an electronic device yourself, you need to understand the device and how it works. A classic electronic cigarette most often consists of three main parts:
- battery;
- evaporator (atomizer);
- cartridge.
The device also contains a microchip, an air pressure sensor and an LED, which gives a smoldering effect.
Some advanced models have an informative display and other bells and whistles. But we are primarily interested in the basic elements that will allow us to understand the principle of vapor generation and make a simple electronic cigarette. An electronic cigarette is somewhat similar to an inhaler. An aromatic liquid is poured into the cartridge. When inhaling, the microchip transmits a signal to the evaporator and the heating element turns on. Once on it, the liquid turns into vapor and then enters the smoker’s lungs.
The scheme is quite simple. But how to make an electronic one at home? Let's figure it out now!
Homemade pulse soldering iron with your own hands
The principle of operation of a pulse tool is to supply a small current to the tip during soldering, and not constantly. To assemble such a super fast heating soldering iron (for example, Moment), you will have to use a transformer.
What else is needed:
- LED indicators;
- Copper wire;
- Plastic body;
- Stand made of dielectrics;
- On/off button.
The operating principle of a pulse soldering iron is a little more complicated than that of a conventional device with a heating element. To start creating it, you will first have to tinker with the transformer, as well as make calculations and select the wire.
You can use a switching power supply, and in this case the transformer just needs to be slightly altered and rewinded.
This is done like this:
- The secondary winding is removed and rewinding is done using a couple of turns of wire;
- The transformer with a new winding is placed in the prepared housing;
- Instead of a switch, a button to turn on the device is inserted;
- A dielectric stand is mounted, and a copper loop is fixed on it - a thin tip;
- The tip is then connected to the secondary winding of the transformer;
- All that remains is to make the handle.
During operation, you do not need to hold the button in the on state for a long time, as in this case the device may overheat and fail.
Making an electronic cigarette from a flashlight
Making an electronic cigarette will be easier for a person who has experience working with electronic devices. Otherwise, you risk building a non-working prototype (at best) or a device that could explode in your hands at any moment.
If you do not know how to handle electronics, it is better to purchase a ready-made device. And if since childhood you have loved assembling and disassembling electronics, soldering, have the necessary tools, and understand the principle of operation of the device, then read our instructions and go for it!
As we have already said, the e-cigarette has three main parts - the rest can be easily excluded from the set. The battery can be a simple AA battery. And the body completely gives free rein to imagination - craftsmen use instead a simple syringe, lighters, pens, flashlight bodies and much more.
Some parts can be found in vape shops that sell spare parts for electronic devices.
So, it would be best to buy a ready-made evaporator - this element is quite difficult to make from improvised means.
Benefits of homemade cigarettes
A home-made electronic smoking device is a stylish accessory that can be smoked not only at home, but also in public places, because there is no smoke or odors.
The abundance and assortment of electronic smoking devices, the ability to replace the tobacco mixture with liquids with a variety of flavors and moderate nicotine content or its complete absence - all this makes such devices popular among vapers.
High-quality smoking devices are expensive, but when you compare the price and costs of the necessary elements, the financial benefit is obvious.
With proper use of the smoking device, the device can last for several years.
What can be made from a vape
Nowadays smoking is the scourge of our society. Despite the fact that tobacco companies systematically raise the price tag for the product, some heavy smokers are still willing to pay any money for their addiction. Along with this, there are those who support the possibility of quitting smoking without harm to health. So, following fashion, people switch to smoking electronic cigarettes. However, some such devices are very expensive, so more and more craftsmen are interested in how to make an electronic cigarette themselves. It is for this category of people that this article was written.
Disadvantages and risks associated with homemade vaping
Having understood how to assemble an electronic smoking device, you should still gain relevant experience.
In such a matter, not only the starting materials, but also the tools necessary for assembly are selected with particular scrupulousness, so as not to injure the face, respiratory organs and hands during operation. Here's another reason to think about how often the device is near your face. It will probably be difficult to mix the smoking liquid yourself, so you will have to purchase it. But there are still craftsmen who create dubious mixtures from ordinary ingredients, endangering their own health. The fact is that any violation of proportions will harm both the body and the environment.
It turns out that buying an electronic cigarette is considered much safer than making it yourself. Without the necessary knowledge and skills, you will not be able to independently manufacture a device that will not pose a source of danger during operation.
Electronic cigarette at home
Making an electronic cigarette at home is a great option to save money. By making the device yourself, you can understand how a vape works. Another advantage is the fact that you can decide for yourself what type it will have.
Security measures
When operating, you should adhere to safety rules, in particular:
- Vape liquid should not get into the eyes;
- Swallowing liquids should also be avoided;
- the device should not be placed in direct sunlight, and should not be stored indoors at high temperatures;
- the device should not be given to children; a working vape cannot be cleaned;
- It is prohibited to smoke while driving a vehicle, as the vapor that is generated when smoking can obscure the view and cause a traffic accident.
Assembly instructions at home
To make a vape, first of all, you need to take care of purchasing the necessary materials. For those who ultimately want to have a high-quality device, all components for it must be selected appropriately: the batteries must be so powerful. So that their charge is enough for long-term use of the vape; wires and clamps must be strong; All necessary containers must be leak-tight.
Required tools and materials
It’s not enough to know how to make a wipe; you need to know exactly what you need for the device. So, to adapt a simple modification (for example, made from a cardboard tube), the following materials and tools will be useful:
- batteries in form factor C or D (3-4 pieces);
- insulating tape;
- scissors;
- pliers;
- screw;
- clothespin clip;
- thin metal plate;
- electric drive;
- cigarette cartridge, which is purchased in a store;
- cardboard tube.
Electronic cigarette circuit
As for the electronic cigarette circuit, it looks like this.
Procedure
For those who are interested in how to assemble an electronic cigarette, we offer the following algorithm:
- We connect three form factor D batteries in series, with the positive pole placed at the very top.
- We take a piece of wire, the length of which should be 3 cm longer than all the batteries combined. From the ends you need to remove the insulation by about 5 cm on one edge and 2 cm on the other. In the place where more is exposed, a spiral is made. A clothespin is attached to the other side. The resulting part is crimped with pliers.
- The side with the spiral is connected to the negative side of the top battery. The structure is secured with electrical tape.
- Cardboard is used for the body.
- A loop is made at the bottom of the wire and attached to the bend with glue.
- Batteries are placed in the resulting tube so that the negative contact extends downwards from the end that was bent. The clip is secured with an elastic band.
- We form a plug to secure the cigarette cartridge.
- A T-shaped piece is made from a metal plate, which is bent around a screw.
- For the vape to work, we connect the ring base of the cartridge to the clamp.
- Then we connect the central terminal to the positive pole of the batteries.
Important! For those who want to know how to make a box mod, it is worth saying that it consists of batteries, a button, a resistor, a housing, a mosfet transistor, and a 510 connector. The device can also be made by hand.
Assembling an electronic cigarette
For those who are thinking about how to make a cigarette at home, the issue of assembling the device is also important. So, the easiest option is to purchase all the necessary components in the store and assemble them according to the attached instructions. The advantage of this option is the guarantee of the quality of the device.
DIY battery-powered soldering iron
It’s quite possible to make a battery-powered soldering iron yourself by preparing the necessary materials.
To create a battery-powered soldering iron you need:
- Ballpoint pen body;
- Wire made of steel and copper;
- Resistor;
- Textolite double-sided;
- Copper foil and wire;
- Insulating tape;
- Heat-resistant handle;
- Iron tube (can be replaced with a body from a metal ballpoint pen);
- AA or Krona batteries;
- Talc;
- Wire cutters;
- Silicate glue;
- Scissors and stationery knife;
- Newspaper.
Instructions on how to make a cordless soldering iron:
- Work begins with sharpening the copper wire. This can be done on a newspaper with a stationery knife. Sharpening should be continued until the tip of the wire resembles the end of a screwdriver (bevel angle 45 degrees). After sharpening, solder must be applied to the surface, otherwise the uncovered part will burn during operation.
- To create an electrically insulating mass, you need to mix glue and talc to the consistency of liquid sour cream, and then apply it to the sting with tweezers or a plate. This mixture should be very sticky and after applying it to the sting, it should be sprinkled with talcum powder.
- Next, a foil tube is put on the tip. In this case, you need to leave the tip protruding from the tube no more than 1 cm. Next, the heater is covered with a thin layer of insulation and dried. The temperature should be at least 150 degrees, and the mass should become solid. After this, you need to use nichrome wire and wrap it around the sting. Winding is done in a spiral. The ends of the wire must be brought out straight, and the winding must be covered with an electrical insulating mixture and dried again. The turning end is retracted onto the heater and then attached to the tube. Apply the mixture again and dry.
- All that remains is to assemble the device. The ends of the heater are connected to the surface of the batteries. The contacts are insulated and the whole thing ends with a wooden or plastic handle that holds the batteries.
When working with a portable soldering iron, you should always keep a can of compressed air nearby. You will need it to remove dust from microcircuits before soldering.
You can make a model with a power cord. True, in this case you will need a 220/12V step-down transformer unit.
For ease of use, you can make your own stand for the device, the basis of which can be any metal box.
What can be made from an electronic cigarette
Next, we offer a list of what can be made from an electronic cigarette:
- Portable cordless soldering iron.
- Powerbank.
- Cautery on wood.
- A powerful electronic lighter that can withstand any wind.
- home
- Useful tips
In order to perform all these spectacular tricks with smoke, you will need a hookah, an electronic cigarette or a vape. Some people believe that an ordinary cigarette with a broken filter will do for such tricks, but such smoking will be doubly harmful to your lungs.
Smoke rings
Such tricks with smoke are considered the most spectacular. You can achieve the effect in two ways:
- Get more steam into your mouth, then quickly form your lips into an “O” shape, keeping the tip of your tongue close to the lingual frenulum. With short exhalations, push out small doses of smoke.
- This method involves the same actions, only in this case you must pronounce the vowel “O” with your larynx. The sound itself will not be heard - only a kind of click in your throat. Remember to keep your mouth open in a wide circle.
Practice is important in this matter. Don't be upset if the first rings fall apart quickly or don't work out at all.
Stage 6
As soon as you have assembled the atomizer, you need to test the operation of your winding for leaks or bitterness. How to do the test? Easily! If you are using a Kanthal coil, set the power to 3 Volts for testing on low heat. And then with each new puff you should increase the power to 3.8 - 3.9 Volts. By increasing the current you will make sure that there is no burning taste from the winding. If leaks are found, it means that an insufficient amount of wool was laid, or the installation was done incorrectly. And bitterness when inhaling is the first sign of too much wick! Depending on the result, adjust the volume of the wick by replacing the fleece. Using this method, you will find the most optimal way to maintain your electronic cigarette.
- When purchasing a serviced evaporative system, also purchase quality tools for installing the heating element.
- Use only wires intended for electronic cigarettes
: Kanthal, steel, titanium, nickel. - Do not burn nickel and titanium; these metals should be cleaned with alcohol before making the coil, and then thread the wick into the coil.
- Change the coil and cotton regularly if you notice a decrease in performance and a burning taste.
- Use only special cotton wool for vaping
as a wick; we do not recommend using medical or synthetic cotton wool.
The popularity of electronic cigarettes is growing inexorably every day. Some people are trying to stop smoking with their help, while others initially chose a cheaper and less dangerous method of smoking. And, of course, there are those who simply love to indulge in the tasty and pleasant-smelling vapor from an electric cigarette.
But, unfortunately, such devices cost good money, so some people cannot afford to buy them at all. Therefore, some vapers prefer to make a mod with their own hands, creating exclusive vaping devices.
At first glance, it may seem that a homemade mod is a budget option for those vapers who cannot afford to buy a device.
Of course, when making a mod with your own hands, this is precisely the goal, but at the same time, experienced vapers consider this activity exciting and exciting. Moreover, making your own box mod means emphasizing your individuality and vaping experience.
Therefore, if you are going to make a mod with your own hands, then know that the widest possibilities open up for you in terms of design and consumables.
Double ghost puff
This trick with cigarette smoke is done as follows:
- Take a puff, but don't inhale the smoke into your lungs - hold it in your mouth.
- Leaning your head back slightly, slowly exhale the smoke for 1-2 seconds. Keep your tongue pressed to the roof of your mouth. At the last stage, sharply lower it down.
- While the smoke cloud is at a distance of 5-10 cm from your face, with your lips slightly parted and your head tilted towards it, quickly inhale it back, trying to collect it completely.
Is it worth risking your health?
There are cases when amateur activities directly lead to a hospital bed. And there are a lot of them.
Therefore, those who want to make their own cigarette must be very careful and have experience in assembling electronic devices.
Incorrect assembly and operation can result in burns to the face, hands, and respiratory tract. To reduce the risk of burns, you need to buy liquid for cigarettes rather than make your own.
Additionally, the vape can explode and cause serious injury.
1ohm.ru
The idea of a replaceable atomizer with a soldering iron function has been tormenting me for a long time and there were even attempts to make it myself using improvised means, but the design turned out to be bulky and unreliable, but here the method is elementary and does not require any effort at all since all the elements fit together just perfectly.
First of all, we need the sting itself
Its parameters: 5V 8W USB soldering iron Color: Silver Size (approx): 4.2cm
an atomizer from Egoshka type mt3, or rather its lower part without a tank.
and an adapter from 510 to ITS (but this is not certain)
Now assembly: 1) Take the evaporator itself and remove the air duct and spiral from it.
what remains is this
2) Insert the tip and lightly compress it with pliers.
3) And install a positive pin, it fits perfectly. and screw it back into the base.
I use all this with my old VAMO. The design is simple to the point of disgrace, but it works. maybe it will be useful to someone.
We set the power to 8-10 watts and you can work; it takes about 8 seconds to warm up. It is worth understanding that this is not a full-functional soldering iron, but so to speak (a substitute) that can be used somewhere on the road or in a place where it is inconvenient to pull a wire to solder a couple of wires.
Below is a short video with an example of how it works.
mysku.ru
"French breath", "waterfall"
These smoke tricks are done this way:
- Inhale the smoke for two to three seconds. It is important to keep it in your mouth - you can do this by slightly puffing out your cheeks, like a hamster.
- Now open your mouth slightly, protruding your lower lip thoroughly, and begin to slowly release smoke. He will rise up.
- Once the smoke reaches your nose, begin to slowly inhale the steam back into your nose.