Santa Claus with a face made of polymer clay from a bottle and two hats
I want to show you how to make Santa Claus under the Christmas tree using available materials. Less words, more photos :) Let's start...
For the face we need:
- polymer clay;
- tablespoon;
- the stacks are flat, which is convenient for you to work with;
- silicone stacks;
- stacks with a ball at the end of different sizes (boules or dumbbells);
- acrylic paints;
- dry pastel;
- matte acrylic varnish (preferably varnish in a can like “Clear” or varnish from a car dealership). Trouble can happen with creative varnishes; over time, the varnish will begin to stick and collect all the dust.
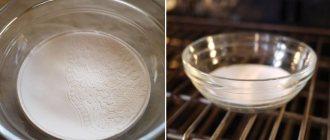
We take about half a pack (25-30 g) of any light-colored polymer clay or the remains, then the workpiece will have to be repainted in flesh color.
We send this blank to bake according to the recommendations for your polymer clay. After cooling, we tint with dry pastels and paint with acrylic paints. Finally, coat with varnish and leave for 2 hours for the varnish to dry completely.
While the face is drying, let's make the body.
We will need:
- glue gun;
- scissors;
- a needle and thread of a suitable color;
- wooden base (in principle, any base, if made from a smaller bottle, then a metal lid from a jar will do);
- plastic bottle 2 l;
- snow maiden hats with pigtails, now sold everywhere, I bought them at a chain hypermarket for 29.90 rubles per piece;
- a piece of white fabric, enough to wrap the bottle and make the head;
- various ribbons and lace for decoration.
Using a gun, glue the bottle to the base, align the white fabric, and glue one edge of the fabric to the base. We cut off one braid from the hat, wrap it in fabric, form the head and try on the face :)
We cut off the neck of the bottle, turn it over and insert it back (for rigidity), seal it, insert the head and seal it again.
We cover the bottle with fabric and sew it to the head, having previously folded the edge of the fabric. We try on the hat, cut the hat along one of the seams and cut off the end of the cap with the pompom.
Next, we wrap the bottle with a fur coat blank and glue on the face. We cut off the excess from the “fur coat” so that it fits well.
Take any ribbon or braid you like and glue it in the center of the workpiece. Carefully sew our fur coat along the ribbon and in the neck area. This is how old Dracula turned out :)
Cut off the excess collar. We cut off the white trim from the second hat, form a collar and sew it on. We cut off all the braids from the hats and unravel them into fibers, this will be the fur on the fur coat.
Sew on the “fur”. From the fibers of the loose braids we form a wig for the Girl and sew it to her head. Now we have an Indian shaman :)
We make a mustache from a small piece of fiber. We take one “strand of the braid”, fold it in half and sew through the fold, this is how we get a beard. Carefully glue the mustache and beard with superglue.
This is how Grandfather with kind eyes turned out. There is very little left. We make a boyar semicircular hat for Grandfather Frost.
For the handles I made a rough pattern. I folded the remaining hat into four layers. Now we cut out and sew the blanks in pairs.
I sewed by hand, since I’m still only dreaming of a sewing machine, but it’s much faster. Then we cut the blanks and turn them inside out, stuffing them with the same fibers into the “braids”. We sew on the “fur” by analogy with a fur coat. These are the handles we got, all that remains is to attach them to the body in any convenient way, sew or glue them :)
All we have to do is make the most important attribute of Santa Claus - the Magic Staff. The materials can be anything, for example, a tree branch decorated with sparkles. I have a piece of polymer clay, skewers and ribbon.
This is the kind of Grandfather Frost I got :) My daughters really liked it, the eldest Varyusha (she is 4 years old) talked to him for a long time and told him what gifts she wanted for the New Year :) And the youngest Vlada held several tea ceremonies with him :) On my own behalf I can add that the toy turned out to be very strong, it is simply impossible to break or smash by accident, we checked :) Good luck and health in the coming year!!!
Thank you for your attention! If anything is unclear, I will be happy to answer questions.
PS: If you liked my master class, please click on the “Like” button just below, and then perhaps Santa Claus, through the administration of the Masters Fair, will give me a gift :)... Thank you!
DIY clay Santa Claus. Master class with step-by-step photos
Santa Claus made of clay. Master class with step-by-step photos.
Author: Alyabyeva Marina Viktorovna, teacher of additional education, MBUDO Central Children's Education Center of the city of Dimitrovgrad, Ulyanovsk region. Description: the master class is intended for children of preschool and primary school age, additional education teachers, educators, technology teachers and creative parents. Purpose: a figurine of Santa Claus can be used as an interior decoration for the New Year holidays. Goal: making a souvenir from clay. Objectives: 1. To introduce the techniques and methods of sculpting a figurine of Santa Claus from clay;
2. Create a desire to make a figurine of Santa Claus from the natural material clay; 3. Develop fine motor skills, imagination, artistic taste; 4. Learn to sculpt and connect parts, applying them well to the base, taking into account the properties of the clay; 5. Develop an eye and sense of proportion; 6. Encourage desire, make exclusive gifts with your own hands and do something nice for others. Where are you from, Santa Claus?
Perhaps the story of Father Frost, a kind gray old man with a beard and a bag of gifts, and his Western brother Santa Claus originates from the Great Old Man of the North? This is the evil deity of the Celts, the lord of blizzards and cold. Once upon a time he did not give out gifts, but on the contrary, he was angry and demanding. And he carried a bag with him to collect sacrifices from people. In those ancient times, people believed that spirits protected them, they appeased these spirits in every possible way and thanked them for their care. At holidays, they represented the spirits of their ancestors, dressing in the most terrible and unusual outfits. It was called caroling. Young people especially loved caroling, of course. One of the young men dressed more terribly than anyone else. He was forbidden to speak; he had to portray a formidable and omnipotent spirit - Grandfather. There is a version that it was the mighty and terrible Grandfather who was later reborn into the kind Grandfather Frost. And now he does not scare or punish anyone, but, on the contrary, brings joy and gifts. Or maybe the story of Santa Claus comes from the fairytale Red Nose Frost? This fairy tale hero was invented by the Russian people themselves. It was the master of winter, snow and frost. Once upon a time they called him Grandfather Treskun and claimed that he was a little old man with a beard and a stern disposition. Even the Sun allegedly feared his formidable character, and from November to March, Grandfather Treskun owned all the lands, fields and forests undividedly. And we were first introduced to that same handsome grandfather, kind and cheerful, whom we are now waiting so impatiently for, in 1840 by Vladimir Odoevsky in the story “Moroz Ivanovich.” It was Odoevsky who managed to retell the folk tale “Morozko” in a completely new way, and turned the evil, like the Celts, Grandfather from the folk tale into a cheerful and friendly old man with gifts. If in the folk tale Grandfather froze the lazy girl, then in Odoevsky's story Frost just gave her a necklace of icicles. But he generously gifted the hardworking girl. It is interesting that to this day some northern peoples have rituals of “appeasing” Grandfather so that he does not get angry and does not destroy crops, birds and fish. To do this, on New Year's Eve, women put wine and cakes outside the door. The history of Father Frost remembers many of the old man’s guises, but to us he is more familiar in a long, warm fur coat, painted mittens, and a hat. He must certainly have a long gray beard and a staff in his hands. The history of the European Father Frost, or Santa Claus, begins in 1823. He was invented by Clement Clarke Moore and presented as a kind elf. According to Moore, Santa came on eight reindeer and entered houses through the chimney. Santa Claus was dressed in a red fur coat in 1885, and in 1930 the Coca-Cola company depicted Grandfather in the company's colors - red and white. This image of a modern Santa is now known all over the world! But where old man Frost lives is a separate legend. After all, his place of residence is still not known exactly. They say that he certainly lives in the North Pole, and maybe in Lapland. The old man likes to live in the cold, perhaps he likes the Far North. Odoevsky, in the story about Moroz Ivanovich, “sent” the fairy-tale grandfather into the well. In the spring, grandfather hides there, because it is cold there even in the summer. Required materials: clay, containers with water, plastic boards, rags, stacks, brushes, foam sponges, whitewash, gouache, clear varnish.
Step-by-step work:
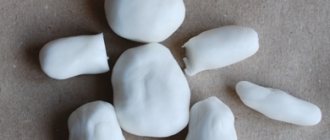
We knead a piece of clay in our hands - we get to know the clay, it feels the energy of the master and will definitely be obedient and pliable. Divide the piece in half - lam, lam, lam, divide the clay in half. Roll one part into a thick carrot - a cone,
With your thumbs we press it inside the thick part, a void is formed, and the wall thickness is no more than 1 centimeter, but not less than 0.5 centimeters.
We smooth out all the cracks and uneven surfaces, level the edges, with wet hands and sliding movements of the fingers. Place the hollow cone on the wide side. From the second piece, we separate pieces of the required size in portions, observing the proportions of the figure. Roll up a plump carrot - the head, and apply its sharp part to the sharp part of the cone.
Roll up two carrots and form a mitten on the wide side, flattening the end and separating the finger.
After wetting the connection points with water, we apply the sharp part to the cone - the hands.
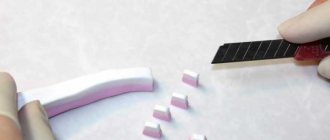
Clay has a characteristic feature - it is resistant to dry hands and a lot of water, and the joints are moistened with water, which in turn plays the role of glue during sculpting. Therefore, we constantly lightly moisten our hands with 2-3 fingers and the joints too. To roll out thin parts well - flagella (fur for decorating a fur coat), you need to roll out pieces of clay on a damp cloth, with your fingers together, fingers apart. The flagella will turn out to be plastic and will adhere well to the fur coat, pressing along the bottom of the cone, around the mittens, in front, on the collar, on the hat. At the end, hair is placed between the fur of the hat and the collar and a beard made of carrots, slightly flattened.
If desired, you can use a stack or a pen rod to emboss the beard - strands, fur texture.
The work is ready! The figurine is dried in natural conditions for 3 to 5 days, avoiding drafts. We prime the figure with white.
We paint using gouache, brushes and foam sponges for dipping - imitation fur, on a fur coat. Cover the work with transparent varnish, you can use spray varnish.
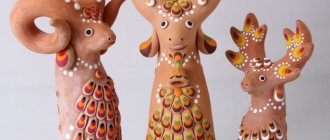
And these are the figures my students came up with!
The figurine of Santa Claus is ready, it can rightfully become a pleasant gift for loved ones or decorate our interior for the New Year holidays! On the same basis, you can mold and paint a figurine of the Snow Maiden. The guys tried their best and this is what they came up with:
The braid is twisted from wet clay strands and applied to the head.
Have a nice New Year holidays!
We recommend watching:
Torn paper applique Santa Claus for kindergarten Wool painting Santa Claus. Master class with step-by-step photos New Year's crafts for primary schoolchildren Do-it-yourself New Year's crafts for schoolchildren. Santa Claus with a surprise
Similar articles:
DIY paper Santa Claus
Drawing Santa Claus with preschoolers
How to crochet Santa Claus
DIY Santa Claus. Master Class
Drawing lesson of Santa Claus for children 6-7 years old
From salt dough
Mothers came up with the idea of sculpting figures from salt dough, instead of plasticine, a long time ago, since any joint work with a child is not complete without him testing the material to his teeth.
The entire process of making Santa Claus from salt dough is shown in the photo. It is not much different from crafts made from clay, mastic or plasticine. The only significant difference is that the salt dough material is not as flexible and thin. You can color the raw materials with food dyes. And if there is no risk of being eaten, you can add regular aniline dye to the dough.
See similar master classes: How to make a Snow Maiden from modules.
Crafts from foamiran
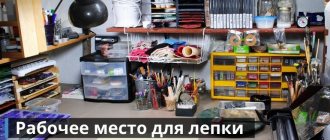
How to decorate your workplace or New Year's table? The Christmas tree branch is very large and can interfere with your work. But a little Santa Claus made of shiny foamiran is just right. It will not only decorate, but will also attract the views of your colleagues. Children in kindergarten will also appreciate this craft.
MK was prepared by Svetlana Sorokina. Let's start.
To create Santa Claus we will need:
- Glitter foamiran red and white, 2 mm thick;
- Chinese or marshmallow foamiran, beige, 1 mm thick;
- Pink or red pompom with a diameter of 1 cm;
- White pompom with a diameter of 1.5-2 cm;
- 2 half beads for eyes with a diameter of 2-3 mm;
- Decorative splint in silver color.
Step-by-step description of the work:
We will make Santa Claus in the shape of a cone. For this we need a compass. We measure 11.5 cm on a compass, apply it to the corner of the back side of the foamiran and draw from one edge to the other (Photo 1).
We draw another blank with a compass width of 8 cm (Photo 2).
Cut out the blanks (Photo 3).
Glue the edges of a large piece together to form a cone. Don't worry if you can see glue on the glue line (Photo 4).
Cut a strip of white glitter foamiran 1-1.3 cm wide. Stretch it a little at one edge (Photo 5).
Glue it to the bottom of the cone (Photo 6).
From the decorative tire we cut a strip with two rows of rhinestones and glue it in the center onto white foamiran (Photo 7).
We make a Santa Claus hat from a small piece of red foamiran. We glue the edges not to each other, but to overlap one edge over the other (about 2 cm). This will make the hat thinner. We glue a decorative strip along the edge. We bend the tip of the cap and glue it (Photo 8).
Glue the white pompom (Photo 9).
Trim the top a little. We glue the rhinestone tire along the gluing line, but not the entire length. The beard will hide the rest (Photo 10).
Cut out the shape of a face from a flesh-colored one. I made it a little longer than the template so that it would hide behind the hat (Photo 11).
Glue the face, pink pompom and draw eyes (Photo 12).
Cut out two blanks for the beard. Small along the contour of the face, and the second one is slightly larger (Photo 13).
Making fringe. Apply it to the iron for a few seconds to make it curl a little (Photo 14).
First glue the large part (Photo 15).
Then a small one. Glue half beads into the eyes. Funny Santa Claus is ready.
How to make a craft from nylon tights, master class in video
There is a cool idea for creating dolls using the stocking technique. Unfortunately, I am not a master at this, so I am providing a master class in video format.
And here I’ll give you an idea from a sock
You can make a body without handles. The main thing is that it is sustainable.
Well, do you often find balloons in your house? They also make wonderful Santa Clauses.
That's not all. We can say that we are only at the very beginning of the journey!
Santa Claus with a cool paper beard
Prepare colored paper in red, white and beige, a black marker, scissors and glue. We will act like this:
- We glue the red and white sheets together.
- Fold the top of the red cap as shown in the photo.
- Using strips of white paper, which we will wrap around a pencil, like on curlers, we will make a luxurious beard for Santa Claus.
- We will cut out the grandfather’s face from flesh-colored paper and paste it onto a white square.
- Our mustache will be made from a strip of white paper glued to the face. Bend the strip as in the photo and round the mustache.
- We take a felt-tip pen or marker in our hands and draw eyes, eyebrows, nose and mouth on the face.
- The white circle attached to the very top of the cap will be the pompom.
- The white stripe on the cap will become the border between the cap and the face framed by the beard.
You can use a felt-tip pen to give different facial expressions to the characters! Let them all be cheerful and mischievous!