Device and main components
The all-terrain vehicle consists of the following components:
- Support frame.
- Engine. Rear placement is preferable, otherwise the car will nod off.
- Chassis: chassis, clutch, independent suspension, etc. Soft all-terrain tires with an increased diameter are installed.
- Steering.
- Cabins.
In the three-wheeled version, control is carried out using a simple motorcycle fork.
A 4x4 vehicle uses one of the following mechanisms:
- automobile rotating unit;
- breakable frame type.
The second option allows for high maneuverability with a long length. Vehicles with such a frame are called “fracture”. It consists of 2 parts connected by a steering knuckle.
Instead of a pneumatic chassis, the vehicle can be equipped with tracks.
Do-it-yourself low-pressure tires for UAZ
How to make a tracked all-terrain vehicle with your own hands
In order to make the structure in question with your own hands, you need to select the appropriate material. “Shoes” from airplanes or helicopters are ideal. However, this is a rather expensive option. In most cases, you can use rubber from tractors or trucks. The tools you will need are a sharpener, an electric winch, a knife, a hammer, wire cutters, and an awl.
Then the following manipulations are performed step by step:
- A new tread pattern is selected and cut at the owner's discretion. The most popular is the “Christmas tree” look.
- A cut is made around the circumference of the wheel being processed so that it is possible to remove the reinforcing wire.
- Gaps are made in the form of small rectangles along the inner base, through which the wire will be removed using a winch device.
- It is necessary to focus on the intended pattern of the design, using a winch and pliers to fish out the unnecessary layer of reinforcement. Taking into account the previously applied pattern, the drawn part is adjusted using a knife.
Tools
To make pneumatic ducts with your own hands, you will need a set of certain tools and devices. This list includes the following items:
- Welding machine.
- Hammer, set of screwdrivers.
- Metal cutters.
- Drill and grinder with attachments for metal processing.
- Set of car keys.
The following materials will be needed:
- Motor from a walk-behind tractor or similar agricultural equipment.
- Iron motorcycle or car rims that should be treated with an anti-corrosion coating.
- Cameras from aviation or agricultural equipment.
- Pipe cuttings.
- Steering column. It is advisable to purchase this part in a new form, since it will be responsible for the quality of control of the machine.
- Suspension elements (car hubs can be used).
- Metal corners and fastening fittings.
- Wire and fittings.
Self-made all-terrain vehicle fracture on the wheels
All-terrain vehicles with low pressure tires
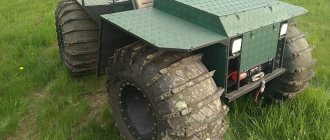
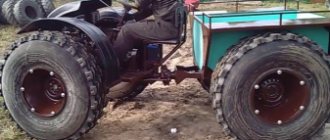
Dear visitors to the “Self-Made Friend” website, today we will look at the step-by-step process of assembling a fractured all-terrain vehicle on Alexander Murashov’s wheels. Video of testing and photo of assembly is attached. This all-terrain vehicle has two semi-frames connected to each other by a steering knuckle from the front axle from the UAZ, and is driven by the steering control of the VAZ. The semi-frames are welded from square-section corrugated pipe, the rear part of the frame has a conical shape tapering to the junction with the steering knuckle - this is necessary to increase the steering angle. This frame layout is borrowed from the T-150 tractor, that is, the operating principle of the fracture. The engine is installed from the Domestic car OKA 0.7 l 33 l/s VAZ gearbox and axles, rubber wheels, VAZ rims modified to the inner diameter of the wheel, additional protection for the camera nipple. The cardan shafts are shortened and adjusted.
Additionally, a lightweight cabin and kung were made from corrugated pipe, the kung was covered with a banner.
Materials
- ICE OKA 0.7 33 l/s
- Bridge VAZ 2 pcs
- professional pipe
- VAZ gearbox
- the wheels are strong
- steering knuckle UAZ
- finishing materials: aluminum sheet, polycarbonate, banner.
Tools
- welding inverter
- Angle grinder (grinder)
- drill
- set of wrenches
- measuring tool
- skillful hands)
Step-by-step photos of assembling an all-terrain vehicle with your own hands.
The frame is welded from professional pipe, in front of you is its front part, on which the engine will later be installed.
Rear part of the frame.
Place where the bridge is attached to the frame.
Trying on the bridge.
The wheel rims are mounted on the axle hubs.
checkpoint
Two half-frames are connected to each other by a steering knuckle from the front axle of the UAZ. Brake system.
Shortening the driveshafts of an all-terrain vehicle.
UAZ steering knuckle Please ATTENTION. The lever is converted to a straight position
Connecting shortened cardan shafts to the axle
Note! That torque is transmitted directly through the steering knuckle
An engine from an OKA 0.7 l 33 l/s car is installed. The angle of rotation of one part of the frame relative to the other. Manufacturing of all-terrain vehicle rims. Rim.
Tire stripping
Note! The camera's nipple is well protected! Steering and instrument panel installed
Manufacturing of the body and kung of an all-terrain vehicle.
The lightweight cabin is trimmed with polycarbonate. Cladding with sheet aluminum. Engine and wiring connections. Video from all-terrain vehicle testing.
Design and operating principle
Amplifiers are installed inside the steel case, on which the transmission units and engine are mounted. Torque is transmitted using a belt clutch to a driven sprocket, connected by a roller chain to a manual transmission from VAZ cars. The transmission is connected to the drive axle by a cardan transmission; the drive wheels have protrusions that engage with corresponding recesses in the track. The rubber band has metal reinforcements that extend the life of the unit.
The engine is equipped with a carburetor, fuel is supplied from the tank by gravity, starting is carried out by a starter (not installed on all all-terrain vehicles) or manually.
The transmission ratios allow you to start moving at 4th speed without the risk of stopping the engine. The track tension is regulated by the pressure in the pneumatic tires of the road wheels; the tires simultaneously reduce the level of vibration when driving over rough terrain. The all-terrain vehicle is floating (subject to hermetically sealed welding); movement on water is ensured by the rotation of the caterpillar tracks.
The machine is equipped with hydraulic disc-type brake mechanisms, borrowed from the VAZ-2108 car. Stopping is accomplished by pressing the pedal; fluid is supplied to the calipers through flexible lines. The design of the rear axle uses a standard differential; an optional forced locking mechanism is installed, which improves maneuverability on soft ground.
How to make a pneumatic duct from a walk-behind tractor
Low pressure tires for UAZ and other models
In order to take on the creation of such an all-terrain vehicle, an amateur designer must solve the following problem: for what purpose is the future vehicle intended. Here you need to clarify the desired number of seats, the weight of the maximum luggage, the season of use and for what conditions the device is intended.
Definition of pneumatic duct design
Only after the final clarification of all of the above, after determining the concept of the future all-terrain vehicle, can we begin to search for possible options for solving the problem.
And now the idea is ready, the goal is visible, which means we can move on to the issue of selecting the elements of the all-terrain vehicle. Here you need to decide on the type and model of the engine, the composition of the transmission, the design and type of frame, the equipment of the cabin and other elements
One of the main characteristics that needs to be paid attention to when creating an all-terrain vehicle is the choice of the chassis system formula
It is also necessary to calculate the design parameters - dead weight, useful weight and total weight, what will be the tire sizes, what is the required engine power for the intended purpose.
Equipment of the Okhotets all-terrain vehicle
The standard kit for assembling the Okhotets snow and swamp-going vehicle includes:
- side elements with wings;
- bottom with structural reinforcements;
- aft and frontal skin sheets;
- top panels and body protection elements;
- kit for self-production of caterpillar tracks;
- Lifan gasoline engine equipped with an electric starter;
- centrifugal type clutch;
- intermediate shaft with driven pulley;
- drive belts and chains;
- supporting elements with bearings;
- drawings and assembly instructions;
- packing list and list of parts that need to be purchased for assembly.
All-terrain vehicle on wheels Vosmerochka | DIY FRIEND
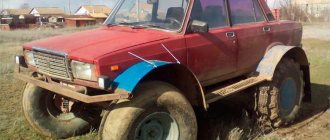
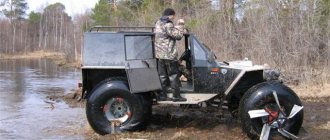
Dear visitors of the site “Homemade Friend”, today we will look at the design features of the homemade all-terrain vehicle “Vosmerochka” on rubber wheels and a VAZ 2108 body. Step-by-step assembly photos and testing videos are included. The all-terrain vehicle "Vosmerochka" was designed and assembled from components and assemblies exclusively of domestic automotive equipment by Oleg Burlakovsky. According to the author’s stories, when going into the forest in UAZs, we constantly encountered the problem of cross-country ability; a UAZ, of course, is an SUV, but still you can’t drive it everywhere; you often had to use a winch. For this reason, the master decided to create a universal all-terrain vehicle, so that without any problems you could drive anywhere, through mud, gullies, ravines, water obstacles and snow drifts.
An old “eight” was taken as a donor; the all-terrain vehicle was equipped with a water-cooled internal combustion engine, a manual gearbox, as well as the body itself and the steering assembly, respectively.
UAZ military axles, a transfer case from a Soviet army truck GAZ-66, a homemade frame welded from a rectangular section of corrugated steel pipe, KRAZ “battery” wheels 1300 mm high and 500 mm wide.
Let's move on to viewing step-by-step photos of assembling the all-terrain vehicle.
Materials
- ICE VAZ-2108
- Transfer case GAZ-66
- rectangular metal profile
- springs
- KRAZ tires
- Gearbox VAZ-2108
- UAZ bridges (military)
- figure eight body
Tools
- welding inverter
- Angle grinder (grinder)
- drill
- set of wrenches
- measuring and plumbing tools
- skillful hands
Step-by-step photos of assembling an all-terrain vehicle with your own hands. Tire stripping and tread cutting. Trying on bridges. These are the kind of discs. Frame made of corrugated pipe of rectangular section. Springs. Installing the engine on the all-terrain vehicle frame. The differential is welded. Installation of the VAZ-2108 body. Fuel tank. Passenger seat. The meeting with the traffic police officers, according to the author, went well, they just took a photo and released him with the World)) Painting. Drawing the “Fern” pattern Winter trip.
All-terrain vehicle fracture 4x4 "Arkhangelsk"
To create this all-terrain vehicle, the author needed the following materials:
1) Axles from GAZ-442) wheels VI-33) Engine 20 hp 4) CVT from a Buran snowmobile 5) Gearbox from a Peugeot 2066) distribution box from a Niva car. 7) profile pipe
Let's take a closer look at the stages of building this all-terrain vehicle.
To begin with, the author sketched out several design diagrams of the all-terrain vehicle.
The frame of the cabin and kung is planned to be made from exactly the same pipe:
The author considers it mandatory to install a lock, as an option, a self-locking differential in the gearbox. Although blocking is not used often, it is still needed sometimes.
Doubts about the diagram were overcome only by the distribution box. To check, the author calculated the gear ratios both with and without a transfer case. Option with an installed transfer case:
It is possible that it is planned to replace the safari variator with a musher variator for four-stroke engines of 3600 rpm.
One of them was the installation of a 20 liter engine. With. with a CVT and transfer case, in terms of weight and power output, such a design will be average. The author does not want to give up the transfer case because the differential in it will be able to absorb transmission shocks, which will have a positive effect on the service life of the car.
But the author also considered a design without a transfer case. The variator goes directly to the front-wheel drive gearbox. Such a scheme just requires an engine of 20 hp. and the presence of self-locking in the gearbox.
Work also began on assembling the main components of the all-terrain vehicle.
A fist from GAZ-66 was prepared, which is planned to be installed on the future frame of the all-terrain vehicle, but the author was confused by the large weight of the structure:
Below is a drawing where you can see the height of the semi-frames of the all-terrain vehicle:
After which a fracture unit for the all-terrain vehicle frames was made:
The author of the all-terrain vehicle with the nickname “f7800” on the website lunokhodov.net from the city of Arkhangelsk.
Receive a selection of new homemade products by email. No spam, only useful ideas!
*By filling out the form you agree to the processing of personal data
All-terrain vehicle ZVM-39081A SIVER went to Yakutia.
Let me start with the fact that we won the auction for the supply of the SIVER all-terrain vehicle for the needs of the Arctic regions of Yakutia. Due to the lack of funds for delivery, it was decided to drive the car under our own power. I’m flying to N-Novgorod with the well-known all-terrain vehicle Dima, and since the equipment is already very familiar to us, we get by without any special preludes, a couple of days to get ready, and early in the morning on the road.. We even saw live the new equipment produced since February 2016 “ VEYA.. first of all to refuel, full tanks of 2x100 liters, and 2x50 canisters with you. At the beginning, of course, there was a slight fear of the unknown, since GAZ equipment was not stable in initial operation, something could have failed... The guys from Yakutia already went out like this 4 years ago, the gearbox jammed at 4 speed, they returned to replace it. But we seemed to get through it, no extraneous noises or sounds, overheating, etc. Well, in general, we’re going.. The plant gave us another person who, in principle, assembled it)) At the beginning, well, as always, we don’t perceive each other, and men always develop a sense of competition in such cases, so so.. we communicate carefully in a quiet way)) The road is interesting, we are still fresh, relations are becoming more and more friendly, our team turned out to be simple, knowledgeable, without show-off and unnecessary pathos.. We talked in earnest, spent fuel, pumped from left to right. Common Rise has stalled! We revived it for about 20 minutes, supplied fuel directly so that the engine would give a signal to the computer and the computer would stop killing its brains. everything worked out, everything went out, the weather is whispering, the breakdown doesn’t count)))
Let's make some refreshments
To make your own low-pressure tires you will need:
- used truck tires (for example, from Gaz-66 or VI-3 tires installed on Kraz 255). If you buy tires specifically for tires, then choose rubber that is not “chewed” inside. Otherwise, after removing the top layer, you will get a weak spot or even a hole that will have to be vulcanized;
- a construction knife and a set of replacement blades, since the construction of the tire uses fairly strong threads that quickly dull the blades;
- a template that can be made from thick cardboard or sheet steel. In order for the tires to be not only effective, but also to look good, the tread must be cut as evenly and symmetrically as possible. You will also need a chalk or marker with which you will outline the template;
- durable clamps. These are often used by straighteners to clamp body panels when restoring damaged cars. An ordinary clamp will do, but in this case you need to act more carefully;
- a manual or mechanical winch, as well as a cable that pulls the cut piece of the tread layer. You can use a manual gearbox or a winch mounted on a vehicle. You won’t be able to manually create force to make the rims, since the layers of rubber are very tightly bonded.
Self-production
Using a template, apply the future outline of the tread along the entire perimeter of the wheel. Some obradyshas can be seen with the protector left in the center. It is along the contour of the outline that it is necessary to make cuts in the rubber. For this, it is best to use a construction knife, as you can control the depth of the cut by setting the required blade length. If you are confident in your abilities, you can use a grinder. To avoid cutting through the tire, use the sound as a guide. As soon as you cut through the rubber layer and reach the metal cord of the tire, the sound will acquire the appropriate color.
Cut the tire profile along the inner perimeter (where the metal wire ring used to be). It is the cut section that must be grasped with the clamp. Use a winch to create tension, and then use a utility knife to gradually trim off the peeling piece. After stripping the entire tire, you will get strips. Please note that when tension is created, the tire will tend to lean in, so it is necessary to implement a stop.
Particular attention should be paid to this point if you do the lifting using a winch installed on the car. It is not necessary to create a lot of force for peeling.
For extra safety, place an old jacket on the cable, which will serve as a kind of damper if the clamp does break.
Discs
The video clearly shows the process of making discs with your own hands. Since the tire becomes elastic after stripping, it is necessary to ensure good side support. To ensure that when the pressure decreases, the rims do not deflate and do not tend to be dismantled, a special sealant is used during installation. If all recommendations are followed, self-made low-pressure tires are practically not inferior to factory-made analogues.
Many residents have seen cars on the roads with huge wheels mounted on homemade rims for low-pressure tires. These discs are not available for sale. They are made only to order. Low pressure wheels are in demand among such categories of people as:
- military personnel of various branches;
- hunters and fishermen, especially in winter;
- farmers;
- geologists;
- travelers.
And nothing has changed. There is no one to complain to anymore.
For several years now, my fellow villagers and I have been demanding from local authorities to make a road for us at least to the street on which we live. For three years we have been regularly writing complaints and appeals to the village, district, and regional administrations, but “things are still there,” there was no road. After the rains and the muddy roads, we are cut off from civilization for a long time, sometimes for a month, despite the fact that we live in the Central Black Earth Region of Russia. You can’t go to the store or the paramedic station to buy bread, and if trouble happens, you won’t be able to wait for an ambulance. There are only replies and promises from officials.
“The specified road is in satisfactory transport and operational condition. A?! How do you like it?
I don’t know where to complain now, I was sent from the Administration for a second round. At least Pikabu can share our aspirations, a modern village that is still ALIVE no matter what.
Low pressure tires - description
Low pressure tires are installed on minibuses, small trucks and cars. They have fewer layers of cord than regular tires and are much softer, giving the vehicle a good, comfortable ride.
Improved elasticity of the carcass is provided by: large volume inside the low-pressure tire; small side pocket and much thinner than the sidewall. Due to the fact that such tires have very good shock-absorbing characteristics, the level and comfort of the trip increases significantly.
Small road irregularities do not react to the car in any way. By reducing vibrations, shocks and shocks of the machine, all parts will last much longer.
If you have different types of roads on your way - dirt or asphalt, low-pressure tires will provide excellent movement and will not cause any obstacles. If you fall into a hole on the road, due to the fact that there is a large amount of air inside the tire, an impact on the rim is avoided. The likelihood of cord delamination and thread fraying is also reduced due to a good elastic frame.
Varieties
Two types of ultra-low pressure “rubber” can be installed on all-terrain vehicles, agricultural machinery and other machines - without tubes and with a tube. Tubeless products are considered more comfortable and safe when riding; they have a relatively low weight. But tires with tubes are practically not subject to damage and various deformations, since they better withstand mechanical loads.
According to the functional parameters and design features of the SND, which are equipped with all-terrain vehicles, there are:
- Wide-profile. They are approved for use at a variety of operating pressures. Such tires are usually installed on vehicles with a high load capacity, since wide-profile tires have unique frontal rolling resistance. Visually they have an oval profile.
- Arched. This rubber is 3–5 times wider than standard tires, its thickness is at the level of 50–70 cm. Arched SNDs are recommended for installation on drive wheels. All-terrain vehicles with such tires will overcome any off-road conditions (watch the video).
- Toroidal. They come in tubeless and tube versions, and are most in demand among drivers who want to make their car as passable as possible on rough terrain. The profile of toroid tires is average.
There are also so-called pneumatic rollers - tires with special lugs that act as a reliable stiffener and increase the vehicle’s performance when driving on unimproved roads.
Advantages
Like everything in our world, low-pressure tires have a number of advantages:
- They have a special design that provides a large area of contact with the road. This property gives the car truly all-terrain qualities;
- They have low specific pressure and guarantee minimal load on the ground. Consequently, such wheels can be installed on agricultural machinery and all-terrain vehicles;
- They increase the overall ground clearance of the car, which allows you to overcome even the most difficult obstacles (including water).
Flaws
One of the disadvantages is that these tires are still designed for use on standard asphalt surfaces. Also, if the car is equipped with low-pressure tires, the vehicle owner is strongly advised not to get carried away with sharp turns, because the profile is a weak point even for high-quality branded low-pressure tires - it can simply burst.
It is also logical that such tires have another significant drawback - their high cost. Not every car owner with an average income can afford such luxury. For comparison, one such tire can cost more than a whole set of fairly high-quality winter tires for a standard passenger car.
However, some enterprising motorists who do not want to overpay achieve the effect of low-pressure wheels on their own, using their own hands.
Peculiarities
The caracat is considered a universal means of transportation.
The so-called fracture allows the owner to save money. For a small price and some time spent, people can get a practical and convenient vehicle. It will be especially popular in rural areas, which are famous for their difficult roads. It is during trips to fishing, hunting or just to the forest that it is best to use caracat. When constructing a caracat, it is necessary to take into account that the main center of gravity in it shifts slightly, and the axis in front increases. The modern market offers a huge variety of parts and accessories that can increase the functionality of an all-terrain vehicle and make it easier to control.
The Caracat is perfect for driving on snowy roads. Thanks to special technology in creating circuits and mounting the chassis, it practically does not put pressure on the earth’s surface. This allows the all-terrain vehicle to avoid falling into snow and ice. To prevent vehicles from sliding on ice, it is recommended to install special couplings to the ground. Which one to choose and how to do it depends only on the caracat wheels.
In appearance, the caracat resembles an ATV, so many doubt which is better to choose. The main advantage of karakat over its rival is environmental friendliness. Thanks to the large wheels, the soil is not destroyed and roads are not broken. But due to the fact that caracats are mainly made by artisans, they are not covered by a guarantee and there are no instructions for use. In terms of size, a homemade all-terrain vehicle can be quite compact, which simplifies its transportation. Depending on the materials used, the appearance of the caracat can vary significantly.
Compared to an ATV, the carakat has a lower speed. On average it does not exceed 40 km/h. In general, it was created for off-road use, where high acceleration is unlikely to be needed. The speed depends on the engine power and may be higher.
The cost of such a machine is determined based on the components used; on average, their prices are approximately at the same level.
Thus, the karakat is a homemade all-terrain vehicle, which, thanks to its large wheels, is capable of driving through swampy areas, uneven roads and fields. Water is also not a barrier for him. Large wheels act as a float, which is why some call this all-terrain vehicle an amphibian.
When creating a transport, the following elements are used:
- frame;
- rear axle;
- driver's seat;
- good light.
You can take any frame. For example, when using the base of a walk-behind tractor, you can get a car for one person. The total carrying capacity of such a vehicle does not exceed 200 kilograms, but this is enough to transport a small load over a long distance on a bad road. The width of the vehicle is not done at random, it is calculated so that the caracat is as resistant to turning over as possible. Typically this value is at least 1100 millimeters. Modern caracats are produced with a power of more than 10 horsepower. This allows you to reach speeds of around 10 km/h. In difficult areas, the speed decreases and reaches 1-2 km/h.
Important How to make a harrow for a walk-behind tractor with your own hands according to the drawing
The main advantages of the technology:
- relatively low cost of parts for karakat;
- good buoyancy of transport;
- low fuel consumption;
- simplicity of design.
Disadvantages of homemade transport:
- low reliability of components made from scrap materials;
- low maneuverability;
- difficulties in storing equipment due to its size;
- rapid destruction of tire material.
Homemade wheels and tires
First of all, you need to select the source material on which such tires will be made. It is best if the design is based on aircraft tires - they are made of high-strength rubber and the best quality. Tires from agricultural machinery or industrial all-terrain vehicles are also suitable.
Each bus consists of several interconnected elements. To manufacture the SND, it is necessary to remove excess rubber from the tread and side surfaces, and remove the seat cores from the inner part. If necessary, you can even remove the rubberized part of the cord base, but this is quite difficult to do without affecting the nearby layer. So, the main task is to lighten the tires and make them such that they will allow the car to move over difficult terrain and weak-bearing soils.
The manufacturing procedure includes several stages:
- We clean, wash and dry the workpiece. We mark the patterns of the new tread (the places of the cuts) with a marker.
- We cut through the rubber along the inner perimeter of the circle to rip out all the excess wire.
- After this, we cut out small “windows”.
- Through the holes we see a wire, which we pry up using available tools.
- We fix the tire and hook the wire to the winch.
- Using a winch we pull out all the wire.
- We trim the perimeter of the circle just below the cord and fix it with pliers.
- We tear off the excess rubber using a winch.
- We cut the pulled piece of rubber using a knife.
- We remove the bulk of the material from the surface of the tire (treads and sidewalls), layer by layer, until the tire is represented exclusively by the original carcass.
- We clean the surfaces with sandpaper.
- We assemble the frame. We weld metal tubes (plates) to the disk and weld them together using similar tubes of the appropriate size.
- We carefully polish the resulting workpiece so that the wheel chamber is not damaged by sharp fragments left after welding.
- Pull the tube onto the rim and inflate the tire. As a result, we obtain a ready-made wheel design that can be used for predetermined purposes.
- The time has come to “put” the resulting wheels on the vehicle and test it on the move.
Homemade products and Syrians on unusual wheels
Examples of factory vehicles and products produced by folk craftsmen, in the design of which SND are used.
- Industrial:
- Mini swamp rover KIT TM06.
- Amphibious all-terrain vehicle Tiger XBH 8X8.
- SUV TRACK.
- Homemade:
- Snow and swamp vehicle XPEN.
- Lightweight 4WD car.
- MVH all-terrain vehicle.
As you can see, snowmobiles, swamp vehicles, caracats and ATVs cannot do without SND, the special design of which allows you to easily move along swampy or snowy surfaces. ATVs and cross-country motorcycles also often have similar tires installed. Thanks to them, all-terrain vehicles can traverse rough terrain faster and more efficiently.
Engine
The power indicator on a homemade unit determines the performance of the selected walk-behind tractor. The higher this parameter, the more efficiently the equipment will function. On the other hand, high power causes increased fuel consumption. If the owner lives in the outback, far from a gas station, this aspect will play a significant role.
Those users who plan to use the equipment only in the warm season are advised to opt for a budget modification with a two-stroke engine. It is simpler and launches quickly. For fishing and hunting in winter, the best option would be a four-stroke power unit. Such variations warm up more slowly, providing longer engine life.
Until we started designing
Before making a homemade all-terrain vehicle from a walk-behind tractor, from an old vehicle, the details are clarified. You can make an all-terrain vehicle based on a walk-behind tractor with caterpillar tracks or pneumatic wheels.
The tracked unit is not difficult to operate - this is important to take into account. You need to understand where and under what conditions you will use the device, as well as how many people and what weight the vehicle can carry without damage. Next you can develop:
Important Features and advantages of PIT chain saws (PIT)
Next you can develop:
- sketch;
- blueprints.
However, it is prohibited to take any car engine. The engine must have forced cooling. It is necessary to buy devices with air and water cooling.
Note! The engine in such a vehicle must be 100% high power so that you can easily move through any territory.
When using a homemade all-terrain vehicle walk-behind tractor in winter, it is better to use a 4-stroke engine. It is the one that works excellently at low temperatures, it is mobile, and easy to operate. A small 4x4 all-terrain vehicle with a walk-behind tractor engine, made independently, will become a true pride for any craftsman. The units can be purchased at a low cost, so it is easier and more economical to assemble them yourself.
How to make a walk-behind tractor from a chainsaw
The following products and materials are used:
- Motorcycle steering wheel.
- Transmission from an old moped.
- Stainless steel pipes with a diameter of 20-30 mm.
- Wheels with pneumatic tires from a car or agricultural machinery. An alternative option is homemade metal rims with lugs. To make them you will need a steel sheet and a corner.
- Bolts and nuts.
The engine is removed from the chainsaw. It is recommended to take a professional tool with a 10-13 hp motor.
The work is performed in the following order:
- The stainless steel pipe is bent into a U-shaped frame. The ends of the “legs” should be bent upward.
- The structure is reinforced with jumpers made of the same material.
- The steering wheel is welded.
- The plate for installing the battery is secured using electric welding.
- A muffler is made from a piece of pipe with a diameter of 7 cm and a length of 250 mm. The internal space is filled with sawdust so that the size of the outlet hole is no more than 1.6 cm.
- A small U-shaped frame for the engine is made from a pipe with a diameter of 4 cm. Brackets for bolting are welded to the edge and in the middle.
- Install the motor on the frame and screw it on.
- The axle shafts reinforced with a cotter pin are attached and the wheels are installed on them.
- To complete the process, the steering wheel, gearbox and gas tank are attached.
All that remains is to test the car in field conditions.
How to install Zhiguli wheels
If you have old spare parts for Lada cars, then there are two options for using them. The first is the creation of lug elements based on discs. This procedure requires the following steps:
- remove and clean the disks;
- weld the plates in a certain order, which will act as lugs;
- install lugs using weights and extensions on the base.
If you use pneumatic tires from Zhiguli, then it is advisable to install winter tires on the walk-behind tractor, which are more aggressive and have greater cross-country ability. If the walk-behind tractor is used for large-area work, then it is necessary to use a paired version or lengthen the axle when installing parts from Zhiguli.