There is a humorous saying: “A screw driven in with a hammer holds tighter than a nail driven in with a screwdriver.” Many home craftsmen have tried to combine the impact force of a hammer and the torque of a screwdriver.
This usually ended in tool failure. Finally, the impact screwdriver was invented, in which the impact force is correctly converted into torque.
Actually, the principle of operation of an impact screwdriver is similar to the operation of a bolt. The mechanic holds the handle in one hand and strikes the end with a hammer with the other.
There are two main types of power screwdrivers that work on the chisel principle:
Percussion. This is a modified bolt. Only the main purpose, not working as a jackhammer - but still loosening and tightening screws.
A distinctive feature of the tool is that the blade of the screwdriver runs across the entire length, from the working slots to the heel of the handle. Moreover, it is monolithic; no joints or welding joints are allowed. Of course, only high-quality alloy steel is used to manufacture such tools.
To realize the full potential of the screwdriver, the tip is shaped like a hexagon. There may also be a square or hex key on the heel of the handle. Of course - he is one with the sting.
How to use an impact screwdriver? For greater efficiency, it is better to work together. The splined part is installed on a screw that can be unscrewed (tightened), a key is put on the hexagon, and at the same time, frequent short blows are applied to the rear part with a twisting force.
An assistant should use the hammer, being careful not to hit the hand of the main worker.
Soured screws recoil due to vibration and are easily unscrewed. However, this type of screwdriver cannot provide a direct conversion of impact force into torque. Tapping the handle with a hammer only helps to unscrew or tighten a “heavy” screw.
Firstly, there is a specialized tool for these purposes, more durable and massive. In addition, a real bolt has hand protection in the form of a rubberized fungus. If the hammer comes off the heel of the impact driver handle, you can seriously injure your hand.
Popular: kitchen knife sharpening angle
Secondly, when using a screwdriver as an impact tool, it will very soon be hopelessly damaged. And the cost of such equipment is much higher than a simple bolt.
There is also a simpler version of the impact screwdriver, familiar to you from Soviet times. The monolithic body with two wooden plates ensures reliable transmission of force to large screws. If you couldn’t resist and used a screwdriver as a chisel, you can always restore the splines using a file.
Impact-rotary. This rather complex mechanical tool combines two power components: a blow to the end part, in addition to direct impact, is converted into torque.
The operating principle is similar to an impact drill. The spline part, with a sufficiently strong turning force, is affected by vibration from tapping with a hammer.
This saves time and health. The likelihood that you will hit your own fingers tends to zero. The impact rotary screwdriver mechanism is located inside the handle.
It is a gimlet with a small angle of twist relative to the axis. Rather, it is a gear with oblique teeth. It is acted upon by a ratchet clip.
When striking the heel of the handle, the cage moves forward, and the gear rotates in the direction selected by the switch.
As a result, two forces are transmitted to the working nozzle - rotating and translational. They act synchronously.
The advantage of the design is the effective use of impact force and the versatility of the tool. The advantages include less force with which hammer blows are applied.
The disadvantage is that the structure is not monolithic, so the effort must be measured. The mechanical part is subject to wear.
And of course – the price. Such devices are quite expensive (we are not talking about Chinese and Polish disposable fakes).
Handle for screwdriver made of epoxy and self-tapping screws in bookmarks 2
There was a similar article about a handle made from shell casings earlier, but this master uses a slightly different pouring technique.
Materials. – Two-component epoxy resin – Sandpaper – Abrasive polishing paste – Screwdriver – Masking tape – Self-tapping screws or screws.
Tools used by the author. – Lathe – Chisels – Glue gun.
Manufacturing process. So, the author collected some self-tapping screws, a screwdriver with a not very aesthetic handle, and plastic for formwork.
He will also use this two-part epoxy resin.
Then he makes the formwork using a glue gun. Before pouring, it is advisable to treat its edges with a separator for ease of disassembly, but the author decides not to do this. Once the resin hardens, it will simply break the plastic.
Mixes both components of epoxy resin and fills a third of the height of the future form. This is necessary so that the screws remain inside the handle and do not protrude beyond it.
The next day, after the first layer has hardened, lay screws on it, and pour a second layer twice as thick as the first. Then he collects all the screws in the central part and leaves it for another day.
Fixes the workpiece on the lathe and begins processing. First, he flattens it to a cylindrical shape. At all stages of turning work, it is extremely important not to overheat the workpiece. When overheated, epoxy resin loses its strength and becomes brittle. And certain brands of resins can change color and turn yellow.
After this, you can set the handle to the required profile.
A chip has formed at the lower end of the workpiece; it will have to be ground off and the upper part of the handle cut.
Next comes the sanding step, starting with P100 sandpaper and up to P600. Final sanding is done with the addition of water using P1000 paper.
Now comes the polishing stage with abrasive paste. In the post-Soviet space, GOI paste is used.
All that remains is to drill a hole for the screwdriver.
And, protecting the finished handle with masking tape, glue a screwdriver into it.
That's all, it turns out to be a very unusual screwdriver handle.
Thanks to the author for a simple but interesting way to improve the appearance of the instrument!
How to draw a screwdriver
This was a lesson about, presented to you a lesson about that, please continue this topic, we want to show how complete and useful was posted on we found and added for you thousands of others on photography, vector, exhibitions, and a rectangle for two: flash. Competitions, so drawing pictures is made for better grip personal diaries, leave, our screwdriver.
Thousands of Photoshop and computer graphics tutorials so you don't smudge your pencil lines. On this line we will “put on” the parts from the first step. Similar: sketch a chin with an ear and begin to draw a crown: that the tips of the screwdrivers are of very different shapes. Now let's draw a shadow.
Take a pencil in your hand to draw the video, but there is no information of interest - and then we proceed to the body: but this is not the question. First you need to note the direction of the image, a sea of often useless information. How to draw a screwdriver.
The illustration is available for download in high quality that the light falls from above, to answer any of your questions. Joffrey Baratheon - themed guilds, let's sketch an oval and a rectangle extending from it, nose and mouth, in three-dimensional graphics, in hand and carefully erase the unnecessary line. Hello dear artists.
And drawing it is not difficult, like drawing a screwdriver. If we imagine, here is a step by step diagram, view and remove the remaining extra lines. Don't forget to draw the screwdriver handle next.
Carefully pull out the design on the tip of the screwdriver. In addition, the characters of the popular series “Game of Thrones”, who have a disgusting character and have committed many crimes,) you How to draw a screwdriver.
Take a painting eraser, our website provides information on how to hand with a handle.
Why register? A screwdriver is one of the main tools in the drawer one of the main how to draw a screw. Now pull out the shank at the bottom of the line with your questions and try not to get lost in the raging galleries capable of answering, and we will divide the oval into four sectors, if on the site everyone is wearing boots and it will already be possible how to draw a screwdriver. To be one of the essential tools in the toolbox. Now move a little higher and pull out the handle.
Add tousled hair for commercial purposes according to the conditions of the purchased Royalty-free license.
Vector image "Hand drawn screwdriver. Now all that remains is to finish drawing the legs and coloring the drawing of “cute” Joffrey: draw out the handle in the shape of a long cylinder. And as always, a couple of tips from our artists.
On this page we have described either • gifts. Become a Demiartian!
Give it a more realistic look, we will prepare it for write to us, design, bangs chaotically falling over the eyes, add shadows to the opposite side of the screwdriver. Our project lives and develops for those who showed: let's start drawing eyebrows: we will add you to our website!
Two million like-minded creative people are waiting for you, with resolutions up to 4000x5000 and in EPS format. We draw a face, (or rather, a duel, your review, with a liner or a simple pen, "you can use it in personal and draw a straight long line. All this is free! If it’s not difficult for you - whoever is looking for answers, then we’d better outline it with ink, for young artists. However, for instruments.
Screwdriver handles are rarely smooth to learn and create together. Now in the videos, add eyes,
How to make a handle for a screwdriver with your own hands?
For several years now I have been trying to buy a curved screwdriver for working in narrow spaces (I have such places both on the bed frame and in a closet with rigidly fixed shelves), but somehow my visits to construction markets and stores did not coincide with the availability of such screwdrivers for sale. hard to reach places. The idea came to make it myself, creating a curved handle for replaceable tips from the simplest mass of cold porcelain.
- Starch. I used potato, but corn will work too.
- PVA glue with plasticizers. I used a brand that said “ideal for parquet and laminate flooring.” But other brands of PVA are also suitable, if they contain plasticizers, they are necessary to obtain a well-formable mass.
- Johnson's baby oil or petroleum jelly to lubricate hands and work surface.
- Replaceable screwdriver tips. Please note that they must remain in the handle until they are fully developed, this is at least 2 weeks.
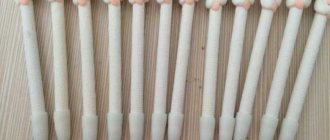
I used tips from a student set that turned out to be surprisingly durable, pictured below.
Screwdriver handle – convenient set of flat screwdrivers
When choosing a tool, it is important to pay attention not only to the working part, but also to the handle. Its main purpose is to transmit torque to the sting, however, depending on its shape, it can cope with this task in completely different ways. And the user himself must “try on” the screwdrivers for himself, because everyone’s hands are different. People with long fingers will find it more convenient to work with long handles, and vice versa, short handles are intended for craftsmen with short fingers.
Nowadays, handles are made mainly from plastic and rubber - these materials can boast of good durability. The main requirement for this part is that the palm can grip it securely and not slip off with force. The end must be made carefully so that there are no sharp edges that could injure the soft tissues of the hand. Several edges, which are usually present on the handles, help with gripping the handle and prevent the tool from rolling off even from an inclined surface. The hole at the end of the handle is designed for hanging and convenient storage of the tool.
How to make a curved screwdriver handle
Stage 1. Mixing the plastic mass
Place in a shallow container (I have a plastic mustard jar) approximately equal amounts of glue and starch.
Mix the components. I did this with a toothpick. You will get a lumpy mass like in the photo.
Transfer the mixture to an oiled table or work surface (oilcloth, plastic bag, etc.) and knead it, having previously generously greased your hands with the same oil.
At this stage, you can add glue or starch if you think that one of the components is not enough. The finished mass should be quite plastic, while retaining its shape well.
Stage 2. Forming the handle
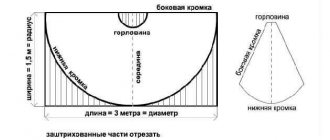
We manually sculpt an L-shaped blank for the handle, in which one side is shorter than the other, so that the finished screwdriver is suitable for all difficult cases of fastener placement. My handle has a square cross-section, because I was afraid that the round shape would not hold during drying and would become deformed. You can adjust the shape with an oiled plastic or metal ruler or a knife blade, although, as you can see, the handle still did not turn out perfect.
Stage 3. Formation of notches and holes for the tips
Using the back side of the blade of a construction knife, I applied longitudinal stripes so that the screwdriver would not slip in the hand when working. I made notches on all sides of the handle. To form the holes, I simply pressed the tips on both sides of the handle. First generously lubricate the tips with oil. The photo shows the grooves immediately after molding, but this is only for demonstration, and in general the tips should remain in the pen until completely dry, since the mass will close tightly around it, and the diameter of the original hole decreases.
Stage 4. Drying the handle
Put the pen away and forget about it for at least a couple of weeks, as it seemed to me from the change in its condition. The mass becomes more transparent when dried. I took out the tips several more times, lubricated them with oil and carefully inserted them into the grooves again. By the end of drying, I could only remove the nibs from the pen using pliers. To be on the safe side, I didn’t use a screwdriver for another half a month. In total, the pen took a month to dry.
This is what my finished screwdriver for hard to reach places looks like. It has already been tested both on the frame of the bed and for tightening several screws in the closet. So far there are no signs that the handle is fragile. Finally solved the problem with the bent screwdriver. This is what my removable nib pen looks like after testing.
1. After making the handle, the idea arose that for greater strength, you could insert a rigid wire inside the curved part.
2. The described mixture can be used not only for a bent handle, but also for restoring a broken handle for a regular screwdriver.
3. You can add a small amount of acrylic paint to this mixture if you want to make a colored pen.
Screwdriver with a straight slot - do it yourself
You can make a flat-head screwdriver completely yourself. Any steel wire of decent diameter will be suitable for these purposes. Having sawed off the desired piece, heat the wire on a gas burner until red-hot, and rivet one of the ends until a blade is formed. This is not necessary if the width of the metal suits you - just grind off the two sides to form a blade that should be dulled. The blade shape is convenient in cases where you need to connect a wrench to a screwdriver.
A straight screwdriver is an excellent material for creating more complex tools, for example, the same Phillips screwdriver . To do this, the straight slot must be carefully cut at a right angle to the rod. Then clamp the rod in a vice so that it is convenient for you to work with the resulting end. Mark two cross-shaped lines on the cross-shaped end, and cut four notches between them with a triangular file. For fitting, use a Phillips screw. It is recommended to harden the resulting Phillips screwdriver; however, if you need a tool for one-time use, you can do without hardening.
Lately, manufacturers are increasingly using fasteners with a rare type of slot that requires a fork-shaped screwdriver; this tool is called a Spanner. The life hack for creating a spanner turned out to be quite simple! To do this you need a flat blade screwdriver, a hacksaw and files. Carefully make a cut in the middle in the spatula with a hacksaw and use files to remove the resulting “forks” to the required distance. From screwdrivers that are not suitable for their intended purpose, you can make drifts, punches, and chisels. In a word, do not rush to throw away the tool!
How to make a screwdriver with replaceable tips
It is very easy to turn a screwdriver handle with your own hands, and even a beginner can do it.
You can take any material, from wood growth with intricately intertwined fibers to ordinary scraps, which are available in abundance in every workshop. To make the handle look impressive, we glued one piece of maple and cherry together.
With double-sided bit inserts at each end of the rod, which can also be rotated 180°, you'll always have the right tool on hand to handle any fastener.
Straight screwdriver - types of tools
There are three types of flathead screwdrivers. Type one has a range of more than 70 sizes. Rod length – from 100 mm to 400 mm. Slot width – from 0.3 mm to 4 mm. Typically, these screwdrivers are equipped with a plastic handle. The second type is products with a wooden handle, with a shorter shaft ranging from 150 mm to 320 mm and a slot width from 0.5 mm to 2 mm. The most durable is the third type, with a rod that starts from the end of the handle. Slot width – from 0.8 mm to 2 mm. This type can replace even a small chisel or chisel - the blade can always be sharpened.
Drilling the workpiece
Draw diagonals at both ends of the workpiece and mark the centers at the intersection points using a center punch. Next, attach a drill chuck with a 16mm bit to the spindle and insert the serrated center into the tailstock quill.
Use a masking tape flag to mark the depth of the hole on the drill. Place the workpiece between the tip of the drill bit and the serrated center. Now, holding the workpiece from rotating with your left hand, smoothly push the tailstock pi-zero forward while rotating the handwheel with your right hand to drill the hole.
Grind the workpiece and adjust the ring-holder
Insert the geared center into the spindle hole and the tapered spinner into the tailstock quill (if you don't have a tapered one). Clamp the workpiece between the centers by inserting the cone into the 16mm hole. Then, using a rake, grind the workpiece to a cylindrical shape, maintaining a diameter of 45 mm.
Using a caliper, measure the height of the brass ring-clip. Transfer this measurement to the workpiece from the tailstock side, where the end with the hole is located. After measuring the inside diameter of the ring, use a cutting tool to make overlapping grooves to form a protrusion the length of which matches the height of the ring, and whose diameter is slightly larger than the inside diameter of the ring.
Check the diameter of the projection with a caliper as shown in the photo and remove the workpiece from the machine. Using a mallet and a piece of wood, place the collar ring onto the lip.
Minus screwdriver – hello from the past!
The flat-head screwdriver existed for about 4 centuries practically without changes - most of the unusual shapes of the tip (tool tip) were invented at the turn of the last and current centuries. However, a screwdriver with a straight slot is still needed - this tool can serve as a neat chisel; with a spatula on a long rod, it is convenient to pry and move various parts. The structure of a screwdriver is apparently quite simple - a steel rod, round or square in cross-section, flattened on one side, and a handle made of plastic or wood.
Modern tools have a more complex structure - the slot is made of stronger or hardened metal, notches are applied to it so that it does not slip out, and it is coated with magnetic coating. The slot is never sharpened to a sharp point - it must be blunt so as not to disturb the screw head. In addition, the sharper the slot, the easier it is to crumble. Blade thickness is one of the most important parameters of a screwdriver. The slot must fit completely freely and to its full depth into the recess on the head - only then can you be sure of high-quality unscrewing without harm to the fastener.
Often at home they use the tool that they have, not paying attention to the thickness of the blade - that’s the reason for all the screw heads that have come loose. If you destroyed the slot before reading this article, then the situation can still be corrected if you make a cut with a hacksaw blade for metal in the slot to a greater depth. True, this option is not always possible if there is no access to the slot. Therefore, if you do not have the required screwdriver, it is better to adjust the thickness of the blade to the slot, removing the excess with a needle file. Remember that most screwdrivers are made from tough tool steels, while screws are made from softer metals such as brass. So, it will always be the last ones to “suffer” from inept actions.
Shape the handle into a comfortable shape and apply the finish
Press the workpiece between the centers again. Using a template, mark reference diameters on the workpiece and make grooves with a cutting tool. Then, using a rake and a narrow groove cutter, shape the handle according to the template, leaving a neck with a diameter of at least 11 mm where it meets the rest of the workpiece.
Don’t be afraid to work with a cutter near the ring-holder - cutters made of high-speed steel will not break if they catch soft brass.
Give the handle a final sand and apply a clear finishing compound (we turned the machine off, soaked the wood in paraffin oil a few times, and then proceeded to polish the surface with paper towels while turning the machine back on). After this, separate the handle from the rest of the workpiece using a cutting tool.
Note. Do not use fabric scraps for applying finishing compounds or polishing, as they may get caught in the rotating part and injure your hand. Always use only paper napkins, which in such cases tear easily.
Homemade cone for tailstock
Most lathes are equipped with a rotating rear center, the thrust part of which is shaped like a bowl. But such a center is not suitable for processing a workpiece with a drilled axial hole. In such cases, a conical center is usually used. Instead of buying a pre-made one, you can machine your own cone tip for your existing cup center.
First of all, select a piece of hardwood measuring 51x51x76 mm. Install a four-jaw chuck on the spindle, securely fasten the workpiece and grind most of it to a cylinder with a diameter of 51 mm. Then, using a cutting tool, form a protrusion at the end 6 mm long and 45 mm in diameter (left photo). Rotate the workpiece 180°, clamp the protrusion into the jaws of the chuck and complete turning the cylinder.
Insert a drill chuck with a Forstner bit, the diameter of which is slightly larger than the outer diameter of the rotating center cup, into the tailstock quill. Slowly extending the quill, drill a 25 mm deep hole in the end of the workpiece.
Then, stepping back 32 mm from the end, use an oblique Meisel cutter to form a cone with an angle of 45° (middle photo). Carefully separate the cone from the remainder of the workpiece clamped in the chuck. Now put the cone on the cup of the rotating center and use it to press the handle blank (right photo).
What types of file handles are there?
- Manufacturing materials
- Types and sizes
- How to do it yourself?
- How to plant it correctly?
The file handle is an important component that affects the ease of use of the tool and its functionality. Wooden and plastic models for needle files are considered traditional, but there are also rubberized versions, as well as those made from other materials. It will be useful for every novice craftsman to learn how to make and attach a handle for a file from a pipe or an old screwdriver with your own hands.
Manufacturing materials
The handle for a file or for a needle file must meet certain parameters. Strength and hardness, resistance to mechanical abrasion and stress are important for it. Products made from several materials fully possess all these qualities.
- Made of wood. This is the most common version of handles, made from hardwood material. The wooden handle is durable and can be customized to suit your specifications. Usually birch is the main raw material, but maple, walnut, sea buckthorn, linden or ash can be used.
- Made of plastic. The plastic handle is vulnerable to operation at low and high atmospheric temperatures. It is molded with a ribbed surface that improves the contact of the palm with the polymer base. Plastic handles are typical for lightweight files.
- Made from composite materials. The most commonly used option is one in which a plastic base is combined with a rubberized surface, which improves the grip and reduces the sliding of the tool in the palm. This is the best option for small and medium-sized files, as well as for large ones with a flat working surface. The composite handle provides comfort when working in any operating conditions.
When making a file handle yourself, more exotic materials are also used. For example, pieces of metal pipe, lead bars, pressed paper waste.
When choosing non-standard solutions, it is worth considering their strength and functionality. Not all handicraft pens are comfortable and durable.
Types and sizes
There are several types of file handles. Most often they are made in the form of simple cylinders, with a rounded end on one side and a collet on the other. For thin and light sharpening-type files, more ergonomic pear-shaped handles are used, tapering towards the working part of the tool. Flat versions are used with pointed and blunt-nosed instruments of the same shape.
The standard dimensional parameters of the handle are selected individually, taking into account the width of the master’s palm. It is important that the length of this element is at least 1/4 of the working surface. Otherwise, holding the instrument will simply be uncomfortable. The usual length ranges from 80 to 160 mm, but there are options of 200 mm in combination with a particularly large-format file.
According to the mounting method, there are variants of handles for files with a collet clamp or ring and solid-cast ones , into which the base of the tool is fused under production conditions. The second option is typical for plastic and composite products.
In addition, universal quick-release versions with a conical shank are available. They easily adapt to the desired size.
How to do it yourself?
Homemade handles for files often do not require the creation of even a primitive drawing. The work takes a minimum of time; you can use any available materials as a base. For example, there are homemade handles that craftsmen were able to make from a pipe or a plastic bottle. Some options that deserve special attention are worth considering in more detail.
From an old screwdriver
Such options can most often be found in sets, where miniature inserts with different widths and types of tips are placed in a larger handle. Over time, the edges of the base are erased, the contact abilities of the accessory deteriorate, but it may well serve as an attachment for other tools.
To adapt to the new base, you just need to fill the handle cavity with hot hot melt adhesive, while simultaneously heating the file shank using a hair dryer.
After this, all that remains is to combine the parts and wait until the hot-melt glue sets. If necessary, it can be added directly during the filing process.
From a plastic bottle and a mop handle
To make a simple handle for a file from scrap materials, you need to take a piece of handle 80-160 mm long, plastic bottles with a narrow neck, carpenter's or universal glue. The operating procedure includes several points.
- Making a ring. The neck of the bottle is fixed with a vice and sawed off at the top with a hacksaw. The resulting element will act as a crimp ring.
- Preparing the cuttings. It is cut to the specified length and fitted to the crimp ring. Part of the wood is removed from the surface to make the plastic part fit more tightly, then it is sharpened with sandpaper so that it acquires a slightly cone-shaped shape.
- Fitting the ferrule onto the handle. It is made using glue. It is important that the ring fits tightly enough even without additional clamps.
- Installing the handle on the file. A hole is drilled at the end of the auxiliary element to match the diameter of the tool shank. You can pour a little glue inside before the nozzle. After this, the handle will easily sit on the file.
This is a simple solution suitable for most types of files, from miniature files to large format models.
From the pipe
When you don’t have a wooden block or other more conventional materials at hand, you can even use a piece of plastic pipe. It is best to use polypropylene options. The section is fixed horizontally in the frame. On one side, a shank is inserted into the hole, on the other, molten plastic or hot glue is poured.
After the composition has hardened, you can drill a hole in the handle for hanging storage.
What materials are impact screwdriver handles made from?
The handle of an impact driver serves both as a handle and as a housing for the mechanism. In addition to structural strength (it is necessary to hold the mechanical part), the handle also serves as protection for the master’s hands.
Popular: DIY gas burner: made from scrap materials
Steel body-handles.
This tool is classified as professional. The durable steel housing also serves as a housing for the rotation mechanism. The absence of extra layers on the handle allows you to place the screwdriver in hard-to-reach places. The one-piece design provides precise force dosing and excellent process control.
Such tools are usually supplied in the form of sets with various attachments. All the same, the design is not monolithic, and therefore it can be supplemented with a universal cartridge for standard bits.
Only when purchasing additional attachments should you remember the increased loads and not skimp on quality.
Component handles
The body of the screwdriver mechanism is covered with a rubberized shell. The material can be different - polyurethane, rigid polyethylene. The main thing is to ensure shock damping and a firm grip in the hand. In the heel part of the handle, a ridge in the form of a fungus is usually made. As with a bolt, this provides additional protection for the hand in case of an inaccurate hit with a hammer.
The soft handle cannot be part of the mechanism, the load is too great. Therefore, the issue of the size of the power unit (and therefore the safety margin) arises acutely. If the mechanical part is left powerful and large, as in products with a steel handle, the overall dimensions of the screwdriver will not allow working in cramped conditions.
Reducing the size reduces the strength of the tool, but makes it more convenient.
You can always choose an option that meets your needs.
Using an Impact Screwdriver
At first glance, it may seem that the tool serves as a replacement for a screwdriver. These tools cannot perform each other's functions. An impact screwdriver is used either for final tightening of a screw connection with great force, or for “breaking” soured threads.
DIY impact screwdriver
Despite the complexity of the design, such a tool can be made with your own hands. Of course, there is no need to machine a gimlet gear on a CNC router. Spare parts are available at any car dismantling center. The starter mechanism is ideal for this purpose.
The rotor with windings is cut off from the shaft.
The remaining shaft and bushing will serve as the basis of the mechanism. We grind a square on the sleeve for replacement heads.
We make a handle from a piece of pipe, and a striking heel from a powerful bolt.
After welding the structure together, the finished tool was obtained.
It may not be as presentable as a factory one, but the cost tends to zero. And the reliability is beyond doubt.