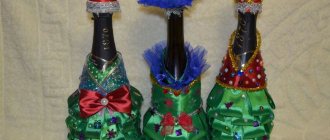
At many weddings, an interesting custom is observed: the newlyweds should have “wedding bulls” on the table - these are a couple of bottles of alcoholic drinks (usually champagne), which are stored and opened during the first anniversary or on the day of discharge from the hospital. According to tradition, the bottles are elegantly decorated . For decoration, satin ribbons, beads, and seed beads are most often used.
Photo of how you can decorate champagne ribbons for a wedding with your own hands
Recommendations for decorating bottles with ribbons
Decorating wedding champagne is easy to do with your own hands. The main thing is to know some nuances and strictly follow the step-by-step master classes. The design should be festive and bright - satin ribbons are best suited for this.
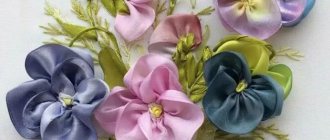
You shouldn’t limit yourself to just ribbons; you can add colored feathers, rhinestones, artificial flowers and lace, beads and beads to them
General rules on how to decorate champagne for a wedding with your own ribbons:
- Any such decoration begins with the ribbon being attached to the surface of the bottle using bias tape. You should start from the neck or just below its level.
- There is no need to immediately cut a certain number of pieces, since their length will vary depending on the bends of the bottle shape.
- The bottom edge of the last glued tape is hidden under the edge of the previous tape. Thus, the decoration is built over the entire surface, to the very bottom.
- The decorative element does not have to be located at an angle. You can wrap the bottle crosswise and hide the imperfections with thin lace.
- The neck can be left open, or you can wrap it completely.
- Only transparent glue is used. You should coat it carefully so that after drying you do not find unsightly stains.
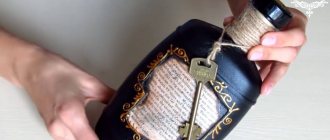
If the decor with ribbons will only partially cover the bottle, then you need to remove the labels in advance . To do this carefully, the bottles need to be briefly immersed in warm water - the glue and paper will soften and be easily removed.
Photo of decorating champagne for a wedding with your own hands using ribbons
Original wedding decor on bottles with satin ribbons
Origins of the tradition
The word “bulls” for the beautiful bottles on the table, of course, is not the most beautiful one chosen. But it takes its roots from the Don Cossacks. In their villages, it was customary to give a wedding gift of a cow and a bull, tied by the horns with beautiful ribbons. They were given by parents so that a young family could feed itself in the first year, and a year later give relatives fresh milk. This was considered a sign of a strong family, a sign that the young were coping with family life.
Of course, now it would be strange for city residents to receive livestock as a gift. But the tradition, although modified, remained firmly in our heads. And the current “bulls” look much more beautiful. The alcohol used is usually champagne or wine, but you can also take different types of alcohol: one bottle is the bride’s favorite drink, the other is the groom’s.
Related article: Edge stitch with knitting needles for a scarf with video
Also, wedding traditions, along with “bulls”, include a wedding loaf, “shishki” - small buns that are distributed to guests in order “not to cause problems in family life”, bonbonnieres - gifts or compliments to guests (as a rule, these are small candies or chocolates with notes of gratitude), drinking glasses, and so on.
DIY champagne decoration for a wedding with satin ribbons
Decorating a bottle with ribbons is the simplest and most affordable way that does not require special skills or high costs . Despite this simplicity of the decor, the result will be spectacular and bright if you carefully follow all the steps in the master class for decorating a champagne bottle with satin ribbons.
What you will need for work:
- ribbon: blue and golden brocade;
- heat gun;
- a bottle of champagne;
- scissors;
- additional decor: beads, lace.
The colors shown are taken as an example. They can be replaced with other shades that suit the wedding design, but it is better to use no more than 2-3 colors
Step by step execution:
- Try the blue satin ribbon on the neck of the bottle and cut it to the desired length. Apply glue and attach around the throat, placing the right end of the decorative item over the left.
- The second tape will be longer, as the bottle begins to expand towards the bottom. Cut the required length and glue it in the same way, slightly covering the edge of the first tape. Attach 2 more ribbons in the same way.
- The fifth and sixth row will be made of brocade ribbon. The technique is absolutely the same.
- Glue a layer of brocade ribbon to the very bottom of the bottle, wrapping the champagne crosswise. Cover the remaining space between the top and bottom of the bottle with a blue piece of paper - its ends should connect to the back of the champagne.
- The joint is unlikely to be neat, so you need to cut off the blue tape (about 10 cm). Coat the edge with glue and push it under the very bottom layer, press. Then stretch it upward and glue it, covering the joints.
- Add additional decorations to the front of the bottle, arranging them in a random pattern.
The wedding champagne made from ribbons is ready - you need to wait until the glue has completely dried and you can bring the “bull” to the holiday.
Champagne in blue and gold with peacock feather
Decoration with corrugated paper
Corrugated paper, especially festive green, will perfectly decorate your bottle of champagne for the New Year 2022. It’s not at all difficult to do it yourself, especially for beginners, you just need to purchase this material at an office supply store and stock up on some details for further New Year’s decor. As you can see in the photo, these can be golden ribbons that play the role of securing paper, bells, flowers, gift ribbons in all their variety, beads and much more, collected in a specific festive composition. So let's get started.
To work you need:
- corrugated paper (any color);
- a bottle of champagne;
- gold thin ribbon;
- gift ribbon (different colors);
- floral paper;
- ready-made gift bows;
- scotch;
- all kinds of decorations on hand.
Progress:
- Grab a bottle of champagne and get to work. First you need to design the neck and stopper. To do this, carefully wrap them with a small piece of corrugated paper. To prevent the paper from opening, we secure it with tape.
- We do similar work with the rest of our product, wrapping it with the same material, and for fixation we use a piece of gold gift ribbon.
- The final stage. To do this, you need to decorate the sparkling wine with a New Year's decorative composition, which you can make from anything. Let's say, as in our case, these are bells, ready-made gift bows, beads, rain, artificial flowers (you can replace them with small Christmas balls), transparent colored floral paper.
Such beauty, made with your own hands, can be placed not only under the tree for the New Year 2022, but also presented as a gift to loved ones. They will certainly appreciate it. In order to make several souvenir copies, you should check out our video tutorial, which will provide you with another great idea.
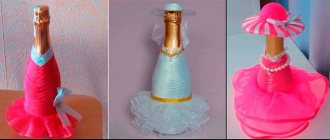
Master class: bride and groom made from champagne bottles
The bride and groom made of satin ribbons on champagne bottles is a common attribute of a wedding celebration. Previously, this craft was ordered from decorators, but now anyone with minimal handicraft skills can make such a decoration.
You can decorate champagne in the form of newlyweds using different techniques: entwining bottles with ribbons in the simplest way or using the more complex kanzashi technique.
Champagne wedding couple decorated with ribbons
Groom made of ribbons on a bottle of champagne
To make a groom, you need to prepare materials :
- white and blue ribbons;
- white half beads of different sizes;
- heat gun;
- lace;
- organza;
- small artificial flower;
- champagne
Step by step execution:
- Cut a white satin ribbon 2 cm wide so that it is enough to wrap the neck of the drink. Fold along and carefully iron the fold line. Lightly scorch the edges with fire.
- Apply glue to the bottle and glue the tape, first one edge, then the other. Please note that on the back side the tape should be positioned slightly higher than on the front side so that it fits tightly to the surface of the glass.
- Raise the ribbon along the fold, like raising a collar, before putting on the tie. Glue the same white piece from below, close to the fold line of the first tape. Repeat the steps one more time.
- From a blue ribbon - it should already be white, tie a tie in any convenient way. The tie can be replaced with a bow tie from the same ribbon.
- Place a tie under the white decorative “collar” and tighten. Lower the collar and attach the free end of the tie to the bottle with glue.
- Below the shirt, braid the bottle with a blue ribbon until the shape of the champagne begins to change dramatically. At this point you will need to glue several tapes on top of each other to level the surface.
- Continue covering the drink with tape all the way to the bottom. The joint should be located on the front side. It will need to be covered with half beads, similar to buttons.
Under the shirt, a little to the side on a drop of glue, plant a boutonniere flower, and the bottle groom is ready!
Champagne bottle groom with bow tie
Very wintery: knitted clothes
With the onset of cold weather, we often wrap ourselves in warm sweaters and blankets. Why not knit a suitable “suit” for a bottle of wine? Both decor and packaging at the same time.
If you don’t want to knit anything special, look in the closet for an old sweater. Those who don’t like to knit can simply look for old jumpers in the closet of a suitable color. Well, craftswomen who enjoy spending an evening with a ball and knitting needles come up with exclusive outfits for gift bottles.
Knitted clothes for champagne You can limit yourself to just funny hats and scarves. It will take much less time than knitting a full outfit, and the effect is no worse:
Scarves and hats for bottles The main thing is the winter, New Year's mood. And it can be conveyed literally with one or two expressive details.
A small detail with a New Year's mood
How to sew holiday covers
Velvet wedding champagne vestments look especially expensive. Any container decorated in this way will turn into a center of attention. The simplicity of the pattern, along with the availability of materials and tools, are among the advantages of this decoration.
Required:
- two pieces of velvet white and black;
- threads to match the fabric;
- cardboard or pattern paper;
- pencil, scissors;
- beads, lace, organza.
Stages of sewing covers:
- Place the paper on the bottle and take measurements with a pencil;
- Draw the pattern on paper, cut it out with seam allowances;
- Along the contour, the pattern is applied to the fabric. The case for the “bride’s” bottle is cut out on white velvet, and for the “groom’s” champagne - on black.
- The material is cut out according to patterns, sewn along the contour from the wrong side, and turned inside out.
- They put the prepared outfits on the bottles.
- Champagne for the “bride” is decorated with an organza veil and lace and beads are attached with a glue gun.
- The “groom’s” bottle is decorated with beads and ribbons.
Velvet can be used to decorate newlyweds' glasses, money chests and bouquets of flowers. Velvet covers are then used repeatedly; they will come in handy at other important events.
How to decorate champagne with sweets
You will need:
— silent paper (2 orange sheets, 1 green sheet)
*Tissue paper is thin paper, also known as tissue paper. You can find it at gift wrapping racks, as well as in specialized art stores.
- candies (in this example there are 48 pieces)
- raffia
*Raffia are long fibers that can be found on the leaves of the raffia palm tree. They are popular among florists and are used in arts and crafts.
- hot glue
- hot glue gun
1.
Prepare some orange tissue paper and cut it into 7 x 7 cm squares.
2.
Apply glue to the flat side of each candy. Now you need to glue the candy into the middle of the paper square.
3.
Next, you need to fold the edges of the paper towards the top of the candy. Start gluing the candies to the bottle using glue.
* It is better to decorate the bottle with candies from the bottom up in a circle.
* Try to glue the candies tightly to each other.
4.
Making leaves. To do this, prepare green tissue paper and cut out long narrow leaves from it.
5.
The leaves need to be glued together in several layers. Next, you need to decorate the neck of the bottle with them.
6.
Your bottle will look even more like a pineapple if you wrap some raffia around the neck.
Leg-split
This method of decorating a bottle for March 8th is suitable for bright personalities who cannot tolerate routine and banality.
This decor looks fresh and bold. The coarse thread contrasts sharply with the spring festival, making this decoration method unique.
Both thick and thin twine (almost a thread) look beautiful. Such a rope can cover the entire surface of the bottle, and only part of the container. In case of partial wrapping, you must first remove the label from the bottle.
To dilute the severity of the twine, the wrapped surface can be decorated with flowers or delicate lace.
Decorated containers can be stored after using the contents, using them as an element of interior decor.
Types of decor for wedding bottles
This lovely holiday accessory can be made using any craft technique. The most commonly used materials are satin ribbons, artificial flowers, fabric, lace and stained glass paints. Based on the materials used, decor is divided into the following types:
- decoupage;
- engraving;
- glass painting;
- decoration with bows, feathers, beads;
- decoration with natural flowers and leaves;
- making flowers from metal plates, polymer clay and textiles;
- making wedding or national costumes.
The main requirement for decor is that it must correspond to the level of solemnity, be in harmony with the dishes, the decoration of the hall, and the outfits of the newlyweds. Pompous gold engraving is inappropriate for a wedding in Provence style. Intricate roses, pendants, and lace will fit perfectly into a sophisticated ceremony in aristocratic decoration.
Real masterpieces are obtained by using allusions to a profession or hobby during marriage. A bottle entwined with rope, miniature anchors and steering wheels will suit a sailor groom, and the bride’s passion for travel can be emphasized with tiny images of famous landmarks.
Feathers
One of the freshest ideas for decorating bottles for March 8 with your own hands is feathers.
This design will definitely become the highlight of the gift. Delicate and soft feathers look impressive and exclusive.
This bottle does not require additional decoration. The maximum that can be added in this case is a piece of ribbon or lace to hide the joint between the feathers and the label. And then, such decor may be needed only if the edge is not very neat.
To decorate your bottle yourself, you'll need feathers, glue, champagne, and maybe some ribbon.
Feathers are glued in rows, starting from the bottom edge of the bottle. The first row should be at such a distance from the bottom that the feather completely covers the container and extends 1–1.5 cm to the bottom edge.
It is better to use soft, downy feathers - if there are only hard flight feathers, then they should protrude beyond the edge by 0.5–0.7 cm. Otherwise, the bottle will be unstable.
It is advisable to hide the edge (the sharp edge that was used to write in the old days) of the top row under the label. If this is not possible, it is hidden under a layer of braid or lace.
Bride
Mark the center of the champagne bottle, measure out a narrow white satin ribbon and glue it to the bottle at an angle of 45 degrees.
Thus, we decorate the “corset” with white thin ribbon.
We cover the rest of the bottle in a circle with a wide white satin ribbon.
Glue stretch guipure on top of the satin ribbon.
We cut out elements of flowers and leaves from guipure fabric.
We glue the cut out elements to the bottle.
We glue a ribbon to the top of the bottle and decorate it with half beads.
We glue half beads and rhinestones to the cut out elements.
You can add an additional decoration to the “bride” - a veil.
Necessary materials
To understand what materials will be needed in the process of decorating a bottle, you need to decide on the decoration method. This can be a simple design with tinsel, sparkles, serpentine and other New Year's attributes. To fix them, you don’t need additional accessories; you just need to beautifully wrap the garlands around the bottle or tie them with a bow. Champagne decorated in this way will look good on the table during a noisy festive feast or corporate party.
Another way to quickly decorate a bottle will require you to purchase special thermal stickers (custom labels) with thematic designs and wishes.
The original labels are removed from the vessel by dipping in heated water.
Very often, paints and decoupage techniques are used for decoration. Both of these options are considered the most classic. To create the outer “clothes” of champagne using these techniques you will need:
- acrylic paints;
- special contours;
- brush;
- thematic drawings and stencils;
- napkins;
- PVA glue;
- water-based varnish;
- additional decorations: beads, ribbons, wreaths.
If you decide that your bottle will have beautiful New Year's wreaths on it, you should purchase the following materials to create them:
- wire;
- designer paper;
- artificial or natural spruce branches;
- dry flowers;
- walnuts;
- tangerines;
- dried fruits;
- satin ribbons;
- cord;
- lace fabric.
A wreath created from these materials will itself be a highlight in the design of sparkling wine. For greater solemnity, it is recommended to first wrap the bottle with foil or any decorative paper (for example, corrugated) and put a wreath on top of it.
The finishing touch will be decorating the wreath with a transparent pendant or satin bow.
If you love crafts, you can make special pockets for drinks.
To create them you will need:
- fabric of neutral tone (beige, creme brulee); It is recommended to choose natural materials such as linen, cotton, felt, and if they are unavailable, you can use any fabric that is at hand;
- thick threads (decorative, interspersed with lurex);
- needles or sewing machine;
- a pattern made independently based on the parameters of the bottle;
- decorative elements: buttons, beads, ribbons, stickers, lace, rhinestones, sequins.
Pockets can not be sewn, but knitted or crocheted in the form of a pullover, a Snow Maiden dress, or a Santa Claus outfit. You can also complement these outfits with knitted winter accessories: a hat and scarf. Based on your skills and imagination, knitted items can be made in the form of the symbol of the year, a snowman and other characters.
To create knitted decorative patterns you will need:
- knitting needles – No. 1,2,3;
- hooks – No. 1,2;
- acrylic yarn of different colors (green, red, white, brown);
- knitting patterns.
You can also decorate a holiday bottle with a drink in other ways.
Let us give some interesting examples.
- Decorative cord. Additional tools you will need: glue, lace elements, beads, buttons, decorative figures, fur.
- Sparkles. You will need glue. The decoration can cover the entire bottle or be applied in stencils to certain areas of the champagne.
- An aerosol can. For a more festive design, you can apply paint using appliqués and stencils.
- Rice napkins. It is better if they are translucent and with thematic patterns.
- Decorative stones. They must be placed in a fantasy order on a prepared base - ribbons, painted glass, corrugated paper.
- Newspapers. Clippings in foreign languages, made in beautiful fonts, will look original.
- Rain. Suitable for additional decoration and creating a truly New Year's mood.
- Figures made of polymer clay. This material, like no other, provides limitless opportunity for creativity. You can make snowflakes, figures of snowmen, Santa Claus, owls, Christmas trees and many others from clay. Such decor will make a bottle of champagne a real masterpiece.
Dressing up a bottle of sparkling wine in different clothes
You can make a funny New Year's character out of a container with a drink. Make a hat from an old sock, cut an even strip from an unnecessary T-shirt with a suitable print, attach a fringe - the scarf is ready.
A great way to add a new flavor to the holiday is to decorate bottles in the shape of Santa Claus' reindeer. Make horns from fluffy pipe cleaners for children's crafts. Eyes can also be purchased ready-made, or drawn on paper and cut out. A red nose for a deer can be made from a pompom or a large button.