In one of the towns in Thailand, local workers at an automobile plant began making cars from foam plastic. However, not all parts are made from this material. Some spare parts are molded from plastic or Kevlar (body). The rest completely or partially imitate the real model. So, for example, the speedometer, steering wheel, headlights and, of course, the wheels of the pseudo-car will be real. Thai craftsmen manage to make exact replicas of cars with their own hands, using the most accessible and inexpensive materials.
MANUFACTURING A MACHINE FROM FOAM INDEPENDENTLY
Not long ago, the auto industry and the entire Internet community were introduced to an innovative discovery, which can rather be called a simple invention of Thai craftsmen. They learned how to create fakes of real cars.
In one of the towns in Thailand, local workers at an automobile plant began making cars from foam plastic. However, not all parts are made from this material. Some spare parts are molded from plastic or Kevlar (body). The rest completely or partially imitate the real model. So, for example, the speedometer, steering wheel, headlights and, of course, the wheels of the pseudo-car will be real. Thai craftsmen manage to make exact replicas of cars with their own hands, using the most accessible and inexpensive materials.
Foam machines in Russia
However, domestic masters can boast of similar achievements. For example, one of the most successful marketing decisions was a company that used foam machines to advertise new models. It would be appropriate to note that the billboard, on which three real-size cars were located, was the largest in the entire territory of Russia.
The production of such products on the domestic market is carried out by companies with a narrow specialization. As a rule, these include companies producing foam products. You can order from such companies not only decorative and finishing elements for building facades, but also complex shapes and even large-sized structures made of polystyrene foam. This production is based on the use of special equipment and software, which greatly simplifies the process. We will lift the curtain and tell you how you can make a car with your own hands using polystyrene foam.
Process of making a foam machine
Initially, it is worth noting that a car model made of foam plastic can be an excellent investment in advertising. Such blanks do not differ in appearance from the real thing, and their cost is much lower.
To do this, you must first sand the product, then prime it. If flaws are identified, the procedure is repeated. And so on until the surface of the future foam car becomes ideal.
Finally, the workpiece is painted. After several layers of primer, the product can be coated with real car paint. The base is then attached to the metal frame. Such a model, made with your own hands from foam plastic, is difficult to distinguish from a real car.
The fake foam model will look more realistic if you install real headlights and wheels in it. Such a layout will fully satisfy the wishes of any client. It can be used in advertising campaigns, for presentations and decoration of sales floors.
Foam crafts
Polystyrene foam is a universal material. It is widely used in construction, interior design and the creation of landscape gardening compositions. But these are not all areas of its use.
Today, advertising models, dummies and other complex structures made of polystyrene foam are especially popular, with the help of which you can successfully and profitably advertise your products.
Expanded polystyrene can also be used in creativity. You can make a lot of interesting and exciting crafts with your own hands from polystyrene foam. The special advantages of polystyrene foam - easy processing and affordable price - make it an ideal material for a wide variety of workpieces. As proof of this is the technology described above for the manufacture of foam plastic machines. But these are large-scale events, and in order to provide leisure time for the child and attract children into the world of creativity, smaller cars can be made from this material.
In order to make a small model of the domestic or foreign automobile industry with your own hands, you should prepare:
Of course, the process of making a miniature car from foam is much simpler than making a real-size car. To make a craft machine with your own hands, just cut out a model from several parts. Then they can be glued together using a silicone gun or double-sided tape. Having given the product a more or less similar shape, it can be lightly sanded to give it a more believable appearance. Then wheels and additional elements can be attached to the base. Finally, the craft can be painted with acrylic paints.
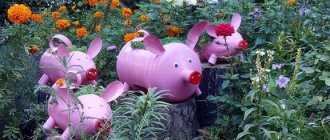
Similar toys can be made in any size. The big advantage of crafts made from foam plastic is that the child has the opportunity to realize all his fantasies. Due to the fact that polystyrene foam is lightweight, it can be pierced with wire, glued and cut to give any shape without any problems, it is actively used in school and children's creativity. To paint these blanks, acrylic paints are enough; with their help, a child can realize his dream of what his car should look like. Together with children, you can recreate not only car models, but also animal figures using foam plastic. With the help of such crafts, you can learn geometric shapes, letters, and numbers during the manufacturing process.
In general, polystyrene foam is a unique material that, due to its advantages, can be used in a wide variety of areas and for a wide variety of purposes.
Source
Fire truck
In fact, there are different types of cars used by firefighters, but to create a beautiful model of a candy fire truck, you will need to take an egg carton.
Made from high-quality cardboard, such a machine will be stable and strong.
Description of machine creation:
- First cut the boxes.
- Then paint the layout with gouache or acrylic paint.
- Next, start cutting a toilet paper spool in half and twist scarlet and yellow tubes onto its halves.
- Glue the elements together. For this machine, you can also create wheels from cardboard using plastic caps and placing them on metal axles.
- At the end, place the reels with sleeves in the body, stick on the headlights from beer caps and the craft is done. If you want, you can also add a truck.
You can make a truck from kinders in a similar way. If you understand the topic, you can understand that there is nothing difficult in creating such beautiful crafts.
It would be desirable, of course, to have a step-by-step explanation with pictures.
A candy machine will be a wonderful gift for a boy or a man on a men's holiday or birthday.
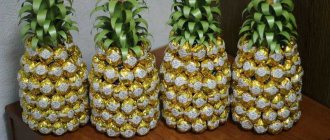
To make a car out of candies with your own hands, you will need to take a large number of candies and glue them to a frame made of cardboard boxes or polystyrene foam.
You can choose a variety of candies for crafts and combine them for the same craft.
Let's make a children's cartoon McQueen car out of candy.
To make the craft, you will need cardboard boxes for the frame, as well as a chocolate wrapper for the spoiler, white and red colored paper, scissors, glue, markers, foil, candies for gluing the car with about 250 - 300 grams, as well as wafer candies to put the top of the car and the sides of the car are about ten, for the wheels there are round cookies.
Let's start creating the machine, forming a frame from the boxes. We glue the boxes together or wrap them with tape.
At the next stage, where the windshield is, we cover the car with white paper. For greater accuracy and to get a finished cardboard machine under a layer of candies, it is better to cover the entire machine with red paper so that there are no visible gaps between the candies or do nothing, do not paste it over.
The chocolate wrapper will serve as a spoiler; we’ll glue it on later, but now we’ll cover it with red paper.
Let's draw McQueen's eyes with a felt-tip pen. Let's make windows out of foil.
Now you can start decorating the car with sweets. First, we glue long candies with waffles at the top tightly to each other in a row, and also glue two candies at the bottom on the sides. We fasten the candies with glue, not too tightly, so that later you can take a separate candy without breaking the entire structure.
Gradually it begins to emerge as to what kind of car will be made from candy.
Now we cover the whole car with candies on the sides, where the trunk and fenders are at the back.
Glue a “smile” onto a white paper bumper.
Now we glue the spoiler on the back, greasing the side of the chocolate wrapper with glue and fixing it to the back of the car. It is better to fix the wing and support it with something until the glue “sets.”
Let's make wheels from chocolate covered cookies. We will use toothpicks or wooden sticks to make the axes.
At your discretion, you can model the car body in one way or another to create a passenger car, an antique car or a truck.
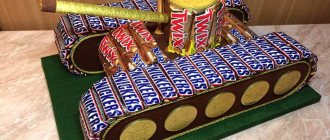
And here you can see different examples with cars made from candies, the top ten cars.
You can also watch the creation of the car in the video below or here at the link BMW, car, car made from Snickers.
A gift in the form of candy will delight anyone - both a child and an adult. But today it has become no longer fashionable to give an ordinary box of sweets. Candy gifts can be decorated in original compositions: bouquets, topiaries, ships, cars. Making such gifts is not difficult, and each of you can do it yourself. This article provides readers with a master class that describes how to make a candy machine with your own hands. After carefully studying the information, you will be convinced that such a composition is easy to manufacture.
Passenger car
As an option, you can make a car from candies. For work you will need the following materials:
Creating a composition
First, the body of the future car is made. You need to cut out 2 elements from foam plastic. The size of one is 10 X 20 cm, the second is 10 X 10 cm.
The last element must be trimmed so that there is an even descent. The cut areas must be cleaned with special paper. Connect the blanks together so that the small element is on top of the large one, while moving to one edge.
If you do everything correctly, you will immediately understand how the gift takes the form of a car. After this, cover the product with paper.
A candy car, of course, will not be of high quality without wheels.
. They need to be made of cardboard. Draw circles on it that match the proportions of the car (about 5 cm), and cut them out. It is better to use corrugated or standard cardboard in 2 folds, since the wheels must be strong.
Product design
Attach a round sweet to the center of each wheel - these will be discs. Place the caramels around them in a circle. Then attach the wheels to the foam piece in the right places. After this, start decorating the car body with rectangular-shaped candies.
Skip the places where there should be windows. Glue the side parts in the same way. If the edges of the product do not fit specific shaped candies, decorate them with small caramel. The end parts of the workpiece must be made from long candy tubes.
The candy machine is almost created, all that remains is to decorate it
. Draw or create eyes on the “windshield” using applique (like the characters from the cartoon “Cars”).
If you are creating such a present for an adult, then you can attach his image to the side glass or make a cartoon.
How to make a candy machine with your own hands is now clear in general terms, but there is one nuance. Men also love sweets, so you can choose a variety of models for them: vintage cars made from candies, fire engines made from candies, as well as trucks, BMWs, jeeps and KamAZs.
Performing a Song
Frame. Cut out two pieces from foam plastic. The size of one is 10x20 cm, the other is 10x10 cm. Cut the latter a little on one side so that there is a smooth descent. Clean the cut areas. Glue the blanks together so that the small part is on top of the large one, while moving to one edge. If you do everything correctly, you will immediately notice how the product takes on the shape of a car. Next, cover the workpiece with paper.
A candy machine, of course, cannot exist without wheels. We will make them from cardboard. Draw circles on it that match the proportions of the car (about 5-6 cm) and cut them out. It is advisable to take corrugated or regular cardboard in two folds. One way or another, the round parts must be tight.
Decoration of the product with candies. Glue a round sweet in the middle of each wheel - these will be the rims. Place the caramels around them in a circle. Next, attach the wheels to the foam blank in the right places. Now decorate the car body with rectangular-shaped candies.
Skip places where windows are expected. Cover the sides in the same way. If similar shaped sweets do not fit on the edges of the composition, decorate them with small caramels. The end sides of the machine are made of candy tubes.
Sweet machine on cardboard base
Candy machine - master class
: cut out the side parts of the car from corrugated cardboard. In order not to be mistaken in size, we first apply the prepared candies. Cut out the third part of the top of the machine. Glue all three parts together with double-sided tape or the glue of your choice.
We cover the body with corrugated paper. First, we cut out a strip and paste it over the top of the machine, bending the strip inside the machine with our hands. Then we glue the side parts.
We cut out and glue the front and side windows from golden corrugated paper. We seal the bottom of the car with cardboard covered with corrugated paper.
We make wheels. Can be made from jar lids as described above. Can be made from circles of cardboard covered with golden paper. Cut out 8 circles from cardboard. Make 8 circles of paper with a slightly larger diameter, glue the circles of cardboard, glue them together in two.
Now we cover the car with Dolci chocolates. Attach the wheels. For the front we make headlights from round chocolate candies. On the back there is a number printed on a printer. The candy machine master class is over. The sweet gift is ready.
DIY candy truck
consists of two parts: the cabin and the body. To work you will need:
We cut out blanks for the body and cabin, focusing on the size and quantity of sweets and kinders. We glue the 2 parts of the cabin together, for strength we also connect them with tape. We cover the cabin with corrugated paper. We glue the body together like a box and cover it with colored paper.
We make wheels, the truck has 6 of them. Cut out circles from cardboard and glue 3-4 circles together, depending on the thickness of the cardboard, and glue them to the car. We make a threshold near the door in the cabin. We cut out the wings from cardboard, cover them with paper, bend them and attach them above the cab wheels. We glue candy headlights to the cockpit above the wings. We carefully cover the entire car with chocolates, dropping a drop of glue on each top and bottom.
kinder surprises in the back of the truck
. The chocolate and sweets machine is ready!
DIY fire truck
The original craft can be made in the form of an applique of buttons.
Necessary materials:- Buttons in red, yellow, white and black;
- White paper or cardboard;
- PVA glue.
Print out a sketch of a fire truck on your computer or draw it by hand. Cover the wheels with black buttons and glue a yellow button in the center of the wheels. We cover the body and cabin with red buttons. The steps and stairs are white, the sirens are black.
Let the craft dry thoroughly, place it in a beautiful frame and enjoy the result.
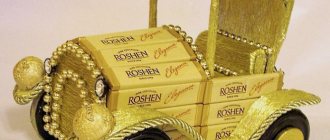
Sweet vintage car
The master class on creating a retro car from candy is somewhat more complicated in terms of making a larger number of small parts. To make such a car, you will need the following materials and equipment:
First, make the body parts out of cardboard. Use foam plastic to make the nose of the cabin and the second part for the hood. Try chocolate on them, sand them, cover them with gold paper. After this, connect all the elements of the machine.
Try on and cut out the bottom of the product, cover it with gold paper and connect the parts. Attach the net to the spout of the car and tie it with a cord. Cover the finished part with chocolate.
Then use cardboard to make ring-shaped templates for the wheels. For the sleeve, cut cylinders from foam. Decorate everything with dark fabric. Wrap all the toothpicks in gold paper. Connect the wheel rim and hubs with a toothpick, piercing them. Trim the ends of the toothpicks. After this, all that remains is to decorate the wheel along the contour with black ribbon.
Use skewers to create axes by wrapping them in paper. Attach the axle along with the wheels to the bottom of the product. Make wings with a footrest out of cardboard and put them in place, bending them as necessary.
At the end, use wire decorated with gold paper to bend 4 arches over the booth. Cut a piece from dark fabric for the roof of the workpiece. Carefully stick it on with thick tape. Then cut out 4 elements for the seats and their backs, decorate them with the same fabric and make chairs for the car interior from them.
Create the steering wheel, lever, and main glass from ordinary wire. Glue round headlight candies.
Any beginner can make a sweet car, decorating it like a real model. And if you want to give a gift to a girl who is indifferent to cars, you can make her a sewing machine from sweets.
Attention, TODAY only!
Probably no one will argue that giving and receiving gifts is very pleasant. And if the gift is made with your own hands, then it is doubly pleasant! We invite you to learn how to create memorable and desirable gifts for boys and young men - candy machines that are as easy as pie to assemble with your own hands.
Candy machine
VN:F [1.9.21_1169]
Rating: 4.3/ 5 (11 votes cast)
18.10 12:11>10k
What to give a little boy for his birthday? A simple question that may leave you stumped. Let's try to give an answer (or rather, one of the possible options) to it.
A homemade candy machine is an original, non-standard and very tasty birthday gift from the Bubuk holiday portal.
All men (even the smallest ones) love cars, and all children (even the biggest ones) love sweets. Let's combine these passions! Can at least one boy resist such beauty?
Let's start with the basics. We cut out a car frame like this from a piece of foam plastic. By the way, if you don’t have polystyrene foam, you can glue the case together from cardboard.
By the way, a candy machine is not the only craft made from sweets. There is also, for example, a camera, a sewing machine, a laptop and much more.
We make wheels from thin pieces of the same foam plastic or thick cardboard. Glue a paper backing to one side. It will turn out as shown in the figure.
Next, we proceed to decorating the candy machine made by ourselves: we cover the wheels with candies. You can choose a variety of shapes and colors. When choosing a shape, the main thing is that the entire surface of the wheel is covered. In our example, a round one was placed in the center, and 6 regular ones were glued along the edge.
Friends, we are sure that upon receiving such a gift, even an adult man will rejoice like a child.
We fasten the wheels in their proper place. Now we do the same with the rest of the body. Cover it with a layer of candy, filling the empty space. We leave the sight glasses untouched.
- All that remains is to glue or draw eyes on the windshield, like in the cartoon Cars.
- Don’t forget to add a postcard and Happy Birthday greetings to such a wonderful gift as a candy machine.
Source: https://boobooka.com/den-rozhdeniya/dr-handmade/mashinka-iz-konfet/
How to assemble original candy machines with your own hands in a step-by-step tutorial
To create a sweet machine you will need:
If you decide to use foam plastic as a base, then you can make it without preliminary calculations, “by eye.” Cut a shape from an existing piece of foam that resembles a car body, like this:
If you don't have a thick enough piece of foam, you can glue together several existing small pieces to get a piece of the desired size.
If you decide to make your own candy machine based on a cardboard design, you will have to arm yourself with a ruler and a pencil and perform some preliminary calculations. So, we draw two identical rectangles that will become the sides of the car, for example measuring 35*10 cm. After this, we can draw the front and back parts of the car - they can be, for example, squares measuring 10*10 cm. Now all that remains is to draw the bottom and the hood of the future car will be rectangles, 10 cm wide and 35 and 20 cm long, respectively. We cut out the resulting parts and glue them together using hot glue. The result should be a “box” base, which is perfectly illustrated by this step-by-step photo:
Once the foam or cardboard frame of the future car is ready, you can begin decorating it. Here you can give free rein to your imagination! Choose the color and texture of paper to your taste and cover the car body with it. We recommend using corrugated paper, especially when working with a foam base, as it better hides unevenness and blemishes due to its slightly crinkled texture. To make the paper fit better on the frame, you should spread glue over its entire surface and press it tightly with your fingers to the base, paying special attention to the corners of the figure.
In addition to pasting with colored paper, the base of the car can be decorated with various details - cut out of colored cardboard and glued “glasses”, draw funny “airbrushing” on the sides of the car, or you can draw eyes on the windshield, like those of the characters in the cartoon “Cars” . Candy retro cars with folding soft roofs look very interesting. To make such a roof, you can use several pieces of wire, as well as fabric or regular colored paper.
Unusual candy cakes master classes!
Not long ago we talked about how to make bouquets of sweets with your own hands. But it turns out that you can make amazing compositions that will become wonderful sweet gifts for your loved ones and will delight the eye.
Compositions made from sweets are suitable for any festive occasion and will appeal to everyone: women, children, and men. We offer you several master classes on making the most popular compositions from sweets with your own hands. Once you know the basics, you can get a little creative and come up with your own compositions .
DIY candy basket
A basket of candies is one of the simplest candy compositions that can be easily made using a paper base. To make a neat basket, they usually use candies in the form of long sticks .
- To work you will need:
- - Candies
- – Loose colored cardboard
- - Paper
- - Double sided tape
- - Glue
- - Scissors
Let's get started:
Bend the tails of long chocolates , gluing them to the sides using double-sided tape.
2) For the basket you will need a cardboard base, which you can make yourself, or use a ready-made one. Measure the height of the candy and measure out a rectangle on a sheet of cardboard with a width corresponding to the height of the candy, and a length depending on the size of your future basket.
Staple a piece of paper into a cylinder and secure the edges with a stapler. For 300 grams of sweets you get a basket with a diameter of 7-8 centimeters .
3) You need to glue a round bottom . To do this, you can use a circle of loose paper, folding the edges and gluing them with glue on the outside. a circle of cardboard onto loose paper that corresponds to the diameter of the bottom of the cylinder.
4) Apply strips of double-sided tape to the top and bottom of the outside of the cylinder.
5) Then start attaching the candies .
6) You should end up with a simple basket :
7) As an addition, decorate the basket with a bow by tying a row of candies. The basket is ready. Now you can put other candies in it or make several flowers from corrugated paper .
Laptop made from candy
This original candy gift can be used as the basis for many other compositions. A laptop can easily be made from a candy box , which is decorated with candies on the outside.
The box should have an opening and closing lid that will serve as a “monitor” for the composition laptop.
If you don't have a suitable box, the base of the product can be made from a piece of foam.
- To work you will need:
- – Candies (flat and rectangular)
- – Foam plastic (thickness – 2 cm)
- – Shiny paper
- – Printed page showing the Windows splash screen
- - Scotch
- - Glue
- – Paper knife
- - Pen
- – Thick wire
- - Scissors
- Let's get started:
- 1) Lay out flat candies to get the outline of the future laptop and trace the outline with a pen.
two identical rectangles from foam along the contour , then wrap each of them in shiny paper or foil. These will be the main parts of the laptop - the monitor and keyboard.
- 3) Take the first blank and glue a printout with a computer screensaver in the center of it.
- 4) Place flat long candies on all sides of the picture.
- 5) Lay out the candies and glue them to the second blank, which will be the keyboard . For example, this is how you can use taller rectangular candies to get keys:
- 6) Glue the candies to the outside of the laptop .
7) Cover the sides of the blanks , then only on three sides. You will need the fourth side of each of them for fastening. To do this, use a thick wire, inserting it into the end of the monitor .
 Bend the wire to the desired angle and insert the other end into the keyboard blank. To connect it to the monitor.
- 9) You will end up with an open laptop.
- Here are a few more options for a laptop made from candy , which will be an excellent gift for your beloved men with a sweet tooth:
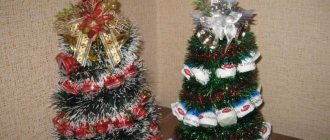
- DIY candy tree
Very popular gifts for any special occasion are candy trees . There are several ways to make them, but the principle is the same: a round base, a leg and a pot.
Option 1:
This version of a candy tree is the simplest. It will take you no more than an hour . A variety of trees can be made from this product. It all depends on your imagination.
- To work you will need:
- – Candies of various shapes (about 50 pieces)
- – Old newspapers
- – Wooden stick for the trunk
- – Threads
- – Glass or vase
- - Glue
– Foil
– Decorations (ribbons, colored paper)
- - Scissors
- Let's get started:
1) Make a small ball of the desired diameter and wrap it with thread so that it does not unfold. Stick a wooden stick at the bottom, which will serve as the trunk of your tree.
2) Stick the lower end of the stick into a glass or vase and somehow strengthen it so that the trunk does not tilt. For example, you can fill a vase with the same newspapers or use a piece of foam. The base for your tree is ready.
3) Make sure that the trunk stands tightly in the vase and does not fall when you decorate your tree with candies and other details. Start by attaching the candies. They can be glued using a glue gun. It is better to use candies with a flat bottom , then it will be easy for you to unwrap them directly on the tree and eat them.
- As a basis for the trees, you can take other, more professional materials, for example, a foam ball and a plastic stick , which can be found in specialized craft stores:
- As a base, you can use liquid gypsum , which, when hardened, will tightly hold the trunk.
- Working with gypsum will take a little longer, although the resulting wood will be more stable and reliable .
- Option 2:
Original trees can be made from Chupa Chups candies or other candies on sticks . Moreover, these will not be simple candy trees: each such mini-tree will represent one candy .
- To work you will need:
- – Candy on sticks
- – Mastic (edible plasticine)
- – Sprinkles for cakes of different colors
- – Thimbles
- – Decorations for pots
- – Gypsum or hardening plastic
- – Water
- Let's get started:
1) Insert the lollipop into the thimble and secure it with plaster of Paris or any other material that works (such as clay or salt dough). Allow the base to harden.
- 2) Having unwrapped the candy, wrap it in fondant and form a ball of the correct shape.
- 3) After wetting it with water, place the candy in a container with sprinkles and roll it around so that the small particles stick to the tree .
4) Decorate the thimble with ribbons or wrap it in foil . Your candy tree is ready.
- In a similar way, you can make a large tree out of round chewing gum.
- Candy tree (master classes):
- DIY candy cake
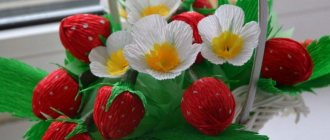
A candy cake is an original gift for a birthday or other holiday, as well as a beautiful craft that is easy to make. The composition is decorated with candy flowers , which can be made from corrugated paper. You can read more about candy flowers here.
- To work you will need:
- - Candies
- – Corrugated paper
- - Styrofoam
- – Ribbons for decoration
- - Glue
- - Cardboard box
- - Scissors
- Let's get started:
1) Cut out cake blanks from thick sheets of foam plastic: one larger, the other smaller. The size of the “cakes” will depend on you. Cover the blanks with corrugated paper , leaving beautiful edges on top.
- 2) Also cover a cardboard box with , which you will place on the top level and in which you can put small gifts and toys.
- 3) Cover the top of the foam blanks with the same paper and place all the levels on top of each other , securing them well.
This is the basis for your future cake. Now you can decorate it with candies. For example, you can place candy flowers and bouquets on top of it, or cover the sides with candies by placing sweets on glue or double-sided tape.
This composition can be made from the same foam base, cutting it in the shape of a triangle. You will get a piece of candy cake .
- One-story candy cake made of long and round candies and paper flowers:
This original cake is made from broken Kitkat chocolate bars and topped with M&M's. Not a bad idea for a children's party or birthday . The chocolate bars were probably used without a base and were held together with tape.
- Candy grapes master class
A bunch of grapes made from sweets is an excellent and very original gift for those with a sweet tooth. It can be used as a separate gift, or used to decorate any composition: cake, bouquet, and so on.
- Option 1:
- To work you will need:
- – Round candies in wrapper
- – Wire for bouquets
- - Scotch
– Details for decoration – leaves, ribbons, ladybugs, etc.
- Scissors
Let's get started:
1) Make blanks for the bunch. attach a wire to each candy using tape .
2) Then collect several candies (5-6 pieces) together and secure with ribbon or tape. For example, you can use colored tape that matches the color of the wrapper, then the fasteners will not be visible.
- 3) Make several small bunches , which you will then attach to thicker wire.
- 4) When the whole bunch is ready, decorate it with leaves, ribbons and other decorations .
- Using these bunches you can decorate a gift bottle of wine :
- Option 2:
Another option for making candy grapes involves using toothpicks and a piece of foam . Such a bunch is also not that difficult to make.
- To work you will need:
- – Round candies with a flat bottom in a wrapper
- – Toothpicks
- - Wrapping
- - Styrofoam
- – Floral organza
- – Glue gun
– Scotch green
– Details for decoration – leaves, ribbons, etc.
- - Scissors
- Let's get started:
- 1) Wrap each candy in wrapping paper and attach a toothpick to it.
- 2) Wrap the toothpick at the base of the candy with green tape .
- 3) Cut out the base for the bunch and start sticking candies into it one at a time.
- 4) Cut a square with rounded corners and attach it to a toothpick using colored tape. Make a lot of these
- 5) Insert organza toothpicks between the candies to hide the foam base .
- 6) Wrap two long wooden skewers with green tape along the entire length.
- 7) Insert the skewers into the base of the bunch and secure them with glue so that they do not fall out.
- Decorate the bunch with artificial leaves and green organza .
- Candy gift for men: candy steering wheel
The steering wheel is an original gift for a male driver who also has a sweet tooth. It's very easy to make using a sheet of foam or cardboard.
- To work you will need:
- – Flat-bottomed candies
- – Glue or double tape
- – Cardboard
- - Pencil
- – Dark paint for cardboard
- - Scissors
- Let's get started:
1) Cut out a blank from cardboard for the base for the future steering wheel , drawing the outlines in advance using a pencil. To make the steering wheel even, use templates in the form of plates or other round materials at hand. You can use a compass.
- 2) Paint the steering wheel with dark paint .
- 3) Cover the steering wheel with candies.
- 4) You can decorate it with the logo of your favorite car brand .
- Steering wheel made from candies master class:
- Knowing the basics of candy compositions, you can come up with your own gifts for family and friends. Here are some examples of original candy compositions:
DIY candy gifts (photo): Denisova N. Yu.
https://www.infoniac.ru/news/Podarki-i-kompozicii-iz-konfet-kollekciya-master-klassov.html
Source: https://subscribe.ru/group/rossiya-evropa-amerika-dalee-vezde/10062454/
Foam letter decoration
First of all, be sure to wait for the glue to dry completely. When designing letters you need to show imagination and creative talent. Many items are suitable as a headset, here are some examples:
When the decorative components are thought out, selected and prepared, you can begin the second stage of work. Start carefully gluing the base from the sides and gradually move to the front parts. The process is quite long, but fascinating and the result will definitely please you and impress your friends. And, of course, not a single guest of the event will be able to pass by and will definitely want to take a photo against such a beautiful background!
How to make letters from foam plastic original
Any decorated foam products look especially impressive. But they will look even more original if you make a winding of multi-colored threads. The density, evenness and accuracy of laying the layers will play a very important role.
Letters covered with colored self-adhesive film or special shiny tape for decorations look unusual and beautiful. These components can be found at handmade and craft stores.
Glowing foam letters
Foam molds with multi-colored light bulbs will look especially impressive. The process of their manufacture is identical to that described above, except that for decoration you will need a Christmas tree garland or a strip with LEDs, which is much more convenient to work with and it looks more beautiful.
The luminous elements need to be attached along the contour of the base using tape, which is masked on top with other elements (ribbons, sparkles, etc.). It is recommended to use individual backlighting for each letter, so that if there are problems with the wiring, all of them will not go out at once and you won’t have to spend a long time looking for the cause of the problem in the entire system.
We make wheels for a car in a detailed DIY master class
You can make four wheels for the car, or you can make five - in this case, one of them will need to be mounted on the back wall of the body of our candy car. We take the lids for the jars and carefully glue them together with hot glue in pairs so that we end up with small flat cylinders. We cover the resulting wheels with black paper. To achieve greater realism, we make rims for the wheels - we cut out small circles from cardboard, with a diameter slightly smaller than the diameter of the covers, cover them with colored paper (silver or gold) and attach them to the sides of the car. If you wish, you can print a picture of a real disk on a color printer and use this more realistic option instead of a colored cardboard circle.
In order to glue candies to the car frame, it is best to use double-sided tape - this way they will stick better, will not lose their appearance and will be easy to remove. Under no circumstances should you try to secure sweets with hot glue - the chocolate will melt and the candy wrappers will become sticky and unpleasant to the touch. It is also better not to use liquid adhesives - they can soak through the wrapper. However, the tape will not adhere well to every surface. From crepe paper, for example, it will most likely fall off. In this case, you will still have to use glue and be especially careful. The glue should be chosen carefully; you should not skimp on it. A good option is the Titan brand. You can choose any sweets.
Candy machine for men
A candy car is a wonderful gift that is easy to make. First you need to make a base for the machine from candy. The master class begins with the selection of material for the base. If you take foam plastic as a base, then you can create it without complex calculations. Cut one piece of foam into a shape that resembles the body of a car.
If you do not have a huge piece of foam, you need to glue a couple of small pieces together to make a part of the required size. If you're going to build your own car using cardboard, you'll need to grab a ruler and pencil to make some important calculations. So, draw 2 identical rectangles, they will be the sides of the car with dimensions of thirty-five by ten centimeters.
Next, you need to depict the front and back parts of the machine; they can be, for example, squares measuring ten by ten centimeters. After this, you need to draw the bottom and hood of your car - these will be rectangles, ten centimeters wide and thirty-five and twenty centimeters long. Next, start cutting out the created parts and glue them together. The end result should be a base box.
After creating the frame, you can move on to the decor. Here you need to give freedom to your imagination! Choose any shade and texture of paper and cover the body of the machine with it. To ensure that the paper fits well on the frame, you should spread glue over the entire surface and press it firmly to the base with your hand, paying special attention to the corners of the figure.
You can also decorate the base of the car with other elements , for example, you can cut out parts from multi-colored material and glue “glasses”, or make fun “airbrushing” on the sides of the car. Vintage candy cars with folding roofs look very nice. To make such a roof, you can use a couple of pieces of wire, as well as fabric or simple multi-colored paper.
Now you need to complete the second stage to create wheels for the car. You can make 4 wheels for a car, but in this option one of them will have to be mounted on the back wall of the car body. First, take the lids for the jars and carefully glue them together in pairs with glue so that small cylinders come out at the end. Cover the created wheels with black cardboard.
To add realism, make rims for wheels and cut out small circles from paper, with a diameter slightly smaller than the diameter of the lids, cover them with multi-colored paper (golden) and attach them to the sides of the car.
You can also make a picture with an image of a disk on a simple printer and use this more beautiful option instead of a circle of multi-colored cardboard. The last step is to glue the candies to the base.
In order to attach the candies to the frame of the car, you should use thick tape . Thanks to the adhesive tape, they will stick perfectly, will not lose their beauty and can be quickly removed. You should not try to secure the candies with special glue - the chocolate will begin to melt and the candy wrappers will become sticky. This is how easy it is to make a candy machine with your own hands.
You can also try to make a BMW, Jeep or KamAZ in the same way. It would be much more difficult to make a sewing machine or a candy machine, but that's another story.
Tasty Automotive
The first master class will teach you how to make a car on a cardboard base as a gift. Depending on the color scheme, this retro car will please a gentleman or lady.
To make a car you will need:
A description of the manufacturing process and step-by-step photos will help you cope with this task.
Make rectangular body blanks from thick cardboard: 2 side parts 26*7.5 cm, 1 rear 14*7.5 cm, 1 front 8*7.5 cm.
Cover the elements with crepe paper on one side.
Assemble the body blank from the parts.
Trace the resulting box on a new sheet of cardboard along the contour - this will form the bottom of the car. Cut with a small margin.
Place crepe paper on one side of the bottom.
Connect the bottom and walls of the body using a heat gun, and then cover it in a circle with paper.
Glue paper to the bottom.
Using the internal dimensions of the car, measure the foam to create the bottom of the cabin, up to 9 cm in length, then cut a rectangular piece of cardboard to size for the partition. Cover the parts with paper.
Cut out the hood part, cover it with paper and tie it to the body using ribbons. This will ensure it opens freely to place candies.
Use a hot-melt gun to glue the chocolate onto the hood.
From metal covers glued in pairs, decorated with paper, you get car wheels.
We attach the wheels to the car and make sills from rectangular pieces of cardboard.
Then we cut out the wings from cardboard, cover them with gold-colored paper, and twist them slightly to give them a semicircular shape. Glue it to the car.
We measure the wire according to the size of the cabin, wrap it in paper, bend the frame of the hood from it, then cover it with fabric.
We glue in the steering wheel, seats, and decorate the wheels with chocolate coins.
We fix the bouquet on the hood with a ribbon.
Assembly sequence
The mini chocolates used are 7.5 x 1.5 cm in size, so use the numbers above as a guide when creating your base. Cut out two identical rectangles that will become the sides of the car.
To cut out three parts for the middle of the car, it is better to use cardboard with an internal fold. The main criterion when cutting will be . Connect the resulting parts together with double-sided tape.
Cut a pink strip from corrugated cardboard. Determine the length and width of the strip by the size of the machine. Glue to the surface so that a slight fold is formed. Cut out the parts for the sidewalls and glue them onto the car blank. Cut out a part for the front glass from golden corrugated cardboard. Cut out and glue 4 windows from the same cardboard.
It's time to start gluing. To do this, you can use a heat gun or double-sided tape. Please note that the inscriptions should not be located in the same direction.
Using a compass, draw 8 circles that will later become the wheels of the candy work of art. Cut out larger circles from golden cardstock to make a hem. Glue the paper to the cardboard and glue the two circles together.
Glue round candy headlights on the front.
From various sweets
To form sweet machines, square crackers or biscuits, round cookies, marshmallows, marshmallows, waffles, marmalade, toothpicks of different sizes, including canape sticks are ideal. The main thing is to form a stable frame. For wheels, double round chocolate chip cookies or round chocolate candies are suitable. Canapé sticks are inserted between them. You can put biscuits on top of the sticks. The most convenient way to form a cabin is with waffles.
Now you need to decorate the car.
Marmalade can serve as headlights, and marshmallows or a round candy can serve as steering wheels.
For the driver of our car, a sweet in the shape of an animal, for example, a gummy bear, may be suitable.
Sweet gift - a candy machine. Material preparation stage
- a piece of foam plastic 5-6 cm thick;
- thick cardboard;
- White paper;
- glue;
- heat gun;
- compass;
- sandpaper;
- candies.
You will need several types of sweets: small “Eclair” caramels, rectangular ones like “Cow” or “Chamomile”, round ones like “Golden Lily”, long ones like “Ice stick” or “Conafetto”. Of course, your candy machine can be made from other sweets. The main thing is that their shape and size correspond to those indicated in the master class.
For boys
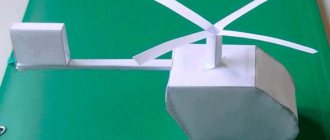
The second master class will tell you how to prepare a gift for a child from a foam-based machine. Any boy would be pleased to receive such a gift.
Progress
Step-by-step description of making a surprise for a young car enthusiast.
Cut out the blank of the future car and 4 wheels from foam plastic. Make cuts in the body blank for the wheels.
Cover the wheels with paper depicting tires and hubcaps, and the bottom of the car with decorative paper.
Using white shiny paper, create an imitation of glass, and stick mischievous eyes on the windshield.
Cover the car with candies, and glue a spoiler on the back of two candies, which will consist of a cardboard blank decorated with shiny paper.
Cover the windshield with decorative cord around the perimeter and tie a bow to match the product.
A chidhood dream
It is difficult to say exactly when such handicraft appeared. Of course, not much works the first time. You need to have experience by practicing working with paper, cardboard and glue. The car will appeal not only to boys and men, but even to girls. Because the craft from today’s lesson is very reminiscent of a carriage for a real princess.
So, let's move on to MK. Bring inspiration, invite your muse, and purchase materials.
This is such a beautiful machine. It’s easy to do, and then it’s a joy to look at the craft.