Quickly and from scrap materials.
Let’s not argue about the benefits of order and trust the wisdom and experience of people of different eras and generations:
It is necessary to restore order while there is still no turmoil. - Lao Tzu
Order saves time. – Johann Goethe
Order frees thought. – S.P. Korolev
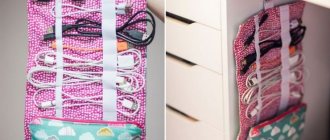
It is impossible to put everything in order, let's start with ourselves. Many of us spend most of the day at our desk with a bunch of necessary and unnecessary junk. We are literally entangled in wires, chargers, adapters and other electronics. Why not organize it all?
To solve the problem, I suggest making a simple organizer. Each of the available means can do it. You may have to buy something extra, but spending a penny is not comparable to the benefits that our product will bring.
The basis
1. First you need to decide on the size of the future organizer. I recommend making it so that it fits easily in a drawer or on a specific shelf.
We are looking for a place for the future organizer, measuring the length and width of the space.
2. Now we need a base that will fit in the allotted space without any problems. As a frame, you can use a board, a very thick piece of cardboard, chipboard/kragis/plywood. A metal plate or plexiglass will do; you can use a DVD box or an old vinyl record (cutting a square out of it) as a base.
There is only one condition for the base - it must ensure the rigidity of the structure and not bend. For example, I found a suitable piece of galvanized steel in the pantry.
3. To make the finished product look beautiful, I covered it with black tape (to match the color of the rubber bands used). Those who are not interested in the aesthetic appearance of the organizer can skip this step.
Be careful, low battery!
Modern phone models hold less and less charge. And the point is not that batteries are getting worse. On the contrary, progress keeps pace with the times, lagging behind just a little. It’s just that now the telephone occupies a much larger place in a person’s life than just a dialer.
Now the phone combines the functions of a player, messenger, mailbox and much more. This is not counting social networks, which actively eat up the treasured charging percentages.
All this leads to the fact that the gadget needs to be charged more often. The charge received by your phone at home is not always enough for the whole day. Sometimes you have to connect to an outlet in completely unexpected places: cafes, university classrooms, at work, and even to common plugs in shopping centers.
Rubber
4. Most likely, you won’t have the required amount of elastic at home; you’ll have to go to a fabric store to get it.
There you can choose a ribbon of any color and width. Calculating the required length is very simple:
- divide the length of the base by the width of the tape - we get the number of vertical stripes (we take into account only whole stripes);
- multiply the number of stripes by the width of the base and multiply the resulting length by two (the stripes will encircle the frame on both sides);
- Now we similarly divide the width of the base by the width of the tape - we get the number of horizontal stripes (we take into account only whole stripes);
- multiply the number of stripes by the length of the base and multiply the resulting length by two (the stripes will encircle the frame on both sides);
- we add the two numbers that were obtained in the second and fourth steps and get the required length of the tape.
5. Now the elastic band needs to be cut into strips (vertical and horizontal). We have already counted the number of stripes, the length of the vertical ones is equal to twice the width of the base, and the length of the horizontal ones is twice the length of the base. In other words, each strip should encircle the frame without overlapping.
6. The most painstaking process is sewing rings from strips. Pre-singe the edges of the tape on the fire and you can start making rings.
We make a small overlap of 3-4 mm. and sew the ribbon together with a ring. You can ask your wife for help, especially if she has the skills to operate a sewing machine.
Original Apple Watch charging stand
I am also a lover of Apple products, and therefore I constantly use Apple Watch and iPhone. I just needed to make some kind of original stand for my equipment. So I decided to make it from black walnut and thermoplastic polymer.
I'll tell you exactly how I made it.
Step 1: Cut pieces to size
I cut the walnut lumber on a band saw. Then I did the same with plastic, but on a cutting machine with a table. Why did I decide to use these particular materials? Because I wanted a “multi-layer” base that combines wood, plastic and, again, a black walnut top.
This is the “sandwich” made from “raw” materials
Step 2: Cut out the phone slot
To cut out the slot to install my phone, I decided to use a jigsaw, setting it at 18 degrees beforehand. And thanks to the sharp teeth I smoothed out the edges.
Now the phone can be placed in the slot, but it’s still too early to charge
Step 3. Finish working with the database
By cutting a 15 degree bevel at the front, as well as a recess at the bottom, I not only made the charging station look nicer, but also provided a place to mount the LEDs at the bottom.
This is what the station looks like after creating a bevel in front
Step 4: Create a watch stand
Using heat resistant plastic, I decided to cut a crescent moon out of it. Using a Forstner drill bit I then drilled out a circle on the face of the plastic. There will be a place to install the magnetic charger for the Apple Watch.
Once I made the cut in the front of the cable holder, I used superglue to secure everything in place.
The watch stand is ready: all that remains is to decorate it
Step 5: Using Varnish
After gluing the magnet and charger holder to the dock, I simply applied three coats of varnish. So that it is beautiful.
The varnishing process is quite simple
Wood varnish
Step 7: Lighting the Base
The last step before starting to use it was to install white LEDs at the bottom of the base (see step 3) so that when the charging station is turned on, the plastic glows.
The backlight further decorates the device
Step 6. Ready to go
Overall, this dock looks great after all the work. The phone and watch fit perfectly into place and are immediately apparent by clicking or activating the display while charging.
This is how I got the docking station
Such a charging station, in my opinion, looks no worse than ready-made options that can be purchased in a store. Charging my iPhone and Apple Watch is now easier.
Weaving
7. When all the elastic rings are ready, we begin to put them on the base.
First we put on all the vertical stripes. 8. Now we begin to put on the horizontal ones one by one. They need to not just be put on top, but threaded through one vertical one.
Each subsequent strip is threaded in a checkerboard pattern.
9. The result is a beautiful checkered organizer.
Charging station made of plywood
I've been missing a simple stand for my phone for a long time, so I decided to make something myself. A limited amount of materials and the presence of good friends who helped me with production allowed me to make a simple charging stand.
Step 1. Cutting the material with a laser cutter
I asked a friend to cut out all the details for me from the material I provided (wood 64 cm long). I gave him a file with diagrams of each part and he cut them out for me.
I then took all the prepared pieces and secured the pieces with wood glue. I haven’t installed the small sides yet - I’ll still have to climb inside.
The laser cutter is the most important tool in the entire job.
Step 2. Blocks for greater stand strength
Using small pieces of wood, I made small blocks, then installed them inside the structure and glued them together. According to my idea, they will not only become a support for the corners, but will also help raise the back panel, which serves as a stand for the phone.
Blocks are the main thing that will need to be installed inside
Step 3. Small walls
Now that I have installed the blocks inside, I can trace one of the sides. The other one should be left open. Why? This will make it easier to access the charging cable if it slips out of place and ends up inside the box.
One of the sides must be closed
wood glue
Step 4: Install the plate at the back
The last step is to install the back panel into the large cut out slot at the top. The support from below will be the blocks located inside.
When I was done, all I had to do was insert the cable and place the phone. Now it can be charged. Simplicity of assembly and ease of use makes my stand a rather interesting budget option. This way I can protect the cord from wear and tear, and it’s easier to charge my phone this way.
This is how the docking station turned out
Modern charging stations combine not only a pleasant appearance, but also very good functionality. Simple for wired charging and cool for wireless charging - they are all equally useful. And it’s especially great that you can make them yourself.
Fill in
This product can be filled with any small items stored in the table. Place wires, adapters, batteries, memory cards and flash drives, chargers and headphones in the organizer.
All the elastic bands stay in place quite confidently, but you can additionally stitch them around the perimeter. This process is quite painstaking; I would not recommend starting it right away.
While the elastic bands are not sewn on, you can try to change the shape of the organizer so that not only small objects, but also large ones fit into it.
To do this, in a certain place when weaving the elastic, we skip the required number of intersecting rings. The size of such loops is determined by the dimensions of the device that we will carry in the organizer.
A few days later, when the final weaving pattern has been approved, you can sew elastic bands around the perimeter or glue them with Moment glue. If the organizer will not be used in the most active way, you do not need to stitch or glue the elastic bands.
Help
There are devices that help you charge your phone anywhere. Portable batteries are cheap, but they also need to be recharged and carry a bunch of wires.
It is much more convenient to have a special holder on hand that is attached to the outlet. He holds the phone and helps to carefully remove the cord so that no one else will trip over it.
Moreover, you can now charge your phone in any room, even if there are no tables there! This is very convenient, considering that such a holder is easy to make yourself.
Bonus
Our organizer can be stored not only in a desk drawer, it will perfectly cope with its functions on the road or travel. Determine the size of the product in advance so that it can then be placed in a bag or backpack.
This is how we stretched our hands in an hour, amused our wife and children by involving them in making the organizer, and added a little order to our daily lives. When family members see the finished product, they will definitely want one for themselves.
( 3 votes, overall rating: 5.00 out of 5)