How to make a super simple toothbrush holder and clean your bathroom sink. If your bathroom doesn't have enough space, even something as small as a toothbrush can feel like it's taking up a lot of space. Hanging a toothbrush holder on the wall helps clear up space, or you can hang it inside a cabinet to hide your brushes from view.
Photographer and Instructables user Andrea Biffi used one mini pack of Sugru to make a really simple wall-mounted toothbrush holder. All you have to do is roll Sugru into a cylinder, then press your toothbrushes into it and stick it to a vertical surface to dry. Be sure to wet the handle of your toothbrushes first, otherwise they may stick to the Sugru and become a useless decoration.
Products for inventors Link to the store.
Source: wonderhowto.com/
Necessary materials
To make such convenient cups for the bathroom, I needed to prepare the following materials:
- A piece of wood (you can choose the size yourself depending on how many cups you need).
- Glass Mason jars. I used 3 pieces (one for each of my babies). Here you can also proceed from your own needs.
- Clamps - one for each jar.
- Drill.
- Screws.
- Metal rings.
- Screwdriver.
- Paint. You can also use stain.
- Sandpaper.
- Wax paper.
Preparatory stage
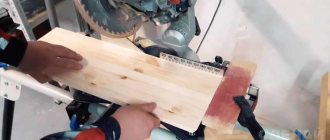
I was lucky that I already had a piece of wood in my garage that looked pretty good. I marked it according to the required dimensions, and then my husband sawed off the required part. This gave me a nice wooden base for my cups.
Style standard for women over 50: what Irina Ponarovskaya wears at 68 years old
In the USA, a dog stole a car and crashed it into a building (no one was hurt)
MAI student designs a capsule for two for space research
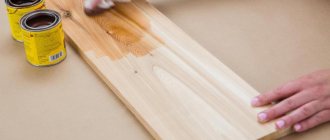
I decided to paint the wood white and then lightly sand the board. I wanted the base to look a little worn. I waited for the paint to dry. Then I went over the board with sandpaper.
I also decided to add a little accent to the wood using a wax paper transfer technique. I had to spend quite some time printing my chosen image onto the wax paper because it was stuck in the printer and wouldn't come out.
First I wrote Brush in a font I liked. I then stamped the mirror image onto wax paper. I knew it was too thin to fit through the printer properly, so I glued it on top of a regular sheet of paper. The problem was that the printer struggled to grip the slippery wax paper, causing it to tear and wrinkle. But in the end everything worked out for me.
May cause damage: danger of magnets on refrigerators
Don’t “eat up” your problems with food: 10 ways to achieve intuitive eating
Stylists advise real men to take a closer look at a crew-neck jumper
Then, carefully, without touching the ink, I placed a piece of wax paper face down on the wood and taped it in place.
Using a blunt object, I rubbed the image. At the same time, it was imprinted on the tree. So a unique inscription appeared on my board, which significantly improved its appearance.
How to make it yourself
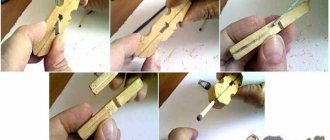
First you need to take an ordinary brush and wrap its head with foil. This will prevent various debris from getting on the bristles and protect them from various types of mechanical damage. Then, using a hacksaw, you need to make cuts on the brush handle (top and bottom). At the top of the handle there will be a vibration motor, and at the bottom there will be a battery that powers it.
It is worth noting that the cut points on the handle for installing the battery and motor need to be properly deepened using a drill. In this case, it is recommended to carry out deepening work at low speeds so as not to damage the brush handle. In the middle of the handle you need to make through holes for installing wires and a small recess for subsequent installation of a switch or toggle switch.
The next step is to carefully solder the wires to the vibration motor and thread them through the brush handle. Then the vibration motor itself is installed in the corresponding recess, and then it is glued to the surface of the handle with a glue gun.
The next step is to bring the wire through the middle plane of the handle and solder it directly to the switch itself. Then the switch, like the vibration motor, is installed in its pre-made seat and glued with a glue gun.
At the final stage of creating an electric toothbrush, you need to connect the wires directly to the battery, and then glue all parts of the brush together. Immediately before final assembly, it is recommended to check the electric brush mechanism for its operation and serviceability.
Board design
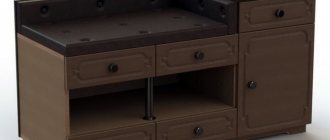
Before adding the clips, I attached a D-ring to the back of my board so it could be safely hung on the wall.
Next, I started making the most difficult part - the clamps for the cans. They may seem easy to attach since you only need a drill and screws. However, this was truly no easy task. I had to call my husband for help. Things moved quickly with him. We evenly distributed and screwed the clamps.
There are carvings on the top of the Mason jars. Therefore, they adhere perfectly to such a metal ring. I just then tightened the clamps around the cans tighter with a screwdriver. All I have to do is attach everything to the wall and put toothbrushes, toothpaste and other little things my kids use in jars.
Required materials and tools
Before you start making a homemade electric toothbrush, you need to stock up on all the materials necessary for this in advance. Components and tools. It is worth noting that to manufacture such a device you will not have to purchase expensive equipment or consumables.
To make an electric toothbrush at home, you need to take care of the following in advance:
- soldering iron;
- electric drills;
- hacksaws (you will need a hacksaw directly for metal);
- glue gun;
- foil (food);
- vibration motor (in this case, you can use a vibration motor from an old or broken smartphone);
- toothbrush (it is advisable to purchase a brush with a wide handle);
- batteries.
In addition, when making an electric brush, you will need a small number of wires, as well as a small switch or toggle switch that would interrupt the power supply circuit of the motor. It is worth noting that an electric brush made from improvised materials will reduce the daily cost of toothpaste, and will also more effectively remove plaque that appears on the surface of the teeth.
Bathroom organization
As a result of all the effort, my bathroom has become much more functional. Now, after using the morning toilet, my children put their toothbrushes in their own cups, where they also store some other small items for washing. Therefore, I do not regret at all that I spent a little time and money on making such a convenient structure for storing things in the bathroom. The important thing is that, if necessary, the jars can be removed from the metal rings, washed and dried.
Found a violation? Report content
Using brushes inappropriately
The main purpose of used old brushes prepared for disposal is to clean various surfaces. The toothbrush is used:
- For washing dishes with a narrow neck, where a brush cannot fit.
- For washing small parts of appliances that cannot be reached with a rag or sponge (coffee grinders, teapots).
- For cleaning small hands on the gas stove, kitchen furniture and their internal surfaces.
- For cleaning ribbed surfaces.
- For cleaning strainers in juicers, colanders, tea strainers, etc.
- When cleaning soft parts (headphone membranes, phone speakers) from dust and dirt.
- For removing red deposits from taps and shower heads.
- A dry old brush can easily remove dust from the computer keyboard, especially the spaces between the keys, where not only dust, but also food crumbs settle.
- Two old toothbrushes are connected at the bottom with tape with their heads facing each other. This device cleans blinds and bicycle chains from dirt, passing along the surfaces on both sides simultaneously.
- The bristles easily remove dirt from the mosquito net. The mesh is placed in the bathtub, the shower is drained, and detergent is applied to the bristles. Wash its surface and corners from dust, dirt, and stuck insects.
- To remove urinary stone deposits, limescale and germs under the toilet rim, heat the plastic handle of the brush with a gas lighter and bend it.
- The bristles remove heels from carpets and upholstered furniture in combination with stain removers.
- Soft bristles with a drop of detergent will easily remove fresh stains from clothing.
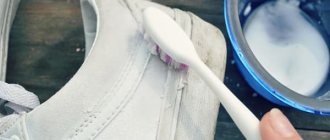
- When cleaning the white soles of sneakers. Toothpaste is squeezed onto the brush, applied to the dirty side and sole surfaces of the shoes and cleaned. Then rinse with water and wipe dry.
- The bristles easily clean the surface of the corn from hairs or skins on new potatoes.
- Cleaning surfaces of jewelry and costume jewelry. Place gold and silver jewelry in a container with a drop of detergent and 1.2 drops of ammonia. Leave for 20-30 minutes. Then rinse under running water and clean the surfaces with a toothbrush.
- Fine bristles are indispensable when cleaning an aquarium, especially if there are models of sunken ships and castles there.
Attention!
The bristles of the brush do not scratch surfaces, so you can use it without fear for cleaning.
For beauty
Old toothbrushes are used for beauty purposes. This:
- Applying hair dye when coloring at home.
- Applying care products to hair.
- Eyebrow tinting and gel application so that the hairs do not stand out from the general row.
- Removing a clump of mascara from eyelashes.
- Applying castor oil to the eyebrows and eyelashes, which is beneficial for growth and contains vitamins.
- Light facial scrub. Before the procedure, the brush is washed, for example, in a chlorhexidine solution. A scrubbing composition is applied to the steamed face and gently massaged with bristles. Next, wash your face and apply nourishing cream.
- Lip massage.
- Cleaning your nails after working in the garden. To do this, prepare a solution from several crystals of citric acid and 1 tsp. water. The bristles are dipped into the solution and cleaned. You can also clean your heels in the same way.