4.8/5 — (20 votes)
Hello everyone! Well, it’s completely unnoticed, but winter is already in full swing, and the main thing is that there will soon be a large number of January holidays. What are you going to do these days? Perhaps some of you will have a lot of rest, some will do various kinds of crafts, do household chores, and some will visit friends and give them New Year's gifts and surprises made with their own hands.
Today, this post will be dedicated to exactly what you can give to your loved ones, parents, and friends.
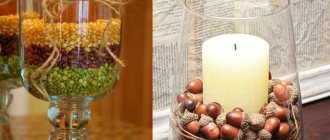
Jar of nuts
You will need: a glass jar with a lid, nuts, half a plastic transparent ball, white cardboard, scissors, glue, artificial snow, pencil, small snowman and Christmas tree (or other figures), red ribbon.
Master Class
- Trace a plastic circle onto white cardstock, then cut out a circle.
- Glue the snowman and Christmas tree onto the white circle.
- Place some artificial snow in a plastic circle.
- Glue the white circle and the plastic circle together as shown in the photo instructions.
- Glue the decoration onto the lid of the jar.
- Fill the jar with nuts and close it.
- Decorate the gift with a red ribbon.
The jar of nuts is ready!
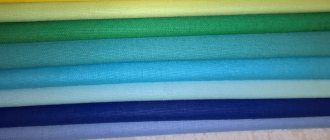
Pillow "Dog"
You just need to make the “Dog” pillow with your own hands.
Having sewn it and tastefully packaged it, you can give it to your grandparents, who will really be delighted with such a homemade gift. Well, if you wish, such a soft product will show off on your bed. The main thing is not to be lazy! To make it you will need:
- pattern paper;
- pencil;
- scissors;
- needle and thread;
- padding polyester;
- multi-colored fabric.
Progress:
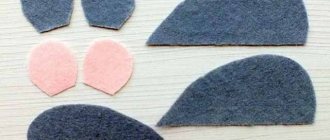
- Let's start with a drawing on paper, then cut out our dog and transfer it to fabric (tracing the outline with soap). We also cut out the design on the fabric.
- We make the eyes and nose from black fabric.
- We sew the mouth with black thread, and, if desired, you can cut it out of red fabric in an arc.
- We make the tail, ears and paws from one fabric of a certain color, sew it together, stuff it lightly with padding poly, and then sew it to the pillow itself.
- We sew our product together, and leave a small hole at the bottom in order to fill it with filler (if not, then you can use cotton wool, foam rubber, or various scraps).
You can make other types of pillows and give them to your family for the New Year 2022. For a change, we bring you our wonderful photo ideas.
If you are interested in not only sewing, but also knitting, then watch our video and create a charming crochet “Dog” pillow.
Master class on making a crochet “Dog” pillow
Handmade soap
You will need: transparent or white soap base, silicone Christmas tree mold, dyes and glitter for soap, palm oil, any essential oil, board, knife, skewer.
Master Class
- Cut the soap base into pieces.
- Melt the base in the microwave or in a steam bath.
- Add a few drops of any essential oil for aroma.
- If desired, add a few drops of soap coloring and glitter.
- Mix well.
- Pour the first layer of soap into the mold and place it in the refrigerator for 5 minutes.
- Make several holes with a wooden skewer so that the layers of soap adhere tightly to each other.
- Pour the second layer of soap and set it aside in a cool place to harden completely.
- Turn the mold out and remove the soap.
- Decorate the soap with glitter.
Christmas tree-shaped soap is ready! I recommend watching the video master class! You can find even more master classes on soap making HERE!
NEW YEAR'S SOAP. Gift set of soap for the New Year ♥ Just 15 minutes!
New Year's champagne
If on the eve of the New Year 2022 you are faced with the fact that you do not know what gift to give to your dear parents, then do not despair and do not hang your nose.
Better stock up on your precious patience and get to work. We will transform with our own hands an ordinary bottle of champagne into a magical drink from a winter fairy tale. Don't worry, you don't need a lot of tools for this. For production you will need:
- a bottle of champagne;
- water;
- paper napkins;
- PVA glue;
- brush;
- acrylic paint and varnish;
- fine sandpaper for sanding;
- foam sponge;
- rice napkin;
- art and construction paints;
- paint drying retardant;
- decorative elements: rhinestones, beads, decorative stones, glitter, stickers, half-pearls, crystal paste;
- paraffin candles.
Progress:
- Remove the main label from the champagne bottle and, if desired, the gold label from the cork.
- We start decorating with the cork: take a white paper napkin and, tearing it off in small pieces, attach it to the cork, greased with glue. We straighten the pieces of napkin with a brush dipped in water. Then again glue, napkin, water. If the napkin is not tightly stuck to the cork, then simply go over it with a wet brush. After the entire cork and neck have been formed until the bottle expands, coat everything thoroughly with glue again and leave to dry for a day.
- When the paper on the cork and neck has dried, we proceed to priming the bottle, during which construction acrylic paint and acrylic varnish are used. To do this, first degrease our bottle using any alcohol-containing product. Then we apply a thin layer of acrylic paint with a roller or foam sponge. Let's give it time to dry. After time, apply a very thin layer of acrylic varnish. Dries out. Then again - paint and, after a while, varnish. After this, we take fine sandpaper and sand the surface, removing all the unevenness and roughness. After this, we cover the entire bottle, along with the cork and neck, paint and varnish. This results in a smooth surface.
- Now we decoupage the bottle: take a rice napkin with the desired image, slightly tear off its upper edge and attach it to the bottle with water, and then cover it with glue on top. When the picture dries, cover it with a small layer of acrylic varnish.
- We take art and construction paints that match the background of the picture, and apply them with a foam sponge to the surface of the resulting product, including the cork and neck. If necessary, apply several layers of paint. After drying, coat with acrylic varnish.
- When the varnish dries, we pay special attention to the joints of the napkin, or rather, to masking them. To hide flaws, you should finish painting with paints, and for this you should use a paint drying retardant.
- When the painting is completed, you need to apply two layers of acrylic varnish to the bottle, and when everything dries, sand it with the finest sandpaper to achieve a smooth and even surface. If the desired is not achieved, it is worth repeating the process: varnish - sandpaper.
- After covering the surface of the bottle with several layers of varnish, dry it and proceed to further decoration. By the way, it’s worth noting that the bottom should also be covered with paint and varnish as much as needed.
- In the process of decorating a bottle, your imagination is not limited. You can use rhinestones, beads, decorative stones, glitter of different colors, stickers, half-pearls, crystal paste, edema made with a paraffin candle.
This is the beauty we got, made with our own hands. By the way, such a gift for the New Year 2022 can be presented not only to parents, but also to your management at work, as well as colleagues. Look at our photo ideas and your imagination will be greatly enriched.
Decouping a bottle of champagne by 2022 is, of course, a painstaking task, but it is worth it. Everyone will be delighted. Considering the difficulty of this creativity, many may have questions regarding production, to do this, watch our video, and you will certainly succeed.
Master class on New Year's decoupage of champagne bottles
Pineapple made of champagne and sweets
You will need: a bottle of champagne, 50 Ferrerro Rocher chocolates, a glue gun, green and gold papyrus paper, scissors, tape, a sleeve, gold ribbon.
Master Class
- Wrap the bottle in gold paper and secure with tape.
- Glue the candy to the bottom of the bottle.
- Glue the candies to form the first bottom circle.
- Glue the second circle of candies, staggering them from the first bottom circle.
- Cover half the bottle with candy in the same way.
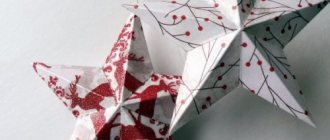
- Fold the green paper and cut out the leaf garland as shown in the image.
- Wrap the leaf garland around the sleeve and secure with tape.
- Place the sleeve on the neck of the bottle and glue the remaining sheets.
- Decorate the pineapple with a gold ribbon bow.
Champagne pineapple is ready! I recommend watching this video!
Raffaello and champagne pineapple. DIY. Candy Pineapple