Autumn is not only a bright, but also fruitful time. Nature itself gives us the resources to create masterpieces. Cloudy autumn evenings can be spent fun and usefully with your children, exploring the world and creating beauty with your own hands. You will find autumn crafts from a variety of materials, photos and descriptions of ideas in our article.
Leaf Crafts
An ornamental material that can literally be found under your feet in the fall are leaves of unusually bright, varied shades. There are also green ones, but there are already yellow, orange, crimson and even purple ones!
Ideas for what you can do with children:
- applications;
- toys;
- voluminous decorative items;
- bouquets and compositions (with the addition of flowers, fruits, toys).
Advice! To ensure that the leaf blades in the finished product do not become deformed or curled, they must be prepared. Iron the collected leaves between two layers of paper. It is better not to use newspaper, because newspaper ink can print on the leaves.
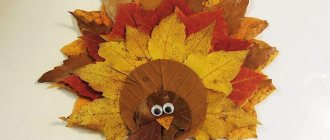
From individual leaves you can create interesting toys, in the making of which even kids can participate. Select a sheet of suitable shape and use permanent markers or acrylic paint to draw the faces of birds, animals, and fish scales. You can draw different facial expressions and discuss with your child the emotions that the drawn characters express.
A new hit that will conquer the most picky jury at a competition in a school or kindergarten will be an elegant umbrella that will save you from the autumn blues. For our creation, a frame from an old, used umbrella will be useful. Open the umbrella and stick overlapping leaves onto the fabric canopy. You can take leaves of one shade, or you can make a complex smooth color transition, stretching from red to green shades.
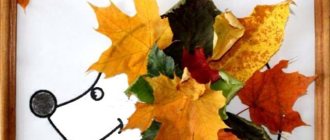
For the little ones, you can draw the outline of the animal with a bright felt-tip pen on a sheet of paper. Then the child will be able to independently fill it with colored fragments from natural materials at his own discretion.
A vase of leaves can become not only a decoration for a themed holiday, but also a household item if you cover it in several layers with water-soluble acrylic varnish and dry it thoroughly. To create a vase (stand):
- Wrap the outside of a bowl (glass, ceramic) with cling film;
- Cover with leaves in several layers, gluing them together with PVA glue or hot glue from a gun. Please note that the outer layer of leaves should be laid out with the right sides facing you so that the vase looks beautiful and neat;
- wait until it dries completely and carefully remove the vase from the bowl.
New for the latest season are spectacular, elegant bouquets of roses. They are made from brightly colored leaves neatly twisted in a spiral.
Application
Creating appliques is the easiest way to make charming snowmen to decorate your home. It does not take much time and does not require significant expenditure of materials or special skills.
Dear Snowman: applique of 2 cotton pads and cotton swabs
You will need 2 sheets of paper: blue and black, 2 cotton pads, decorative eyes, a cotton swab, sequins, 2 thin ribbons of orange and red and glue.
Cotton swabs are glued onto blue paper, the cotton swab is cut in half and glued to the bottom circle, which acts as the body. A small trapezoid and a rectangle are cut out of black paper. They are used to make a hat for a snowman and glue it above his “head”. All that remains is to glue on the decorative eyes, cut the ribbons and glue them on as a nose, mouth and scarf, and also glue the craft sequins onto the body to represent “buttons”.
Snowman made of 3 cotton pads and colored paper
You need to take colored paper: blue or cyan, black and red, 3 cotton pads and a black marker or felt-tip pen.
Cotton swabs are glued onto blue paper, a hat, eyes and buttons for crafts are cut out of black paper, and glued onto disks. A nose and a scarf are cut out of red paper and attached with glue. The craft is completed by drawing with a marker the details of the snowman’s face and his arms.
Application “Cheerful Snowman” made of cotton pads, cotton wool and colored paper
You will need 4 sheets of colored paper: blue, dark blue, pink and orange, as well as a cotton pad, cotton wool and a black marker.
A cotton swab is glued to dark blue paper. A hat is cut out of blue, a circle is cut out of pink for a rosy cheek, and a triangle is cut out of orange for a nose. Everything is attached to the disk with glue, the cap is filled with cotton wool. Using a black marker, add details in the form of eyes, mouth and design on the cap.
Origami
You can create many interesting creations from colored paper and cardboard:
- postcards;
- garlands and pendants for interiors in kindergartens and at home;
- applications;
- voluminous toys on stands.
To make a garland that will become a bright decorative element of a holiday on the theme of “Golden Autumn”, you will need a minimum of time.
- Using the template, cut out leaves from thick colored paper.
- Start stitching on the machine, gradually adding leaves. If you don’t have a sewing machine, you can fasten the leaves together with a needle and thread manually using decorative stitches.
Also, to make a garland, the leaves can be tied in thread or twine. You can add other elements to the leaves: flowers, fruits, figures of animals and birds.
Pumpkin is a bright, elegant fruit. Decorative pumpkins will serve as an excellent decoration for a kindergarten or elementary school class. And then they can be used for Halloween crafts. To quickly and beautifully make a pumpkin, cut out several identical oval-shaped parts (4-10) from thick paper or cardboard and glue their halves in pairs so that the result is a closed ring. All that remains is to add a tail made of blue wire (brush) or brown cardboard. Ready!
A postcard with confetti glued on from red, yellow, orange paper is quickly and beautifully obtained. You can make confetti yourself - using an ordinary stationery hole punch.
You can make a beautiful postcard for school with three-dimensional elements.
How to make a postcard with an umbrella step by step
- Cut out a circle from colored paper. Divide it into 3 sectors, twist a cone (bag) from each sector and glue it together.
- Attach the cones to a cardboard base of contrasting color, connecting the cones in the shape of an umbrella (triangle).
- Cut out a handle from black or blue paper and glue it on.
- Decorate the postcard to your taste in an autumn theme: leaves, rowan berries, bugs. Can be complemented with ribbon, beads, rhinestones.
Application "Snowman" with templates and stencils for children
One of the main winter heroes is the snowman. Children of all ages run outside with the first snow and make snowmen, good-natured snow men who are loved by everyone. That is why the snowman applique with templates is one of the most common applications that educators and teachers offer to make for their students. Moreover, templates for such an application are not difficult to find, and even easier to make yourself.
In our master class we will look at several craft options, including those made from paper and plasticine. Forward to exciting winter fun!
From cotton pads
Cotton pads are an environmentally friendly, inexpensive raw material for beautiful children's crafts. They must first be painted in suitable colors. Watercolor paint is suitable for this - it gives smooth color transitions, dries quickly and is safe for children. How to color cotton pads:
- Wet a cotton pad. You can dip it in a container of water and squeeze it lightly to remove excess moisture. Follow. So that the disk does not lose its round shape.
- Next, use a brush to pick up paint from the cuvettes and drip onto the disc. The drops will spread picturesquely, forming streaks and patterns. Can be painted in one tone.
- Leave the discs to dry (on the battery or just in the air).
By the way, ready-made painted disks can be layered, thus obtaining 2.
Already painted discs can be glued entirely, making, for example, apples (you need to add a tail to them - draw, for example). Or cut out the necessary shapes with sharp scissors.
Crafts in the form of angels
We figured out how to make a Christmas tree, then we suggest you learn how to make angels from cotton pads. The creative process of making angels will not take much time, especially if children participate in the work. You will get beautiful silhouettes of angels. They are fun to decorate the New Year tree with.
For this creative process you will need:
- packaging of cotton pads;
- scissors for figure cutting;
- small beads;
- a thread;
- golden acrylic paint;
- toothpicks.
Having collected the material, we get to work. How to make these crafts from cotton pads for the New Year:
- We take cotton pads, they need to be divided into two parts. Using curly scissors, cut the separated part in a circle. Place a small bead in the middle of the cut part.
- We twist the workpiece and tie it with white threads. We push the lower part of the workpiece to the sides. Now, fold the second part of the separated disk in half.
- Next, bend the corners towards the center. Insert a toothpick into the middle. Twist a cotton pad with a toothpick into a cone.
- Then apply glue to the blank with the bead between the spread wings of the angel, preferably using hot glue. Glue the part with the toothpick. And let’s start decorating crafts made from cotton pads for the New Year.
- For decoration, take golden acrylic paint. Apply a strip of paint to the head. We decorate the wings along the contour with dots of material. Next, we decorate the lower rim of the craft. If desired, you can glue a thread to the angel’s head and decorate the Christmas tree with the craft.
The angel is ready. The work is not difficult, children can handle it quite well, but if the child is of preschool age, it is better to be near him during the creative process.
Felt crafts
Autumn crafts from felt are easy to make. It is easy to cut, threads and dust do not fly off it. A huge color palette allows you to embody the most unexpected author's ideas. It is absolutely safe for children.
You can make a garland using the method described above, or you can create an unusual wreath on the theme of “Golden Autumn” to decorate the interior. We will need:
- wreath base. If you can’t buy a foam blank, you can twist a ring from a newspaper, wrapping it with tape for strength;
- felt of suitable shades;
- scissors for cutting;
- glue;
- threads for embroidery and warping;
- decor: braid, lace, buttons, beads, etc.
How to make a beautiful seasonal wreath:
- Wrap the base tightly with threads so that there are no gaps.
- From felt, cut out leaves of different shapes (oak, maple, birch, etc.). If you have the skill, embroider veins on them using a stem stitch.
- Glue the leaves to the base.
- Decorate to your taste. You can add mushrooms and berries sewn from felt. You can cut out flowers from felt to complement autumn motifs.
- Tie a ribbon so you can hang the wreath on your door or wall.
Experienced craftswomen can make educational toys on the theme of golden autumn. Cut out shapes of a hedgehog, berries, and mushrooms from felt. Decorate as your imagination dictates: with embroidery, beads, buttons. Glue or sew one piece of Velcro tape onto the back of the small pieces. Attach the second half of the Velcro to the body of the hedgehog. You can play with a homemade toy!
Pompom snowman
Funny snowmen are made from pompoms.
To make such a snowman you need:
- white yarn;
- cardboard;
- scissors;
- thin branches;
- glue;
- beads, ribbons, felt and other things for decoration.
How to do:
- To make a pompom from cardboard, cut out two circles with a hole in the middle and make a slit on one of the sides. Put them together, placing a thread inside, and wind white yarn, as in the photo. When there is enough yarn, cut all the threads along the outer circle with scissors between two cardboard circles. Using the thread that was placed between the cardboard, we tighten the cut yarn and remove the cardboard circles. The result is a pompom. For the snowman's head, you need to cut out circles from cardboard of a smaller diameter.
- We connect two pompoms together by tying the threads that were used to tighten the pompoms.
- We cut off the remaining threads.
- Decorate the snowman by gluing on the eyes and nose. We tie a scarf from a ribbon and make a headdress - wire headphones or a hat.
- We use two thin branches to secure the arms.
Crafts from pine cones
Cones are an amazing natural material, the uses of which are very diverse. You can decorate one cone, make a composition from gifts of nature of different shapes and sizes. Or you can make an interesting thing in a new way.
We suggest you decorate a vase or jar with individual scales. To do this, disassemble the cone into separate scales - “petals”. Attach them to the jar using hot glue. For small children, you can smear the base with plasticine, onto which you can stick the scales.
Each cone can become a unique beautiful toy if you add a little imagination and love. Legs made of pipe cleaners and several pairs of ready-made eyes - here is a spider in front of us. Large simple round eyes made of felt and a pair of wings - already an owl. Beady eyes and a small black paper nose will help you create a prickly hedgehog.
You can make a basket from small cones of the same size. For fastening, use a glue gun or super glue. Be sure to wait until the product is completely dry.
You can create an autumn interior composition from pine cones, moss, and dried forest flowers.
Volumetric snowman made of cotton wool
With older children, you can make a snowman, which can become a decoration on the Christmas tree or which can be placed under a small Christmas tree.
Materials:
- cotton wool;
- PVA glue;
- soda;
- soap;
- toothpicks;
- brush;
- glitter;
- red or orange gouache;
- several black beads.
Manufacturing process:
- With soapy hands, roll two balls of different diameters from cotton wool and let dry.
- Mix PVA glue with a pinch of soda and glitter and coat the cotton balls with a brush.
- We wrap a small amount of cotton wool around the tip of a toothpick in the shape of a carrot nose cone. Paint the nose with orange or red paint mixed with PVA glue and let it dry.
- Connect two cotton balls of different diameters with a toothpick dipped in glue.
- Glue on a nose made of cotton wool, buttons and eyes made of beads.
- Hands can be made from thin branches or from small cotton balls.
- You can tie balls for the snowman from a small piece of fabric and make a cylinder out of paper; you can also make a hat out of a sock for the snowman instead of a cylinder.
Autumn crafts from nuts
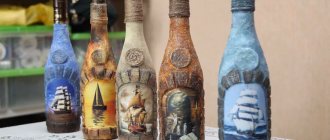
Walnut shells just beg to be made into a flotilla of boats and sent sailing through the stormy autumn puddle seas. Attach a piece of plasticine to the bottom of the shell. Stick a toothpick or a twig into it - this is the mast.
The sail can be made from a piece of fabric, scraps of felt, or just blades of grass. Complete with a small paper flag. Even if you don’t play with boats on the street, you can float on the waves in a basin or bathtub. Or create a composition on a cardboard base.
With the help of paints, plasticine, threads, a simple shell is transformed into cute little mice, ladybugs, deer and even exotic fruits. The most important thing is that these natural raw materials are very easy to handle, and even the smallest craftsman can create toys with his own hands.
DIY Christmas tree
For children 2-4 years old, this work will simply be a repetition of the previous one, when they made a snowman, but with some complication - they will have to glue toys to the tree and the top of the head, and make a snowdrift under the tree.
- prepare cotton pads, cut in half, tops for Christmas trees, multi-colored circles - toys for the Christmas tree, cotton balls, PVA glue, dark-colored cards (black, dark brown);
- show the children a picture with a decorated Christmas tree, tell them why this picture will be needed (invitation to parents for the New Year holiday);
- together with the children: apply a drop of glue to half of the disk, glue a cotton pad at the bottom of the card with the cut side up, and glue the other half next to it in the same way. Glue the second and third tier of the Christmas tree in the same way. Glue a star on the top of the head, multi-colored toy balls on the halves of the disks, smear a card with glue under the Christmas tree and attach cotton balls - there will be snowdrifts.
Crafts from foamiran
Foamiran - or foam cardboard - is a pliable, soft material that holds its shape well. This is a relative newcomer to the creative goods market. You can cut figures of various configurations and complexity from it. Foamiran is used to make jewelry that looks indistinguishable from real gifts of nature. Craftswomen can make beautiful headbands, brooches, hairpins, and boutonnieres. These attributes will be useful, for example, for an autumn holiday in a kindergarten or school production.
Little creators themselves can make the following out of foam:
- applications;
- wreaths;
- volumetric creations;
- toys
- add it to postcards.
We'll tell you how to make a pumpkin with your own hands. It will become a decoration and a gift for the autumn birthday of the birthday boy. Cut out 10 identical circles from orange foamiran and fasten them like a book on one side. On top add a ponytail from a rolled piece of brown color and a green curl.
Snowman made of cotton wool
Cotton wool and glue are the materials that are always available in every home, and the manufacturing technique is so simple that a child can make a snowman on his own.
To make such a snowman you need to prepare:
- blue or white cardboard;
- colored paper or felt;
- scissors;
- glue;
- cotton wool
Step-by-step instruction:
- Roll the cotton wool into small balls with a diameter of 1-2 cm.
- On blue or white cardboard, draw the outline of a snowman with a pencil.
- Glue the rolled cotton wool along the contour and inside the circles of the snowman so that the pencil mark is hidden.
- Cut out two thin strips for the arms from brown paper or felt and glue them on.
- We cut out mittens, a scarf, a top hat, a carrot nose, buttons, eyes from felt or paper and glue them on. Buttons and eyes can be made from beads.
- Draw a mouth with a black felt-tip pen.
Autumn applications from different materials
Bright autumn creations can be made with children from a completely different variety of products:
- cereals and seeds, having previously painted them in the appropriate colors;
- curled and torn paper;
- fabrics;
- plasticine.
You can do this kind of creativity with kids on a cloudy day. On paper, draw a simple pattern of twigs. Along the way, children knead red plasticine in their fingers, roll balls and stick them where an adult will show them - these will be “rowan” berries.
You can draw figures of men or animals. Then the child makes hair, outfits, etc. with his own hands from dried flowers, colored paper, threads.
You can make a picture from the “Seasons” series from disposable cardboard plates. Draw the outline of the tree. Let the child tell you what the same tree looks like and how it differs in different seasons. Then, together, make the tree “outfits” for each season: buds in the spring, bright greenery in the summer, falling leaves, and finally, a sleeping tree wrapped in snow.
Praise your child more often - even for the very first, inept autumn crafts. The baby will be glad to receive praise from adults and will begin to explore the world without fear. Little creators, as a rule, grow into adults who are able to see the beauty of the world around them and create it themselves.
Snowman made from plastic spoons
Funny decorations for the New Year's table in the form of snowmen can be made from white plastic spoons.
Materials:
- plastic spoons;
- paper or plastic cups;
- glue;
- acrylic paints;
- paper;
- sponge;
- cotton wool;
- felt, pieces of fabric;
- markers.
Step-by-step instruction:
- Draw a snowman's face on a plastic spoon.
- Cut out a scarf from fabric or felt and glue it on.
- We make a hat out of felt and secure it with glue.
- We paint the cups with acrylic paint.
- Inside the glass we place pieces of sponge with a small slot for spoons.
- We set the spoons and fill the glass with washed off white paper, and decorate the top with cotton wool.