- Candlestick made from an inverted glass
- Available materials and simple tools
DIY glass candlestick master class
We offer you a fairly easy master class with a photo of a candlestick made from a glass, which you can make with your own hands. To make it you need the following materials:
- Small thuja branches.
- A piece of paper or newspaper.
- Large tall glass.
- Scissors.
- Spray or regular glue.
Let's start the work by cutting the thuja branches to the required size and laying them out on paper. Then we will apply glue to them; if you do not have it in the form of a spray, you will need to use a brush to apply it.
We paste thuja branches around the glass in a circle; this must be done quickly so that the glue does not have time to dry.
Interesting! Do-it-yourself candlestick from a jar for New Year 2022 - how to make a candlestick, step-by-step master class with photos
After the glue has completely dried, you need to carefully trim off all excess with scissors. At this stage, all the big work is finished, all that remains is to choose a suitable candle and place it in the glass. As a result, we got a very original and beautiful candlestick that will become a worthy interior decoration.
Garland of flowers
A bright flower garland will look very impressive, for the manufacture of which you will need:
- 18 multi-colored spoons;
- scissors;
- glue;
- thick thread;
- dye;
- pom-poms;
- thick cardboard.
Cut out 3 triangles of the same size from cardboard and color them.
Note!
Cut off the handles of the spoons. Mark the middle in the triangles and stick petals around it (6 pieces per flower). Place a pompom in the center of each flower.
Make 2 holes in each triangle and thread a thread through them, thus connecting the flowers into a garland.
Creating New Year's decor
Holiday decor with candles can greatly reduce the number of other decorations. The warm glow in itself creates a fabulous and inviting atmosphere, and combined with glass surfaces it also creates a play of light with shadow and highlights. Glasses are the simplest option to create a beautiful candlestick without resorting to buying expensive analogues. In the future, even just being next to the beaded Christmas tree, it will remind you of the New Year and Christmas.
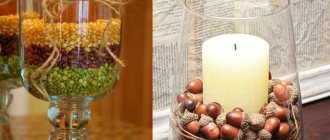
With dry filling
A transparent glass looks beautiful when filled with bulk ingredients. Their roles may include:
- cereals and beans (looks especially appropriate with an ethnic theme for Christmas);
- acorns;
- cones;
- beads and Christmas balls;
- sea pebbles;
- anise and cinnamon sticks.
The “filling” can be combined, layered, and shiny New Year’s elements can be added.
How to make a candlestick from a wine glass with a long stem?
If you still have a glass or plastic wine glass or glass, you can turn it into a candlestick. This method belongs to the list of easily and quickly implementable ones - in conditions when there is little time left, but you still need to decorate the table additionally. There can be several candlesticks if the table is large and there are a dozen or more guests. A candlestick made from a large glass will serve as a decoration in the center (or closer to it) on a spacious table designed for 10-15 people.
But not only the festive table is the place where such candlesticks are used; they are placed in other prominent places within the kitchen-living room. Important: before using any candlesticks, make sure that the base is made of fireproof material so that the holiday does not suddenly become an incident or even an accident.
Also read! DIY New Year bottle decor: 20 ideas
With an inverted glass
To make one such decorative element - a candle on an upside-down champagne glass, use a candle that stands confidently on any surface. Check how stable it is before setting it on fire. An inverted glass or wine glass creates a space at the bottom that can be filled with something decorative.
The glass is left transparent when any figurative decoration or decoration that fills the entire volume is placed inside, into the cavity formed by its inverted state. It doesn’t matter what it is - a piece of garland, an LED lamp, a three-dimensional inscription on a workpiece, a figurine, a polyhedron or something else - this element must be clearly visible, otherwise the meaning of its insertion into this cavity is lost.
For example, they place figurines of characters from films or games, or a small matryoshka doll there. For a New Year's candlestick, this is a Christmas tree toy in the form of a ball with sparkles. If you don’t yet have such paraphernalia, use a decorated, painted spruce cone, a Christmas tree shower, or a piece of plastic garland.
As a special option - a small battery-powered flashlight with LEDs with a warm glow, the color and shade reminiscent of a candle flame or smoldering coals of a fire. Cold-colored light (from white to blue), as well as green and other backlight colors that create absolutely unnecessary contrast, do not suit the range of a candle flame.
When, for example, a triple candlestick is created, the old glasses are placed upside down on a worn CD or a neat blank made of natural wood or plywood, pre-painted and decorated with sparkles. To prevent them from moving, the candlestick, made in the form of a non-demountable structure, is glued together with epoxy or hot melt adhesive. Gluing the glasses prevents them from falling off the round base. Before gluing, do not forget to insert the selected attributes of additional decoration into the cavity under the inverted glasses (if the glasses remain transparent).
Lampshaded
Glasses are also suitable for making mini lamps with candles. Important: the lampshade must be fireproof. To do this, use a cone-shaped wine glass.
Step-by-step instruction.
- Select paper of the required color.
- Glue the cap for the future lamp. The layers of paper are joined together in an overlapping manner.
- Impregnate it with non-flammable compounds and varnish. This is important - the paper should not smolder, because it is located not far from the candle light.
- Paint the stem of the glass, for example, with acrylic paint of the desired color. Place a piece of candle on it.
- Place a lampshade on the stem of the wine glass.
Before lighting such a lamp, it is recommended to additionally decorate both the lampshade itself and the inverted container.
Painted with colored paints
Do not use a glass with cracks or scratches - the appearance will be ruined. It is quite difficult to paint chaotically spreading cracks with a “web” and thus disguise them.
A glass goblet accidentally split into two or several parts is glued together, painted and decorated. An outside observer will never guess that the product is broken - all defects are hidden very reliably.
Paint the stem of the glass - preferably to match the tone of the paraffin from which the candle is made: the color should be opalescent, whitish, vaguely reminiscent of a creamy tint.
Cracked glasses that are unsuitable for further use are covered with a decorative layer based on waterproof varnish or paint, and then painted according to the wishes of the owners of such a candlestick. To prevent the coating from falling off over time, sand the walls of the glass until matte. Next, the glass, which has become matte, is coated with colored varnish. For example, a coating made of silver paint (made from aluminum powder) or “golden” paint (made from brass or bronze powder) is considered especially chic. A copper shade can be obtained from the same copper - powdered copper is mixed with colorless varnish, then this composition is applied to a wine glass. After the layer applied to the product has dried, it is additionally painted with any paint interspersed with glitter.
Do not miss! Patterns of protruding cones for the New Year 2022 for cutting out onto the window
Making unusual crafts from plastic cups
There is nothing more enjoyable than spending time with your children. Read a book, play with your favorite car or doll, just run. We should not forget about creativity. It's easy to make a lot of interesting things using simple materials. They don't have to be expensive. For example, you can create unusual crafts from plastic cups.
Ideas for spectacular creativity
Plastic dishes are easy to process and cost pennies. Therefore, working with her is an indescribable pleasure .
Products can be divided into two types:
- Made from several cups. These include figures of animals and birds, souvenir flowers, baskets or buckets. Most often, additional parts made of paper, plasticine or cardboard are used in the work.
- Folded from a large number of blanks. Here we are talking about volumetric interior works. The size of balls, snowmen or Christmas trees can reach several meters.
The cups can be used in their original form or cut. The scope for creativity is limited only by imagination. It is not forbidden to finish drawing something or adding the necessary elements.
To make crafts you will need:
- multi-colored plastic glasses;
- small scissors;
- stapler;
- glue;
- plasticine:
- colored paper, cardboard, fabric;
- gouache, varnish, felt-tip pens;
- various elements for decoration.
The list can be expanded or shortened as desired.
Crafts from disposable tableware
All kids, without exception, will be interested in making animals. The kind faces of a bunny or a bear cub look bright and unusual. Characters from famous fairy tales or popular cartoons can later become elements of educational theater games.
If the cup has a color, then the type of product is selected based on the shade. It is better to make a pig from pink dishes, blue ones are suitable for making fish, and orange ones will make a fox. A transparent glass can be painted. To fix gouache or watercolor use colorless varnish . It is applied to the workpiece after the first layer of paint has dried. The varnished product acquires shine and looks more impressive.
To make a hare you need to take a glass of a suitable color. It is better if it is white or gray. Place the container upside down. Cut out eyes, nose, antennae, ears, tail and paws from cardboard. Color if necessary. Use glue and plasticine to secure the elements. A simple toy is ready.
To create a flower, scissors will be useful. A glass of bright color must be cut along the entire perimeter. The width of the strips should be no more than 2 centimeters. The next glass is cut into leaves. The blanks are twisted with scissors to achieve a rounded shape. Then the elements are connected to each other. Several glasses form a lush chrysanthemum. Beads and sparkles will come in handy.
Candlestick using decoupage technique
Don't know how to turn an unnecessary glass into an interesting decorative item? Try to transform it using the decoupage technique. Choose three-ply paper napkins with beautiful designs. For the work you will also need acrylic paint, PVA glue, varnish and special contours at your request for the final part of the decor. Degrease the surface of the glass goblet and apply the first layer of acrylic paint as a primer. The most convenient way to do this is with a sponge; one layer is enough, but if you think that the result is not even enough, repeat the manipulation. While the paint is drying, it's time to choose the designs that you will stick on. Cut out the most interesting and beautiful motifs from a napkin. Think about their location based on. After the paint has dried, glue the selected elements to the bowl of the glass using PVA glue. Gently smooth the napkin with a brush, try to glue the drawings without folds or wrinkles. When the glue dries, the craft can be tinted with paints and individual lines can be emphasized with a special outline. Finally, don't forget to coat your work with varnish.
What you need for creativity
For children's crafts from plates, in addition to the plates themselves, you will also need other materials that will act as auxiliary materials in the product:
- Glue;
- Scissors;
- Brushes and paints;
- Stapler;
- Paper napkins for decoupage or gift paper;
- Other plastic utensils.
You can use other materials to help create the final result.
Miracles under the glass dome
If you still have one or several unnecessary glasses/glasses on the stem, you can make a very original candlestick. Turn the existing container upside down. Now its leg is on top - and it is on it that the candle will be installed. The bowl of the glass magically turned into a container for placing decor. Take a fairly thick piece of cardboard, draw a circle around the edges of the glass and cut it out. If desired, the “plug” can be painted or even painted. Now you can start the most interesting part - decorating. Degrease and rub the inside of the bowl well. You can place any small figurines, souvenirs and simply beautiful little things in it. These can be sea pebbles and shells, artificial flowers, multi-colored beads or buttons. Using this technique, you can make candlesticks from glasses for the New Year with your own hands. Just choose the decor you need - voluminous snowflakes, miniature Christmas trees, a Santa Claus figurine, or just a mountain of gifts.
Decorative frame
You can also use disposable spoons to create original frames that decorate various interior items.
Note!
For this you will need:
- spoons in large quantities;
- scissors;
- glue;
- polystyrene foam or thick cardboard;
- a watch, a small round mirror, a photograph or another item that is valuable to you.
After measuring the diameter of the desired object, cut out a circle of the appropriate size in cardboard or foam plastic.
Place a watch, photo or mirror in the resulting frame and secure it. Cut off the handles of the spoons. Glue the rounded parts of the spoons to the frame in rows in a circle, from the edge to the center.
Color the finished product of your creativity the way you want.
Beautiful examples
- You can decorate a lampshade at home, for example, with a texture reminiscent of colored stones or ice floes of a frozen coffee drink.
- A glass with a long stem, for example, is trimmed with lace. It, in turn, is impregnated with colored varnish or a colored adhesive base so that it hardens and does not peel off later. You can also line a measuring cup.
- Any glass can be given a matte shine. But, being applied to a smooth surface, such a candlestick requires extremely careful handling.
- Flat-cylindrical glasses with a stem, the bottom of which is equal in area to the inner surface of the main bottom, are decorated with thuja branches, “embalmed” in transparent glue or varnish. Once sealed in a hardened compound, they will retain their fresh green appearance dozens of months later.
DIY glass candlestick: step-by-step master class
Decorative craft supplies can transform hanging glass containers, which in turn make ideal candle or plant holders. Today we will tell you how to make a cute hanging candlestick with your own hands from a glass, beads and wire.
The glass glasses, bowls and other similar containers themselves can be purchased at convenience stores or in the hardware section of the supermarket. Don't worry if you can't find a glass container that is exactly the same size or shape, as the design shown is flexible enough to fit most other containers of the same size. You can also use a broken glass with a broken stem as a glass container for this project - you just need to sand the chipped area.
You can also use aluminum wire instead of copper wire and vice versa, although aluminum may be a little more difficult to shape.
Our project is divided into two stages: first we will create a wire braid to hold the glass container, and only then we will make a chain to hang the container and add decorative elements.
To make a wire frame you will need the following materials and tools:
- Pliers and round nose pliers for making jewelry
- 16 gauge aluminum wire
- Wire cutters
- Glass beaker, small aquarium or bowl with a diameter of about 10 cm
- Rubber
Step-by-step instruction
Step 1
Twisting pieces of wire into a loop
Cut two pieces of aluminum jewelry wire from the skein, each approximately 75 cm long.
Using a piece of pipe with a diameter of 1.5-2 cm or any other object, round in cross-section and of a similar diameter. Bend both pieces of wire in half and wrap them simultaneously around the pipe or cylinder at the bend in the middle. Twist them at least 3 or 4 turns to securely fasten one piece of wire around the other.
Remove the cylinder, resulting in a loop and four wire ends.
Step 2
Separating the ends of the wire in an "X" shape
Bend the ends of the wire away from each other and arrange them in the shape of the letter “X” - they should be evenly spread, as shown in the photo. These ends of the wire form the main frame that will hold the glass container.
Step 3
Forming a wire frame in the shape of a glass vessel
Loop each wire around your glass container. During this process, hold the loop down, under the bottom (at its center) of the glass bowl.
Step 4
Twisting the ends of the wire into spiral curls
Remove the wire craft from the glass container. Using pliers, wrap a small loop around one of the wire ends. And then, using your fingers or the same pliers, continue to wrap the wire around the resulting small loop until you get a spiral.
Step 5
Twisting the spiral on the remaining wire ends
Repeat the previous step on all other ends of the wire. In the next step, we will adjust the size of the spirals and frame to the outline of the glass vessel.
Step 6
Adjusting the size of the wire spirals
Place the glass container inside the wire frame. Continue twisting the wire ends in a spiral until their height is slightly higher than the neck of the glass container.
Step 7
Fixing the frame on the vessel with an elastic band
Stretch an elastic band over the wire frame with the container inside and secure it about halfway up so that it holds all four wires stationary around the glass container. Distribute the ends of the wire evenly around the container. Hold the loop in the center of the base of the vessel.
Step 8
Fixing the frame with wire
Cut a piece of 16- or 18-gauge aluminum wire at least 12 inches long. Wrap it around the wire frame just below the spiral, over the edge of the vessel.
Braid the wire around the edge of the glass vessel, then the next wire in the frame, directly under the spiral. Try to keep the frame wires fixed in the center. It will be ideal if the wire arches of the main frame are located at the same distance.
Use the free end of the wire to bend around the frame arcs until you come to the first arc. Braid the first arc again and cut off the end. Such a wire braid will perfectly fix a glass container of any shape; it should look like a drawing.
Step 9
Making a decorative chain
To hang the candlestick you need to make a chain with beads from aluminum wire. For this part of the project you will need the following materials:
- 18 or 20 gauge aluminum wire
- round pliers
- faceted glass beads with a diameter of 6 mm.
Step 10
Making wire loops
Cut the wire into pieces about 3 cm long. Make a loop on the end of each of them. Now string a glass bead onto the resulting pins. Wrap the loose ends of each pin into loops.
Step 11
Connecting links with beads into a chain
Connect the resulting links of the future chain to each other, opening the loops on the side, similar to opening the connecting rings to prevent them from bending.
All chains with beads must be the same length - at least 15 cm.
Step 12
Attaching the chain to the frame
Using jump rings, attach each chain to the wire frame by the outer loop of the wire spiral.
Step 13
Attaching chains to a ring
Using a large jump ring, tie the loose ends of the chains together into a bun. Now you can hang the candlestick from the large connecting ring.
Step 14
Manufacturing of additional pendants
If desired, you can make and attach more hanging decorations to the craft.
Step 14
Setting up a candle or plant
Once you've finished decorating your candle holder, place a candle or plant inside the glass container. After this, hang the product outside or inside the house where it will be visible and easy to use.
We are confident that such hand-made candlesticks made from wine glasses or bowls will decorate the interior of your home or garden and fill the atmosphere of evenings spent in candlelight with warmth and comfort and bring loved ones even closer.
Garden decoration “Cat”
Garden decorations have always been popular among gardening enthusiasts. This is not at all surprising, since it is thanks to the decor that a garden can be made unique and the right mood can be created in it.
To make a garden decoration you will need the following:
- Disposable plastic plate.
- Adhesive colored paper.
- Dye.
- Stapler.
- Scissors.
- Glue “Moment”.
The manufacturing sequence looks like this:
- Take a disposable plate and carefully cut a piece out of it. The resulting workpiece should have a moon-shaped shape. This will be the body of the cat.
- From the remaining piece, carefully cut out a small arc that will become the tail, a circle and a couple of small triangles for the ears and muzzle. Connect two triangles and a circle together to form a muzzle. Secure carefully using a stapler.
- Paint parts of the cat's body with paint.
Important! In order for the color to be more saturated, it is better to paint in several stages.
- Connect all the parts of the cat using a stapler.
- Cut out a nose, eyes and antennae from adhesive colored paper and stick them on the face.
Looking for inspiration
Not only a professional, but anyone can create handmade candlesticks. The only things that matter are imagination and the desire to create. Very often, candles are decorated in a duet with glasses and wine glasses. You can get an idea from artists and paint the glass surface with paints.
Decoupage masters share the secrets of their technique and teach even children how to work with napkins. A sophisticated candlestick will be made from a wine glass decorated with beads, rhinestones and delicate lace. Exclusive independent work will always attract attention and will not leave anyone indifferent.
How many grams of food fit in 1 faceted glass?
This glass has become the main measure of weight and volume in all culinary recipes. We still use this measure when cooking. Therefore, we think that it would be nice to know how many grams of a particular product are in 1 glass (200 cm³).
- Water - 200 g
- Wheat flour - 130 g
- Sugar - 180 g
- Powdered sugar - 160 g
- Milk – 200 g
- Condensed milk - 360 g
- Sour cream – 210 g
- Vegetable oil - 190 g
- Ghee - 190 g
- Buckwheat – 165 g
- Semolina - 150 g
- Rice - 180 g
- Cocoa powder - 130 g
- Jam -275 g
- Vinegar - 200 g
This information will definitely be useful if you cook often and use a cut glass as a measure. Save the article to your bookmarks and return to the list every time you test an unusual recipe. Then the proportions will not be violated, and the dish will be prepared correctly. And to make it easier for your friends to calculate the amount of ingredients, send the link to them too!
Graphic designer and artist Joanna Bean Martin shared with us the technique of how to marbleize the bottom of glassware with nail polish. Without delay, we decided to bring this idea to life. Who knew there was such an easy way to add color to your next meal or party?
Remember, the brighter and bolder the colors you use, the more pleasing the result will be.
Have fun!
To create a marble effect when decorating glassware you will need:
- Flat bottom glassware
- Nail polish of different colors
- Clear nail polish
- Disposable plastic containers
- Nail polish remover
- Masking tape
- Toothpicks
Let's start creating marble overflows.
1)
Wrap the glass with masking tape, leaving only the bottom exposed.
2)
Pour water into a disposable plastic container.
Open all the nail polish bottles and start dripping the polish into the water. Drip the colors one by one until they form layers one on top of the other. 3)
Take a toothpick and move it from the center to the edge, making streaks.
Work quickly so that the varnish does not have time to harden and form lumps. 4)
Immerse the bottom of the glass in the varnish.
Wait until the varnish collects around the sides of the glass and carefully pull it out. Small air bubbles may form, but this is to be expected! 5)
To decorate the next glass, you need to take a new toothpick and clean water.
Allow the glasses to dry completely before applying a coat of clear varnish. 6)
Once everything is dry, remove the masking tape and adjust the design using nail polish remover and a cotton swab. Your bright glasses are ready. All that remains is to wash the dishes and hands. Drink up! Author of the master classErica
If you want to paint wine glasses for yourself or as a gift, for a wedding or a theme party, rest assured that you will get great pleasure from creativity - because it is done easily, quickly and inexpensively.
Before you begin the step-by-step master class on painting glasses with your own hands, you need to decide on the future design of your wine glasses, so we invite you to get inspired and get original ideas for “glass” decor in the next chapter.
Painting glasses and wine glasses can vary in drawing technique, degree of complexity, use of materials and, of course, subject matter.
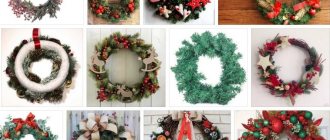
Varieties of candlesticks made from glasses
There are many options for how glasses can be used as candlesticks.
Candlestick made from an inverted glass
The simplest among them is to simply turn the glass upside down and place a suitable candle on the base of the stem. In this case, the glass can be decorated by wrapping a rope around it, a white lace border can be glued to the base, and textile flowers of the same shades can be glued above it. The candle itself, which will be placed on the stem of the glass, can also be tied several times with a tourniquet; overall, the result will be a very beautiful composition.
A very simple, but at the same time very elegant candlestick can be made if you create a decorative composition of cinnamon sticks and spruce branches, fresh flowers and leaves, berries, and Christmas tree balls in an inverted glass. To make such a candlestick more convenient, you can glue a CD to its base, thus removing the hole in the glass.
Painted with acrylic paint
You can create very beautiful candlesticks for the New Year holidays by painting them with acrylic paints. As a result, we can get excellent candlesticks from glasses in the shape of snowmen, Santa Clauses, penguins - everything will depend on your imagination!
Candlestick with floating candles
A candlestick with a floating candle would be a very romantic option. In the middle you can place decorated balls, rose hips, flowers, twigs, Christmas tree needles, sea pebbles, fern leaves, then fill with water, and place a small candle-tablet on the surface.
With beads and stones
Incredibly delicate and beautiful candlesticks will be obtained if you place mother-of-pearl beads in a glass and install a candle. The glass can be filled with absolutely any decor that matches the theme of the evening; these can be sea pebbles and shells, dry maple leaves, twigs and acorns. It will also look very original if you make several small layers of different grains.
Candlestick with lampshade
A very original candlestick from a glass, you can make it yourself in the form of a table lamp. To do this, you need to cut out a lampshade from thick colored paper, glue it and put it on a glass with candles. Thanks to the conical shape, the lampshade doesn’t even need to be fixed. Such an unusual lamp can be additionally decorated with any decor, such as braid, rhinestones, flowers, appliqués.
Crafts from plastic cups for the New Year
Sometimes the most unexpected materials are used to make children's crafts dedicated to the New Year celebration. In particular, boys and girls can make original New Year's accessories from plastic cups. In our article you will find some interesting ideas.
How to make a New Year's craft "Snowman" from cups?
One of the most common New Year's crafts that you can make with your own hands from disposable plastic cups is a snowman. Making this character is not at all difficult, so even a child can cope with this task. The following master class will help you create this original interior decoration:
- Take 25 cups, lay them out in a circle and connect them together with a stapler.
- Also attach the second row to the first; it should take you the same number of glasses.
- Continue attaching cups, using fewer and fewer each row.
- You should end up with a fairly large lump.
- Take 18 cups and repeat the entire specified sequence of actions. Install the second com on the first.
- Place a garland under the snowman and turn it on.
- Decorate the toy to your own taste.
Crafts for the New Year can be made not only from plastic disposable cups, but also from paper ones. So, from this material you can make a beautiful garland to decorate the room for the holiday. The following step-by-step instructions will help you do this:
- Prepare the necessary materials. You will need disposable paper cups, tinsel, scissors, stapler, paper and foil.
- Using a stapler, attach the tinsel to the bottom edge of the glass.
- Similarly - to the top edge of the cup.
- Roll a small ball from a sheet of white paper.
- Wrap it in foil.
- Thread the thread from the rain into a needle and pierce the bottom of the glass in its very src=»https://womanadvice.ru/sites/default/files/34/podelki_iz_plastikovyh_stakanchikov_na_novyy_god15.jpg» class=»aligncenter» width=»660″ height=» 494″[/img]
- Pull the needle through the glass.
- Attach a ball to the rain.
- You've got a bright New Year's bell.
- Make a few more bells using different colored materials.
- Collect all the resulting bells on tinsel and hang the garland in the desired place.
DIY decorative candlestick made from a glass in a marine style
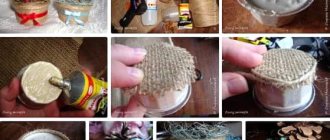
A single wine glass and trophies brought from vacations from the shores of the seas and oceans can easily be turned into an original candlestick for home decor or as a gift.
In this master class you will see how to make a candlestick from a glass with your own hands, using sea sand, shells and other natural materials for decoration. This accessory will decorate the bathroom, living room or bedroom. Don't forget to put a candle on the table for the New Year and warm the atmosphere on a romantic evening.
Available materials and simple tools
To make a decorative candle holder, find a glass wine glass. Any glass will do except champagne and fortified wine glasses. Their bowls are too narrow to create a marine-themed composition.
Glasses for red wine or cocktails are ideal because their rim diameter is larger than the diameter of the entire bowl. Look in the closet, ask your friends, there are often single glasses left without a pair that can no longer be placed on the table.
Also prepare:
- candle;
- CD;
- sea or river sand;
- sea salt;
- shells of different types;
- a simple pencil;
- transparent universal glue “Dragon”;
- tweezers.
Step-by-step transformation of a glass into a candlestick
Place sea salt in a bowl. Shake it a little so that small debris and small salt crystals fall to the bottom. Generously coat the stem of the glass with clear all-purpose adhesive. Deepen the base into the bowl of salt until the salt covers the entire surface.
Remove the wine glass, turn it upside down and set it aside until the glue dries completely. This will be the working part of the candlestick.
Take a damaged CD from your supplies. It would be better if it was a transparent round plate, which is used to cover the discs in a large package. Cover the central hole with any flat shell. The circle will make the candlestick stable, and the mirror surface will enhance the effect by reflecting the lights of the candle flame.
Place the glass on the disk in the center with the bowl facing down, and use a simple pencil to trace the outline of the edge. This way you will designate the area of the future composition of sand and seashells.
Apply a thin layer of transparent glue to the central platform and cover it generously with sand. Gently press down on the sand and then shake off the excess.
Glue the stones and discarded shells inside the drawn circle in the shape of a cone. At the same time, do not skimp on glue.
Apply glue selectively to the surface of the cone and add sand again. Shake off excess sand.
Select the most beautiful shells and colored pieces of glass and glue them onto the cone-shaped composition and on the inside.
Apply glue to the edge of the wine glass and glue it to the disc.
After complete drying, place a candle on a hand-made candlestick made from a glass and light it.
If you have a lot of seafood, be sure to check out our other master classes using this material:
- bottle decor,
- marine style candle,
- photo frame from a bottle,
- shell topiary.
Almost free souvenirs seal the memory of a wonderful vacation. Even after a few years, they will lift your spirits and warm you with pleasant memories.
A master class on making a candlestick from a glass with step-by-step photos was prepared specifically for the online magazine “Women’s Hobbies”. Find all handicraft lessons in the MK catalogue. Don't be afraid to try new things! Detailed instructions are intended for beginners.
Cockerel from a plate
Crafts made from paper plates in the shape of a chicken are very popular and easy to make. They will also require a minimum of materials:
- 5 paper plates;
- Glue;
- Paints;
- If desired, you can use feathers for decoration.
Progress:
- We leave one plate whole, it will serve as the body. Carefully cut out the rims from the rest. From one plate we also cut out an even circle without a rim for the head;
- The cut out rims of the plates will be used for the tail, comb, beak, and beard. They need to be painted in appropriate colors and glued to the head, the tail to the body;
- You can also cut out legs and a wing from the headbands, you can simply draw them;
- Now you need to glue the body onto the cardboard base, inserting the cut out tail under it;
- At the next stage, the head with all the details already drawn and glued is attached to the body;
- You can attach a feather to decorate the wing or simply draw it on the body.
Candlestick with frosty berries
Let's add a little winter fairy tale to the table setting; a candlestick made from a glass is a good idea for this. For the New Year, everyone is waiting for some kind of miracle, but you can really create it with your own hands. We install a glass candelabra with frozen red berries covered in ice. A master class will help you make this amazing craft.
What you will need: • a wine glass; • white acrylic enamel; • yellow and red acrylic paint; • black tinting paste; • a simple pencil; • alcohol or nail polish remover; • Matt lacquer; • cotton pad; • candle; • decorative decoration frosty berries; • palette and glass of water; • thin brush.
Step-by-step production: 1. Degrease the glass with medical alcohol.
2. Coat the stem of the glassware with black tinting paste.
3. We paint the bowl itself with white enamel.
4. Apply matte varnish to the dried paint.
5. Turn the glass upside down, and on the white part we depict a snowman, make his face, draw eyes, nose, mouth and cheeks.
6. We decorate his head with decorative berries.
7. Since the stem of the glass is on top, it will play the role of the candlestick itself. A charming and cute craft, if there are children in the house, they will undoubtedly be happy.
For reference! Frost can be applied to the berries with fine salt or sugar, using PVA glue.
Pencil cup
If you decide to make such a craft with your children, then know that you can teach kids to use plasticine, to see even simple, ordinary objects with new uses, which is important.
To work, you will need to prepare a plastic bottle, and it can be from milk, kefir, plasticine, scissors, but also, of course, flowers, everything here is at your discretion. For example, if there are no specialized flowers, you can use artificial ones, even those made of paper.
You need to prepare the top part of the bottle in advance, cutting it off so that the glass is no lower than 15 cm; if you ignore this practical advice, the glass will not be stable at all.
Next, it is important to take plasticine, starting to glue thick sausages from it, distinguished by their green color. This is due to the fact that it combines perfectly with plant stems. As for the top strip, the plasticine is attached to it, the bottom strip is intended for attaching large flowers.
As soon as the glass is ready, you can safely put both pencils and brushes in it. This step-by-step process of making crafts with your own hands will allow you to easily implement such an idea, turning it into reality.