Comments: no Published: 11/29/2015
Rating:
Illumination of door handles in a car is an insignificant but very useful option that makes using the car at night much more comfortable. A person does not have to fumble around the door to open it. Doing such tuning with your own hands is quite simple, and it is quite inexpensive.
A combination of aesthetics and functionality
The interior lighting of a VAZ as its tuning, done by hand, is usually designed by the developer to solve several problems at the same time.
The first of these tasks in relation to the VAZ-2110 is the creation of an appropriate image, which is achieved by using additional sources of varying brightness and color.
As for the functional role played by car interior lighting, its practical achievement is much more difficult. For the VAZ-2110, the presence of additional light sources means that in the dark, very comfortable conditions are provided not only for the driver, but also for passengers. Let's name just a few of them:
- tuning in the form of lighting helps to quickly find various objects, including small ones, both in the handbag and glove box, and on the seats;
- the so-called polite interior lighting makes getting into the VAZ-2110 much more comfortable, by delaying the turning off of the light after closing the door, and gradually reducing the brightness of the standard light bulb;
- illumination of the lower part of the VAZ-2110 interior allows you to quickly detect objects that have fallen to the floor near the feet;
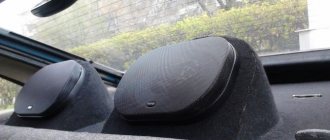
- Illuminated door handles make it easier for passengers to get in and out.
The list of advantages can be continued if desired.
Laser backlight with logo, LEDs and other lighting options
So, what kind of backlights are there, what are their features? Which option is better to choose for your car doors? Of course, additional lighting can be achieved through simple LED bulbs and shades used to illuminate drawers. This is a fairly inexpensive method that does not require much time, effort, or money. True, you shouldn’t expect anything unique from him. The only thing that can surprise you is to install an additional switch - then it will be possible to deactivate this option even with the door open.
A more interesting option is laser illumination for car doors. Its advantages, of course, include originality, because just ten years ago neither the owners nor even the car manufacturers themselves could imagine that such mini-projectors with a logo would appear in the near future. Naturally, in this case, material costs will increase somewhat, because laser technology appeared in the tuning field relatively recently. However, it is not enormous, so if desired, almost every motorist will be able to afford such a lighting device for the door. And laser illumination with a logo should not cause problems with installation; everything can be done with your own hands.
Another type that requires discussion is the installation of LED strip. So, in this case there is no need to cut the trim to hide the tape inside the doors. True, if there is a desire to protect her from negative external influences, then a similar operation can be performed. By installing this type of door tuning yourself, you will get much more light compared to LED bulbs, and it will not fade, even if there is special plastic or silicone protection. But we are not talking about an exquisite image of the logo when exiting the car. The disadvantages include the possibility of damage to this element during car washing, so do not forget to warn the service personnel in advance about its presence.
DIY LED lighting installation
In order to get the job done, we will need:
- heat shrink pipe;
- electric wires;
- LED strip and LED lights.
Installation is carried out, as a rule, on the dashboard, in places where lamps and standard lighting elements are located. They can be simply replaced with LEDs if desired. The base of the diode lamp is the same as that of a standard lamp, so replacement is carried out without any difficulties.
Next, you need to install the tape at the bottom in the foot area and around the perimeter of the top of the car. After the necessary measurements, cut off the amount of tape that is needed. Cuts should be made in areas where solder contacts are located.
When measuring, you need to provide some excess wires for reserve. After cutting and soldering to the contacts of the tape, you need to put on the heat-shrinkable tube and heat it with a hair dryer until there is no shrinkage. We process the following fragments in a similar way.
The connection must be made through an RGB block container or in the same way as neon lights. This will ensure that the lights turn on when the car doors are opened.
It is very important to maintain the correct polarity here - this was discussed above
After connecting it yourself, the car door lights will be ready for use - check its operation. If everything is in order, you can be congratulated on your success.
Tools and materials used
When implementing any type of interior lighting with your own hands, simple tools and consumables are used.
- The installation tools you will need are pliers, a sharp knife, scissors, and a soldering iron.
- Consumables are considered to be tin and rosin for soldering, one or more terminal blocks, screw-on lugs, as well as a toggle switch or a locking button.
The LED strip is sold by length, so the necessary measurements should be made in advance.
During installation, the individual lighting components are connected to each other by a flexible (multi-wire) cable, the core area of which should be 1 square millimeter. Soldering and contact connection points are covered with electrical tape. A conventional multimeter is used as a means of monitoring correct installation.
How to troubleshoot door switches on a Grant
We invite you to study in detail simple methods for troubleshooting door limit switches on the popular Lada Granta. In practice, every car owner can cope with repairs. So, what can you do when, in the cold season, the door switch stops working correctly:
One of the simplest ways is to treat the surface of the mechanism with a water-repellent specialized liquid. This will help until the air temperature reaches minus 50 degrees. However, such a measure is temporary and rather short-term. It is necessary to remove the anthers from the end switches. It must be remembered that special rubber caps perform a purely protective function, and if you remove them, you will have to more carefully monitor the cleanliness of the mechanism
It is important that the anthers can be removed for a short time when there is severe frost outside, which negatively affects the operation of the device. It is recommended to lubricate rubber surfaces with silicone. However, this method will be useful to you at an air temperature of at least minus 10 degrees. Standard caps can be replaced with analogues
You can use boots from other mechanisms, for example, a good version of Toprun, they are almost identical to the original LADA Granta caps. The most important thing is that such anthers are made of a material that does not lose its elasticity in cold weather. You can install a small spring under the boot. To do this, you can use springs with a diameter of 12-13mm, a length of 18-20mm, with a wire thickness of 1mm. The springs are installed directly on the switch rods under the anthers. If the spring is good, then it will allow the cap to be compressed, and at a temperature of minus 40 degrees it will never let you down.
Illumination of interior car handles
I often read and saw some photos of the interior door handles. I didn’t see it in person, but I really wanted to... In order not to put off meeting the beautiful, and not wanting to overpay for second-hand illuminated pens, I decided to illuminate them myself. LED was chosen as the light. But then I came across the fact that there are no red ones of the required shade on sale. In BMW, all the lighting is coral red. The diodes I came across were either ruby red (like the stars of the Kremlin) or almost orange. There was no middle ground (maybe I was looking poorly...), so I resorted to a trick. I used white light diodes...(?)
I bought regular SMD 5060 flat diodes of warm white color (there were also cold and white moon ones) for 3 volts. I cut out light guides from 4mm plexiglass and polished them on all sides. And to obtain the desired shade, I used a light filter made of red plexiglass, which I subsequently also polished and installed between the diode and the light guide.
Next, square holes were cut out in the handles with a knife.
The light guides fit tightly into the holes. A red stripe filter was soldered to the end of each.
Having attached an LED with soldered wires and resistance to the light filter, I filled the whole thing with hot-melt glue from a gun.
I connected it to all the batteries in the house (9 volts accumulated)
And satisfied with the result, I went to install the handles in the car. This is how they shine in their place. As you can see, the color tone does not differ at all from the original backlight. The only negative is that the light is brighter than I wanted. But I think so. By matting with fine sandpaper you can achieve a decrease in the brightness of the illuminated area and a more uniform beam of light.
That's it. I’ll go look on the Internet for courses on photography in the dark... Since the latest photos do not stand up to any criticism... And if the light was on in the cabin and I could see everything perfectly, then the camera refused to look at the world through my eyes. And although the camera seems to be quite sophisticated (7 years ago it was sold as a semi-professional one), I am unable to figure out this number of settings... As they say: either the skis don’t work, or I’m a *****...
PS Maybe one of the photographers can advise whether it is possible to take decent photos in the dark with my camera... only in Russian, without terms.
Well, as usual, I couldn’t find peace... My work of art was gnawing and tormenting my soul
How to connect?
First of all, you need to understand how to supply light to electronic devices. It is necessary that opening the door does not disrupt their operation. This is achieved by connecting the door to the electrical network in the area of the door hinges. This area of the door leaf and door frame is in contact with each other.
DIY door lighting connections
Illuminated push handles are installed for metal entrance doors. Usually, they are already installed on the door. The door is sold together with the frame. The wire for connecting the LED goes to a loop inside the case and extends outside the box. All you need to consider when installing a door is how to connect the wire to the general electrical network. Since this is factory fittings, it has a special device for changing the voltage to the value required by the LED device.
How to connect the backlight in models that do not have wiring in the housing. When you try to do this yourself, you will encounter several problems, some of them serious.
- First, how to run the wire. It will not be possible to make a hole in the loop area and push it through. Why? Because the door has stiffening ribs across the entire width of the door leaf. These are 2-3 vertical stiffeners. If you drill a hole at the loop and insert a wire, it is impossible to overcome the internal barrier. There is only one way out: run the wire along the contour of the door. This causes another problem. How to route the wire along the outer body of the door so that it does not get pressed when closing. Otherwise, the insulation will be damaged and there will be an electric shock. The doors have seals; you can run a wire under the seal.
- How to secure the wire in the loop area.
- How to change the electrical potential to a suitable one for an LED light bulb.
Hole for wire in door frame
The problems have been voiced and a solution has already been found for the first of them. All that remains is to decide on the course of action.
- First of all, we draw a wire from the door frame to the door leaf. We make a hole in the door structure for the wire. The wire runs along the outside of the box, will pass through it and attach to the canvas. The junction of the box and the canvas is a likely place for damage to the wiring. Hence, keep the amount of wire to a minimum. At this point it is placed in a protective housing. The body is not thick so that it does not interfere with closing the door.
- Next, remove the seal, starting from the top hinge and up to the locking mechanism along the upper side of the canvas. We lay the wire under the seal. It is attached to the canvas, secured with glue in places, and on top it is pressed with a sealant. If the seal is connected using a tongue-and-groove system to the canvas, then wiring the wire will be easier. There will be somewhere to hide it. If the sealant is glued, then glue the sealant to a lesser thickness or use a knife to remove the excess.
- After the wire is drawn, we make a hole in the handle area. Remove the lock to connect the wire.
- After all the parts are done, we check again whether the wire is pinched, especially in the loop area.
- To connect the LED to a 220V network, a special convector is used. Buy it at the store. You can see its connection in the instructions.
Voltage transformer
The lighting of the fittings looks beautiful and is convenient. But doing this work yourself is problematic. It is better if the fittings are manufactured and installed on the door by specialists during production.
Thinking through the design
Of course, a car with neon lights looks amazing! And neon interior lighting, when installed correctly, can significantly change the interior of a car. Such lighting looks most advantageous in the dark, as well as on a snowy road in winter.
ADVICE! Think about the color scheme of your lighting in advance. Leading automobile designers, when choosing any type of lighting tuning, recommend choosing it not to match the body, but to contrast it. For example, if you have a blue car, then cherry-colored neon lighting will look much more impressive. Is it difficult to decide on colors? No problem! "Da Vinci's color wheel" can help you.
A car with neon lights looks amazing
Let's start installation
You purchased a brand new neon kit for your car, brought it home and are ready to install. To get started, please read the instructions carefully.
If you decide to install neon lighting for the car interior, then the tape is attached starting from the rear of the car to the trim using superglue or a special adhesive strip included in the kit. Just glue the cord in the right place and connect the batteries to it - car electrics, regular batteries or an inverter for connecting to the cigarette lighter. Connect the wires in the correct sequence: from the + contact of the battery to the place where you plan to install the switch, and connect the negative contact to the body. For a neon cord up to 5 meters long, a 12-volt inverter is sufficient. It can be used to create designs, variations of shapes and colors that are limited only by your imagination.
If, for example, the bottom of a car is chosen as the location for installing the neon, then first you need to mark the fastening. And then:
- Don't forget to buy the necessary tools, silicone for insulation, fastenings (staples, screws, clamps), wires and a transformer.
- Install the tubes according to the intended pattern.
- Now feel free to tackle the electrics. The wire connection is serial. Observe polarity.
- The transformer is secured under the hood with screws. We connect to the battery with high-voltage wires. Then we pull the switch from minus into the interior. All that remains is to connect the wires from the tubes to the high-voltage unit.
Ready! Your car has been completely transformed. Now get ready for the admiring glances of passers-by and other motorists. Good luck on the roads.
A combination of aesthetics and functionality
The interior lighting of a VAZ as its tuning, done by hand, is usually designed by the developer to solve several problems at the same time.
The first of these tasks in relation to the VAZ-2110 is the creation of an appropriate image, which is achieved by using additional sources of varying brightness and color.
As for the functional role played by car interior lighting, its practical achievement is much more difficult. For the VAZ-2110, the presence of additional light sources means that in the dark, very comfortable conditions are provided not only for the driver, but also for passengers. Let's name just a few of them:
- tuning in the form of lighting helps to quickly find various objects, including small ones, both in the handbag and glove box, and on the seats;
- the so-called polite interior lighting makes getting into the VAZ-2110 much more comfortable, by delaying the turning off of the light after closing the door, and gradually reducing the brightness of the standard light bulb;
- illumination of the lower part of the VAZ-2110 interior allows you to quickly detect objects that have fallen to the floor near the feet;
- Illuminated door handles make it easier for passengers to get in and out.
The list of advantages can be continued if desired.
Installation of backlight with logo
Operations for installing an LED or laser projector are formed according to the characteristics of the device:
- logo color and chosen color;
- type of fastening and type of power supply;
- the need for technical equipment and facilities.
In accordance with the list, individual manipulations should be excluded or supplemented. A complete list of procedures for installing car door lighting with your chosen logo yourself:
- Remove the casing where the lighting system is secured. Perform with improvised means with maximum care.
- Form holes of the appropriate diameter in the bottom of the machine door. Use the cutter included with the product or your own similar device.
- Select an optical element with a logo, install and secure the projector. For mortise modules, a complete nut is used.
- When using an overhead or standard module, seal the joint with tape or masking tape.
- For mortise mechanisms, connect the projector power supply to a standard 12V power supply. Carefully insulate the connection points.
- Carefully return the door shell to its original position. Remove traces of external work. Bring the car back to its original condition.
- Assess the accuracy of opening and closing, check the correct movement of the door. Ensure that the installed system operates adequately.
https://youtube.com/watch?v=L_DT-y0Tc6Y
The specifics of installing the door lighting module allow the procedure to be combined with the installation of a door closer and alarm installation.
The lighting system for car doors performs a technological and auxiliary function. At night, a laser or LED projection illuminates part of the space near the door, allowing the driver to navigate outside the car. In contrast to the use of factory equipment, a machine with an installed system has a stylish visual effect and individual design.
Logo lighting is used for the front and rear doors. A variety of lenses with emblems of car brands and models, availability of assortment and technological ease of installation strengthen the product in the body accessories market. The devices are easy to use, require ordinary daily care and following the instructions, are economical in energy consumption, and create comfort at night.
Let there be light
If you are wondering how to make the wheels illuminated, then our instructions will answer it for you. Let's do this job using LEDs, as they are best suited for this purpose. We will not describe installation on all four wheels. Let's look at the whole process using one wheel as an example, and the rest are performed in a similar way:
- To begin, we will need several LED strips, four current stabilizers, corrugated tubes, wires, sealant, glue and wire.
- Then we lift one side of the car and. If desired, the car can be placed on safety stands, since working with a car mounted on a jack is extremely dangerous due to poor stability.
- After removing the wheel, you must thoroughly wash the brake disc casing with gasoline and dry thoroughly.
- After everything has dried, you need to measure the length of the LED strip. This is quite easy to do - just wrap the tape around the casing and cut off the excess. Remember that the tape should only be cut in places specially marked for this purpose. Every three diodes there is a white mark, cut along it (if you cut it in the wrong place, you will simply ruin the tape, since it will no longer work).
- We coat the finished diode strip with glue on the side that will be adjacent to the casing.
- Carefully glue the tape to the casing and let the glue set. After the glue has dried sufficiently, we additionally attach the tape with wire to the brake disc casing.
- The tape is fastened quite tightly. Carefully seal the cut end of the tape using sealant. This is necessary so that moisture does not get into the silicone tape with lamps and ruin all our beauty.
- Wires (plus and minus) are released from the untouched end of our ribbon. We solder the wires to them that will connect to the stabilizer.
- We carefully insulate the soldered wires and place them in a corrugated tube, after which we bring them into the cabin.
- Next, the wires are connected to the stabilizer and lead from it to the headlight wires. If you connect it not to the headlights, but directly to it, then you will have to install an additional switch in the cabin for our lighting. In our case, the illumination of the car wheels will work only when the headlights are on.
Do-it-yourself wheel lighting requires a lot of care and precision on your part. The main components of the backlight are very fragile and can easily fail if mishandled.
Do not forget that when connecting LED strips it is very important to observe the polarity (plus and minus), since if you connect the poles incorrectly, the diodes will not work
If you lower your financial priorities, you can purchase a ready-made kit. Ready-made car wheel lighting has many unique features. For example, sound sensors that respond to musical compositions. As a result, “light music” is produced on wheels. If the lighting kit is multi-colored, then the wheels will play with different colors of the light spectrum. The kits, as a rule, always contain detailed instructions for installing and operating a specific device.
Keep up with auto fashion and let your “steel friend” be the most beautiful, bright and memorable!
One of the easiest and most exciting ways to give your car an unusual look is light tuning. This is a fairly common art that allows you to add zest to any car and make the underbody, radiator grilles and even wheels shine with neon colors. Wheel illumination, as a method of light tuning, always looks very unusual and attracts attention; the contrasting glowing wheels of the car are mesmerizing.
In fact, this effect can be obtained from the primitive installation of LED light equipment in the wheels of a car. For this, an LED strip is used, which should be installed and connected. Next we will look at these processes in more detail.
What is a projection of a car logo on a car door?
Illumination in the door with the logo of the car brand is an advanced innovative technology for exterior design. This is a stylish light decoration of a part of the body, an open space near it. Its features:
- Spectacular lighting decoration of a part of the car and the surrounding area when opening the door.
- An economical option for additional finishing of a standard structure.
- A simple and convenient system for assembly and mounting on the vehicle trim.
- The ability to customize the backlight yourself at home.
- Wide selection, variety of shapes, logos of light decoration.
- Low power consumption with high brightness (use of low-voltage LED illuminators).
- Constant availability on the market, intense competition among projector sellers.
- Introduction of new technologies into the factory settings of the car (wireless transmission of light rays, use of laser techniques).
Car door lighting in this interpretation is not only a useful attribute, but also a way to acquire a stylish original accessory to reflect the taste and imagination of the vehicle owner. The module has moderate dimensions, does not disturb the balance of the car, is disguised under the body skin, and is sheltered from adverse weather conditions.
A common practice in choosing a projection on a car door is the car logo. The image of the selected element is transferred to the driver's exit location. At night, door illumination creates an additional light coating on the asphalt or roadway. The system is designed in such a way that when the door is closed, the adjustment magnet is activated and the projection is turned off.
DIY door handle lighting
When in a dark car interior people begin to fumble with their hands along the trim in search of a handle, the driver can only hope for the efficiency and confident coordination of the movements of his passengers. Such situations happen all the time, and if you have to transport guests after a noisy feast, a country picnic or a barbecue party, the condition of the doors can deteriorate sharply.
Illumination of door handles, done independently and at no special cost, will help correct the situation. This is one of the interior tuning options, which is not a mandatory procedure, but, unlike many other types of finishing, can bring practical benefits.
Main conclusions
Illumination of door handles in the car interior is a convenient and visually attractive tuning option that decorates and increases visibility in a dark interior. There are different options for implementing the method, from simply installing an LED on the back of the case, to using a special panel with a luminous inscription.
Perhaps there are other options, original, successful in decorative terms. We encourage all our readers who have their own experience in this matter to comment on this article and publish their own ideas, lighting options, or share thoughts on improving existing methods.
Previous LEDsCharacteristics and advantages of the Piranha LED Next LEDsFeatures, characteristics and maintenance of LED lamps for street lighting
Tape placement
First, we select a place to place the tape. Ideally, it should not be visible. But it should shine well on the rug. Having decided on the installation location, you can proceed to preparing the tape:
- First you need to measure out the desired piece of tape. Please note that it can only be cut in certain places. In this regard, it is better to make it a little shorter than to allow it to sag;
- Next you need to carefully solder small pieces of four-wire wire to the tape;
- We are testing, to do this you need to connect the resulting structure to a power source;
- If everything is in order, then isolate the connections. The easiest way is to use silicone sealant, but you can get by with regular electrical tape;
- We fasten the resulting lighting device into place. To do this, you can use plastic ties or silicone glue.
This work will have to be carried out with any connection method. After this, you need to decide where to connect the backlight. A lot depends on your goals and wishes.
Installing a diode in the handle
Fittings with LED lighting.
Next, you will need to install the diode directly into the handle itself. This is where an electric drill comes in handy. But first, try to place the diode inside the handle and temporarily fix it on the door. Usually in modern cars the design allows this to be done. After this, be sure to connect the diode to the electrics and check the operation.
Experts advise always pointing the diode lamp downward - this way the light will best illuminate the handle. They also recommend connecting the other ends of the wire to a power source in the form of a window lifter if you don't want a constant glow. But if on the contrary, it makes sense to solder the wires to the cigarette lighter power supply.
When this is ready, make the necessary markings on the handle in those places where the wiring will come out and where the diode will be visible. This is not always necessary and depends on the specific design of the handle. But if it comes to this, then you will have to work with a drill, drilling holes. Choose the minimum drill diameter. After all, you can make the hole bigger, but you can’t make it smaller.
Now all you have to do is finish connecting the wires and diode. Now that all the main work is finished, you can safely put the plastic protective plugs on the small terminals first, and then put on them the plastic case that was originally removed.
As for the power part, here you first need to insulate it using small pieces of electrical tape, and then just put plastic protection on the wiring. But keep in mind that the protection is already applied when the LED wires are connected to the main power wires.
Connection
There are several suitable options for how to make the lighting in your car yourself to ensure an original glow in your legs.
Each motorist will decide for himself how it will be more convenient and easier for him to connect the LED footlights in the car. But there are 3 main options:
- to the lighting of the interior itself;
- through the cigarette lighter;
- from dimensions.
The choice depends on the format in which the driver wants to see the backlight. After all, each scheme provides its own version of when and how the glow will be activated.
Through interior lighting
Some motorists prefer to install footwell lighting in their car by connecting to the main lighting system of the vehicle interior.
This connection method ensures that the backlight will always turn on exactly when the doors are opened or when the car interior lighting is turned on.
If you connect LED lighting for the footwell area in a car through interior lighting, then the light source will need to be connected according to the following algorithm:
- remove the interior lamp;
- connect the wires, observing polarity;
- the white wire usually goes to the plus;
- the negative wire is connected to the red wire;
- the wires are hidden under the interior trim;
- It’s most convenient to stretch them directly along the side post;
- Next, connect the wires of the installed LED strips to each other;
- connect them to a power source;
- check the system for functionality;
- if everything is functioning, perform high-quality insulation;
- return the lampshade to its place.
If you install an additional controller, the light will gradually dim rather than suddenly turn off.
If you are not sure about the polarity of the wiring, use a tester or multimeter. This will make it clear where is the plus and where is the minus. However, the wires may differ in color, depending on the car.
In this way you can connect to functioning interior lighting, but this is not the only option.
Through the cigarette lighter
You can also activate the LED strip from the cigarette lighter, which is done quite often.
By connecting the strip to the cigarette lighter, the light will turn on when the doors are opened.
Not the worst option, since most drivers do not need backlighting while driving. They use it for comfortable getting in and out of the car.
The connection itself is performed according to the following algorithm:
- plus the LED strip connects to the cigarette lighter;
- the minus must be connected to the limit switch on the door;
- the tape wiring is brought out together with the rest of the wires, connecting into a single bundle;
- All contacts are insulated and secured with a tie if necessary.
How exactly to remove and hide the wires depends on the specific car and the driver’s ideas.
Through dimensions
If you connect from the dimensions, then the backlight will function constantly, in parallel with the operation of the dimensions. That is, this is the most relevant option for many, since the system will turn on at night while traveling.
You can connect the plus from any backlight bulb. For example, the glove compartment or dashboard. The minus is thrown onto the body.
If you connect the minus to the door limit switch, then the backlight will turn on provided that the door is open and the lights are on.
Here, each motorist decides for himself how and in what situations he needs the LED strip in his legs to work. Therefore, you can choose different connection options.
By installing the tape in the legs, you can achieve the original appearance of the interior, as well as get some practicality from such a solution. Having chosen the appropriate work option, all that remains is to implement the scheme. Moreover, you can do this yourself, without having a wealth of experience and special specialized education.
How to find limit switches quickly and without any problems
Many people do not quite know where the limit switches are located in Kalina, Niva or other cars. But when you have to install an alarm, searching for them takes quite a lot of time. In order not to waste extra time on inspecting the interior of your own car, you should use the following tips:
- find the documentation for the car and look at the layout of various systems, devices, limit switches and wires that lead to them;
- look at the instructions for the alarm system - often this is where you can find the location of connection points such as limit switches;
- look for a layout diagram for a Niva, Viburnum or other vehicle models on the Internet;
- look for these points in the car interior using a voltmeter.
These methods will help the car enthusiast find absolutely all limit switches if he needs to connect an alarm system or replace these switches with new-style devices
The limit switches are designed to make it easier for the driver to deal with different car systems, and it doesn’t matter whether it’s a domestic car - Niva, Kalina or foreign models, everything will be as comfortable as possible
Limit switches are very small in size, are installed in many places on the car, and perform specific functions. These devices are designed for comfortable access to a functional range of certain vehicle systems and simplify the process of connecting an alarm system. Each limit switch is responsible for the operation of its zone, but they can be connected to the same wire. Connecting to different wires is no less common. Negative and positive limit switches are found in both foreign and domestic cars - the interiors of Niva, Viburnum and the external space of the car. They are easy to buy, you can replace them yourself, and every motorist can connect additional wires to them independently.
Your request on the topic of plus or minus to connect to the grant end caps has been processed. The best repair video and instructions on how to repair can only be found on our website. The presented videos are published with photos. Enjoy watching.
Owner's reviews: Price. Reliability Pick-up Control Economy. I really like the car!
Category: Video instructions
Published by admin: at the request of Istom
Preparing and connecting wires
Illuminated door handles from the inside.
Now let's get to work. First you need to disassemble the door handle. This is done using appropriate screwdrivers. Now take the LED lamp and remove the plastic housing from it. There you will see pins at the end of the lamp that will need to be soldered to the wiring. But before this, it is advisable to lightly clean the wiring and put small terminals on them. This will make soldering much more convenient for you, and the quality of work will be better.
Related article: Cleaning an old cast iron bathtub
Don’t rush to put plastic plugs on the wires for protection just yet, since in any case you will still have to remove them until the work is completely finished. On the other side of the wires, it is also necessary to lightly strip and put terminals on the ends, but of a larger size.
When doing this kind of work, it is important to consider one important point. As a rule, any door light in a car has two sides: one is the lamp itself that will glow, and the other is the part from which the main power will be supplied to this lamp
So this power can come either directly from the electrical part of the car (usually you need to open the box that is located near the steering wheel) or from the door card, if it has direct power (this is often observed in modern car brands).
In the first case, you need to calculate the length of the wires in advance so that it is completely enough to connect the backlight and at the same time for proper placement, so that in the end the wires do not get in the way under your feet. In the second case, small wires are usually used, since their location does not extend beyond the area of the handle. But still, in both the first and second cases, it is advisable to take long wires, since they can always be shortened.
After this, use an ammeter to check that all wiring is connected correctly. If you don’t understand electricity very well, then it is better to seek advice or direct help from an electrician so that in the future there are no unpleasant problems with a possible short circuit.
Tool for the job
Illumination scheme for external handles.
First of all, you need to stock up on the necessary materials and tools in advance. Moreover, you need to provide for the availability of everything right away, since working with electricity cannot be delayed, especially when it comes to a car. So, you will need:
- small LED light bulb;
- terminals;
- thin wires;
- blowtorch;
- screwdrivers;
- knife;
- insulating tape;
- drill;
- Super glue;
- plastic plugs for terminals;
- ammeter;
- pliers.
When everything you need is prepared, decide for yourself which door you want to start with. Experts recommend starting with lighting on the front doors, since access to the electrical part of the car in case of anything will always be closer here.
LED lighting elements
Illumination, including in the leg area, can be created by various sources. Without big problems, you can implement all the varieties of known interior lighting options with your own hands.
The accumulated experience clearly demonstrates that such tuning provides the best results when using single and strip semiconductor light sources to illuminate the area around the legs and other places. This is determined by the fact that:
- they do not require high voltage for their operation and are powered from the vehicle’s on-board network;
- due to the low voltage, semiconductor sources are safe to use, even in the area of the feet;
- sources of this type are economical and do not create a serious load on the on-board network of the VAZ-2110;
- LED strips are very flexible and allow you to go around any contour;
- LED strips are available today in a variety of colors.
It is of no small importance that you can make such lighting yourself and connect it to the car network without deep knowledge in the field of electrical engineering
Why connecting an alarm system to limit switches is an important process
Every car alarm, no matter what car it is installed in, is an important element that ensures the safety of the vehicle. For Niva, Grant, Kalina, Skoda, Chevrolet, Lanos, Octavia Tour, Logan and others, the connection diagram is almost the same. Many people cannot fit limit switches into the process of connecting an alarm system, but it is the connection to them that plays a very important role.
If you correctly connect the alarm wires to the limit switches, then the owner of a Niva, Kalina, Skoda, Logan, Chevrolet, Lanos, Octavia or other cars will be able to achieve the following effect:
- the alarm system will block the limit switches of the door, hood and other systems more reliably than without it;
- installing an alarm on the end switches of a Niva, Viburnum or other cars will maximally prevent unauthorized entry into the interior of the cabin;
- such a system will notify the vehicle owner that he has forgotten to open the door or trunk, or has not turned off the lights or heating system.
The limit switches of different cars have their own specific connection to the central unit. There are options when all limit switches are combined into an integral system, and there are cases that suggest that a separate wire must lead to each limit switch. Depending on this feature, the level of complexity of connecting the alarm will depend. If the system operates on one wire, you can simply crash into it, but when each limit switch has its own separate wire, you need to make a separate alarm connection to each of them.
How to properly install an LED strip for car interior LED lighting?
Installation of a car with LED strip is carried out according to the standard scheme. First of all, you need to purchase a set of wires, heat shrink tubing, and tape.
It, like individual diodes, is purchased at automobile markets and/or in specialized automobile stores. You should not skimp on the quality and length of the tape; experts advise stocking up on good LEDs. It’s better to buy more diode strip than to realize at the last moment that you don’t have enough.
In addition to interior design, diode strips are actively used to illuminate car wheels.
Step-by-step instructions for diode connection of car interior lighting
Arrangement of lighting in the car, with your own hands, should begin with the instrument panel of the vehicle. To do this, standard equipment is removed: instruments, panel lighting, and diodes are installed. The installation process is very simple, since the diodes have bases similar to factory equipment.
Then you need to determine the installation locations. Many people prefer to mount diodes along the entire perimeter of the ceiling, parallel to the car body pillars. The summer is laid gradually, and the remains can be cut off.
The cut points are clearly visible: they are marked with special membranes. After the procedure, do not forget to clean the ends of the cut and solder them together. We close the connections with bushings and heat them with a hairdryer. In this case, it is better not to use an industrial hair dryer, since there is a high risk of overheating; an alternative is a regular household appliance.
Switching on is carried out similarly to the circuit of neon lamps. You need to be especially careful at this moment and not confuse the polarity points that are indicated on the tapes at the cut points.
Essentially, this is where the workflow ends. There is nothing complicated. Only the installation must be carried out sequentially and be careful about small elements when connecting them.
An important aspect when working is the combination of lighting aesthetics and its functionality, which will be discussed below.
To install or not
Before you buy a backlight kit for your car, think about whether you really need it. Think about what goals you set for yourself and how well the lanterns can satisfy them.
The presence of additional lighting in the doors makes travel more comfortable and somewhat safer. Suppose that on the way you needed to find some object lying in a door pocket. But I can’t find it at all. And here it will be useful to have additional lighting, which is not provided standard in the car. Although you should be objective, since many foreign cars, such as Toyota, Mercedes, Volkswagen and the same new Hyundai Grandeur already have lighting as standard, which cannot be said about domestic cars or old foreign cars.
So it turns out that the backlight acts as a tuning element, but at the same time performs some useful functions. Depending on the design and installation method, the door light can work when the door is closed or open.
Whether to install such equipment with your own hands or not, everyone decides for themselves.
Turn off the backlight in the switch
If there are no other ways to get rid of the flickering lamp lamp, you will need to completely turn off the LED or neon lighting on the switch. Let's look at how to do it yourself and what are the main stages of this procedure.
Preparatory stage
For those who have never installed switches or done electrical work, it is recommended that you carefully consider your actions. Pre-requisite:
- Disconnect the general power supply in the apartment/house from the switchboard switch (by checking its absence with an electrical probe or an indicator screwdriver).
- Prepare a set of necessary tools (mostly a flat-tip screwdriver).
Operating principle of the lighting device
To create illumination, an LED or neon bulb is introduced into the switch circuit parallel to the main contacts. The disconnected chandelier base circuit allows electrical current to reach the switch lighting system. Turned on, on the contrary, leads to disconnection of its power supply. The mechanism of action is based on the difference in resistance between the lamp and the additional light source.
The current passing through the switch LED is clearly not enough to heat the filament of the incandescent light bulb. However, if the chandelier contains an energy-saving lamp or an ice element, then a driver system is used that can operate on low current. Due to the latter, the semiconductor crystal may begin to blink due to the gradual accumulation of potential in the resistor and its periodic release.
What turns on the light
All LEDs and fluorescent lamps operate on direct current. Therefore, at the beginning of their case, a special driver is installed, which includes two required elements:
- Diode bridge – AC to DC converter.
- An electrolytic capacitor is a smoother for voltage pulse dips.
The latter is the main culprit for spontaneous turning on of the light. The fact is that, although weak, current passes through the backlight system - it is impossible to turn it off (only if you completely remove this parallel circuit) - and this is quite enough for the capacitor to accumulate charge. When its potential reaches a predetermined value, a discharge occurs - the light bulb flashes. Although such an event occurs fragmentarily, it nevertheless worsens the life of the lamp, especially gas-discharge ones. In addition, this reduces the comfort of a person’s stay in such a room.
Tests of in-vehicle logo projectors in cars
I’ll make a reservation right away. I just needed to measure the power and show how different samples shine. That's why I didn't analyze it. The Internet is full of such material. Whoever needs it will find it. My goal was to compare some models. I definitely took a 3 W LED and “type” Cree. If the three-watt unit successfully loses in brightness, then the rest shine quite decently.
I apologize for the picture, because... in fact, he didn’t crash it into the door, but installed it in a stool. It's faster to connect. I set my device to 7 W a long time ago and gave up on all the experiments.
| Projector 3W | Measured power, 2.2 W | Heating on the ring - 72 degrees |
| Projector 5W | Measured power, 4.2 W | Heating on the ring - 64 degrees |
| Projector 7 W | Measured power, 6.4 W | Heating on the ring - 72 degrees |
From the readings, there is only one conclusion - the first copy with a plastic case has good heating and really won’t last long. You can, of course, deceive the Chinese and install the projector not in the casing, but directly in the door - install it in metal, i.e. a kind of radiator will appear in the form of the frame of the car itself)).
Based on the rest of the subjects, it can be understood that there is no significant difference in temperature. But to calm down, I would set it to 5 W, it will work a little longer. Although my “Fina” has been running 7 W for two years now and whatever. Real ones. Chinese, not just any dealers of Russian tailoring.
Tags: machine, battery, beat, sconce, view, choice, switch, house, , replacement, sign, isolate, cable, like, design, , light bulb, , magnet, installation, power, nominal, lighting, transfer, rule, principle , wire, project, start, , work, size, resistor, row, garden, light, lamp, LED, system, connection, means, ten, type, current, , photo, shield, effect