Circular saws are essential tools for the household. Thanks to their technical and functional properties, today not a single furniture production or carpentry shop can do without them. And in private households there are many problems that would be more expedient to solve with their participation. The only thing that limits their use today is their cost, which is growing every year, as is the human need for them. One of the ways to overcome this barrier and acquire such a universal assistant is to assemble a homemade circular saw,
Considering the load and operating cycle of electric saws, for their home production you will need an equally reliable basic electrical appliance. Craftsmen advise using a grinder or an angle grinder, which almost everyone has. Its traction potential will be sufficient for sawing wood, cutting beams into slats and other tasks that most users set for it. Let's look at several ways to make an electric saw from a grinder at home.
DIY circular saw: the easiest way to make it
In order to start assembling a homemade product, you will need:
- metal clamps;
- electric drill;
- toothed disc;
- several pieces of metal corner;
- bolt ties modifications M3 or M5;
- working gearbox;
- rods made of high-strength steel;
- wrench.
The power base of the future design will be the engine from a household grinder.
Work progress step by step
- the previously installed disk is first removed from the grinder;
- Take a disk with teeth for woodworking, which is tightened with corners. A gap of several millimeters is left, which is adjusted using a bolt tie;
- The body of the grinder - the future electric saw - is covered with clamps. A double metal strip with a thickness of at least 1.5 mm is passed through the bottom of the tool;
- The grinder gearbox is pre-disassembled. You need to make holes in it to attach the handle. The last part can be made of a metal tube, the shape of which should be slightly rounded;
- to adjust the gaps between the side stop and the base surface, 4 holes are drilled in the gearbox for screwing in bolts;
- The handle is bolted to the gearbox. Its end protruding outside the electric saw is given a horizontal position, holes are drilled and the axis is fed. If the handle is D-shaped, an adapter is installed between the handle and the gearbox - a tube made of thick-walled metal;
- the rods are cut into 6 cm pieces, which are given a loop shape;
- washers are fixed in front of the stop, thereby correcting the gap;
- the handle is connected to the body with an electric motor.
By supplementing such an electric saw from a grinder with your own hands with a stationary base made of chipboard or stable plywood, you can make a stationary circular electric saw for a workbench or desktop.
In both options, it is very important not to make a mistake with the choice of disk and to correctly calculate the gear ratio. It is advisable to focus on single-phase asynchronous motors, which are equipped with most angle grinders. Three-phase motor systems, which can also take place in a similar design, should not be used without additional capacitors. A separate button can be used as a starting capacitor. In this option, you will need to consider additional grounding and check the electrical safety of the homemade product.
Using a commercial adapter
Everything is very simple here. We go to the official website of AliExpress and look for the “Chainsaw” attachment for an angle grinder from CHAIN SAW. The kit includes:
- hand protection;
- fastening the gearbox to the angle grinder body;
- circuit protection;
- pen;
- tools;
- oiler for chain lubrication;
- a set of sprockets and bolts;
- chain;
- tire 11.5 inches.
On the same site you can order an inexpensive Chinese grinder, which can be easily converted into a chain saw if you strictly follow the assembly instructions that come with the attachment:
- First, let's disassemble the grinder. Remove the disk and unscrew the casing.
- We replace the lower washer with one of the two sprockets that come with the nozzle.
- Secure the sprocket with a standard nut.
- We install the gearbox mount on the angle grinder body and tighten the bolts.
- Place the tension bolt in a special place.
- We put the chain on the bar and the drive sprocket.
- We install the protection and fix the structure with bolts.
- We tighten the chain using a tension bolt.
- We tighten the nuts on the tire again.
- We screw the handle to the body and install the oiler mount.
- We install the oiler on the body and generously lubricate the chain.
The grinder with the “Chainsaw” attachment is ready for testing and copes with cutting 70x50 mm timber without any problems. This updated tool does not experience any particular problems when pruning fruit trees. Even when the trunk diameter reaches 17 centimeters.
During operation, the chain must be constantly lubricated in order to maximize the life of this tool and put to shame skeptics who are confident in the uselessness of this attachment.
The main concerns when converting an angle grinder into a chain saw using a purchased adapter are related to the fact that such a power tool should be considered unsafe for the health of the operator and surrounding people, since:
- the safety of the design in this case has not been officially confirmed;
- technical specifications not established;
- There is no automatic chain lubrication system, locking in case of accidental activation and a drive mechanism brake.
Electric chain saw from an angle grinder: step-by-step instructions
In order to recreate a chain saw based on a working grinder, we will need:
- Bulgarian herself;
- drive sprocket, which is best bought new, but if you have a working spare part from an old saw, you can limit yourself to the used option;
- metal to create a bracket to which the guide will be connected;
- a set of saw sets consisting of a bar and chain;
- a set of tools, including a drill;
- bolts.
The build process looks like this:
- unscrew the saw blade from the grinder;
- make holes in the bottom of the metal casing of the device;
- bolt the bracket to the protective shield;
- a sprocket is screwed onto the motor shaft;
- a guide is secured behind the bracket ties;
- After the chain is put on and straightened, the bracket bolts are tightly fixed.
After this you can start working.
Required work items
At the moment, a lot has been said about how to make an electric saw from a grinder. We will touch on the most common method, for which you must have the following initial mechanisms:
- grinder, which will be improved;
- set of wrenches;
- mount for a gasoline saw;
- available arsenal of nuts and bolts of various sizes;
- screw for fastening the tire and tensioning the cutting blade;
- tire from an electric hacksaw;
- cutting mechanism (chain itself).
Of course, to carry out such technical aggregation you will also need a drill with different-sized drills. Well, an experimental area where you can test your know-how for strength.
Advantages and disadvantages of homemade electric saws from an angle grinder
Electric saws, which today can not only be bought in a store, but also made at home, in addition to their main advantage - low cost of their production, have a lot of weaknesses. Namely:
- low level of safety for the health and life of the operator working - in homemade products there is no protection against kickback, which in factory electric saws is taken over by the inertial chain brake. And this increases the likelihood of injury and injury;
- fragility of tire-chain elements due to the lack of automatic lubrication. The only way out in this situation is to periodically dip a homemade saw into a container with chain oil;
- high risk of motor overheating from an angle grinder due to overloads and prolonged use.
Design of a homemade circular saw from an angle grinder
Regardless of the design features, each circular grinder, which is made with your own hands or bought in stores, consists of:
- engine;
- desktop;
- beds;
- disk;
- gearbox
In the form of engines for homemade machines, it is possible to install various available options. It is often recommended to use asynchronous motors that are purchased directly for machine tools, motors from washing machines, drills or grinders. Each of the options has a number of advantages and disadvantages.
When purchasing motors for a specific purpose, you have the opportunity to select its parameters to suit your device. There are no more advantages, as such. The only drawback of this purchase is the high price. Indeed, in fact, the cost of the engine exceeds the cost of hand-held power tools. Therefore, you can report a little and purchase a ready-made machine. For many, this is unaffordable, and such purchases are not practical.
Another solution is motors from washing machines. This method will be optimal if you have a working engine and such unnecessary equipment. Not just any washing machine is suitable for homemade machines. Many modern automatic cars are equipped with a motor, which requires the use of a special controller to control.
Naturally, you can put in your own efforts to assemble the controller, but this is an extra time and financial investment. It is quite easy to connect to a motor from an old washing machine, since their shaft is already equipped with a pulley. The presence of such an engine will greatly simplify the creation of a circular machine. The disadvantages of such devices include their low power. As a result, we will get an inferior machine model, but a fictitious device. But it is worth noting that for certain situations you can use this solution.
A drill, if used as a drive for homemade circular machines, has a number of certain advantages in comparison with previously presented devices. The key advantage is the elimination of the gearbox.
Basically, an electric drill has low speed and high power. The saw blade is driven directly by clamping its axis with the chuck of an electric drill. The disadvantages of such schemes are the need for breaks during the work process. This is due to the fact that the drill is not intended for continuous types of work and it needs to be stopped for 10-20 minutes for every 10 minutes of working with it. This problem can be partly solved by installing additional ventilation on the engine, but this will significantly complicate the machine design.
The use of angle grinders, also called grinders, has virtually no known disadvantages. First of all, its engine has high power. Many men can boast of having such a tool; if not, then you can always purchase it; in any case, it will be useful for its main purpose. Moreover, it is quite easy to integrate into the machine.
Often, the angle grinder is equipped with clamps, thanks to which it can be easily attached to the frame. Installing the pulley on the shaft is as simple as possible. Due to the high engine speeds of the device, there is good ventilation, since there is a built-in cooling system that can function without stopping .
Anyone can construct a circular machine using a grinder. There is no need for special knowledge and skills. Here you need to immerse yourself in creativity a little and diligently do your task. At the very beginning of manufacturing a machine, you should make sure that your intentions are accurate and decide whether you need it? It is important to consider that despite its resistance to continuous operation, the angle grinder can break due to heavy load.
If you intend to open your own production of furniture and wood products at an industrial level, it is naturally worth purchasing a full-fledged circular saw. The homemade device is suitable for home and country purposes, as a tool that allows you to solve household, everyday problems.
Stationary circular
Many different problems can be solved with the help of a homemade circular grinder. Such a machine will become an indispensable assistant when renovating an apartment, making furniture and for many other men’s tasks. You can buy a ready-made circular saw, or you can make it yourself.
You don't need to have any special skills to do this. It is enough to be able to use hand tools and have the necessary minimum materials. Before we talk about how to make a circular saw from a grinder, let's consider the general design of the machine.
The nozzle is a grinder and must be used according to the manufacturer’s recommendations and in compliance with safety precautions. In practice, these recommendations are neglected, which often leads to injury. Let's consider the main points that should be taken into account when working with a chainsaw - an angle grinder.
- The operator's hands and eyes must be protected during operation. Goggles and gloves are a must, but it wouldn't hurt to wear a suit made of rough material. Cutting discs are thin, fragile to break, and while they can be easily controlled with an ordinary grinder, it is not so easy to do this with a saw. The disc can wrap and break, and pieces can fly away and cause injury.
- It is not worth installing a large-diameter cutting disc on a chainsaw with a power of less than 1.5 kW; the engine will cope, but will work at the limit and there will be noticeable drops in speed.
- It is prohibited to work with the protective cover removed.
- The drive belt between the pulleys must be properly tensioned. You can check the tension as follows: grab the belt in the center and try to turn it around its axis. If the belt turns only 900, then it is tensioned correctly; if it is more or less, then adjustment is necessary.
You can use a grinder as a working mechanism in stationary conditions. The bed in this case will have a slightly different design. The stationary option implies the presence of free space and a large amount of work. Therefore, the entire structure can be made more solid, more massive, and, therefore, more reliable.
The frame of the bed can be made from a corner using a welded joint. Bolted and other types of detachable fasteners lose their grip due to constant vibration, and the structure begins to wobble.
A desktop made of a wide board or thick plywood is attached to the top of the metal frame. The workpiece will move along it. The stop angle is equipped with a movable mount for adjusting the cutting width.
Currently reading: Circular saw Interskol dp 165 1200
On the side of the machine there are controls: a socket and on/off buttons. In the stationary version, it makes sense to exclude the key on the body of the angle grinder from the diagram. If there is enough space, a high-power sander can be used as a drive.
Many different problems can be solved with the help of a homemade circular grinder. Such a machine will become an indispensable assistant when renovating an apartment, making furniture and for many other men’s tasks. You can buy a ready-made circular saw, or you can make it yourself.
DIY reciprocating saw from a jigsaw
Parts and fixtures required for manufacturing
- Bar 180 x 70 x 45 mm (perhaps a little more or less, depending on the dimensions of the saw and blade).
- A metal plate designed to connect a jigsaw to a tube.
- A metal tube is about 12 mm in diameter and 150 mm in length (can be a little longer).
- Beam for handle (rounded).
- Two flat pieces of wood that are fixed along the edges of the block (approximately 140 x 70 and 140 x 50 mm, no more than 10 mm thick).
Assembly order
- We start by using bolts to attach the sheet to one side of the tube and the plate to the other.
- To attach it to a jigsaw, drill a hole of the appropriate size in the plate.
- In one of the wooden parts you need to drill a square hole of sufficient size so that the canvas can easily pass through it.
- Therefore, for the second part you need to make a narrow slot for the file and attach a roller stop to it, which will be in contact with the file.
- A groove for the blade should be cut in a large block.
- Using self-tapping screws, we fix both parts from the two edges of the block.
- We secure the handle.
- We attach the plate to the jigsaw using a factory bolt.
In this simple way, the jigsaw was transformed into a reciprocating saw, with which you can start working.
Table saw
Trimming, that is, cross-cutting boards or bars at right angles, turns out better if you use a special device.
You can also make such a machine from a grinder with your own hands.
- To do this, a grinder with a disk for wood is fixed on a rotating bar perpendicular to the direction of the length of the board so that the plane of the disk is directed strictly vertically. One attachment point should be located in the area of the gearbox, and the second should be at the opposite end of the machine.
- The gearbox housing has threaded holes for attaching standard handles. Using the corners and these holes, the grinder must be attached to the moving part of the machine.
- The back of the body is attached to the board with a clamp. The blade guard can be used on any power tool of a suitable size.
- Closer to the vertical support you need to secure the thrust angle. It should be located strictly perpendicular to the plane of the disk, both in the vertical and horizontal directions.
The spring at the rear end of the bar is used to return the miter saw to its original position after finishing the cut. The horizontal table must have a transverse groove into which the disk fits when cutting the board. The diameter of the disk is chosen based on the width of the boards. This way, trimming can be done in one go. The main thing is that the inner hole of the disk must coincide with the mount on the gearbox axis.
Sometimes there is a need to change the width of the board or the thickness of the block. The best option for such work is a circular saw, especially if there are a lot of boards. For cutting boards of short length (1-2 m), a tabletop version of a circular saw is very useful. It is not necessary to buy such a machine; you can make it yourself from the same grinder.
The design of a circular saw is much more complex than a miter saw. The contact time of the saw blade with the wood is quite long, therefore the reliability of attaching the grinder body to the frame should be higher.
Currently reading: Customer reviews about Chainsaw Zubr PBC-450 40P
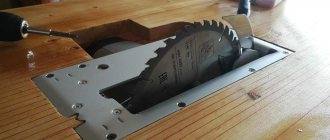
This is what one of the options for a tabletop circular might look like.
The photo shows that the desktop consists of two planes:
- the upper table is designed to advance the workpiece;
- The lower one serves as a stop for the sander.
The disc passes through a groove in the top surface. If the angle of contact of the two planes is provided with rotary hinges, then it will be possible to adjust the working height of the saw blade to reduce the area of rubbing surfaces.
The head of the bolt with which the angle grinder is secured is clearly visible on the top surface of the table. The protruding bolt limits the width of the board being processed. You can cope with this problem by laying another layer of plywood.
The stop angle must have the maximum possible length to prevent the board from deviating from the cutting direction. It is better to fasten the corner in such a way that you can change the working distance between it and the disk: then the width of the cut part will also change.
The principle of converting an angle grinder into a chain saw
Any homemade equipment depends on the quality of the starting materials. How many times in your life has it happened that you planned some work, but were unable to carry it out due to lack of suitable equipment? In such moments, you can turn to improvised means and assemble the necessary tool with your own hands based on another.
If we briefly describe the process of converting a grinder or miter saw into a chain saw with your own hands, it will look like this: you need to cut off the link connection and make a cut in the middle of the tooth so that the cutting edge of the chain teeth reaches the wood during sawing. For your comfort, you can also install handles.